# ELK:Elasticsearch + Logstash + Kibana 搭建教程
Shipper:日志收集者。负责监控本地日志文件的变化,及时把日志文件的最新内容收集起来,输出到Redis暂存。
Indexer:日志存储者。负责从Redis接收日志,写入到本地文件。
Broker:日志Hub,用来连接多个Shipper和多个Indexer。
无论是Shipper还是Indexer,Logstash始终只做前面提到的3件事:
Shipper从日志文件读取最新的行文本,经过处理(这里我们会改写部分元数据),输出到Redis,
Indexer从Redis读取文本,经过处理(这里我们会format文本),输出到文件。
一个Logstash进程可以有多个输入源,所以一个Logstash进程可以同时读取一台服务器上的多个日志文件。Redis是Logstash官方推荐的Broker角色“人选”,支持订阅发布和队列两种数据传输模式,推荐使用。输入输出支持过滤,改写。Logstash支持多种输出源,可以配置多个输出实现数据的多份复制,也可以输出到Email,File,Tcp,或者作为其它程序的输入,又或者安装插件实现和其他系统的对接,比如搜索引擎Elasticsearch。
http://blog.csdn.net/jamesge2010/article/details/51498483
http://kibana.logstash.es/content/logstash/plugins/input/file.html
centeros 下搭建:
参考:http://www.cnblogs.com/tianjixiaoying/p/4316011.html
sh elasticsearch start 作为服务启动时:
WARNING: Elasticsearch may have failed to start.

尝试直接用elasticsearch命令启动:在/usr/local/elk/elasticsearch/bin下:输命令:./elasticsearch 仍然报异常:
Exception in thread "main" java.lang.RuntimeException: don't run elasticsearch as root.
        at org.elasticsearch.bootstrap.Bootstrap.initializeNatives(Bootstrap.java:93)
        at org.elasticsearch.bootstrap.Bootstrap.setup(Bootstrap.java:144)
        at org.elasticsearch.bootstrap.Bootstrap.init(Bootstrap.java:285)
        at org.elasticsearch.bootstrap.Elasticsearch.main(Elasticsearch.java:35)
        Refer to the log for complete error details.

发现elasticsearch不能用root账户启动
参见:http://www.open-open.com/lib/view/open1451451639167.html

新建账户:useradd ***  parsswd *** 切换到非root账户登录启动,仍然报异常:http://www.cnblogs.com/krockey/p/5850141.html


安装:elasticsearch-head报错
b.2 ./bin/plugin -install mobz/elasticsearch-head
提示错误,错误信息是:ERROR: unknown command [-install]. Use [-h] option to list available commands,这是因为Elasticsearch在2.0以上的版本将-install变成了install。
b.3 故而执行命令 ./bin/plugin install mobz/elasticsearch-head即可。
查看yum默认安装路径:
rpm -ql 软件名称
 elasticsearch 外网访问9200端口访问:
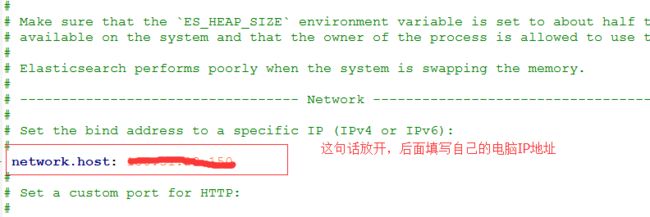
 修改elasticsearch-2.3.3\config\elasticsearch.yml文件    ,重启elasticsearch服务即可
echo 'marvel.agent.enabled: false' >> ./config/elasticsearch.yml
指定是否进行监控,执行上面语句直接把配置加入elasticsearch.yml
导入测试数据:把测试数据放入到/elasticsearch/data 下,首先cd 到data目录下,执行命令:curl -XPUT http://localhost:9200/_bulk --data-binary @logs.json./plugin install license./plugin install marvel-agent
./plugin install elasticsearch/marvel/latest
marvel插件只对开发环境免费,尝试安装后,浏览器访问:http://localhost:9200/_plugin/marvel,页面为空白?
logstash安装配置:http://www.cnblogs.com/yjf512/p/4194012.html
编辑文件config/kibana.yml ,配置属性:
- server.host (站点地址)
- elasticsearch.url (指向Elasticsearch 实例)
集群配置:
无论怎么配置都是报异常:

failed to validate incoming join request from node

是因为注节点中安装了marvel

解决方案:http://stackoverflow.com/questions/37451247/elasticsearch-cluster-cant-join-new-node


参考资料:

http://www.centoscn.com/image-text/install/2015/1105/6386.html
(1)elaticsearch 没有作为服务运行
(2)配置logstash
