服务端性能监控最佳实践(二)—— Spring Boot Actuator介绍
服务端性能监控最佳实践(二)—— Spring Boot Actuator介绍
文章目录
- 服务端性能监控最佳实践(二)—— Spring Boot Actuator介绍
- 给一个Maven项目增加Actuator
- 介绍Endpoints
- 查看所有endpoints
- 配置endpoints的开关
- 重要的endpoint
- /actuator/httptrace
- /actuator/mappings
- /actuator/metrics
- /actuator/health
- 自定义健康指标
- 结语
监控后台服务是否正常运行,有很多指标需要我们关注,一是机器本身的状态,比如CPU利用率、磁盘使用率、内存、网络等,通过这些来判断机器是否运行正常。这些是属于机器指标,一般云服务商会提供。今天我们要分析的是程序的性能指标,因为即使机器正常,但程序可能已经挂了。
对java程序来说,我们主要关注JVM的状态是否正常,希望能把一般通过jconsole得到的数据能通过监控自动获取出趋势图。此时我们就需要一个非常强大的模块:Spring Boot Actuator 来帮助获取到应用的统计信息。Spring Boot Actuator不止能提供jvm相关信息,也能对应用相关依赖做健康检查,功能十分强大,接入非常简单。
给一个Maven项目增加Actuator
使用如下依赖
<dependency>
  	<groupId>org.springframework.bootgroupId>
  	<artifactId>spring-boot-starter-actuatorartifactId>
dependency>
介绍Endpoints
Endpoints是Actuator中的端点,每个端点都提供了不同的功能,Actuator内置了很多Endpoints,配置就可以使用。
如/health提供了应用健康信息。
/info提供了应用基本信息。
/logfile可以直接查看日志文件等等。
同时我们也可以定义自己的Endpoints,以此来自定义想要的监控项。
查看所有endpoints
启动项目,访问http://localhost:8080/actuator查看,你应该能看到如下列表
{
    "_links":{
        "self":{
            "href":"http://localhost:7777/actuator",
            "templated":false
        },
        "auditevents":{
            "href":"http://localhost:7777/actuator/auditevents",
            "templated":false
        },
        "health":{
            "href":"http://localhost:7777/actuator/health",
            "templated":false
        },
        "env":{
            "href":"http://localhost:7777/actuator/env",
            "templated":false
        }
    }
}
访问/actuator获取到的是当前已开启的endpoints列表,有一些文档说很多endpoints是默认开启的,但从Spring Boot2.0之后,因为安全原因,大部分的endpoints都是默认关闭的了,需要在配置文件中手动开启。
配置endpoints的开关
在配置文件中,可以通过include和exclude配置endpoint在http或jmx中是否开启或关闭,如下。
management:
  endpoints:
    web:
      exposure:
        exclude: shutdown
        include: ["auditevents", "info", "health", "metrics", "loggers", "logfile", "httptrace", "env", "flyway", "mappings",
        "scheduledtasks", "prometheus"]
    jmx:
      exposure:
        include: * #所有
这样就能在/actuator页面看到大多数的endpoints了。
重要的endpoint
| id | desc |
|---|---|
auditevents |
显示当前应用程序的审计事件信息 |
beans |
显示应用Spring Beans的完整列表 |
caches |
显示可用缓存信息 |
conditions |
显示自动装配类的状态及及应用信息 |
configprops |
显示所有 @ConfigurationProperties 列表 |
env |
显示 ConfigurableEnvironment 中的属性 |
flyway |
显示 Flyway 数据库迁移信息 |
health |
显示应用的健康信息(未认证只显示status,认证显示全部信息详情) |
info |
显示任意的应用信息(在资源文件写info.xxx即可) |
liquibase |
展示Liquibase 数据库迁移 |
metrics |
展示当前应用的 metrics 信息 |
mappings |
显示所有 @RequestMapping 路径集列表 |
scheduledtasks |
显示应用程序中的计划任务 |
sessions |
允许从Spring会话支持的会话存储中检索和删除用户会话。 |
shutdown |
允许应用以优雅的方式关闭(默认情况下不启用) |
threaddump |
执行一个线程dump |
httptrace |
显示HTTP跟踪信息(默认显示最后100个HTTP请求 - 响应交换) |
/actuator/httptrace
可以查看近期的请求详细数据,比如参数、cookie等
####/actuator/scheduledtasks
显示定时任务列表
{
    "cron": [
        {
            "runnable": {
                "target": "com.test.test.test.test.test.refresh"
            },
            "expression": " 0 0 0 1 1/1 ? "
        }
    ],
    "fixedDelay": [],
    "fixedRate": [],
    "custom": []
}
/actuator/mappings
显示所有的@RequestMapping 路径
/actuator/metrics
显示metrics数据。
/actuator/health
health是比较重要的一个endpoint,因为它本身自带了许多健康检查,可以对我们的线上监控起到非常重要的作用。
/health默认只返回一个简单的UP或DOWN的status信息,想要看到全部数据,需要修改xml配置。
management:
  endpoint:
    health:
      show-details: always #展示所有细节内容
这样我们访问就可以看到如下信息
// 省略了一些detail信息
{
    "status":"UP",
    "details":{
        "db":{
            "status":"UP",
            "details":{
                "dataSource":{
                    "status":"UP"
                }
            }
        },
        "refreshScope":{
            "status":"UP"
        },
        "discoveryComposite":{
            "status":"UP",
            "details":{
                "discoveryClient":{
                    "status":"UP",
                    "details":{

                    }
                },
                "eureka":{
                    "description":"Remote status from Eureka server",
                    "status":"UNKNOWN",
                    "details":{

                    }
                }
            }
        },
        "redis":{
            "status":"UP",
            "details":{
                "version":"2.8.13"
            }
        }
    }
}
可以看到db 、redis、eureka等许多重要依赖的健康信息。如果其中有一个为DOWN,那么应用的整体状态就是DOWN。
我们之所以能看到这些信息的原理是它们都实现了HealthIndicator接口,会返回自身的健康状态,如果我们需要定义自定义的健康指标的话,也是需要实现这个接口或继承AbstractHealthIndicator,重写其中的doHealthCheck方法,后面会会讲解这种方式。
已经实现这个接口的有
| 名称 | 描述 |
|---|---|
CassandraHealthIndicator |
检查 Cassandra 数据库是否启动。 |
DiskSpaceHealthIndicator |
检查磁盘空间不足。 |
DataSourceHealthIndicator |
检查是否可以获得连接 DataSource。 |
ElasticsearchHealthIndicator |
检查 Elasticsearch 集群是否启动。 |
InfluxDbHealthIndicator |
检查 InfluxDB 服务器是否启动。 |
JmsHealthIndicator |
检查 JMS 代理是否启动。 |
MailHealthIndicator |
检查邮件服务器是否启动。 |
MongoHealthIndicator |
检查 Mongo 数据库是否启动。 |
Neo4jHealthIndicator |
检查 Neo4j 服务器是否启动。 |
RabbitHealthIndicator |
检查 Rabbit 服务器是否启动。 |
RedisHealthIndicator |
检查 Redis 服务器是否启动。 |
SolrHealthIndicator |
检查 Solr 服务器是否已启动。 |
自定义健康指标
比如我的项目中,并没有用es默认的client,而是自己去创建一个es的RestLowLevelClientt,以此来跳过https证书检查。这样我就没有办法使用ElasticsearchHealthIndicator,因为它肯定会一直返回down,只能自己实现一个HealthIndicator接口或继承AbstractHealthIndicator类。如下代码(检查逻辑是参照的ElasticsearchHealthIndicator)
public class EsRestLowLevelClientHealthIndicator  extends AbstractHealthIndicator {
    private static final String RED_STATUS = "red";
    private final JsonParser jsonParser;

    private RestLowLevelClient restLowLevelClient;

    @Autowired
    public EsRestLowLevelClientHealthIndicator(RestLowLevelClient restLowLevelClient) {
        this.restLowLevelClient = restLowLevelClient;
        this.jsonParser = JsonParserFactory.getJsonParser();;
    }

    @Override
    protected void doHealthCheck(Health.Builder builder) throws Exception {
        Response response = this.restLowLevelClient.performRequest(new Request("GET", "/_cluster/health/"));
        StatusLine statusLine = response.getStatusLine();
        if (statusLine.getStatusCode() != 200) {
            builder.down();
            builder.withDetail("statusCode", statusLine.getStatusCode());
            builder.withDetail("reasonPhrase", statusLine.getReasonPhrase());
        } else {
            InputStream inputStream = response.getEntity().getContent();
            Throwable var5 = null;

            try {
                this.doHealthCheck(builder, StreamUtils.copyToString(inputStream, StandardCharsets.UTF_8));
            } catch (Throwable var14) {
                var5 = var14;
                throw var14;
            } finally {
                if (inputStream != null) {
                    if (var5 != null) {
                        try {
                            inputStream.close();
                        } catch (Throwable var13) {
                            var5.addSuppressed(var13);
                        }
                    } else {
                        inputStream.close();
                    }
                }

            }

        }
    }

    private void doHealthCheck(Health.Builder builder, String json) {
        Map<String, Object> response = this.jsonParser.parseMap(json);
        String status = (String)response.get("status");
        if (RED_STATUS.equals(status)) {
            builder.outOfService();
        } else {
            builder.up();
        }

        builder.withDetails(response);
    }
}
这个类加载到Spring中,在访问/actuator/health时就会得到如下信息。
{
    "status":"UP",
    "details":{
        "esRestLowLevelClient":{
            "status":"UP",
            "details":{
                "cluster_name":"shark",
                "status":"yellow",
                "timed_out":false,
                "number_of_nodes":26,
                "number_of_data_nodes":26,
                "active_primary_shards":10009,
                "active_shards":20105,
                "relocating_shards":0,
                "initializing_shards":0,
                "unassigned_shards":14,
                "delayed_unassigned_shards":0,
                "number_of_pending_tasks":0,
                "number_of_in_flight_fetch":0,
                "task_max_waiting_in_queue_millis":0,
                "active_shards_percent_as_number":99.93041403648293
            }
        }
    }
}
可以看到我们自定义的esRestLowLevelClient指标为UP状态。
通过/actuator/health,我们可以写一个定时器对应用做黑盒监控,判断返回值是否为UP,否则报警,就可以很容易地对应用和依赖做出监控了。
结语
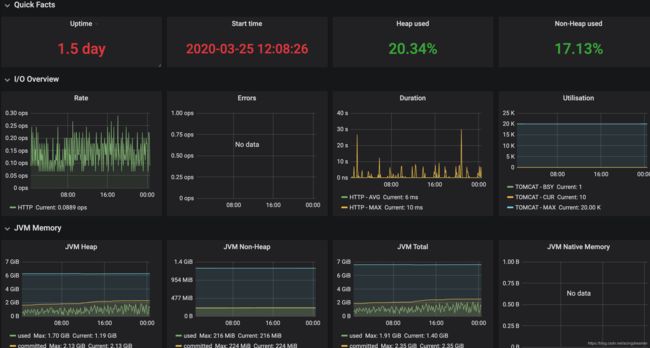
上面主要介绍了Spring Boot Actuator的作用和用法,可以看出它是一个开箱即用、功能强大的组件,除了上面介绍了的还有修改日志等级、管理session等功能,大家可以尝试加入到自己项目中,能大大地提高监控效率。下一篇我们会分享如何把jvm监控数据展示到Grafana中,得到详细的性能监控图表。如下图
本文首发于重口味博客https://blog.csdn.net/acingdreamer,欢迎大家关注
