Android四种布局详解
Android 常见的四种布局
- 线性布局(LinearLayout)
- 详解
- 线性布局里常用的属性
- 相对布局(RelativeLayout)
- 详解
- 相对布局里常用的函数
- 帧布局(FrameLayout)
- 详解
- 其他方式
- 百分比布局
- 详解
- 使用方法
- 两种常见的布局实现(含代码)
线性布局(LinearLayout)
详解
线性布局即会让塔包含的控件按照线性的方式排布,具体的说分为两种。水平分布和垂直分布
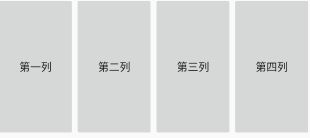
1:水平分布(horitonzal)
2:垂直分布(vertical)
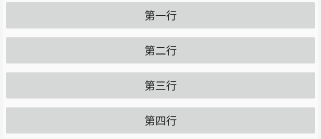
线性布局里常用的属性
1:weight,可以控制控件的权重。比如在水平分布的线性布局中,可以指定每个控件的宽以权重的信息表示。
2:orientation,控制线性布局的排列方向
3:layout_gravity,控制控件在布局中的对齐方式,注意,当布局为垂直布局,只有水平方向的对齐才管用,此时能设置的参数分别为“top”,“center_”vertical“和”bottom“。
<LinearLayout
    android:layout_width="match_parent"
    android:layout_height="0dp"
    android:layout_weight="1"
    android:orientation="horizontal">
    <Button
        android:layout_width="0dp"
        android:layout_height="match_parent"
        android:layout_weight="1"
        android:text="第一列" />
    <Button
        android:layout_width="0dp"
        android:layout_height="match_parent"
        android:layout_weight="1"
        android:text="第二列" />
    <Button
        android:layout_width="0dp"
        android:layout_height="match_parent"
        android:layout_weight="1"
        android:text="第三列" />
    <Button
        android:layout_width="0dp"
        android:layout_height="match_parent"
        android:layout_weight="1"
        android:text="第四列" />
</LinearLayout>
效果图

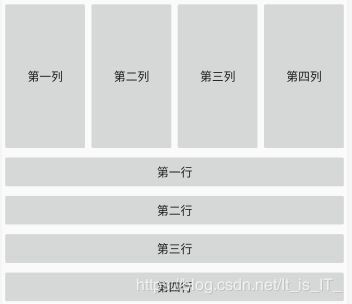
在上图中,虽然每个控件的width设置为0,但是weight都设置为1。因此每个控件的实际宽度为整个布局的宽减去每个控件设置的宽(值=0)之后的值乘以比值(比值=1/4)再加上该控件的设置的宽(值=0)。
相对布局(RelativeLayout)
详解
可以通过相对定位的方式让控件出现在布局钟的指定位置,这个相对对象既可以是其他控件,也可以是布局。
相对布局里常用的函数
1:android:layout_centerInParent=“true“
含义是将控件放在父对象(一般为布局)的中心。当然如果你设置为”false“,就不会放在中心
2:android:layout_alignRight=”@+id/name"
含义是将控件的右边缘与指定的控件右边缘对齐
3:android:layout_below="@+id/name"
含义是将控件放在指定控件的下方,但不对齐
4:android:layout_alignParentLeft=“true”
含义是将控件左边缘与父对象左边缘对齐,一般控件位于父对象内
…
帧布局(FrameLayout)
详解
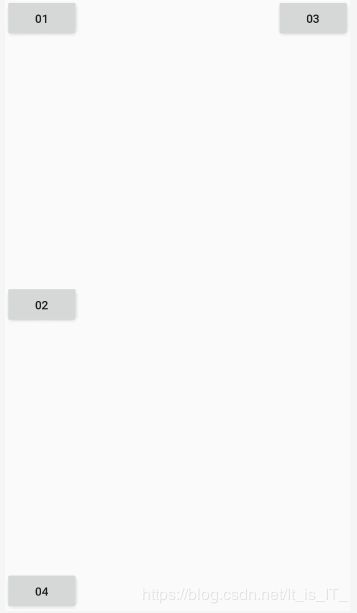
帧布局默认控件摆在左上角,一层叠一层,当然也可以通过其他方式改变布局
其他方式
通过layout_gravity可以改变控件的对齐方式。
<Button
    android:id="@+id/bu_1"
    android:layout_width="wrap_content"
    android:layout_height="wrap_content"
    android:layout_centerInParent="true"
    android:text="01" />
<Button
    android:id="@+id/bu_2"
    android:layout_width="wrap_content"
    android:layout_height="wrap_content"
    android:layout_centerInParent="true"
    android:layout_gravity="center_vertical"
    android:text="02" />
<Button
    android:id="@+id/bu_3"
    android:layout_width="wrap_content"
    android:layout_height="wrap_content"
    android:layout_centerInParent="true"
    android:layout_gravity="end"
    android:text="03" />
<Button
    android:id="@+id/bu_4"
    android:layout_width="wrap_content"
    android:layout_height="wrap_content"
    android:layout_centerInParent="true"
    android:layout_gravity="bottom"
android:text="04" />百分比布局
详解
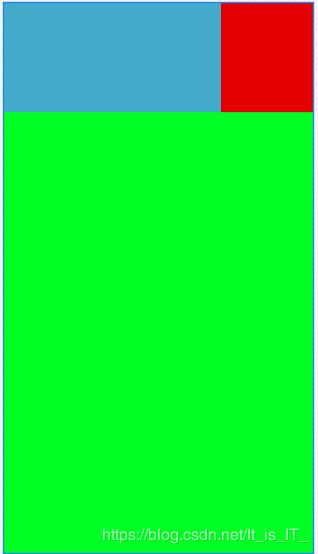
这个布局是新增布局,通过百分比来控制控件的大小,和之前的线性布局一样,因此它是建立在相对布局和帧布局的基础上扩展的布局。
使用方法
这个布局是新增布局,需要添加远程依赖包来实现,具体步骤,找到build.Gradle文件,在dependencies 内添加代码
implementation 'com.android.support:percent:28.0.0'
在gradle配置好了的情况下你可能会出现这样的问题
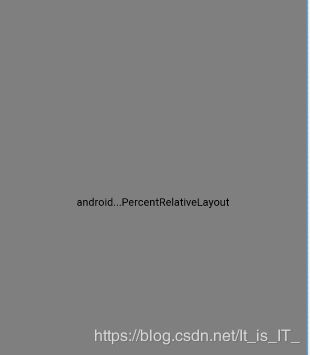
解决方法如下
将percentlayout这一行改成如下这样:
androidx.percentlayout.widget.PercentRelativeLayout
代码如下
<androidx.percentlayout.widget.PercentRelativeLayout
    xmlns:android="http://schemas.android.com/apk/res/android"
    xmlns:app="http://schemas.android.com/apk/res-auto"
    android:layout_width="match_parent"
    android:layout_height="match_parent">
    <View
        android:id="@+id/top_left"
        android:layout_width="0dp"
        android:layout_height="0dp"
        android:layout_alignParentTop="true"
        android:background="#ff44aacc"
        app:layout_heightPercent="20%"
        app:layout_widthPercent="70%" />
    <View
        android:id="@+id/top_right"
        android:layout_width="0dp"
        android:layout_height="0dp"
        android:layout_alignParentTop="true"
        android:layout_toRightOf="@+id/top_left"
        android:background="#ffe40000"
        app:layout_heightPercent="20%"
        app:layout_widthPercent="30%" />
    <View
        android:id="@+id/bottom"
        android:layout_width="match_parent"
        android:layout_height="0dp"
        android:layout_below="@+id/top_left"
        android:background="#ff00ff22"
        app:layout_heightPercent="80%" />
</androidx.percentlayout.widget.PercentRelativeLayout>
效果图
两种常见的布局实现(含代码)
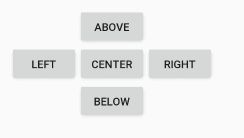
1:梅花布局(使用相对布局)
<RelativeLayout
    android:layout_width="match_parent"
    android:layout_height="0dp"
    android:layout_weight="1">
    <Button
        android:id="@+id/bu_1"
        android:layout_width="wrap_content"
        android:layout_height="wrap_content"
        android:layout_centerInParent="true"
        android:text="center" />

    <Button
        android:layout_width="wrap_content"
        android:layout_height="wrap_content"
        android:layout_above="@+id/bu_1"
        android:layout_alignRight="@+id/bu_1"
        android:text="above" />
    <Button
        android:layout_width="wrap_content"
        android:layout_height="wrap_content"
        android:layout_below="@+id/bu_1"
        android:layout_alignRight="@+id/bu_1"
        android:text="below" />
    <Button
        android:layout_width="wrap_content"
        android:layout_height="wrap_content"
        android:layout_alignBottom="@+id/bu_1"
        android:layout_toRightOf="@+id/bu_1"
        android:text="right" />
    <Button
        android:layout_width="wrap_content"
        android:layout_height="wrap_content"
        android:layout_alignBottom="@+id/bu_1"
        android:layout_toLeftOf="@+id/bu_1"
        android:text="left" />
</RelativeLayout>
效果图
<LinearLayout
    android:layout_width="match_parent"
    android:layout_height="0dp"
    android:layout_weight="1"
    android:orientation="vertical">
    <LinearLayout
        android:layout_width="match_parent"
        android:layout_height="0dp"
        android:layout_weight="1"
        android:orientation="horizontal">
        <Button
            android:layout_width="0dp"
            android:layout_height="match_parent"
            android:layout_weight="1"
            android:text="第一列" />
        <Button
            android:layout_width="0dp"
            android:layout_height="match_parent"
            android:layout_weight="1"
            android:text="第二列" />
        <Button
            android:layout_width="0dp"
            android:layout_height="match_parent"
            android:layout_weight="1"
            android:text="第三列" />
        <Button
            android:layout_width="0dp"
            android:layout_height="match_parent"
            android:layout_weight="1"
            android:text="第四列" />
    </LinearLayout>
    <LinearLayout
        android:layout_width="match_parent"
        android:layout_height="0dp"
        android:layout_weight="1"
        android:orientation="vertical">
        <Button
            android:layout_width="match_parent"
            android:layout_height="0dp"
            android:layout_weight="1"
            android:text="第一行" />
        <Button
            android:layout_width="match_parent"
            android:layout_height="0dp"
            android:layout_weight="1"
            android:text="第二行" />
        <Button
            android:layout_width="match_parent"
            android:layout_height="0dp"
            android:layout_weight="1"
            android:text="第三行" />
        <Button
            android:layout_width="match_parent"
            android:layout_height="0dp"
            android:layout_weight="1"
            android:text="第四行" />
    </LinearLayout>
</LinearLayout>