Adapter类型控件之Adapter(数据适配器)
(一)概述
Adapter是作为连接数据跟View之间桥梁的,你可以创建一个View来使用Adapter来对数据直接进行填充;
(二)Adapter(适配器)的使用
先来看看他的类结构图:
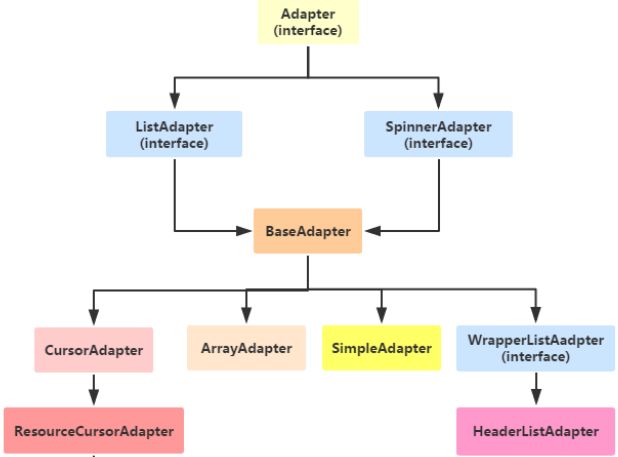

实际开发中经常用到的那几个Adapter:
 用到,不过有点过时了,不推荐使用;
其实,实际开发过程中用的BaseAdapter是非常多的,其他不怎么使用;实际开发过程中Adapter跟listview等Adapter类型控件是搭配的使用的,高级的使用会放到listview中去讲解,本节只介绍Adapter的基础知识和使用;
(三)ArrayAdapter使用案例:
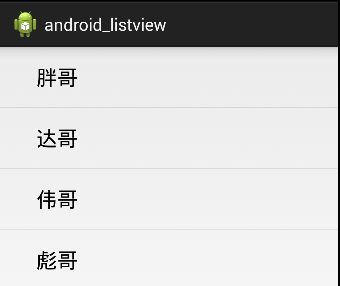
运行结果:
实现代码:
public class MainActivity2 extends Activity {


    @Override
    protected void onCreate(Bundle savedInstanceState) {
        super.onCreate(savedInstanceState);
        setContentView(R.layout.activity_main2);
        //创建数据源
        String[] string = {"胖哥" ,"达哥" ,"伟哥","彪哥"};
        //创建ArrayAdapter
        ArrayAdapter adapter = new ArrayAdapter(this ,
                android.R.layout.simple_expandable_list_item_1 ,string);
        //获取ListView对象,通过调用setAdapter方法为Adapter设置Adapter数据适配器;
        ListView listView = (ListView) findViewById(R.id.listView2);
        listView.setAdapter(adapter);
    }
}
自定义资源文件也是可以实现的额:

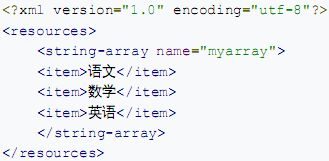
紧接着在listview属性中进行设置就可以了;

![]()

也是可以的额;
![]()
List<String> data = new ArrayList<String>();
        data.add("二虾");
        data.add("池头");
        ArrayAdapter<String> adapter2 = new ArrayAdapter<String>(this ,
android.R.layout.simple_expandable_list_item_1 ,data);(四)SimpleAdapter使用案例:
SimpleAdapter : 名叫简单数据适配器,其实一点不简单~~
运行结果:
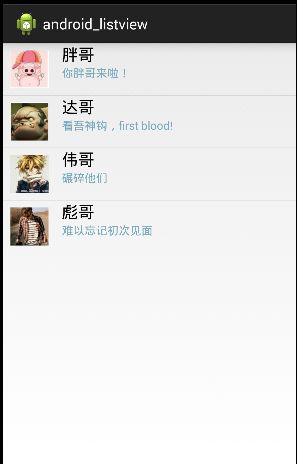
实现代码:
list_items.xml
<LinearLayout xmlns:android="http://schemas.android.com/apk/res/android"
    android:layout_width="match_parent"
    android:layout_height="match_parent"
    android:orientation="horizontal" >


    <ImageView
        android:id="@+id/img1"
        android:layout_width="64dp"
        android:layout_height="64dp"
        android:baselineAlignBottom="true"
        android:padding="8dp"/>


    <LinearLayout android:layout_width="match_parent"
        android:layout_height="wrap_content"
        android:orientation="vertical">

        <TextView android:id="@+id/name"
            android:layout_width="wrap_content"
            android:layout_height="wrap_content"
            android:paddingLeft="8dp"
            android:textColor="#000000"
            android:textSize="20sp"/>

         <TextView android:id="@+id/says"
            android:layout_width="wrap_content"
            android:layout_height="wrap_content"
            android:paddingLeft="8dp"
            android:textColor="#78ABBB"
            android:textSize="14sp"/>

    LinearLayout>
LinearLayout>
MainActivity3.java
public class MainActivity3 extends Activity {

    //创建数据源
    private String[] stringname = new String[]{"胖哥" ,"达哥" ,"伟哥","彪哥"};
    private String[] stringsays = new String[]{"你胖哥来啦!","看吾神钩,first blood!" ,"碾碎他们","难以忘记初次见面"};
    private int[] imgIds = new int[]{R.drawable.pig ,R.drawable.tufu,R.drawable.dazi ,R.drawable.biaoge };
    @Override
    protected void onCreate(Bundle savedInstanceState) {
        super.onCreate(savedInstanceState);
        setContentView(R.layout.activity_main3);

        List> list = new ArrayList>();
        for (int i = 0; i < stringname.length; i++) {
            Map showitemMap = new HashMap();
            showitemMap.put("imgs", imgIds[i]);
            showitemMap.put("name", stringname[i]);
            showitemMap.put("says", stringsays[i]);
            list.add(showitemMap);
        }

        //创建SimppableAdapter
        SimpleAdapter simpleAdapter = new SimpleAdapter(getApplicationContext(), list, R.layout.list_items,
                new String[]{"imgs" , "name" ,"says"}, new int[]{R.id.img1 ,R.id.name ,R.id.says});
        /**
        ArrayAdapter adapter = new ArrayAdapter(this ,
                android.R.layout.simple_expandable_list_item_1 ,stringname);
        **/
        //获取ListView对象,通过调用setAdapter方法为Adapter设置Adapter数据适配器;
        ListView listView = (ListView) findViewById(R.id.listView3);
        listView.setAdapter(simpleAdapter);


    }
}
(五)SimpleCursorAdapter使用案例:

运行结果:
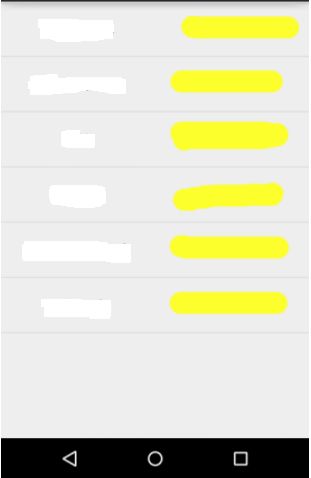
实现代码:
list_item.xml
<LinearLayout xmlns:android="http://schemas.android.com/apk/res/android"
    android:layout_width="match_parent"
    android:layout_height="match_parent"
    android:orientation="horizontal" >

        <TextView android:id="@+id/list_name"
            android:layout_width="0dp"
            android:layout_height="64dp"
            android:layout_weight="1"
           android:gravity="center"
            android:text="曹操"
            android:textColor="#000000"
            android:textSize="18sp"/>

           <TextView android:id="@+id/list_pn"
            android:layout_width="0dp"
            android:layout_height="64dp"
            android:layout_weight="1"
           android:gravity="center"
            android:text="13785258972"
            android:textColor="#67BBFF"
            android:textSize="18sp"/>

LinearLayout>
activity_main.xml只有一个ListView,就不贴了
java代码:
public class MainActivity4 extends Activity {

    private static final Cursor cursor = null;
    @Override
    protected void onCreate(Bundle savedInstanceState) {
        super.onCreate(savedInstanceState);
        setContentView(R.layout.activity_main4);


        //读取联系人
        Cursor cursor = getContentResolver()
                .query(ContactsContract.CommonDataKinds.Phone.CONTENT_URI, null, null, null, null);


    }

    //创建SimpleCursorAdapter
    @SuppressWarnings("deprecation")
    SimpleCursorAdapter spaCursorAdapter = new SimpleCursorAdapter(this, R.layout.list_items2,
            cursor,
            new String[]{ContactsContract.CommonDataKinds.Phone.DISPLAY_NAME ,ContactsContract.CommonDataKinds.Phone.NUMBER},
            new int[]{R.id.list_name ,R.id.list_pn});

    //获取ListView对象,通过调用setAdapter方法为Adapter设置Adapter数据适配器
    ListView listView4=(ListView) findViewById(R.id.listView4);
    listView4.setAdapter(spaCursorAdapter);


}
没错,就是这么简单~~~哇哈哈,<完>


