Android9.0 Activity启动流程分析(三)
文章目录
- 1、Android屏幕层级
- 1.1、Window和PhoneWindow的概念
- 1.2、View和ViewRootImpl的概念
- 2、ClientLiftCycleManager
- 3、handleLaunchActivity
- 3.1、CreatActivity
- 3.2、setContentView
- 4、handleResumeActivity
本篇内容主要讲Window的描绘流程,在讲代码之前我们先了解一些基本概念。
1、Android屏幕层级
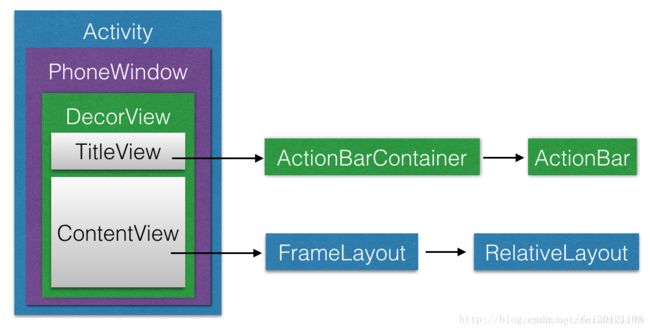
| PhoneWindow | 窗口的具体实现,譬如Activity,一个Dialog,一个Toast,一个Menu菜单等 |
| DecorView(FrameLayout) | 一个应用窗口的根容器 |
| mContentRoot (LinearLayout)) | 是DecorView本身或者是DecorView的一个子元素,在PhoneWindow#generateLayout通过加载预设layout实例,包含两个子元素,一个是TitleView,另一个是ContentView |
| TitleView | ActionBar的容器 |
| ContentView(FrameLayout,contentParent , android.R.id.content) | 窗口内容的容器, 我们平常用的setContentView就是设置它的子View |
1.1、Window和PhoneWindow的概念
Window:Window即窗口,这个概念在Android Framework中的实现为android.view.Window这个抽象类,这个抽象类是对Android系统中的窗口的抽象。实际上,窗口是一个宏观的思想,它是屏幕上用于绘制各种UI元素及响应用户输入事件的一个矩形区域。
在Android系统中,窗口是独占一个Surface实例的显示区域,每个窗口的Surface由WindowManagerService分配。我们可以把Surface看作一块画布,应用可以通过Canvas或OpenGL在其上面作画。画好之后,通过SurfaceFlinger将多块Surface按照特定的顺序(即Z-order)进行混合,而后输出到FrameBuffer中,这样用户界面就得以显示。
PhoneWindow:PhoneWindow这个类是Framework为我们提供的Android窗口的具体实现,该类继承于Window类,是Window类的具体实现,即我们可以通过该类具体去绘制窗口。并且,该类内部包含了 一个DecorView对象,该DectorView对象是所有应用窗口(Activity界面)的根View。
简而言之,PhoneWindow类是主要功能是:把一个FrameLayout类即DecorView对象进行一定的包装,将它作为应用窗口的根View,并提供一组通用的窗口操作接口。
1.2、View和ViewRootImpl的概念
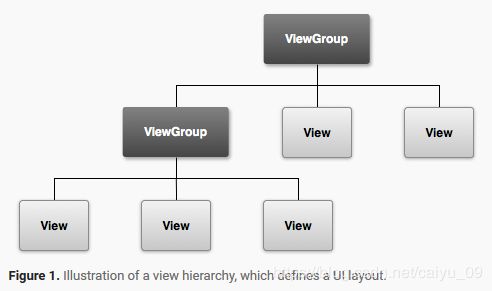
View:在Android APP中,所有的用户界面元素都是由View和ViewGroup的对象构成的。View是绘制在屏幕上的用户能与之交互的一个对象。而ViewGroup则是一个用于存放其他View(和ViewGroup)对象的布局容器! Android为我们提供了一个View和ViewGroup子类的集合,集合中提供了一些常用的输入控件(比如按钮和文本域)和各种各样的布局模式(比如线性或相对布局),在Framework中View是按照下图的方式存储的
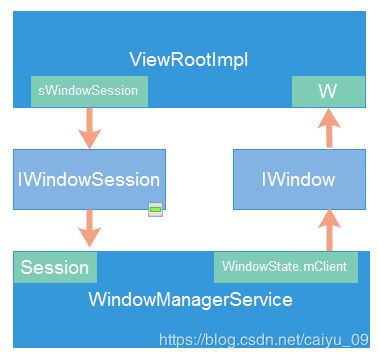
ViewRootImpl:ViewRootImpl是View的根,它控制了View的测量和绘制,ViewRootImpl 的另一个重要职责就是跟 WMS 通信,它通静态变量 sWindowSession(IWindowSession实例)与 WMS 进行通信。同时持有IWindow作为WSM的回调接口,例如WSM在处理touch事件的时候遍会回调IWindow中的接口。
2、ClientLiftCycleManager
了解了一些基本概念之后,我们继续分析代码。
在Android9.0 Activity启动流程分析(二)中,我们分析到realStartActivityLocked函数中会使用ClientLiftCycleManager执行Activity的生命周期,我们回顾下这部分代码。
   // frameworks/base/services/core/java/com/android/server/am/ActivityStackSupervisor.java
   // Create activity launch transaction.
   final ClientTransaction clientTransaction = ClientTransaction.obtain(app.thread,
           r.appToken);
   clientTransaction.addCallback(LaunchActivityItem.obtain(new Intent(r.intent),
           System.identityHashCode(r), r.info,
           // TODO: Have this take the merged configuration instead of separate global
           // and override configs.
           mergedConfiguration.getGlobalConfiguration(),
           mergedConfiguration.getOverrideConfiguration(), r.compat,
           r.launchedFromPackage, task.voiceInteractor, app.repProcState, r.icicle,
           r.persistentState, results, newIntents, mService.isNextTransitionForward(),
           profilerInfo));
   // Set desired final state.
   final ActivityLifecycleItem lifecycleItem;
   if (andResume) {
       lifecycleItem = ResumeActivityItem.obtain(mService.isNextTransitionForward());
   } else {
       lifecycleItem = PauseActivityItem.obtain();
   }
   clientTransaction.setLifecycleStateRequest(lifecycleItem);

   // Schedule transaction.
   mService.getLifecycleManager().scheduleTransaction(clientTransaction);
Android 9.0引入了ClientLifecycleManager和ClientTransactionHandler来辅助管理Activity生命周期,下面我们就看看ClientLifecycleManager是如何工作的。在这里这里创建了ResumeActivityItem并将其保存在ClientTransaction中,然后调用ClientLifecycleManager的scheduleTransaction方法,参数为ClientTransaction。
// frameworks/base/services/core/java/com/android/server/am/ClientLifecycleManager.java
void scheduleTransaction(ClientTransaction transaction) throws RemoteException {
    final IApplicationThread client = transaction.getClient();
    transaction.schedule();
    if (!(client instanceof Binder)) {
        // If client is not an instance of Binder - it's a remote call and at this point it is
        // safe to recycle the object. All objects used for local calls will be recycled after
        // the transaction is executed on client in ActivityThread.
        transaction.recycle();
    }
}
这里的mClient是一个IApplicationThread类型,ActivityThread的内部类ApplicationThread派生这个接口类并实现了对应的方法。所以直接跳转到ApplicationThread中的scheduleTransaction方法
// frameworks/base/core/java/android/app/ActivityThread.java
public void scheduleTransaction(ClientTransaction transaction) throws RemoteException {
    ActivityThread.this.scheduleTransaction(transaction);
}
调用了ActivityThread的scheduleTransaction方法,可是ActivityThread中并没有实现该方法,那么调用的是他父类ClientTransactionHandler的scheduleTransaction方法。
void scheduleTransaction(ClientTransaction transaction) {
    transaction.preExecute(this);
    sendMessage(ActivityThread.H.EXECUTE_TRANSACTION, transaction);
}
scheduleTransaction调用了sendMessage方法发送EXECUTE_TRANSACTION消息,接下来看处理消息的函数handleMessage。
// // frameworks/base/core/java/android/app/ActivityThread.java
public void handleMessage(Message msg) {
    if (DEBUG_MESSAGES) Slog.v(TAG, ">>> handling: " + codeToString(msg.what));
    switch (msg.what) {
        ....
        case EXECUTE_TRANSACTION:
            final ClientTransaction transaction = (ClientTransaction) msg.obj;
            mTransactionExecutor.execute(transaction);
            if (isSystem()) {
                // Client transactions inside system process are recycled on the client side
                // instead of ClientLifecycleManager to avoid being cleared before this
                // message is handled.
                transaction.recycle();
            }
            // TODO(lifecycler): Recycle locally scheduled transactions.
            break;
        ....
    }
}
调用了TransactionExecutor的execute()方法,这个方法我们分两步去看;
// frameworks/base/core/java/android/app/servertransaction/TransactionExecutor.java
public void execute(ClientTransaction transaction) {
    final IBinder token = transaction.getActivityToken();
    log("Start resolving transaction for client: " + mTransactionHandler + ", token: " + token);
    // 1) executeCallbacks
    executeCallbacks(transaction);
    // 2) executeLifecycleState
    executeLifecycleState(transaction);
    mPendingActions.clear();
    log("End resolving transaction");
}
1) TransactionExecutor的execute方法里面先执行Callbacks,然后改变Activity当前的生命周期状态。我们先看executeCallbacks函数;
// frameworks/base/core/java/android/app/servertransaction/TransactionExecutor.java
public void executeCallbacks(ClientTransaction transaction) {
        final List<ClientTransactionItem> callbacks = transaction.getCallbacks();
        if (callbacks == null || callbacks.isEmpty()) {
            // No callbacks to execute, return early.
            return;
        }
        if (DEBUG_RESOLVER) Slog.d(TAG, tId(transaction) + "Resolving callbacks in transaction");

        final IBinder token = transaction.getActivityToken();
        // 创建ActivityClientRecord记录Activity,App进程的ActivityClientRecord和AMS中的ActivityRecord是一一对应的,他们之间通过token关联
        // token是在创建ActivityRecord时创建的,Token继承IApplicationToken.Stub对象,所以它可以跨进程传输
        ActivityClientRecord r = mTransactionHandler.getActivityClient(token);

        // In case when post-execution state of the last callback matches the final state requested
        // for the activity in this transaction, we won't do the last transition here and do it when
        // moving to final state instead (because it may contain additional parameters from server).
        final ActivityLifecycleItem finalStateRequest = transaction.getLifecycleStateRequest();
        final int finalState = finalStateRequest != null ? finalStateRequest.getTargetState()
                : UNDEFINED;
        // Index of the last callback that requests some post-execution state.
        final int lastCallbackRequestingState = lastCallbackRequestingState(transaction);

        final int size = callbacks.size();
        for (int i = 0; i < size; ++i) {
            final ClientTransactionItem item = callbacks.get(i);
            if (DEBUG_RESOLVER) Slog.d(TAG, tId(transaction) + "Resolving callback: " + item);
            final int postExecutionState = item.getPostExecutionState();
            final int closestPreExecutionState = mHelper.getClosestPreExecutionState(r,
                    item.getPostExecutionState());
            if (closestPreExecutionState != UNDEFINED) {
                cycleToPath(r, closestPreExecutionState, transaction);
            }
            // 这里的item第一个是LaunchActivityItem
            item.execute(mTransactionHandler, token, mPendingActions);
            item.postExecute(mTransactionHandler, token, mPendingActions);
            if (r == null) {
                // Launch activity request will create an activity record.
                r = mTransactionHandler.getActivityClient(token);
            }

            if (postExecutionState != UNDEFINED && r != null) {
                // Skip the very last transition and perform it by explicit state request instead.
                final boolean shouldExcludeLastTransition =
                        i == lastCallbackRequestingState && finalState == postExecutionState;
                cycleToPath(r, postExecutionState, shouldExcludeLastTransition, transaction);
            }
        }
    }
接下来看LaunchActivityItem的execute方法
// frameworks/base/core/java/android/app/servertransaction/LaunchActivityItem.java
    @Override
    public void execute(ClientTransactionHandler client, IBinder token,
            PendingTransactionActions pendingActions) {
        Trace.traceBegin(TRACE_TAG_ACTIVITY_MANAGER, "activityStart");
        ActivityClientRecord r = new ActivityClientRecord(token, mIntent, mIdent, mInfo,
                mOverrideConfig, mCompatInfo, mReferrer, mVoiceInteractor, mState, mPersistentState,
                mPendingResults, mPendingNewIntents, mIsForward,
                mProfilerInfo, client);
        // 这里执行了ActivityThread的handleLaunchActivity方法
        client.handleLaunchActivity(r, pendingActions, null /* customIntent */);
        Trace.traceEnd(TRACE_TAG_ACTIVITY_MANAGER);
    }
这里去调用ActivityThread的handleLaunchActivity方法,该方法在后面详解,这里先看下Activity生命周期是如何运行起来的,.
2) executeCallbacks执行结束之后会执行executeLifecycleState函数
// frameworks/base/core/java/android/app/servertransaction/TransactionExecutor.java
private void executeLifecycleState(ClientTransaction transaction) {
    final ActivityLifecycleItem lifecycleItem = transaction.getLifecycleStateRequest();
    if (lifecycleItem == null) {
        // No lifecycle request, return early.
        return;
    }
    log("Resolving lifecycle state: " + lifecycleItem);

    final IBinder token = transaction.getActivityToken();
    final ActivityClientRecord r = mTransactionHandler.getActivityClient(token);

    if (r == null) {
        // Ignore requests for non-existent client records for now.
        return;
    }

    // lifecycleItem.getTargetState()返回的是ON_RESUME
    // Cycle to the state right before the final requested state.
    cycleToPath(r, lifecycleItem.getTargetState(), true /* excludeLastState */);

    // Execute the final transition with proper parameters.
    lifecycleItem.execute(mTransactionHandler, token, mPendingActions);
    lifecycleItem.postExecute(mTransactionHandler, token, mPendingActions);
}
在executeLifecycleState方法里面,会调用TransactionExecutor的cycleToPath函数执行当前Activity的生命周期,第二个参数lifecycleItem.getTargetState确定了我们将要执行哪些声明周期函数,由于我们在realStartActivity函数中创建的是ResumeActivityItem对象,所以这里调用的是ResumeActivityItem的getTargetState函数。
// frameworks/base/core/java/android/app/servertransaction/ResumeActivityItem.java
public int getTargetState() {
    return ON_RESUME;
}
这里只是单纯的返回了ON_RESUME,ON_RESUME保存在他的父类ActivityLifecycleItem中
// frameworks/base/core/java/android/app/servertransaction/ActivityLifecycleItem.java
public static final int UNDEFINED = -1;
public static final int PRE_ON_CREATE = 0;
public static final int ON_CREATE = 1;
public static final int ON_START = 2;
public static final int ON_RESUME = 3;
public static final int ON_PAUSE = 4;
public static final int ON_STOP = 5;
public static final int ON_DESTROY = 6;
public static final int ON_RESTART = 7;
下面我们来看TransactionExecutor的cycleToPath函数
// frameworks/base/core/java/android/app/servertransaction/TransactionExecutor.java
private void cycleToPath(ActivityClientRecord r, int finish,
        boolean excludeLastState) {
    // 获取当前生命周期的状态
    final int start = r.getLifecycleState();
    log("Cycle from: " + start + " to: " + finish + " excludeLastState:" + excludeLastState);

    final IntArray path = mHelper.getLifecyclePath(start, finish, excludeLastState);
    performLifecycleSequence(r, path);
}
在该函数中创建了一个IntArray path,该path确定了我们将要执行哪些生命周期函数,之后调用了performLifecycleSequence函数
private void performLifecycleSequence(ActivityClientRecord r, IntArray path) {
    final int size = path.size();
    for (int i = 0, state; i < size; i++) {
        state = path.get(i);
        log("Transitioning to state: " + state);
        switch (state) {
            case ON_CREATE:
                mTransactionHandler.handleLaunchActivity(r, mPendingActions,
                        null /* customIntent */);
                break;
            case ON_START:
                mTransactionHandler.handleStartActivity(r, mPendingActions);
                break;
            case ON_RESUME:
                mTransactionHandler.handleResumeActivity(r.token, false /* finalStateRequest */,
                        r.isForward, "LIFECYCLER_RESUME_ACTIVITY");
                break;
            case ON_PAUSE:
                mTransactionHandler.handlePauseActivity(r.token, false /* finished */,
                        false /* userLeaving */, 0 /* configChanges */, mPendingActions,
                        "LIFECYCLER_PAUSE_ACTIVITY");
                break;
            case ON_STOP:
                mTransactionHandler.handleStopActivity(r.token, false /* show */,
                        0 /* configChanges */, mPendingActions, false /* finalStateRequest */,
                        "LIFECYCLER_STOP_ACTIVITY");
                break;
            case ON_DESTROY:
                mTransactionHandler.handleDestroyActivity(r.token, false /* finishing */,
                        0 /* configChanges */, false /* getNonConfigInstance */,
                        "performLifecycleSequence. cycling to:" + path.get(size - 1));
                break;
            case ON_RESTART:
                mTransactionHandler.performRestartActivity(r.token, false /* start */);
                break;
            default:
                throw new IllegalArgumentException("Unexpected lifecycle state: " + state);
        }
    }
}
performLifecycleSequence会根据path执行Activity相应的生命周期函数。整个流程还是比较简单的,由于是Android9.0新加的机制所以这里详细介绍了一下。
3、handleLaunchActivity
3.1、CreatActivity
performLifecycleSequence首先会调用到ActivityThread的handleLaunchActivity函数
// frameworks/base/core/java/android/app/ActivityThread.java
public Activity handleLaunchActivity(ActivityClientRecord r,
        PendingTransactionActions pendingActions, Intent customIntent) {
    // If we are getting ready to gc after going to the background, well
    // we are back active so skip it.
    unscheduleGcIdler();
    mSomeActivitiesChanged = true;
    // 性能相关
    if (r.profilerInfo != null) {
        mProfiler.setProfiler(r.profilerInfo);
        mProfiler.startProfiling();
    }

    // Make sure we are running with the most recent config.
    handleConfigurationChanged(null, null);

    if (localLOGV) Slog.v(
        TAG, "Handling launch of " + r);

    // Initialize before creating the activity
    if (!ThreadedRenderer.sRendererDisabled) {
        GraphicsEnvironment.earlyInitEGL();
    }
    // initialize函数主要是在WindowManagerGlobal中获取WindowManagerService的代理
    WindowManagerGlobal.initialize();

    final Activity a = performLaunchActivity(r, customIntent);

    // Configuration相关
    if (a != null) {
        r.createdConfig = new Configuration(mConfiguration);
        reportSizeConfigurations(r);
        if (!r.activity.mFinished && pendingActions != null) {
            pendingActions.setOldState(r.state);
            pendingActions.setRestoreInstanceState(true);
            pendingActions.setCallOnPostCreate(true);
        }
    } else {
        // If there was an error, for any reason, tell the activity manager to stop us.
        try {
            ActivityManager.getService()
                    .finishActivity(r.token, Activity.RESULT_CANCELED, null,
                            Activity.DONT_FINISH_TASK_WITH_ACTIVITY);
        } catch (RemoteException ex) {
            throw ex.rethrowFromSystemServer();
        }
    }

    return a;
}
handleLaunchActivity函数会调用performLaunchActivity返回一个Activity对象,接下来我们看performLaunchActivity函数
// frameworks/base/core/java/android/app/ActivityThread.java
private Activity performLaunchActivity(ActivityClientRecord r, Intent customIntent) {
    // 获取ActivityInfo
    ActivityInfo aInfo = r.activityInfo;
    if (r.packageInfo == null) {
        r.packageInfo = getPackageInfo(aInfo.applicationInfo, r.compatInfo,
                Context.CONTEXT_INCLUDE_CODE);
    }

    ComponentName component = r.intent.getComponent();
    if (component == null) {
        component = r.intent.resolveActivity(
            mInitialApplication.getPackageManager());
        r.intent.setComponent(component);
    }

    if (r.activityInfo.targetActivity != null) {
        component = new ComponentName(r.activityInfo.packageName,
                r.activityInfo.targetActivity);
    }

    // 创建ContextImpl
    ContextImpl appContext = createBaseContextForActivity(r);

    // 利用反射创建Activity
    Activity activity = null;
    try {
        java.lang.ClassLoader cl = appContext.getClassLoader();
        activity = mInstrumentation.newActivity(
                cl, component.getClassName(), r.intent);
        StrictMode.incrementExpectedActivityCount(activity.getClass());
        r.intent.setExtrasClassLoader(cl);
        r.intent.prepareToEnterProcess();
        if (r.state != null) {
            r.state.setClassLoader(cl);
        }
    } catch (Exception e) {
        if (!mInstrumentation.onException(activity, e)) {
            throw new RuntimeException(
                "Unable to instantiate activity " + component
                + ": " + e.toString(), e);
        }
    }

    // 由于在handleBindApplication函数中已经创建了Application,所以在LoadedApk类内mApplication不为空,此处直接返回handleBindApplication函数创建的Application对象
    try {
        Application app = r.packageInfo.makeApplication(false, mInstrumentation);

        if (localLOGV) Slog.v(TAG, "Performing launch of " + r);
        if (localLOGV) Slog.v(
                TAG, r + ": app=" + app
                + ", appName=" + app.getPackageName()
                + ", pkg=" + r.packageInfo.getPackageName()
                + ", comp=" + r.intent.getComponent().toShortString()
                + ", dir=" + r.packageInfo.getAppDir());

        if (activity != null) {
            CharSequence title = r.activityInfo.loadLabel(appContext.getPackageManager());
            Configuration config = new Configuration(mCompatConfiguration);
            if (r.overrideConfig != null) {
                config.updateFrom(r.overrideConfig);
            }
            if (DEBUG_CONFIGURATION) Slog.v(TAG, "Launching activity "
                    + r.activityInfo.name + " with config " + config);
            Window window = null;
            if (r.mPendingRemoveWindow != null && r.mPreserveWindow) {
                window = r.mPendingRemoveWindow;
                r.mPendingRemoveWindow = null;
                r.mPendingRemoveWindowManager = null;
            }

            appContext.setOuterContext(activity);
            // 调用activity的attach方法
            activity.attach(appContext, this, getInstrumentation(), r.token,
                    r.ident, app, r.intent, r.activityInfo, title, r.parent,
                    r.embeddedID, r.lastNonConfigurationInstances, config,
                    r.referrer, r.voiceInteractor, window, r.configCallback);

            if (customIntent != null) {
                activity.mIntent = customIntent;
            }
            r.lastNonConfigurationInstances = null;
            checkAndBlockForNetworkAccess();
            activity.mStartedActivity = false;
            int theme = r.activityInfo.getThemeResource();
            if (theme != 0) {
                activity.setTheme(theme);
            }

            activity.mCalled = false;
            // 调用activity的OnCreate
            if (r.isPersistable()) {
                mInstrumentation.callActivityOnCreate(activity, r.state, r.persistentState);
            } else {
                mInstrumentation.callActivityOnCreate(activity, r.state);
            }
            if (!activity.mCalled) {
                throw new SuperNotCalledException(
                    "Activity " + r.intent.getComponent().toShortString() +
                    " did not call through to super.onCreate()");
            }
            r.activity = activity;
        }
        r.setState(ON_CREATE);

        mActivities.put(r.token, r);

    } catch (SuperNotCalledException e) {
        throw e;

    } catch (Exception e) {
        if (!mInstrumentation.onException(activity, e)) {
            throw new RuntimeException(
                "Unable to start activity " + component
                + ": " + e.toString(), e);
        }
    }

    return activity;
}
函数performLaunchActivity首先利用反射机制创建了Activity对象,然后调用Activity的attach函数初始化新建的Activity,最后调用activity的onCreat函数
我们先看一下Activity.attach函数内部都做了什么。
// frameworks/base/core/java/android/app/Activity.java
final void attach(Context context, ActivityThread aThread,
        Instrumentation instr, IBinder token, int ident,
        Application application, Intent intent, ActivityInfo info,
        CharSequence title, Activity parent, String id,
        NonConfigurationInstances lastNonConfigurationInstances,
        Configuration config, String referrer, IVoiceInteractor voiceInteractor,
        Window window, ActivityConfigCallback activityConfigCallback) {
    attachBaseContext(context);

    mFragments.attachHost(null /*parent*/);

    mWindow = new PhoneWindow(this, window, activityConfigCallback);
	...

    mWindow.setWindowManager(
            (WindowManager)context.getSystemService(Context.WINDOW_SERVICE),
            mToken, mComponent.flattenToString(),
            (info.flags & ActivityInfo.FLAG_HARDWARE_ACCELERATED) != 0);
    if (mParent != null) {
        mWindow.setContainer(mParent.getWindow());
    }
    mWindowManager = mWindow.getWindowManager();
	....
}
Activity的attach函数内部初始化Activity的成员变量,创建了PhoneWindow对象并为PhoneWindow和Activity创建了WindowManagerImpl对象。
3.2、setContentView
执行Activity.attach函数之后会调用Activity的onCreat函数,在我们创建一个Activity时都会在其onCreat函数中调用一个setContentView(R.layout.activity_main)函数,下面我们就来分析在Framework中setContentView都做了哪些事。
// frameworks/base/core/java/android/app/Activity.java
public void setContentView(@LayoutRes int layoutResID) {
    getWindow().setContentView(layoutResID);
    initWindowDecorActionBar();
}
--------------------------------------------------------------------------------------------------------------------------------
public Window getWindow() {
    return mWindow;
}
getWindow函数返回了Activity类中的mWindow对象,在Activity.attach函数中创建了PhoneWindow对象并保存为mWindow,所以这里调用了PhoneWindow的setContentView函数
// frameworks/base/core/java/com/android/internal/policy/PhoneWindow.java
public void setContentView(int layoutResID) {
    // Note: FEATURE_CONTENT_TRANSITIONS may be set in the process of installing the window
    // decor, when theme attributes and the like are crystalized. Do not check the feature
    // before this happens.
    if (mContentParent == null) {
        installDecor();
    } else if (!hasFeature(FEATURE_CONTENT_TRANSITIONS)) {
        mContentParent.removeAllViews();
    }

    if (hasFeature(FEATURE_CONTENT_TRANSITIONS)) {
        final Scene newScene = Scene.getSceneForLayout(mContentParent, layoutResID,
                getContext());
        transitionTo(newScene);
    } else {
        // 调用LayoutInflater的inflate方法解析布局文件,并生成View树,mContentParent为View树的根节点
        mLayoutInflater.inflate(layoutResID, mContentParent);
    }
    mContentParent.requestApplyInsets();
    final Callback cb = getCallback();
    if (cb != null && !isDestroyed()) {
        cb.onContentChanged();
    }
    mContentParentExplicitlySet = true;
}
setContentView先是调用installDecor()在PhoneWindow内部创建DecorView;
//  frameworks/base/core/java/com/android/internal/policy/PhoneWindow.java
private void installDecor() {
   mForceDecorInstall = false;
   // 【1】创建DecorView mDecor
   if (mDecor == null) {
       mDecor = generateDecor(-1);
       mDecor.setDescendantFocusability(ViewGroup.FOCUS_AFTER_DESCENDANTS);
       mDecor.setIsRootNamespace(true);
       if (!mInvalidatePanelMenuPosted && mInvalidatePanelMenuFeatures != 0) {
           mDecor.postOnAnimation(mInvalidatePanelMenuRunnable);
       }
   } else {
       mDecor.setWindow(this);
   }

   // 【2】创建ContentView的根节点ViewGroup mContentParent
   if (mContentParent == null) {
       mContentParent = generateLayout(mDecor);

       // Set up decor part of UI to ignore fitsSystemWindows if appropriate.
       mDecor.makeOptionalFitsSystemWindows();

       final DecorContentParent decorContentParent = (DecorContentParent) mDecor.findViewById(
               R.id.decor_content_parent);

      ...
   }
}
在installDecor函数中有两部分比较重要接下来我们分别分析
【1】generateDecor
//  frameworks/base/core/java/com/android/internal/policy/PhoneWindow.java
protected DecorView generateDecor(int featureId) {
    // System process doesn't have application context and in that case we need to directly use
    // the context we have. Otherwise we want the application context, so we don't cling to the
    // activity.
    Context context;
    if (mUseDecorContext) {
        Context applicationContext = getContext().getApplicationContext();
        if (applicationContext == null) {
            context = getContext();
        } else {
            context = new DecorContext(applicationContext, getContext());
            if (mTheme != -1) {
                context.setTheme(mTheme);
            }
        }
    } else {
        context = getContext();
    }

    return new DecorView(context, featureId, this, getAttributes());
}
generateDecor只是创建了DecorView
【2】generateLayout
//  frameworks/base/core/java/com/android/internal/policy/PhoneWindow.java
protected ViewGroup generateLayout(DecorView decor) {
   ....

   mDecor.startChanging();
   mDecor.onResourcesLoaded(mLayoutInflater, layoutResource);

   ViewGroup contentParent = (ViewGroup)findViewById(ID_ANDROID_CONTENT);

   ....

   mDecor.finishChanging();

   return contentParent;
}
generateLayout函数体很长,但是大部分都是配置相关的,这里我们只关心重点:
ViewGroup contentParent = (ViewGroup)findViewById(ID_ANDROID_CONTENT);
在这里创建了contentParent,contentParent是ViewGroup类型,我们可以理解为他是contentView中View树的根节点。
回到PhoneWindow的setContentView函数,在installDecor之后会调用到:
mLayoutInflater.inflate(layoutResID, mContentParent);
传入的第二个参数就是mContentParent,所以LayoutInflater.inflate函数解析出的View树就保存在mContentParent中。
到目前位置我们已经创建好了View树,可是这些View还并没有显示在屏幕上,接下来我们将继续分析后面的流程
4、handleResumeActivity
根据performLifecycleSequence函数的执行顺序,执行完handleLaunchActivity之后会执行handleStartActivity,由于handleStartActivity中并没有做什么重要的工作,所以这部分的分析就省略了。下面分析handleResumeActivity函数
在handleLaunchActivity执行结束之后我们为Activity创建了View树并保存在了mContentParent中,但是这些View还并没有显示在屏幕上,接下来我们将继续分析后面的流程看看这些View是如何显示的。
//  frameworks/base/core/java/android/app/ActivityThread.java
public void handleResumeActivity(IBinder token, boolean finalStateRequest, boolean isForward,
        String reason) {
    // If we are getting ready to gc after going to the background, well
    // we are back active so skip it.
    unscheduleGcIdler();
    mSomeActivitiesChanged = true;

    // 调用performResumeActivity执行Activity的onResume,并根据token获取前面创建的ActivityClientRecord
    // TODO Push resumeArgs into the activity for consideration
    final ActivityClientRecord r = performResumeActivity(token, finalStateRequest, reason);
    if (r == null) {
        // We didn't actually resume the activity, so skipping any follow-up actions.
        return;
    }

    final Activity a = r.activity;

    if (localLOGV) {
        Slog.v(TAG, "Resume " + r + " started activity: " + a.mStartedActivity
                + ", hideForNow: " + r.hideForNow + ", finished: " + a.mFinished);
    }

    final int forwardBit = isForward
            ? WindowManager.LayoutParams.SOFT_INPUT_IS_FORWARD_NAVIGATION : 0;

    // If the window hasn't yet been added to the window manager,
    // and this guy didn't finish itself or start another activity,
    // then go ahead and add the window.
    boolean willBeVisible = !a.mStartedActivity;
    if (!willBeVisible) {
        try {
            willBeVisible = ActivityManager.getService().willActivityBeVisible(
                    a.getActivityToken());
        } catch (RemoteException e) {
            throw e.rethrowFromSystemServer();
        }
    }
    if (r.window == null && !a.mFinished && willBeVisible) {
        // 获取window
        r.window = r.activity.getWindow();
        // 获取DecorView
        View decor = r.window.getDecorView();

        decor.setVisibility(View.INVISIBLE);
        // 获取WindowManager对象
        ViewManager wm = a.getWindowManager();

        WindowManager.LayoutParams l = r.window.getAttributes();
        a.mDecor = decor;
        l.type = WindowManager.LayoutParams.TYPE_BASE_APPLICATION;
        l.softInputMode |= forwardBit;
        if (r.mPreserveWindow) {
            a.mWindowAdded = true;
            r.mPreserveWindow = false;
            // Normally the ViewRoot sets up callbacks with the Activity
            // in addView->ViewRootImpl#setView. If we are instead reusing
            // the decor view we have to notify the view root that the
            // callbacks may have changed.
            ViewRootImpl impl = decor.getViewRootImpl();

            if (impl != null) {
                impl.notifyChildRebuilt();
            }
        }
        if (a.mVisibleFromClient) {
            if (!a.mWindowAdded) {
                a.mWindowAdded = true;
                // 调用WindowManager的addView方法
                wm.addView(decor, l);
            } else {
                // The activity will get a callback for this {@link LayoutParams} change
                // earlier. However, at that time the decor will not be set (this is set
                // in this method), so no action will be taken. This call ensures the
                // callback occurs with the decor set.
                a.onWindowAttributesChanged(l);
            }
        }
        ....
}
在该函数中首先调用performResumeActivity函数执行Activity的声明周期函数onResume,然后获取前面创建的ActivityClientRecord、PhoneWindow、DecorView、WindowManager等对象并调用WindowManager的addView方法
// frameworks/base/core/java/android/view/WindowManagerImpl.java
public final class WindowManagerImpl implements WindowManager {
    public void addView(@NonNull View view, @NonNull ViewGroup.LayoutParams params) {
        applyDefaultToken(params);
        mGlobal.addView(view, params, mContext.getDisplay(), mParentWindow);
    }
}
WindowManager是抽象类,它的实现类是WindowManagerImpl,所以这里调用的是WindowManagerImpl的addView方法,实际上则是调用的WindowManagerGlobal的addView方法
// frameworks/base/core/java/android/view/WindowManagerGlobal.java
public void addView(View view, ViewGroup.LayoutParams params,
        Display display, Window parentWindow) {
        ....

        // 创建ViewRootImpl对象
        root = new ViewRootImpl(view.getContext(), display);

        view.setLayoutParams(wparams);

        mViews.add(view);
        mRoots.add(root);
        mParams.add(wparams);

        // do this last because it fires off messages to start doing things
        try {
            // 调用ViewRootImpl的setView
            root.setView(view, wparams, panelParentView);
        } catch (RuntimeException e) {
            // BadTokenException or InvalidDisplayException, clean up.
            if (index >= 0) {
                removeViewLocked(index, true);
            }
            throw e;
        }
    }
}
在WindowManagerGlobal的addView函数中创建了ViewRootImpl并调用了他的setView方法。我们先看一下ViewRootImpl的构造函数
// frameworks/base/core/java/android/view/ViewRootImpl.java
public ViewRootImpl(Context context, Display display) {
    mContext = context;
    // mWindowSession为IWindowSession的代理对象,该对象用于和WMS通信。
    mWindowSession = WindowManagerGlobal.getWindowSession();
    mDisplay = display;
    ...

    // 创建了一个W本地Binder对象,用于WMS通知应用程序进程。
    mWindow = new W(this);
    mTargetSdkVersion = context.getApplicationInfo().targetSdkVersion;
    mViewVisibility = View.GONE;
    mTransparentRegion = new Region();
    mPreviousTransparentRegion = new Region();
    mFirst = true; // true for the first time the view is added
    mAdded = false;
    mAttachInfo = new View.AttachInfo(mWindowSession, mWindow, display, this, mHandler, this,
            context);
    ...
    loadSystemProperties();
}
每个应用进程,仅有一个 sWindowSession 对象,它对应了 WmS 中的 Session 子类,WMS 为每一个应用进程分配一个 Session 对象,应用进程使用这个Session对象和WindowManagerService通信。WindowState 类有一个 IWindow mClient 参数,是在构造方法中赋值的,它是由 Session 调用 addWindow 时传递过来的,对应了 ViewRootImpl 中的 W 类的实例。
接下来我们看ViewRootImpl的setView函数
// frameworks/base/core/java/android/view/ViewRootImpl.java
public void setView(View view, WindowManager.LayoutParams attrs, View panelParentView) {
    synchronized (this) {
        if (mView == null) {
            ////将DecorView保存到ViewRootImpl的成员变量mView中
            mView = view;

            ......

            mSoftInputMode = attrs.softInputMode;
            mWindowAttributesChanged = true;
            mWindowAttributesChangesFlag = WindowManager.LayoutParams.EVERYTHING_CHANGED;
            //同时将DecorView保存到mAttachInfo中
            mAttachInfo.mRootView = view;
            mAttachInfo.mScalingRequired = mTranslator != null;
            mAttachInfo.mApplicationScale =
                    mTranslator == null ? 1.0f : mTranslator.applicationScale;
            if (panelParentView != null) {
                mAttachInfo.mPanelParentWindowToken
                        = panelParentView.getApplicationWindowToken();
            }
            mAdded = true;
            int res; /* = WindowManagerImpl.ADD_OKAY; */

            // 【1】在添加窗口前进行UI布局
            requestLayout();
            if ((mWindowAttributes.inputFeatures
                    & WindowManager.LayoutParams.INPUT_FEATURE_NO_INPUT_CHANNEL) == 0) {
                mInputChannel = new InputChannel();
            }
            mForceDecorViewVisibility = (mWindowAttributes.privateFlags
                    & PRIVATE_FLAG_FORCE_DECOR_VIEW_VISIBILITY) != 0;
            try {
                mOrigWindowType = mWindowAttributes.type;
                mAttachInfo.mRecomputeGlobalAttributes = true;
                collectViewAttributes();
                 // 【2】将窗口添加到WMS服务中,mWindow为W本地Binder对象,通过Binder传输到WMS服务端后,变为IWindow代理对象
                res = mWindowSession.addToDisplay(mWindow, mSeq, mWindowAttributes,
                        getHostVisibility(), mDisplay.getDisplayId(),
                        mAttachInfo.mContentInsets, mAttachInfo.mStableInsets,
                        mAttachInfo.mOutsets, mInputChannel);
            } ......
            // 建立窗口消息通道
            if (mInputChannel != null) {
                if (mInputQueueCallback != null) {
                    mInputQueue = new InputQueue();
                    mInputQueueCallback.onInputQueueCreated(mInputQueue);
                }
                mInputEventReceiver = new WindowInputEventReceiver(mInputChannel,
                        Looper.myLooper());
            }

            ......
        }
    }
}
在ViewRootImpl有两个函数比较重要:
【1】requestLayout()
【2】mWindowSession.addToDisplay()
我们先看requestLayout()函数
// frameworks/base/core/java/android/view/ViewRootImpl.java
 public void requestLayout() {
     if (!mHandlingLayoutInLayoutRequest) {
         checkThread();
         mLayoutRequested = true;
         scheduleTraversals();
     }
 }
再看scheduleTraversals()函数
// frameworks/base/core/java/android/view/ViewRootImpl.java
void scheduleTraversals() {
    if (!mTraversalScheduled) {
        mTraversalScheduled = true;
        mTraversalBarrier = mHandler.getLooper().getQueue().postSyncBarrier();
        // 此处会等待Vsync事件当Vsync事件到来时,mTraversalRunnable对象的run()函数将被调用
        mChoreographer.postCallback(
                Choreographer.CALLBACK_TRAVERSAL, mTraversalRunnable, null);
        if (!mUnbufferedInputDispatch) {
            scheduleConsumeBatchedInput();
        }
        notifyRendererOfFramePending();
        pokeDrawLockIfNeeded();
    }
}
mTraversalRunnable的run需要等到Vsync事件到来时才会执行其run函数,所以mWindowSession.addToDisplay函数会在mTraversalRunnable的run函数之前执行。所以下面我们先看mWindowSession.addToDisplay函数。
【2】mWindowSession.addToDisplay()
// frameworks/base/services/core/java/com/android/server/wm/Session.java
public int addToDisplay(IWindow window, int seq, WindowManager.LayoutParams attrs,
    int viewVisibility, int displayId, Rect outContentInsets, Rect outStableInsets,
    Rect outOutsets, InputChannel outInputChannel) {
return mService.addWindow(this, window, seq, attrs, viewVisibility, displayId,
        outContentInsets, outStableInsets, outOutsets, outInputChannel);
}
调用了WindowManagerService的addWindow函数
// frameworks/base/services/core/java/com/android/server/wm/WindowManagerService.java
public int addWindow(Session session, IWindow client, int seq,
        LayoutParams attrs, int viewVisibility, int displayId, Rect outFrame,
        Rect outContentInsets, Rect outStableInsets, Rect outOutsets,
        DisplayCutout.ParcelableWrapper outDisplayCutout, InputChannel outInputChannel) {
    int[] appOp = new int[1];
    int res = mPolicy.checkAddPermission(attrs, appOp);
    if (res != WindowManagerGlobal.ADD_OKAY) {
        return res;
    }

    boolean reportNewConfig = false;
    WindowState parentWindow = null;
    long origId;
    final int callingUid = Binder.getCallingUid();
    final int type = attrs.type;

    synchronized(mWindowMap) {
        if (!mDisplayReady) {
            throw new IllegalStateException("Display has not been initialialized");
        }
        // 获取DisplayContent
        final DisplayContent displayContent = getDisplayContentOrCreate(displayId);

        ....

        AppWindowToken atoken = null;
        final boolean hasParent = parentWindow != null;
        // 调用displayContent的getWindowToken函数创建WindowToken
        // WindowToken保存在displayContent的mTokenMap哈希表中
        // Use existing parent window token for child windows since they go in the same token
        // as there parent window so we can apply the same policy on them.
        WindowToken token = displayContent.getWindowToken(
                hasParent ? parentWindow.mAttrs.token : attrs.token);
        // If this is a child window, we want to apply the same type checking rules as the
        // parent window type.
        final int rootType = hasParent ? parentWindow.mAttrs.type : type;

        boolean addToastWindowRequiresToken = false;

        if (token == null) {
            ....

            final IBinder binder = attrs.token != null ? attrs.token : client.asBinder();
            final boolean isRoundedCornerOverlay =
                    (attrs.privateFlags & PRIVATE_FLAG_IS_ROUNDED_CORNERS_OVERLAY) != 0;
            // 如果未能从displayContent获取到WindowToken则新建一个WindowToken
            token = new WindowToken(this, binder, type, false, displayContent,
                    session.mCanAddInternalSystemWindow, isRoundedCornerOverlay);
        } else if (rootType >= FIRST_APPLICATION_WINDOW && rootType <= LAST_APPLICATION_WINDOW) {
            // 如果Window的类型为APPLICATION_WINDOW则将WindowToken转为AppWindowToken
            atoken = token.asAppWindowToken();
            if (atoken == null) {
               ...
            }
         ...

        // 创建WindowState保存Window
        final WindowState win = new WindowState(this, session, client, token, parentWindow,
                appOp[0], seq, attrs, viewVisibility, session.mUid,
                session.mCanAddInternalSystemWindow);

        ...

        // 为Window注册InputChannel
        final boolean openInputChannels = (outInputChannel != null
                && (attrs.inputFeatures & INPUT_FEATURE_NO_INPUT_CHANNEL) == 0);
        if  (openInputChannels) {
            win.openInputChannel(outInputChannel);
        }

        ...

        // 调用WindowState的attach函数
        win.attach();
        mWindowMap.put(client.asBinder(), win);

        ...

        // 将新建的WindowState添加到WindowContainer的管理中,WindowContainer是WindowToken的父类
        win.mToken.addWindow(win);
        ...

    return res;
}
上面的函数主要工作就是创建了一个WindowState对象并调用他的attach函数,下面我们看看这个函数做了什么。
// frameworks/base/services/core/java/com/android/server/wm/WindowState.java
void attach() {
    if (localLOGV) Slog.v(TAG, "Attaching " + this + " token=" + mToken);
    mSession.windowAddedLocked(mAttrs.packageName);
}
调用了Session的windowAddedLocked函数
// frameworks/base/services/core/java/com/android/server/wm/Session.java
void windowAddedLocked(String packageName) {
    mPackageName = packageName;
    mRelayoutTag = "relayoutWindow: " + mPackageName;
    if (mSurfaceSession == null) {
        if (WindowManagerService.localLOGV) Slog.v(
            TAG_WM, "First window added to " + this + ", creating SurfaceSession");
        mSurfaceSession = new SurfaceSession();

        if (SHOW_TRANSACTIONS) Slog.i(
                TAG_WM, "  NEW SURFACE SESSION " + mSurfaceSession);
        mService.mSessions.add(this);
        if (mLastReportedAnimatorScale != mService.getCurrentAnimatorScale()) {
            mService.dispatchNewAnimatorScaleLocked(this);
        }
    }
    mNumWindow++;
}
在windowAddedLocked函数中创建了一个SurfaceSession对象,SurfaceSession对象承担了应用程序与SurfaceFlinger之间的通信过程,每一个需要与SurfaceFlinger进程交互的应用程序端都需要创建一个SurfaceSession对象。
现在mWindowSession.addToDisplay()函数我们已经分析完了,之后Choreographer会收到Vsync事件,mTraversalRunnable的run函数会被执行。
// frameworks/base/core/java/android/view/ViewRootImpl.java
final class TraversalRunnable implements Runnable {
    @Override
    public void run() {
        doTraversal();
    }
}
--------------------------------------------------------------------------------------------------------------------------------
void doTraversal() {
    if (mTraversalScheduled) {
        mTraversalScheduled = false;
        mHandler.getLooper().getQueue().removeSyncBarrier(mTraversalBarrier);

        if (mProfile) {
            Debug.startMethodTracing("ViewAncestor");
        }

        performTraversals();

        if (mProfile) {
            Debug.stopMethodTracing();
            mProfile = false;
        }
    }
}
mTraversalRunnable对象的类型为TraversalRunnable,该类实现了Runnable接口,在其run()函数中调用了doTraversal()函数之后在doTraversal函数中会调用performTraversals进行窗口的描绘。
performTraversal函数非常复杂,我们只看其中的重点内容
// frameworks/base/core/java/android/view/ViewRootImpl.java
private void performTraversals() {
    ......
    final View host = mView;

    if (mFirst || windowShouldResize || insetsChanged ||
              viewVisibilityChanged || params != null) {
        ......

          try {
              ......
              relayoutResult = relayoutWindow(params, viewVisibility, insetsPending);
          }
          ......

        if (!mStopped) {
            boolean focusChangedDueToTouchMode = ensureTouchModeLocally(
                            (relayoutResult&WindowManagerGlobal.RELAYOUT_RES_IN_TOUCH_MODE) != 0);
            if (focusChangedDueToTouchMode || mWidth != host.getMeasuredWidth()
                        || mHeight != host.getMeasuredHeight() || contentInsetsChanged) {
                //获取测量模式。lp.width和lp.height在创建ViewGroup实例时等于MATCH_PARENT
                int childWidthMeasureSpec = getRootMeasureSpec(mWidth, lp.width);
                int childHeightMeasureSpec = getRootMeasureSpec(mHeight, lp.height);

                // 根据测量模式进行测量。
                // Ask host how big it wants to be
                performMeasure(childWidthMeasureSpec, childHeightMeasureSpec);
                ......
                layoutRequested = true;
            }
        }
    }

    final boolean didLayout = layoutRequested && !mStopped;
    boolean triggerGlobalLayoutListener = didLayout || attachInfo.mRecomputeGlobalAttributes;
    if (didLayout) {
        // 布局
        performLayout(lp, desiredWindowWidth, desiredWindowHeight);

        // By this point all views have been sized and positioned
        ......
    }
    ......      boolean cancelDraw = attachInfo.mTreeObserver.dispatchOnPreDraw() || viewVisibility != View.VISIBLE;
    if (!cancelDraw && !newSurface) {
        if (!skipDraw || mReportNextDraw) {
            ......
            // 描绘
            performDraw();
        }
    }
    ......
}
在performTraversals中会调用performMeasure、performLayout、performDraw三个函数进行窗口的测量、布局、描绘。这个过程不作为分析的重点,我们重点分析下relayoutWindow这个函数。
// frameworks/base/core/java/android/view/ViewRootImpl.java
private int relayoutWindow(WindowManager.LayoutParams params, int viewVisibility,
        boolean insetsPending) throws RemoteException {

    float appScale = mAttachInfo.mApplicationScale;
    boolean restore = false;
    if (params != null && mTranslator != null) {
        restore = true;
        params.backup();
        mTranslator.translateWindowLayout(params);
    }

    if (params != null) {
        if (DBG) Log.d(mTag, "WindowLayout in layoutWindow:" + params);

        if (mOrigWindowType != params.type) {
            // For compatibility with old apps, don't crash here.
            if (mTargetSdkVersion < Build.VERSION_CODES.ICE_CREAM_SANDWICH) {
                Slog.w(mTag, "Window type can not be changed after "
                        + "the window is added; ignoring change of " + mView);
                params.type = mOrigWindowType;
            }
        }
    }

    long frameNumber = -1;
    if (mSurface.isValid()) {
        frameNumber = mSurface.getNextFrameNumber();
    }

    int relayoutResult = mWindowSession.relayout(mWindow, mSeq, params,
            (int) (mView.getMeasuredWidth() * appScale + 0.5f),
            (int) (mView.getMeasuredHeight() * appScale + 0.5f), viewVisibility,
            insetsPending ? WindowManagerGlobal.RELAYOUT_INSETS_PENDING : 0, frameNumber,
            mWinFrame, mPendingOverscanInsets, mPendingContentInsets, mPendingVisibleInsets,
            mPendingStableInsets, mPendingOutsets, mPendingBackDropFrame, mPendingDisplayCutout,
            mPendingMergedConfiguration, mSurface);

    mPendingAlwaysConsumeNavBar =
            (relayoutResult & WindowManagerGlobal.RELAYOUT_RES_CONSUME_ALWAYS_NAV_BAR) != 0;

    if (restore) {
        params.restore();
    }

    if (mTranslator != null) {
        mTranslator.translateRectInScreenToAppWinFrame(mWinFrame);
        mTranslator.translateRectInScreenToAppWindow(mPendingOverscanInsets);
        mTranslator.translateRectInScreenToAppWindow(mPendingContentInsets);
        mTranslator.translateRectInScreenToAppWindow(mPendingVisibleInsets);
        mTranslator.translateRectInScreenToAppWindow(mPendingStableInsets);
    }
    return relayoutResult;
}
调用了WindowSession.relayout函数
// frameworks/base/services/core/java/com/android/server/wm/Session.java
public int relayout(IWindow window, int seq, WindowManager.LayoutParams attrs,
        int requestedWidth, int requestedHeight, int viewFlags, int flags, long frameNumber,
        Rect outFrame, Rect outOverscanInsets, Rect outContentInsets, Rect outVisibleInsets,
        Rect outStableInsets, Rect outsets, Rect outBackdropFrame,
        DisplayCutout.ParcelableWrapper cutout, MergedConfiguration mergedConfiguration,
        Surface outSurface) {
    if (false) Slog.d(TAG_WM, ">>>>>> ENTERED relayout from "
            + Binder.getCallingPid());
    Trace.traceBegin(TRACE_TAG_WINDOW_MANAGER, mRelayoutTag);
    int res = mService.relayoutWindow(this, window, seq, attrs,
            requestedWidth, requestedHeight, viewFlags, flags, frameNumber,
            outFrame, outOverscanInsets, outContentInsets, outVisibleInsets,
            outStableInsets, outsets, outBackdropFrame, cutout,
            mergedConfiguration, outSurface);
    Trace.traceEnd(TRACE_TAG_WINDOW_MANAGER);
    if (false) Slog.d(TAG_WM, "<<<<<< EXITING relayout to "
            + Binder.getCallingPid());
    return res;
}
调用了WindowManagerService的relayoutWindow函数
// frameworks/base/services/core/java/com/android/server/wm/WindowManagerService.java
public int relayoutWindow(Session session, IWindow client, int seq, LayoutParams attrs,
        int requestedWidth, int requestedHeight, int viewVisibility, int flags,
        long frameNumber, Rect outFrame, Rect outOverscanInsets, Rect outContentInsets,
        Rect outVisibleInsets, Rect outStableInsets, Rect outOutsets, Rect outBackdropFrame,
        DisplayCutout.ParcelableWrapper outCutout, MergedConfiguration mergedConfiguration,
        // 这里的Surface用outSurface命名,那猜测outSurface应该是一个输出型参数,后面会有说明
        Surface outSurface) {
    int result = 0;
    boolean configChanged;
    final boolean hasStatusBarPermission =
            mContext.checkCallingOrSelfPermission(permission.STATUS_BAR)
                    == PackageManager.PERMISSION_GRANTED;
    final boolean hasStatusBarServicePermission =
            mContext.checkCallingOrSelfPermission(permission.STATUS_BAR_SERVICE)
                    == PackageManager.PERMISSION_GRANTED;

    long origId = Binder.clearCallingIdentity();
    final int displayId;
    synchronized(mWindowMap) {
        // 根据IWindow对象查找对应的WindowState
        WindowState win = windowForClientLocked(session, client, false);

        if (win == null) {
            return 0;
        }
        displayId = win.getDisplayId();

        WindowStateAnimator winAnimator = win.mWinAnimator;
        if (viewVisibility != View.GONE) {
            win.setRequestedSize(requestedWidth, requestedHeight);
        }

        ....

            try {
                result = createSurfaceControl(outSurface, result, win, winAnimator);
            } catch (Exception e) {
                mInputMonitor.updateInputWindowsLw(true /*force*/);

                Slog.w(TAG_WM, "Exception thrown when creating surface for client "
                         + client + " (" + win.mAttrs.getTitle() + ")",
                         e);
                Binder.restoreCallingIdentity(origId);
                return 0;
            }
           ....
    return result;
}
我们只关注createSurfaceControl这个函数
// frameworks/base/services/core/java/com/android/server/wm/WindowManagerService.java
private int createSurfaceControl(Surface outSurface, int result, WindowState win,
        WindowStateAnimator winAnimator) {
    if (!win.mHasSurface) {
        result |= RELAYOUT_RES_SURFACE_CHANGED;
    }

    WindowSurfaceController surfaceController;
    try {
        Trace.traceBegin(TRACE_TAG_WINDOW_MANAGER, "createSurfaceControl");
        // 创建surfaceController
        surfaceController = winAnimator.createSurfaceLocked(win.mAttrs.type, win.mOwnerUid);
    } finally {
        Trace.traceEnd(TRACE_TAG_WINDOW_MANAGER);
    }

    if (surfaceController != null) {
        surfaceController.getSurface(outSurface);

        if (SHOW_TRANSACTIONS) Slog.i(TAG_WM, "  OUT SURFACE " + outSurface + ": copied");
    } else {
        // For some reason there isn't a surface.  Clear the
        // caller's object so they see the same state.
        Slog.w(TAG_WM, "Failed to create surface control for " + win);
        outSurface.release();
    }

    return result;
}
createSurfaceControl函数中首先创建了WindowSurfaceController对象,然后调用该对象的getSurface方法,参数是outSurface
我们先看 &enspWindowSurfaceController是如何创建的
// frameworks/base/services/core/java/com/android/server/wm/WindowStateAnimator.java
WindowSurfaceController createSurfaceLocked(int windowType, int ownerUid) {
    final WindowState w = mWin;

    ...

    mTmpSize.set(0, 0, 0, 0);
    // 计算Surface的大小
    calculateSurfaceBounds(w, attrs);
    final int width = mTmpSize.width();
    final int height = mTmpSize.height();

    ...
        // 创建WindowSurfaceController
        mSurfaceController = new WindowSurfaceController(mSession.mSurfaceSession,
                attrs.getTitle().toString(), width, height, format, flags, this,
                windowType, ownerUid);

        setOffsetPositionForStackResize(false);
        mSurfaceFormat = format;

        w.setHasSurface(true);

        ....
}
看一下WindowSurfaceController的构造方法
// frameworks/base/services/core/java/com/android/server/wm/WindowSurfaceController.java
public WindowSurfaceController(SurfaceSession s, String name, int w, int h, int format,
        int flags, WindowStateAnimator animator, int windowType, int ownerUid) {
    mAnimator = animator;

    mSurfaceW = w;
    mSurfaceH = h;

    title = name;

    mService = animator.mService;
    final WindowState win = animator.mWin;
    mWindowType = windowType;
    mWindowSession = win.mSession;

    Trace.traceBegin(TRACE_TAG_WINDOW_MANAGER, "new SurfaceControl");
    final SurfaceControl.Builder b = win.makeSurface()
            .setParent(win.getSurfaceControl())
            .setName(name)
            .setSize(w, h)
            .setFormat(format)
            .setFlags(flags)
            .setMetadata(windowType, ownerUid);
    mSurfaceControl = b.build();
    Trace.traceEnd(TRACE_TAG_WINDOW_MANAGER);
}
接下来继续看SurfaceControl 是如何创建的
// frameworks/base/core/java/android/view/SurfaceControl.java
public SurfaceControl build() {
    if (mWidth <= 0 || mHeight <= 0) {
        throw new IllegalArgumentException(
                "width and height must be set");
    }
    return new SurfaceControl(mSession, mName, mWidth, mHeight, mFormat,
            mFlags, mParent, mWindowType, mOwnerUid);
}
--------------------------------------------------------------------------------------------------------------------------------------
private SurfaceControl(SurfaceSession session, String name, int w, int h, int format, int flags,
        SurfaceControl parent, int windowType, int ownerUid)
                throws OutOfResourcesException, IllegalArgumentException {
    if (session == null) {
        throw new IllegalArgumentException("session must not be null");
    }
    if (name == null) {
        throw new IllegalArgumentException("name must not be null");
    }

    if ((flags & SurfaceControl.HIDDEN) == 0) {
        Log.w(TAG, "Surfaces should always be created with the HIDDEN flag set "
                + "to ensure that they are not made visible prematurely before "
                + "all of the surface's properties have been configured.  "
                + "Set the other properties and make the surface visible within "
                + "a transaction.  New surface name: " + name,
                new Throwable());
    }

    mName = name;
    mWidth = w;
    mHeight = h;
    // session就是SurfaceComposerClient在java层的Binder代理
    // mNativeObject是native层SurfaceControl的指针
    mNativeObject = nativeCreate(session, name, w, h, format, flags,
        parent != null ? parent.mNativeObject : 0, windowType, ownerUid);
    if (mNativeObject == 0) {
        throw new OutOfResourcesException(
                "Couldn't allocate SurfaceControl native object");
    }

    mCloseGuard.open("release");
}
在SurfaceControl的构造函数中会调用nativeCreate通过JNI创建native层的SurfaceControl,mNativeObject是native层SurfaceControl的指针。
接下来我们再看WindowSurfaceController的getSurface方法
// frameworks/base/services/core/java/com/android/server/wm/WindowSurfaceController.java
void getSurface(Surface outSurface) {
    outSurface.copyFrom(mSurfaceControl);
}
调用了Surface的copyFrom方法
// frameworks/base/core/java/android/view/Surface.java
public void copyFrom(SurfaceControl other) {
    if (other == null) {
        throw new IllegalArgumentException("other must not be null");
    }
    // 获取native层的surfaceControl的指针
    long surfaceControlPtr = other.mNativeObject;
    if (surfaceControlPtr == 0) {
        throw new NullPointerException(
                "null SurfaceControl native object. Are you using a released SurfaceControl?");
    }
    long newNativeObject = nativeGetFromSurfaceControl(surfaceControlPtr);

    synchronized (mLock) {
        if (mNativeObject != 0) {
            nativeRelease(mNativeObject);
        }
        setNativeObjectLocked(newNativeObject);
    }
}
nativeGetFromSurfaceControl
// frameworks/base/core/jni/android_view_Surface.cpp
static jlong nativeCreateFromSurfaceControl(JNIEnv* env, jclass clazz,
        jlong surfaceControlNativeObj) {
    sp<SurfaceControl> ctrl(reinterpret_cast<SurfaceControl *>(surfaceControlNativeObj));
    // 使用SurfaceControl创建Surface
    sp<Surface> surface(ctrl->createSurface());
    if (surface != NULL) {
        surface->incStrong(&sRefBaseOwner);
    }
    return reinterpret_cast<jlong>(surface.get());
}
nativeGetFromSurfaceControl函数会使用SurfaceControl创建一块Surface,并讲这块Surface的地址保存在newNativeObject中,之后会调用setNativeObjectLocked函数
// frameworks/base/core/java/android/view/Surface.java
private void setNativeObjectLocked(long ptr) {
    if (mNativeObject != ptr) {
        if (mNativeObject == 0 && ptr != 0) {
            mCloseGuard.open("release");
        } else if (mNativeObject != 0 && ptr == 0) {
            mCloseGuard.close();
        }
        mNativeObject = ptr;
        mGenerationId += 1;
        if (mHwuiContext != null) {
            mHwuiContext.updateSurface();
        }
    }
}
这里将java层Surface的mNativeObject 设置为native层Surface的指针,之后会通过Binder将这块Surface传给应用,至此应用层获得了一块可以用来显示用的Surface。
回到应用层的performTraversals函数,该函数在调用relayoutWindow之后会调用performMeasure、performLayout、performDraw三个函数进行窗口的测量、布局、描绘,这样显示屏上就可以看到我们的应用了。
下面整理一下本节的内容

相关链接:
- https://www.jianshu.com/p/c321faba9f5c
- https://www.cnblogs.com/Jackwen/p/5135900.html