java多线程-并发容器ConcurrentHashMap
1.引入
并发容器位于concurrent包中,相对于同步容器Vector和Hashtable,并发容器通过一些机制改进了并发性能。因为同步容器将所有对容器状态的访问都串行化了(synchronized),这样保证了线程的安全性,但是代价就是严重降低了并发性,当多个线程竞争容器时,吞吐量严重降低。因此引入了并发性能较好的并发容器,同同步容器相比,util.concurrent包中引入的并发容器主要解决了以下两个问题:
(1)根据具体场景进行设计,尽量避免synchronized,提供并发性
(2)定义了一些并发安全的符合操作,并且保证并发环境下的迭代操作不会出错
注意:util.concurrent中容器在迭代时,可以不封装在synchronized中,可以保证不抛出异常,但是未必每次看到的都是最新的、当前的数据
2.并发容器简单介绍
(1)ConcurrentHashMap
代替同步的Map(collections.synchronized(new HashMap()))。HashMap是根据散列值分段存储的,同步Map在同步的时候锁住了所有的段,而ConcurrentHashMap加锁的时候根据散列值仅仅锁住了散列值对应的那段,因此提高了并发性能。
(2)CopyOnWriteArrayList和CopyOnWriteArraySet
分别代替List和Set,主要是在遍历操作为主的情况下来代替同步的List和Set,也就是迭代过程保证不出错,除了加锁,就是克隆容器对象。
(3)ConcurrentLinkedQueue
是一个非阻塞队列
(4)ConcurrentSkipListMap
代替SortedMap(如用Collections.synchronizedMap包装的TreeMap)
(5)ConcurrentSkipListSet
代替SortedSet(如用Collections.synchronizedSet包装的TreeSet)
3.ConcurrentHashMap内部结构
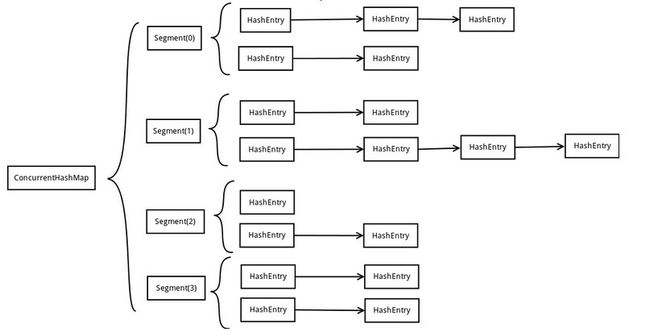
ConcurrentHashMap为了提高自身的并发能力,在内部采用了一个叫做Segment的结构,一个Segment骑士就是一个类似Hash Table的结构。Segment内部维护了一个链表数组:
由上图看出:ConcurrentHashMap定位一个元素的过程需要进行2次Hash操作,第一次Hash定位到Segment,第二次Hash定位到元素所在的链表头部。因此,这种结构带来的副作用是Hash的过程要比普通的HashMap要长,但是带来的好处是写操作的时候可以只对元素所在的Segment进行加锁即可,不会影响到其他Segment。这样,在理想情况下,ConcurrentHashMap可以最高同时支持Segment数量大小的写操作。所以通过这种结构,ConcurrentHashMap的并发能力可以大大提高。
(1)Segment结构
static final class Segment extends ReentrantLock implements Serializable {
    transient volatile int count;                           //Segment中元素的数量
    transient int modCount;                                 //对table大小造成影响的操作数量
    transient int threshold;                                //阀值,Segment里面元素数量超过这个值就会对Segment扩容
    transient volatile HashEntry[] table;              //链表数组,数组中的每一个元素代表了链表的头部
    final float loadFactor;                                 //负载因子
} Segment(int initialCapacity, float lf)
{
loadFactor = lf;
setTable(HashEntry.newArray(initialCapacity));
} static final class HashEntry
{
final K key;
final int hash;
volatile V value;
final HashEntry next;
HashEntry(K key, int hash, HashEntry next, V value)
{
this.key = key;
this.hash = hash;
this.next = next;
this.value = value;
}
@SuppressWarnings("unchecked")
static final HashEntry[] newArray(int i)
{
return new HashEntry[i];
}
} void setTable(HashEntry[] newTable)
{
threshold = (int)(newTable.length * loadFactor);
table = newTable;
} (2)ConcurrentHashMap结构
public class ConcurrentHashMap extends AbstractMap
        implements ConcurrentMap, Serializable {

    static final int DEFAULT_INITIAL_CAPACITY = 16;

    static final float DEFAULT_LOAD_FACTOR = 0.75f;

    static final int DEFAULT_CONCURRENCY_LEVEL = 16;                 //其中Segment的数量

    static final int MAXIMUM_CAPACITY = 1 << 30;

    static final int MAX_SEGMENTS = 1 << 16; // slightly conservative


    static final int RETRIES_BEFORE_LOCK = 2;

    final int segmentMask;

    final int segmentShift;

final Segment[] segments; //Hash表 public ConcurrentHashMap(int initialCapacity,
float loadFactor, int concurrencyLevel) {
if (!(loadFactor > 0) || initialCapacity < 0 || concurrencyLevel <= 0)
throw new IllegalArgumentException();
if (concurrencyLevel > MAX_SEGMENTS) //如果定义的Segment数量大于最大Segment数量,则直接设置为最大Segment数量
concurrencyLevel = MAX_SEGMENTS;
// Find power-of-two sizes best matching arguments
int sshift = 0;
int ssize = 1;
while (ssize < concurrencyLevel) {
++sshift;
ssize <<= 1;
}
segmentShift = 32 - sshift;
segmentMask = ssize - 1;
this.segments = Segment.newArray(ssize); //将Segment的大小设置为2的n次方,为了方便hash
if (initialCapacity > MAXIMUM_CAPACITY)
initialCapacity = MAXIMUM_CAPACITY;
int c = initialCapacity / ssize;
if (c * ssize < initialCapacity)
++c;
int cap = 1;
while (cap < c)
cap <<= 1;
for (int i = 0; i < this.segments.length; ++i)
this.segments[i] = new Segment(cap, loadFactor);
} (4)get方法
    public V get(Object key)
   {
        int hash = hash(key.hashCode());
        return segmentFor(hash).get(key, hash);
} final Segment segmentFor(int hash)
{
return segments[(hash >>> segmentShift) & segmentMask];
} V get(Object key, int hash)
{
if (count != 0)
{ // read-volatile
HashEntry e = getFirst(hash);
while (e != null)
{
if (e.hash == hash && key.equals(e.key))
{
V v = e.value;
if (v != null)
return v;
return readValueUnderLock(e); // recheck
}
e = e.next;
}
}
return null;
} 然后获得链表头部,进而直接遍历即可
(5)put方法
    public V put(K key, V value)
    {
        if (value == null)
            throw new NullPointerException();
        int hash = hash(key.hashCode());
        return segmentFor(hash).put(key, hash, value, false);
} V put(K key, int hash, V value, boolean onlyIfAbsent)
{
lock();
try
{
int c = count;
if (c++ > threshold) // ensure capacity
rehash();
HashEntry[] tab = table;
int index = hash & (tab.length - 1);
HashEntry first = tab[index];
HashEntry e = first;
while (e != null && (e.hash != hash || !key.equals(e.key)))
e = e.next;
V oldValue;
if (e != null)
{
oldValue = e.value;
if (!onlyIfAbsent)
e.value = value;
}
else
{
oldValue = null;
++modCount;
tab[index] = new HashEntry(key, hash, first, value);
count = c; // write-volatile
}
return oldValue;
}
finally
{
unlock();
}
} static final class Segment extends ReentrantLock (6)remove方法
    public V remove(Object key)
   {
	int hash = hash(key.hashCode());
        return segmentFor(hash).remove(key, hash, null);
} V remove(Object key, int hash, Object value)
{
lock();
try
{
int c = count - 1;
HashEntry[] tab = table;
int index = hash & (tab.length - 1);
HashEntry first = tab[index];
HashEntry e = first;
while (e != null && (e.hash != hash || !key.equals(e.key)))
e = e.next;
V oldValue = null;
if (e != null)
{
V v = e.value;
if (value == null || value.equals(v))
{
oldValue = v;
++modCount;
HashEntry newFirst = e.next;
for (HashEntry p = first; p != e; p = p.next)
newFirst = new HashEntry(p.key, p.hash,
newFirst, p.value);
tab[index] = newFirst;
count = c; // write-volatile
}
}
return oldValue;
}
finally
{
unlock();
}
} 删除3后


