Springboot集成Phoenix+Hbase+MybatisPlus
Springboot集成Phoenix+Hbase+MybatisPlus
- 环境配置
- 相关配置文件
- 安装Hbase,集成Phoenix
- Squirrel客户端连接Phoenix
- 集成到Springboot+myBatisPlus项目中
- Springboot+MybatisPlus查询Hbase中数据 测试
- 完结
环境配置
Springboot2.2.1.RELEASE
JDK1.8
Phoenix5.0.0
Hbase2.0.0
MybatisPlus3.1.0
Squirrel SQL Client数据库连接客户端
Hbase部署在Centos7 本地虚拟机中
hbase-2.0.0-bin.tar.gz 下载地址:
https://archive.apache.org/dist/hbase/2.0.0/hbase-2.0.0-bin.tar.gz
apache-phoenix-5.0.0-HBase-2.0-bin.tar.gz 下载地址:
http://archive.apache.org/dist/phoenix/apache-phoenix-5.0.0-HBase-2.0/bin/apache-phoenix-5.0.0-HBase-2.0-bin.tar.gz
Squirrel 客户端工具下载地址:
http://sourceforge.net/projects/squirrel-sql/files/1-stable/4.0.0/squirrel-sql-4.0.0-standard.jar/download
相关配置文件
- pom.xml
<project xmlns="http://maven.apache.org/POM/4.0.0" xmlns:xsi="http://www.w3.org/2001/XMLSchema-instance"
        xsi:schemaLocation="http://maven.apache.org/POM/4.0.0 http://maven.apache.org/xsd/maven-4.0.0.xsd">
   <modelVersion>4.0.0modelVersion>
   <parent>
       <groupId>org.springframework.bootgroupId>
       <artifactId>spring-boot-starter-parentartifactId>
       <version>2.2.1.RELEASEversion>
       <relativePath/>
   parent>
   <groupId>com.yuangroupId>
   <artifactId>demo-druidartifactId>
   <version>0.0.1-SNAPSHOTversion>
   <name>demo-druidname>
   <description>Demo project for Spring Bootdescription>

   <properties>
       <java.version>1.8java.version>
   properties>

   <dependencies>
       <dependency>
           <groupId>org.springframework.bootgroupId>
           <artifactId>spring-boot-starter-webartifactId>
       dependency>
       <dependency>
           <groupId>mysqlgroupId>
           <artifactId>mysql-connector-javaartifactId>
       dependency>
       <dependency>
           <groupId>com.alibabagroupId>
           <artifactId>druid-spring-boot-starterartifactId>
           <version>1.1.10version>
       dependency>
       <dependency>
           <groupId>com.baomidougroupId>
           <artifactId>mybatis-plus-boot-starterartifactId>
           <version>3.1.0version>
       dependency>

       <dependency>
           <groupId>com.baomidougroupId>
           <artifactId>mybatis-plus-generatorartifactId>
           <version>3.1.0version>
       dependency>

       <dependency>
           <groupId>org.freemarkergroupId>
           <artifactId>freemarkerartifactId>
       dependency>


       <dependency>
           <groupId>org.apache.phoenixgroupId>
           <artifactId>phoenix-coreartifactId>
           <version>5.0.0-HBase-2.0version>
       dependency>

       <dependency>
           <groupId>org.apache.hadoopgroupId>
           <artifactId>hadoop-commonartifactId>
           <version>2.9.2version>
       dependency>

       <dependency>
           <groupId>org.springframework.bootgroupId>
           <artifactId>spring-boot-devtoolsartifactId>
           <scope>runtimescope>
       dependency>
       <dependency>
           <groupId>org.projectlombokgroupId>
           <artifactId>lombokartifactId>
           <optional>trueoptional>
       dependency>
       <dependency>
           <groupId>org.springframework.bootgroupId>
           <artifactId>spring-boot-starter-testartifactId>
           <scope>testscope>
       dependency>
   dependencies>

   <build>
       <plugins>
           <plugin>
               <groupId>org.springframework.bootgroupId>
               <artifactId>spring-boot-maven-pluginartifactId>
           plugin>
       plugins>
   build>

project>
- hbase-2.0.0-bin/conf: hbase-site.xml
<configuration>
<property>
         <name>hbase.rootdirname>
         <value>file:///usr/hbase-release/rootdirvalue>
         <description>The directory shared byregion servers.description>
     property>

     <property>
             <name>fs.defaultFSname>
             <value>file:///usr/hbase-release/dfsvalue>
     property>


     <property>
             <name>hbase.zookeeper.property.clientPortname>
             <value>2181value>
             <description>Property from ZooKeeper'sconfig zoo.cfg. The port at which the clients will connect.
     description>
     property>


     <property>
             <name>zookeeper.session.timeoutname>
             <value>620000value>
     property>


     <property>
             <name>hbase.zookeeper.quorumname>
             <value>192.168.100.11:2181value>
     property>

     <property>
             <name>hbase.tmp.dirname>
             <value>/usr/hbase-release/tmpvalue>
     property>

     <property>
             <name>hbase.cluster.distributedname>
             <value>falsevalue>
     property>

     <property>
             <name>hbase.zookeeper.property.dataDirname>
             <value>/usr/hbase-release/datadirvalue>
     property>

     <property>
<name>zookeeper.znode.parentname>
             <value>/hbasevalue>
     property>

	<property>
	  <name>hbase.regionserver.wal.codecname>
	  <value>org.apache.hadoop.hbase.regionserver.wal.IndexedWALEditCodecvalue>
	property>

	<property>
	  <name>hbase.region.server.rpc.scheduler.factory.classname>
	  <value>org.apache.hadoop.hbase.ipc.PhoenixRpcSchedulerFactoryvalue>
	  <description>Factory to create the Phoenix RPC Scheduler that uses separate queues for index and metadata updatesdescription>
	property>

	<property>
	  <name>hbase.rpc.controllerfactory.classname>
	  <value>org.apache.hadoop.hbase.ipc.controller.ServerRpcControllerFactoryvalue>
	   <description>Factory to create the Phoenix RPC Scheduler that uses separate queues for index and metadata updatesdescription>
	property>

	<property>
	   <name>hbase.client.scanner.timeout.periodname>
	  <value>6000000value>
	property>

	<property>
	   <name>hbase.regionserver.lease.periodname>
	  <value>6000000value>
	property>

	 <property>
	    <name>hbase.rpc.timeoutname>
	    <value>6000000value>
	  property>

	<property>
    		<name>hbase.client.operation.timeoutname>
    		<value>6000000value>
  	property>

	<property>
	   <name>hbase.client.ipc.pool.typename>
	   <value>RoundRobinPoolvalue>
	property>

	<property>
	   <name>hbase.client.ipc.pool.sizename>
	   <value>20value>
	property>

	<property>
	 <name>phoenix.query.timeoutMsname>
	 <value>6000000value>
	property>

	<property>
	 <name>phoenix.query.keepAliveMsname>
	 <value>6000000value>
	property>

configuration>
- apache-phoenix-5.0.0-HBase-2.0-bin:/bin/hbase-site.xml
<configuration>
  <property>
    <name>hbase.regionserver.wal.codecname>
    <value>org.apache.hadoop.hbase.regionserver.wal.IndexedWALEditCodecvalue>
  property>

<property>
<name>phoenix.query.timeoutMsname>
<value>60000000value>
property>

configuration>
安装Hbase,集成Phoenix
下载
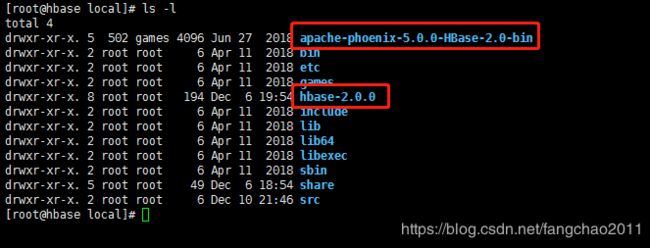
hbase-2.0.0-bin.tar.gz
apache-phoenix-5.0.0-HBase-2.0-bin.tar.gz
修改 hbase-site.xml配置文件,参考文章最前面的配置。
hbase-2.0.0/conf: hbase-site.xml
apache-phoenix-5.0.0-HBase-2.0-bin:/bin/hbase-site.xml
修改vi hbase-env.sh:
设置JDK地址:export JAVA_HOME=/usr/lib/jvm/java-1.8.0-openjdk-1.8.0.232.b09-0.el7_7.x86_64/jre
设置使用内置zookeeper:export HBASE_MANAGES_ZK=true
从apache-phoenix-5.0.0-HBase-2.0-bin中复制 phoenix-5.0.0-HBase-2.0-server.jar
到hbase-2.0.0/lib 下
cd /usr/local/apache-phoenix-5.0.0-HBase-2.0-bin
cp phoenix-5.0.0-HBase-2.0-server.jar /usr/local/hbase-2.0.0/lib
然后启动Hbase数据库
./hbase-2.0.0/bin/start-hbase.sh
停止是:
./hbase-2.0.0/bin/stop-hbase.sh
进入hbase shell
./hbase-2.0.0/bin/hbase shell

进入Phoenix 控制台:
./apache-phoenix-5.0.0-HBase-2.0-bin/bin/sqlline.py 192.168.100.11
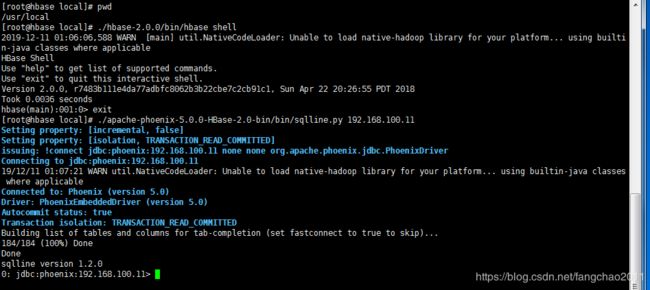
查询数据库所有表:
!tables 或 !table

到此说明Hbase数据库已经部署成功,并且集成Phoenix成功了。
Squirrel客户端连接Phoenix
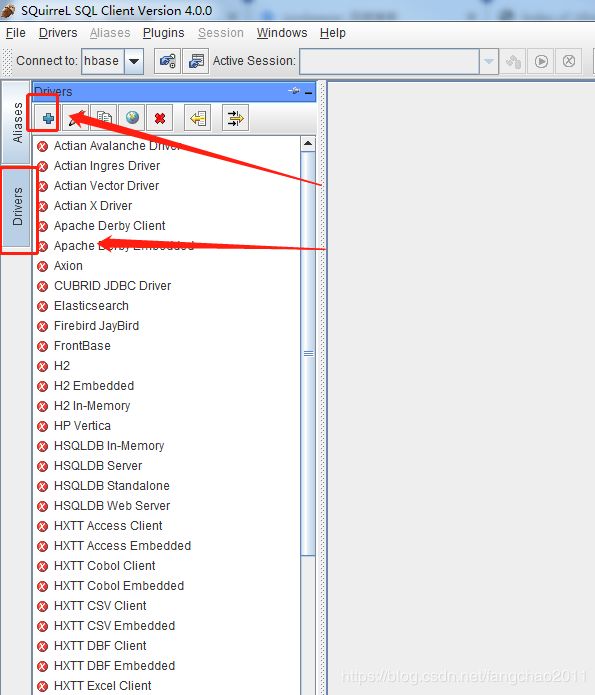
2.添加Phoenix的驱动程序包(驱动包在apache-phoenix-5.0.0-HBase-2.0-bin.tar.gz 这个包里。)到Squirrel的安装路径中,如:D:\Program Files\squirrel-sql-4.0.0\lib
phoenix-core-5.0.0-HBase-2.0.jar
phoenix-pherf-5.0.0-HBase-2.0.jar
phoenix-pherf-5.0.0-HBase-2.0-minimal.jar
phoenix-5.0.0-HBase-2.0-client.jar
phoenix-5.0.0-HBase-2.0-thin-client.jar #如果想支持thin连接,需要加这个包
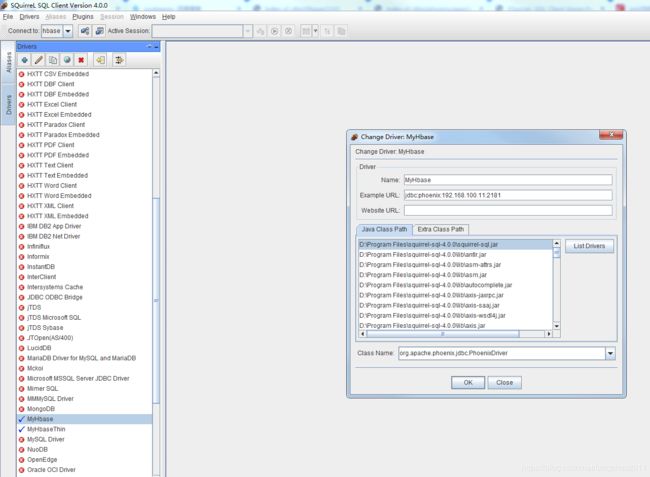
4.胖连接驱动:
Name:自己取
Example URL:jdbc:phoenix:192.168.100.11:2181 (Centos地址:zookeeper端口)
ClassName:加入了驱动包后点击 List Drivers 会自动填充。org.apache.phoenix.jdbc.PhoenixDriver
填写完毕后点击OK
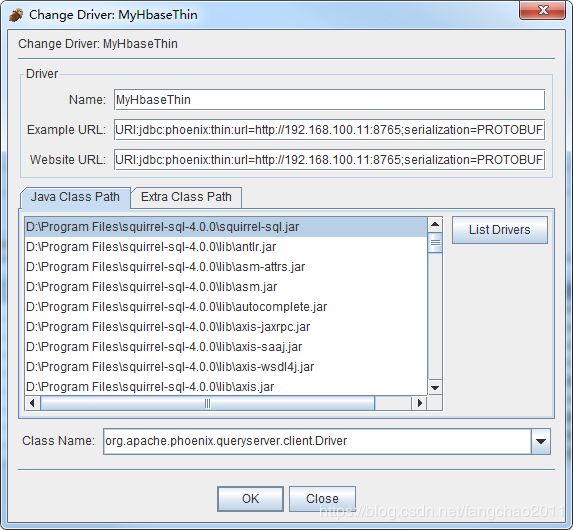
瘦连接:
Example URL:URI:jdbc:phoenix:thin:url=http://192.168.100.11:8765;serialization=PROTOBUF
Website URL:URI:jdbc:phoenix:thin:url=http://192.168.100.11:8765;serialization=PROTOBUF
ClassName:选择 org.apache.phoenix.queryserver.client.Driver
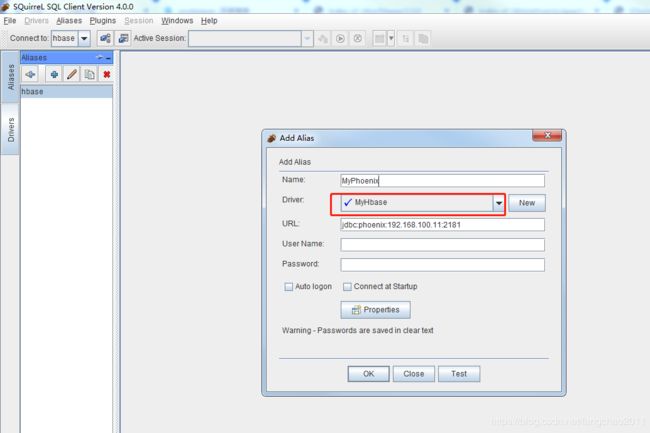
5.添加数据库连接实例
Name:自己取
Driver:选择上面刚创建的驱动
填写数据库+密码
点击Test测试连接。
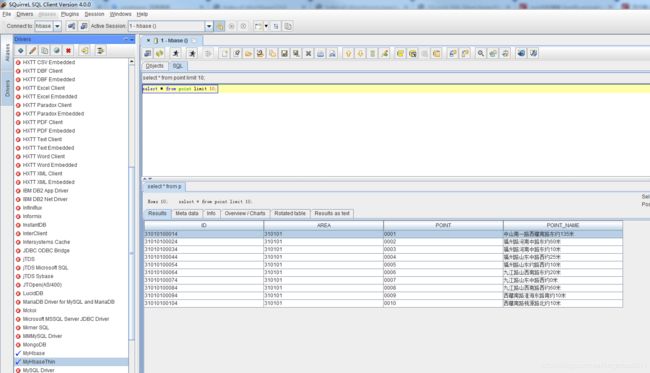
连接成功后:
查看表、写SQL位置如下
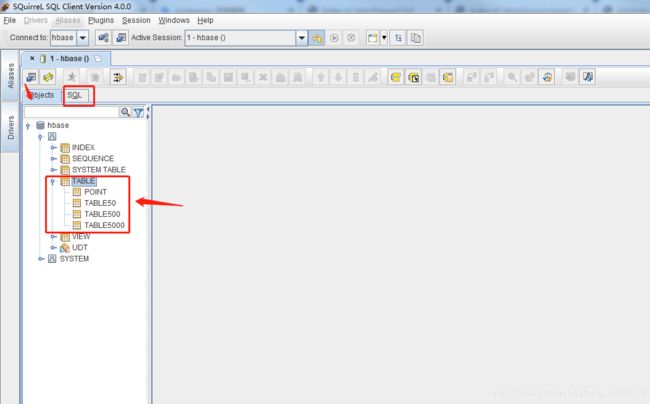
查询10条记录:

集成到Springboot+myBatisPlus项目中
1.配置信息
pom.xml配置:见文章开头。
application.properties:
spring.profiles.active=druid, mybatisplus

#spring.application.name=demo-druid
#server.servlet.context-path=/demo-druid

#server.port=8080

#logging.file=demo-druid.log

#debug=true
#logging.level.com.yuan=debug
application-druid.yml:
spring:
  datasource:
    driver-class-name: org.apache.phoenix.jdbc.PhoenixDriver
    url: jdbc:phoenix:192.168.100.11:2181
    username:
    password:
#    type: com.alibaba.druid.pool.DruidDataSource
    type: com.zaxxer.hikari.HikariDataSource
    hikari:
      # 池中维护的最小空闲连接数
      minimum-idle: 10
      # 池中最大连接数,包括闲置和使用中的连接
      maximum-pool-size: 20
      # 此属性控制从池返回的连接的默认自动提交行为。默认为true
      auto-commit: true
      # 允许最长空闲时间
      idle-timeout: 30000
      # 此属性表示连接池的用户定义名称,主要显示在日志记录和JMX管理控制台中,以标识池和池配置。 默认值:自动生成
      pool-name: custom-hikari
      #此属性控制池中连接的最长生命周期,值0表示无限生命周期,默认1800000即30分钟
      max-lifetime: 1800000
      # 数据库连接超时时间,默认30秒,即30000
      connection-timeout: 30000
      # 连接测试sql 这个地方需要根据数据库方言差异而配置 例如 oracle 就应该写成  select 1 from dual
      connection-test-query: SELECT 1
application-mybatisplus.yml:
mybatis-plus:
#  global-config:
#    db-config:
#      id-type: auto
#      field-strategy: not_empty
#      table-underline: true
#      db-type: mysql
#      logic-delete-value: 1 # 逻辑已删除值(默认为 1)
#      logic-not-delete-value: 0 # 逻辑未删除值(默认为 0)
  mapper-locations: classpath:/mapper/*.xml
相关查询语句编写:
Phoenix查询语句和Mysql 查询差不多
插入和更新不太一样 Phoenix是 UPSERT
例子如下:
MpUserMapper.xml:
<mapper namespace="com.yuan.demodruid.mapper.MpUserMapper">


    <select id="getAll" resultType="com.yuan.demodruid.domain.entity.MpUser">
        select * from point
    select>

    <insert id="putOne">
        upsert into TABLE50 values('test','test','test','test','test','test','test','test','test')
    insert>

    <select id="getOne1" resultType="com.yuan.demodruid.domain.entity.MyHbase">
        select * from TABLE50 where NUMBER=#{id}
    select>

    <insert id="upsertOne">
        upsert into TABLE50 values(#{MyHbase.number},#{MyHbase.area},#{MyHbase.point},#{MyHbase.type},#{MyHbase.bicycleId},#{MyHbase.time},#{MyHbase.company},#{MyHbase.isDownload},#{MyHbase.isOnline})
    insert>

    <insert id="upsertOne500">
        upsert into TABLE500 values(#{MyHbase.number},#{MyHbase.area},#{MyHbase.point},#{MyHbase.type},#{MyHbase.bicycleId},#{MyHbase.time},#{MyHbase.company},#{MyHbase.isDownload},#{MyHbase.isOnline})
    insert>

    <insert id="upsertOne5000">
        upsert into TABLE5000 values(#{MyHbase.number},#{MyHbase.area},#{MyHbase.point},#{MyHbase.type},#{MyHbase.bicycleId},#{MyHbase.time},#{MyHbase.company},#{MyHbase.isDownload},#{MyHbase.isOnline})
    insert>
mapper>
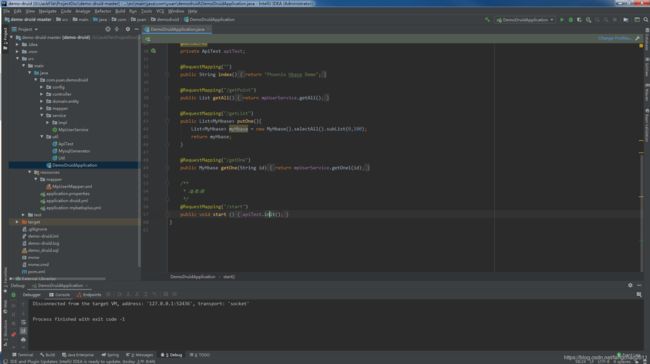
Springboot+MybatisPlus查询Hbase中数据 测试
http://localhost:8080/getPoint

