Android View构造方法第三参数使用方法详解
转载请注明出处:http://blog.csdn.net/mybeta/article/details/39993449
我们都知道,在Android中要使用一个View,一般会有两种方式:1. 在XML文件中配置;2. 直接在代码中new一个View的对象。我们今天讨论的内容就是围绕着View的构造方法的。
1. 示例。
首先我们先来看一个例子。
新建一个工程,layout文件如下:
Activity:
	protected void onCreate(Bundle savedInstanceState) {
		super.onCreate(savedInstanceState);
		setContentView(R.layout.three_button_layout);

		Button btn1 = new Button(this);
		btn1.setText("(Context)");
		Button btn2 = new Button(this, null, 0);
		btn2.setText("(Context, AttributeSet, int)");

		LinearLayout layout = (LinearLayout) findViewById(R.id.layout);
		layout.addView(btn1);
		layout.addView(btn2);
	}
在layout文件中有一个Button,然后在代码中new了两个Button,并且添加到layout文件中,显示结果如下:

很显然,前面两个Button样式是一样的,并且默认可以点击,第3个Button就有点奇怪了,而且还无法点击。为什么会出现这种现象呢?这就是这篇文章要说明的问题了。
2. View构造函数。
要想理解上面的问题,我们必须先得了解View的构造函数。默认情况下,View有3个构造函数,函数原型如下:
public View(Context context);

public View(Context context, AttributeSet attrs);

public View(Context context, AttributeSet attrs, int defStyle);
如果要在代码中new一个View对象,我们一般会使用第一个构造函数。如果是在XML文件中声明的View,系统会默认调用第二个构造函数。而对于第三个构造函数,我们在自己的代码中一般都没有去调用它。
在上面的例子中,btn2这个Button正是采用的第三种构造方法创建出来的,结果导致了很奇怪的结果。既然是用Button做的例子,我们来看下Button的源码(Button的源码可以说是所有Android自带控件中最简单的了吧):【以下所有源码均基于Android2.2】
public class Button extends TextView {
    public Button(Context context) {
        this(context, null);
    }

    public Button(Context context, AttributeSet attrs) {
        this(context, attrs, com.android.internal.R.attr.buttonStyle);
    }

    public Button(Context context, AttributeSet attrs, int defStyle) {
        super(context, attrs, defStyle);
    }
}
我们可以看到,整个类中仅仅只有3个构造方法,但是它继承自TextView,所以它的各种方法都是在TextView中实现的。然而,我们平时看到的TextView和Button还是有很多地方不同的,那是什么地方导致的这些差异呢?
显然,除了第二个构造方法中的com.android.internal.R.attr.buttonStyle,不可能有其他地方来区分TextView和Button了。而这里第二个构造方法调用了第三个构造方法,第三个构造比第二个构造方法多了一个int类型的参数。这就是关键所在了。
3. View构造方法中的第三个参数。
我们来看一下第三个构造方法的注释:官方文档
Perform inflation from XML and apply a class-specific base style. This constructor of View allows subclasses to use their own base style when they are inflating. For example, a Button class's constructor would call this version of the super class constructor and supply R.attr.buttonStyle for defStyle; this allows the theme's button style to modify all of the base view attributes (in particular its background) as well as the Button class's attributes.
对第三个参数的解释是:
An attribute in the current theme that contains a reference to a style resource to apply to this view. If 0, no default style will be applied.
它的大概意思就是,给View提供一个基本的style,如果我们没有对View设置某些属性,就使用这个style中的属性。
继续用Button来分析。
通过Button第3个构造方法的调用,我们来到TextView的构造方法中,当中有一句关键代码:
        TypedArray a =
            context.obtainStyledAttributes(
                attrs, com.android.internal.R.styleable.TextView, defStyle, 0);
接下来,我们分析一下obtainStyledAttributes方法。
4. obtainStyledAttributes。
跟踪该方法,发现最终调用的是Resources.Theme类中的obtainStyledAttributes()方法,该方法里面主要是通过调用一个native方法来拿到控件的属性,放到TypedArray中。我们来仔细阅读一下obtainStyledAttributes()方法的官方文档。
方法原型:
public TypedArray obtainStyledAttributes (AttributeSet set, int[] attrs, int defStyleAttr, int defStyleRes)- set:在XML中明确写出了的属性集合。(比如android:layout_width、android:text="@string/hello_world"这些)
- attrs:需要在上面的set集合中查询哪些内容。如果是自定义View,一般会把自定义的属性写在declare-styleable中,代表我们想查询这些自定义的属性值。
- defStyleAttr:这是一个定义在attrs.xml文件中的attribute。这个值起作用需要两个条件:1. 值不为0;2. 在Theme中使用了(出现即可)。
- defStyleRes:这是在styles.xml文件中定义的一个style。只有当defStyleAttr没有起作用,才会使用到这个值。
- 直接在XML文件中定义的。
- 在XML文件中通过style这个属性定义的。
- 通过defStyleAttr定义的。
- 通过defStyleRes定义的。
- 直接在当然工程的theme主题下定义的。
在这里用到了 buttonStyle属性,它指向另外一个style,这个style在styles.xml文件下:
我们可以看到,这里面的属性都是用来配置Button的。如果在XML文件中没有给Button配置背景、内容的位置等属性,就会默认使用这里的属性。当然这是在使用了defStyleAttr的情况才会出现的,这也解释了文章开头的例子中的奇怪现象了。
5. 实例。
上面的都是理论,我们接下来用一个例子来实践一下。
首先创建一个attrs.xml文件:(如果还不会自定义View属性的,请参考 Android 自定义View 之 自定义View属性)
注意,这里即使将customViewStyle属性写在declare-styleable里,最终效果也一样。
定义style。
首先定义我们的defStyleAttr属性(在本项目中是customViewStyle属性)需要用到的style(位于styles.xml文件中):
然后定义一个在xml布局文件中需要用到的style(位于styles.xml文件中):
自定义一个简单的View:
public class CustomView extends View {

	static final String LOG_TAG = "CustomView";

	public CustomView(Context context) {
		this(context, null);
	}

	public CustomView(Context context, AttributeSet attrs) {
		this(context, attrs, R.attr.customViewStyle);
	}

	public CustomView(Context context, AttributeSet attrs, int defStyle) {
		super(context, attrs, defStyle);

		TypedArray array = context.obtainStyledAttributes(attrs, R.styleable.CustomView, defStyle, 0);

		Log.d(LOG_TAG, "attr1 => " + array.getString(R.styleable.CustomView_attr1));
		Log.d(LOG_TAG, "attr2 => " + array.getString(R.styleable.CustomView_attr2));
		Log.d(LOG_TAG, "attr3 => " + array.getString(R.styleable.CustomView_attr3));
		Log.d(LOG_TAG, "attr4 => " + array.getString(R.styleable.CustomView_attr4));
		Log.d(LOG_TAG, "attr5 => " + array.getString(R.styleable.CustomView_attr5));
		Log.d(LOG_TAG, "attr6 => " + array.getString(R.styleable.CustomView_attr6));
	}

}
注意这里用到了R.attr.customViewStyle。为了使它生效,需要在当初工程的theme中设置它的值(位于styles.xml文件中):
这里就用到了我们上面定义的custom_view_style这个style。
设置一下布局文件:
这里用到了上面定义的xml_style这个style。
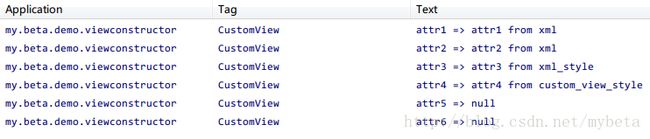
运行结果:
分析:
attr1只在xml布局文件中设置,所以值为attr1 from xml。
attr2在xml布局文件和xml style中都设置了,取值为布局文件中设置的值,所以为attr2 from xml。
attr3没有在xml布局文件中设置,但是在xml style和defStyleAttr定义的style中设置了,取xml style中的值,所以值为attr3 from xml_style。
attr4只在defStyleAttr定义的style中设置了,所以值为attr4 from custom_view_style。
attr5和attr6没有在任何地方设置值,所以为null。
这也证实了前面所得出的顺序是正确的。
我们再来测试一下defStyleRes这个参数,它是一个style,所以添加一个style(位于styles.xml文件中):
然后还需要修改CustomView中的第16行,为下面一行:
TypedArray array = context.obtainStyledAttributes(attrs, R.styleable.CustomView, defStyle, R.style.default_view_style);运行结果:
咦,为什么结果和上面一样呢?
我们看到官方文档中对obtainStyledAttributes()方法的defStyleRes参数解释是这样的:
A resource identifier of a style resource that supplies default values for the TypedArray, used only if defStyleAttr is 0 or can not be found in the theme. Can be 0 to not look for defaults.
也就是说,当defStyleAttr这个参数定义为0(即不使用这个参数),或者是在theme中找不到defStyleAttr这个属性时(即使在theme中的配置是这样的:
所以我们修改CustomView为下面内容(或者是去掉theme中对customViewStyle的使用):
TypedArray array = context.obtainStyledAttributes(attrs, R.styleable.CustomView, 0, R.style.default_view_style);运行结果:
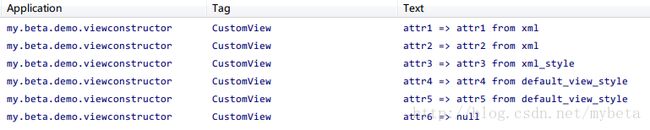
由于defStyleAttr已经失效,所以attr4和attr5都是从default_view_style中获取到的值。
我们知道,在theme所在的style中也可以设置属性,如下:
运行结果:
attr1~attr4不用说了。
attr5在default style和theme下都定义了,取default style下的值,所以为attr5 from default_view-style。
attr6只在theme下定义了,所以取值为attr6 from AppTheme。
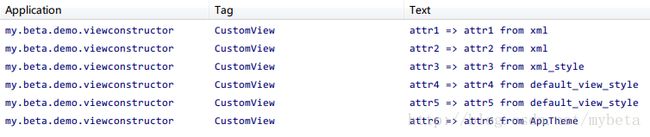
注意,如果将CustomView中重新改成下面的内容(即使customViewStyle生效):
TypedArray array = context.obtainStyledAttributes(attrs, R.styleable.CustomView, defStyle, 0);这时,default style是失效了的,那么在theme中设置的值会不会生效呢?
看运行结果:

attr5在default style和theme下都定义了,但default style失效了,这里并没有因为customViewStyle是有效的而忽略theme中设置的值,所以为attr5 from AppTheme。
attr6只在theme下定义了,同样没有因为customViewStyle是有效的而忽略theme中设置的值,所以取值为attr6 from AppTheme。
这里和default style的取值形式有一点点不同。
6. 总结。
View中的属性有多处地方可以设置值,这个优先级是:
- 直接在XML布局文件中设置的值优先级最高,如果这里设置了值,就不会去取其他地方的值了。
- XML布局文件中有一个叫“style”的属性,它指向一个style,在这个style中设置的属性值优先级次之。
- 如果上面两个地方都没有设置值,那么就会根据View带三个参数的构造方法中的第三个参数attribute指向的style设置值,前提是这个attribute的值不为0。
- 如果上面的attribute设置为0了,我们就根据obtainStyledAttributes()方法中的最后一个参数指向的style来设置值。
- 如果仍然没有设置到值,就会用theme中直接设置的属性值,而不会去管第3步和第4步中是否设置了值。
必须要注意:要想让View构造方法的第三个参数生效,必须让它出现在我们自己的Application或者Activity的android:theme所指向的style中。设置Activity的theme一样可以。
源码下载