ActiveMQ使用与心得(一):介绍,配置,使用
(一) 消息队列简单介绍
消息队列是分布式系统中的重要组件,主要用于解决应用解耦,异步消息,流量削峰等问题。实现高性能,高可用,可伸缩和
最终一致性等。消息队列是大型分布式系统不可缺少的中间件。目前在生产环境,使用较多的消息队列有Kafka,ActiveMQ,RabbitMQ,RocketMQ等。
(二) 应用场景
2.1 异步处理
场景说明:用户注册后,需要发注册邮件和注册短信。
传统的做法:1.串行的方式; 2.并行方式。
1)串行方式:将注册信息写入数据库成功后,发送注册邮件,再发送注册短信。以上三个任务全部完成后,返回给客户端。

2)并行方式:将注册信息写入数据库成功后,发送注册邮件的同时,发送注册短信。以上三个任务完成后,返回给客户端。
与串行的差别是,并行的方式可以提高处理的时间。引入消息队列,就可以将不是必须的业务逻辑改为异步处理。
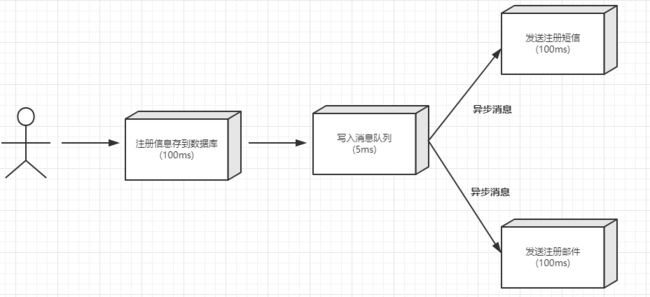
与串行的差别是,并行的方式可以提高处理的时间。引入消息队列,就可以将不是必须的业务逻辑改为异步处理。
2.2 应用解耦
场景说明:后台发货系统,发货后快递发货系统需要通知订单系统,该订单已发货。如果我们用传统的做法是,快递发货系统调用订单系统的接口,更新订单为已发货。

传统模式的缺点:
1) 假如订单系统无法访问,则订单更新为已发货失败,从而导致发货失败
2) 发货系统与订单系统耦合
引入消息队列后的方案:
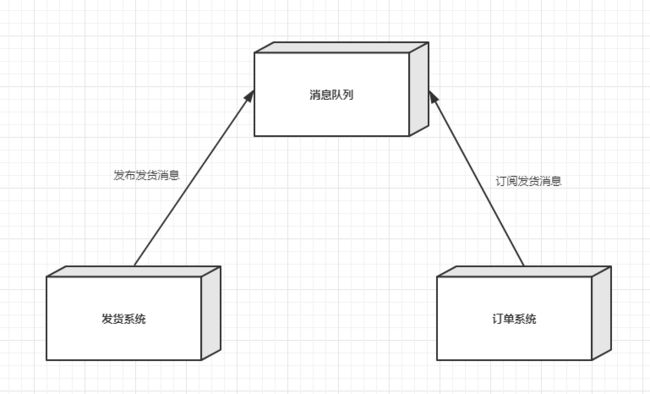
发货系统:发货后,发货系统完成持久化处理,将消息写入消息队列,返回发货成功。
订单系统:订阅发货的消息,获取发货信息,订单系统根据信息,进行更新操作。
如上,发货系统在发货的时候不用关心后续操作了,如果订单系统不能正常使用。也不影响正常发货,实现订单系统与发货系统的应用解耦。
2.3 流量削峰
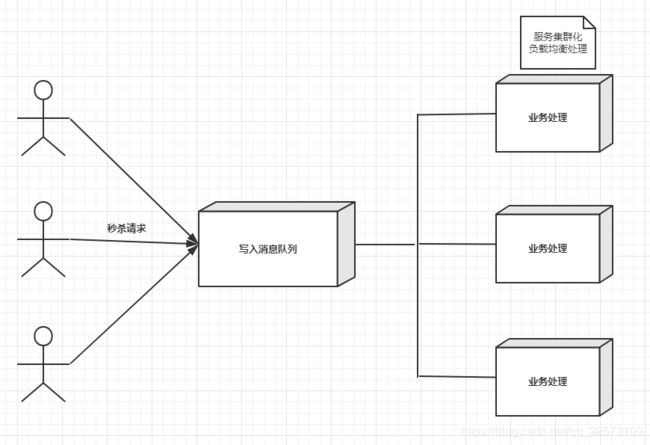
流量削锋也是消息队列中的常用场景,一般在秒杀或抢够活动中使用广泛。
应用场景:秒杀活动,一般会因为流量过大,应用系统配置承载不了这股瞬间流量,导致系统直接挂掉(宕机)。为解决这个问题,我们会将那股巨大的流量拒在系统的上层,即将其转移至 MQ 而不直接涌入我们的接口,此时MQ起到了缓冲作用。
2.4 日志处理
日志处理是指将消息队列用在日志处理中,比如Kafka的应用,解决大量日志传输的问题。
日志采集客户端,负责日志数据采集,定时写受写入Kafka队列。
Kafka消息队列,负责日志数据的接收,存储和转发。
日志处理应用:订阅并消费kafka队列中的日志数据。
(三) ActiveMQ的简要说明
3.1 ActiveMQ的下载与安装
1)直接去官网(http://activemq.apache.org/)下载最新版本即可,由于这是免安装的,只需要解压就行了。安装完之后进入bin目录,双击 activemq.bat文件(linux下在bin目录下执行 activemq start0),笔者的版本是ActiveMQ 5.14.5
2)访问控制台(检验是否成功)
在浏览器输入:http://ip:8161/admin/ 会弹出登陆框,账号和密码都是默认admin。
3)修改端口号
61616为对外服务端口号
8161为控制器端口号
当端口号冲突时,可以修改这两个端口号。cd conf ,修改activemq.xml 修改里面的61616端口。修改jetty.xml,修改里面的8161端口。
3.2 ActiveMQ的两种消息传送模式
1)点对点( Point-to-Point):专门用于使用队列Queue传送消息;基于队列Queue的点对点消息只能被一个消费者消费,如多个消费者都注册到同一个消息队列上,当生产者发送一条消息后,而只有其中一个消费者会接收到该消息,而不是所有消费者都能接收到该消息。
2)发布/订阅(Publish/Subscribe):专门用于使用主题Topic传送消息。基于主题的发布与订阅消息能被多个消费者消费,生产者发送的消息,所有订阅了该topic的消费者都能接收到。
3.3 ActiveMQ的基本组件
- Broker(消息代理):表示消息队列服务器实体,接收客户端连接,提供消息通信的核心服务。
- Producer(消息生产者):业务的发起方,负责生产消息并传递给Broker。
- Consumer(消息消费者):业务的处理方,负责从Broker获取消息并进行业务逻辑处理。
- Queue(队列):在点对点模式下特定生产者向特定队列发送信息,消费者订阅特定队列接收信息并进行业务逻辑处理。
- Topic(主题):在发布/订阅模式下消息的统一汇集地,不同的生产者向Topic发送消息,由Broker分发给不同的订阅者,实现消息的广播。
- Message(消息):根据不同的的通信协议定义的固定格式进行编码的数据包,封装业务数据,实现消息的传输。
3.4 ActiveMQ的连接器
ActiveMQ Broker的主要作用是为客户端提供通信机制,因此ActiveMQ提供了一种连接机制,用连接器(Connector)来描述这种机制。ActiveMQ中的连接器有两种,如下:
- 在客户端与消息代理服务器(Client-to-Broker)之间通信的传输连接器(TransportConnector)。
- 在消息代理服务器(Broker-to-Broker)之间通信的网络连接器(NetWorkConnector)。
3.4.1 传输连接器
为了交换消息,消息生产者和消息消费者(统称为客户端)都要连接到消息代理服务器,这种客户端和消息代理服务器之间的通信就是通过传输连接器完成的。下面是ActiveMQ的配置文件(与传输连接器有关)。
TCP协议:默认协议
在网络传输数据前,必须要序列化数据,消息是通过一个叫wire protocol的来序列化成字节流。默认情况下,ActiveMQ把wire protocol叫做OpenWire,它的目的是促使网络上的效率和数据快速交互。
除了以上基本协议外,ActiveMQ还支持一些高级协议,也可以通过URI的方式进行设置。详情请见官网,以下介绍两种Failover和Fanout。
- Failover是一种重新连接的机制,允许指定任意多个复合的URI,它会自动选择其中的一个URI来尝试建立连接,如果该连接没有成功,则会继续选择其他的URI进行尝试。
配置语法:failover:(tcp://192.168.91.8:61616,tcp://192.168.91.9:61616)?initialReconnectDelay=100
initialReconnectDelay=100,表示表示第一次尝试重连之前等待100ms;默认是随机连接,以保证负载均衡,如果想关闭,可以添加参数randomize=false。 - Fanout是一种重新连接和复制的机制,采用复制的方式把消息复制到多台消息服务器上。
配置语法:fanout:(tcp://192.168.91.18:61616,tcp://192.168.91.28:61616,tcp://192.168.91.38:61616)
笔者解释一下,什么是0.0.0.0? >>>> 本机的所有IP设备
如果我们直接ping 0.0.0.0是不行的,他在IPV4中表示的是无效的目标地址,但是在服务器端它表示本机上的所有IPV4地址,如果一个服务有多个IP地址(192.168.90.42和47.105.181.12),那么我们如果设置的监听地址是0.0.0.0,那么我们无论是通192.168.90.42,还是47.105.181.12都是可以访问该服务的。在路由中,0.0.0.0表示的是默认路由,即当路由表中没有找到完全匹配的路由的时候所对应的路由。
3.4.2 网络连接器
很多情况下,我们要处理的数量会很大,对于这种场景,单台服务器很难支撑,这就需要集群的功能了,为此ActiveMQ提供了网络连接模式。通俗一点,就是通过把多个消息服务器实例连接在一起,作为一个整体对外提供服务,从而提高整体对外的消息服务能力。通过这种方式连接在一起的服务器实例之间可以共享队列和消息列表,从而达到分布式队列的目的,网络连接器就是用来配置服务器之间的通信的。
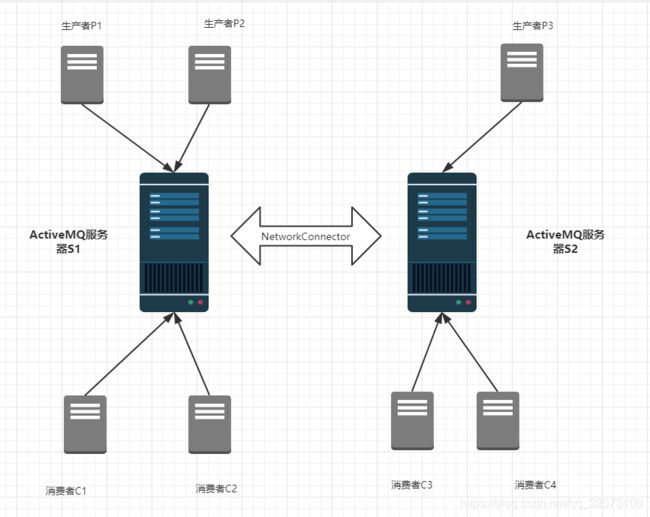
如果想要使用网络连接器的功能,则需要在服务器S1的activemq.xml中的broker节点下添加如下配置(假设192.168.90.42:61616为S2的地址),此时S2算是S1的消费者,S2上的消费者可以通过路由信息找到S1上将要消费的消息。这样就会存在一个问题,S1宕机之后,如果还有消费未消费,S2并不会进行消息消费,因为S2上没有S1上信息的备份。网络连接器的功能只是共享消息队列,这样就导致了消息的不可靠性。
如果是这样,服务器S1可以将消息发送到S2,但这只是单方面的通信。如果想让S1也接收到S2发来的信息,则需要在服务器S2的activemq.xml中的broker节点下也添加如下配置(假设192.168.90.41:61616为S1的地址):
目前,ActiveMQ的最新版本是5.15.9。在5.15版本中常用的网络连接器协议有static和multicast两种。
- static(静态协议):用于为一个网络中的多个代理创建静态配置,这种配置协议支持符合的URI,例如static:(tcp://ip:port,tcp://ip2:port)。
- multicast(多点传送协议):消息服务器会广播自己的服务,也会定位其他代理。这里笔者不太清楚使用方式,感兴趣的小伙伴自行验证。
(四) Spring Boot整合ActiveMQ
4.1 项目结构
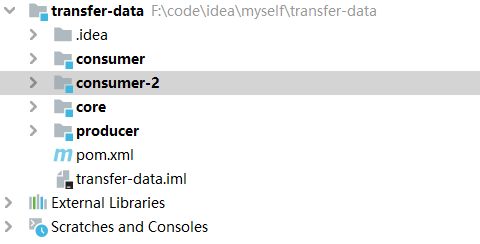
笔者这里是使用idea构建的父子工程,有兴趣的读者可以自己构建一下。
transfer-data是父工程,主要管理jar包的版本号,以及工程的版本号。
core是子工程,主要是负责jar包的引入,设置基础配置类,作为其他三个工程基础依赖。producer是生产者,consumer和consumer-2是两个消费者。
4.2 transfer-data
简单介绍一下jar包版本的管理工具 Spring IO Platform
主要是解决依赖版本冲突问题,例如在使用Spring的时候,经常会使用到第三方库,一般大家都是根据经验挑选一个版本号或挑选最新的,随意性较大,其实这是有问题的,除非做过完整的测试,保证集成该版本的依赖不会出现问题,且后续集成其它第三方库的时候也不会出现问题,否则风险较大,且后续扩展会越来越困难,因为随着业务复杂度的增加,集成的第三方组件会越来会多,依赖之间的关联也会也来越复杂。
Spring IO Platform很好的解决了这些问题。我们在添加第三方依赖的时候,不需要写版本号,它能够自动帮我们挑选一个最优的版本,保证最大限度的扩展,而且该版本的依赖是经过测试的,可以完美的与其它组件结合使用。
    <dependencyManagement>
            <dependencies>
                <!--版本管理工具-->
                <dependency>
                    <groupId>io.spring.platform</groupId>
                    <artifactId>platform-bom</artifactId>
                    <version>Brussels-SR17</version>
                    <type>pom</type>
                    <scope>import</scope>
                </dependency>
                <dependency>
                    <groupId>org.springframework.cloud</groupId>
                    <artifactId>spring-cloud-dependencies</artifactId>
                    <version>Dalston.SR2</version>
                    <type>pom</type>
                    <scope>import</scope>
                </dependency>
            </dependencies>
   </dependencyManagement>
4.3 core
1)下面是基础的jar包配置,由于父工程中已经引入版本控制工具,就没必要写上版本。如果写上版本号,会引入写上的版本号的jar包(继承)。
   <dependencies>
        <dependency>
            <groupId>org.springframework.boot</groupId>
            <artifactId>spring-boot-starter-web</artifactId>
        </dependency>

        <dependency>
            <groupId>org.springframework.boot</groupId>
            <artifactId>spring-boot-starter-activemq</artifactId>
        </dependency>

		<!--该项目Spring Boot版本是1.5.20,如果是Spring Boot 2.0以上,就不是下面这个包了,读者可以自行验证-->
        <dependency>
            <groupId>org.apache.activemq</groupId>
            <artifactId>activemq-pool</artifactId>
        </dependency>

        <dependency>
            <groupId>commons-lang</groupId>
            <artifactId>commons-lang</artifactId>
        </dependency>
        <dependency>
            <groupId>commons-collections</groupId>
            <artifactId>commons-collections</artifactId>
        </dependency>
        <dependency>
            <groupId>commons-beanutils</groupId>
            <artifactId>commons-beanutils</artifactId>
        </dependency>

        <dependency>
            <groupId>org.projectlombok</groupId>
            <artifactId>lombok</artifactId>
        </dependency>

        <dependency>
            <groupId>mysql</groupId>
            <artifactId>mysql-connector-java</artifactId>
        </dependency>
2)
下面是ActiveMQ的配置类,简要说一下过程中遇到的问题
    package cn.bigdata.transfer.core.config;

    import lombok.Getter;
    import lombok.Setter;
    import org.apache.activemq.ActiveMQConnectionFactory;
    import org.apache.activemq.command.ActiveMQQueue;
    import org.apache.activemq.command.ActiveMQTopic;
    import org.apache.activemq.pool.PooledConnectionFactory;
    import org.springframework.boot.context.properties.ConfigurationProperties;
    import org.springframework.context.annotation.Bean;
    import org.springframework.context.annotation.Configuration;
    import org.springframework.context.annotation.PropertySource;
    import org.springframework.jms.config.DefaultJmsListenerContainerFactory;
    import org.springframework.jms.config.JmsListenerContainerFactory;

    import javax.jms.Queue;
    import javax.jms.Topic;

    /**
     * @Author: Heiky
     * @Date: 2019/8/12 10:47
     * @Description: ActiveMQ配置类
     */

    @Getter
    @Setter
    @Configuration
    @PropertySource(value = "classpath:conf.properties")
    @ConfigurationProperties(prefix = "spring.activcemq")
    public class ActiveMQConfig {

        private String brokerUrl;

        private String userName;

        private String password;

        private String queueName;

        private String topicName;

        private Integer maxConnections;

        @Bean
        public Queue queue() {
            return new ActiveMQQueue(queueName);
        }

        @Bean
        public Topic topic() {
            return new ActiveMQTopic(topicName);
        }

    	// @Bean 之前的方法是public,也把bean注册到了Spring容器里面,但是producer启动的时候报错,后面会进行相应的分析
       private ActiveMQConnectionFactory connectionFactory() {
	        ActiveMQConnectionFactory connectionFactory = new ActiveMQConnectionFactory(userName, password, brokerUrl);
	        // 设置消息异步发送,默认为同步发送
	        // 一般情况下,如果消费消息的速度比较快,建议使用同步模式;如果消费消息的速度比较慢,则使用异步的消息传递模式
	        connectionFactory.setUseAsyncSend(true);
	        connectionFactory.setRedeliveryPolicy(redeliveryPolicy());
	        return connectionFactory;
    	}

    	// 消息重发策略
    	public RedeliveryPolicy redeliveryPolicy() {
	        RedeliveryPolicy redeliveryPolicy = new RedeliveryPolicy();
	        //是否在每次尝试重新发送失败后,增长这个等待时间
	        redeliveryPolicy.setUseExponentialBackOff(true);
	        //重发次数,默认为6次   这里设置为3次
	        redeliveryPolicy.setMaximumRedeliveries(3);
	        //重发时间间隔,默认为1秒
	        redeliveryPolicy.setInitialRedeliveryDelay(1);
	        //第一次失败后重新发送之前等待500毫秒,第二次失败再等待500 * 2毫秒,这里的2就是value
	        redeliveryPolicy.setBackOffMultiplier(2);
	        //是否避免消息碰撞
	        redeliveryPolicy.setUseCollisionAvoidance(false);
	        //设置重发最大拖延时间-1 表示没有拖延只有UseExponentialBackOff(true)为true时生效
	        redeliveryPolicy.setMaximumRedeliveryDelay(-1);
	        return redeliveryPolicy;
    	}

        @Bean
        public JmsListenerContainerFactory<?> jmsListenerContainerQueueFactory() {
            // 默认点对点模式
            DefaultJmsListenerContainerFactory bean = new DefaultJmsListenerContainerFactory();
            bean.setConnectionFactory(connectionFactory());
            return bean;
        }

        @Bean
        public JmsListenerContainerFactory<?> jmsListenerContainerTopicFactory() {
            DefaultJmsListenerContainerFactory bean = new DefaultJmsListenerContainerFactory();
            bean.setConnectionFactory(connectionFactory());
            // 开启发布订阅模式
            bean.setPubSubDomain(true);
            return bean;
        }
    }
下面是配置文件的信息
spring.activcemq.userName=Lebron
spring.activcemq.password=James
spring.activcemq.broker-url=tcp://localhost:61616
spring.activcemq.maxConnections=50
spring.activcemq.queueName=ght
spring.activcemq.topicName=Lakers
由于代码比较简单,创建了一个可复用资源的pooledConnectionFactory的bean,jmsListenerContainerQueueFactory是监听queeu的bean,jmsListenerContainerTopicFactory是监听topic的bean。
4.4 producer
由于producer里面引入了core,这里就只写了一个controller,用于将消息添加到队列或者发布任务。
package cn.bigdata.transfer.producer.controller;

import org.springframework.beans.factory.annotation.Autowired;
import org.springframework.jms.annotation.JmsListener;
import org.springframework.jms.core.JmsMessagingTemplate;
import org.springframework.web.bind.annotation.GetMapping;
import org.springframework.web.bind.annotation.RequestMapping;
import org.springframework.web.bind.annotation.RestController;

import javax.jms.Queue;
import javax.jms.Topic;

/**
 * @Author: Heiky
 * @Date: 2019/8/12 13:32
 * @Description: 存入消息队列
 */

@RestController
@RequestMapping("/publish")
public class PublishController {

    @Autowired
    private JmsMessagingTemplate jmsMessagingTemplate;

    @Autowired
    private Queue queue;

    @Autowired
    private Topic topic;

    @GetMapping("/queue")
    public String queue() {

        jmsMessagingTemplate.convertAndSend(queue, "湖人总冠军");
        return "Queue Send Successfully";
    }

    @JmsListener(destination = "sbb")
    public void consumerMsg(String msg) {
        System.out.println(msg);
    }

    @RequestMapping("/topic")
    public String topic(){

        for (int i = 0; i < 10 ; i++){
            jmsMessagingTemplate.convertAndSend(topic, "湖人总冠军");
        }

        return "topic 发送成功";
    }
}
此时读者可能有疑问,什么可以引入JmsMessagingTemplate这个bean,在配置类里面并没有引入这个bean。
这是因为Spring Boot默认配置了这个类,只需要引入即可,走一下源码,了解一下。
package org.springframework.boot.autoconfigure.jms.activemq;

// 省去导入的包

@Configuration
@AutoConfigureBefore({JmsAutoConfiguration.class})
@AutoConfigureAfter({JndiConnectionFactoryAutoConfiguration.class})
@ConditionalOnClass({ConnectionFactory.class, ActiveMQConnectionFactory.class})
@ConditionalOnMissingBean({ConnectionFactory.class})
@EnableConfigurationProperties({ActiveMQProperties.class})
@Import({ActiveMQXAConnectionFactoryConfiguration.class, ActiveMQConnectionFactoryConfiguration.class})
public class ActiveMQAutoConfiguration {
    public ActiveMQAutoConfiguration() {
    }
}
这里主要解释四个注解
@AutoConfigureBefore({JmsAutoConfiguration.class}) 在加载JmsAutoConfiguration之前加载ActiveMQAutoConfiguration
@ConditionalOnClass({ConnectionFactory.class, ActiveMQConnectionFactory.class}) 只有classpath上有ConnectionFactory和ActiveMQConnectionFactory时才会加载ActiveMQAutoConfiguration
@ConditionalOnMissingBean({ConnectionFactory.class}) 当ConnectionFactory这个bean在容器里面不存在的时候,加载ActiveMQAutoConfiguration
@Import({ActiveMQXAConnectionFactoryConfiguration.class, ActiveMQConnectionFactoryConfiguration.class}) 在运行的时候引入这两个类 其中ActiveMQXAConnectionFactory是和分布式事务相关的
由于PooledConnectionFactory是ConnectionFactory的实现类,在core中已经配置了该bean,所以这个bean不会加载了。
分析一下ActiveMQConnectionFactoryConfiguration
package org.springframework.boot.autoconfigure.jms.activemq;

// 省去导入的包

@Configuration
@ConditionalOnMissingBean({ConnectionFactory.class})
class ActiveMQConnectionFactoryConfiguration {
    ActiveMQConnectionFactoryConfiguration() {
    }

	// yaml或者properties存在spring.activemq.pool.enabled=false,创建jmsConnectionFactory(bean,方法名就是bean的名称)。当该条件不存在的时候,也生效。
    @Bean
    @ConditionalOnProperty(
        prefix = "spring.activemq.pool",
        name = {"enabled"},
        havingValue = "false",
        matchIfMissing = true
    )
    public ActiveMQConnectionFactory jmsConnectionFactory(ActiveMQProperties properties, ObjectProvider<List<ActiveMQConnectionFactoryCustomizer>> factoryCustomizers) {
        return (new ActiveMQConnectionFactoryFactory(properties, (List)factoryCustomizers.getIfAvailable())).createConnectionFactory(ActiveMQConnectionFactory.class);
    }

	// 内部静态类
	// classpath下存在PooledConnectionFactory类时,配置生效
    @Configuration
    @ConditionalOnClass({PooledConnectionFactory.class})
    static class PooledConnectionFactoryConfiguration {
        PooledConnectionFactoryConfiguration() {
        }

        @Bean(
            destroyMethod = "stop"
        )

		//  yaml或者properties存在spring.activemq.pool.enabled=true,创建pooledJmsConnectionFactory(bean,方法名就是bean的名称)。当该条件不存在的时候,不生效。
        @ConditionalOnProperty(
            prefix = "spring.activemq.pool",
            name = {"enabled"},
            havingValue = "true",
            matchIfMissing = false
        )
        @ConfigurationProperties(
            prefix = "spring.activemq.pool.configuration"
        )
        public PooledConnectionFactory pooledJmsConnectionFactory(ActiveMQProperties properties, ObjectProvider<List<ActiveMQConnectionFactoryCustomizer>> factoryCustomizers) {
            PooledConnectionFactory pooledConnectionFactory = new PooledConnectionFactory((new ActiveMQConnectionFactoryFactory(properties, (List)factoryCustomizers.getIfAvailable())).createConnectionFactory(ActiveMQConnectionFactory.class));
            Pool pool = properties.getPool();
            pooledConnectionFactory.setBlockIfSessionPoolIsFull(pool.isBlockIfFull());
            pooledConnectionFactory.setBlockIfSessionPoolIsFullTimeout(pool.getBlockIfFullTimeout());
            pooledConnectionFactory.setCreateConnectionOnStartup(pool.isCreateConnectionOnStartup());
            pooledConnectionFactory.setExpiryTimeout(pool.getExpiryTimeout());
            pooledConnectionFactory.setIdleTimeout(pool.getIdleTimeout());
            pooledConnectionFactory.setMaxConnections(pool.getMaxConnections());
            pooledConnectionFactory.setMaximumActiveSessionPerConnection(pool.getMaximumActiveSessionPerConnection());
            pooledConnectionFactory.setReconnectOnException(pool.isReconnectOnException());
            pooledConnectionFactory.setTimeBetweenExpirationCheckMillis(pool.getTimeBetweenExpirationCheck());
            pooledConnectionFactory.setUseAnonymousProducers(pool.isUseAnonymousProducers());
            return pooledConnectionFactory;
        }
    }
}
到ConnectionFactory这个bean在容器里面不存在的时候,才会加载ActiveMQConnectionFactoryConfiguration
解释一下这个ConditionalOnProperty ,源码如下
@Retention(RetentionPolicy.RUNTIME)
@Target({ ElementType.TYPE, ElementType.METHOD })
@Documented
@Conditional(OnPropertyCondition.class)
public @interface ConditionalOnProperty {

    String[] value() default {}; //数组,获取对应property名称的值,与name不可同时使用

    String prefix() default "";//property名称的前缀,可有可无

    String[] name() default {};//数组,property完整名称或部分名称(可与prefix组合使用,组成完整的property名称),与value不可同时使用

    String havingValue() default "";//可与name组合使用,比较获取到的属性值与havingValue给定的值是否相同,相同才加载配置

    boolean matchIfMissing() default false;//缺少该property时是否可以加载。如果为true,没有该property也会正常加载;反之报错

    boolean relaxedNames() default true;//是否可以松散匹配,至今不知道怎么使用的
}
}
最后看看JmsAutoConfiguration这个配置类,就明白为什么可以直接注入JmsMessagingTemplate这个bean了。
package org.springframework.boot.autoconfigure.jms;

// 省去导入的包

@Configuration
@ConditionalOnClass({Message.class, JmsTemplate.class})
@ConditionalOnBean({ConnectionFactory.class})
@EnableConfigurationProperties({JmsProperties.class})
@Import({JmsAnnotationDrivenConfiguration.class})
public class JmsAutoConfiguration {
    public JmsAutoConfiguration() {
    }

    @Configuration
    @ConditionalOnClass({JmsMessagingTemplate.class})
    @Import({JmsAutoConfiguration.JmsTemplateConfiguration.class})
    protected static class MessagingTemplateConfiguration {
        protected MessagingTemplateConfiguration() {
        }

        @Bean
        @ConditionalOnMissingBean
        @ConditionalOnSingleCandidate(JmsTemplate.class)  // 容器中该类型Bean只有一个或@Primary的只有一个时生效
        public JmsMessagingTemplate jmsMessagingTemplate(JmsTemplate jmsTemplate) {
            return new JmsMessagingTemplate(jmsTemplate);
        }
    }

    @Configuration
    protected static class JmsTemplateConfiguration {
        private final JmsProperties properties;
        private final ObjectProvider<DestinationResolver> destinationResolver;
        private final ObjectProvider<MessageConverter> messageConverter;

        public JmsTemplateConfiguration(JmsProperties properties, ObjectProvider<DestinationResolver> destinationResolver, ObjectProvider<MessageConverter> messageConverter) {
            this.properties = properties;
            this.destinationResolver = destinationResolver;
            this.messageConverter = messageConverter;
        }

        @Bean
        @ConditionalOnMissingBean
        @ConditionalOnSingleCandidate(ConnectionFactory.class)  // 容器里面只有一个ConnectionFactory,jmsTemplate才会被实例化
        public JmsTemplate jmsTemplate(ConnectionFactory connectionFactory) {
            JmsTemplate jmsTemplate = new JmsTemplate(connectionFactory);
           	// PTP模式或者pub/sub模式,默认PTP
            jmsTemplate.setPubSubDomain(this.properties.isPubSubDomain());
            DestinationResolver destinationResolver = (DestinationResolver)this.destinationResolver.getIfUnique();
            if (destinationResolver != null) {
                jmsTemplate.setDestinationResolver(destinationResolver);
            }

            MessageConverter messageConverter = (MessageConverter)this.messageConverter.getIfUnique();
            if (messageConverter != null) {
                jmsTemplate.setMessageConverter(messageConverter);
            }

            Template template = this.properties.getTemplate();
            if (template.getDefaultDestination() != null) {
                jmsTemplate.setDefaultDestinationName(template.getDefaultDestination());
            }

            if (template.getDeliveryDelay() != null) {
                jmsTemplate.setDeliveryDelay(template.getDeliveryDelay());
            }

            jmsTemplate.setExplicitQosEnabled(template.determineQosEnabled());
            if (template.getDeliveryMode() != null) {
                jmsTemplate.setDeliveryMode(template.getDeliveryMode().getValue());
            }

            if (template.getPriority() != null) {
                jmsTemplate.setPriority(template.getPriority());
            }

            if (template.getTimeToLive() != null) {
                jmsTemplate.setTimeToLive(template.getTimeToLive());
            }

            if (template.getReceiveTimeout() != null) {
                jmsTemplate.setReceiveTimeout(template.getReceiveTimeout());
            }

            return jmsTemplate;
        }
    }
}
从上面代码也可以看出,JmsMessagingTemplate是对JmsTemplate的封装,简化了使用。
在3.3.2模块里面,提出了一个问题,现在解答一下
	 @Bean
	 public ActiveMQConnectionFactory connectionFactory() {
         return new ActiveMQConnectionFactory(userName, password, brokerUrl);
	 }

	@Bean(destroyMethod = "stop")
	 public PooledConnectionFactory pooledConnectionFactory() {
	     PooledConnectionFactory pooledConnectionFactory = new PooledConnectionFactory(connectionFactory());
	     pooledConnectionFactory.setMaxConnections(maxConnections);
	     return pooledConnectionFactory;
	 }
如果两个定义为@Bean,容器就会有两个ConnectionFactory的实现类,导致jmsTemplate不能实例化。
4.5 consumer
由于consumer里面引入了core,这里就只进行消息的消费。
package cn.bigdata.transfer.consumer.listener;

import org.springframework.jms.annotation.JmsListener;
import org.springframework.messaging.handler.annotation.SendTo;
import org.springframework.stereotype.Component;

/**
 * @Author: Heiky
 * @Date: 2019/8/12 15:49
 * @Description: 消息消费,监听模式
 */

@Component
public class MyMessageListener {

    // JmsListener缺点,destination需要写死,不能动态识别
    @JmsListener(destination = "ght", containerFactory = "jmsListenerContainerQueueFactory")
    @SendTo("sbb") // 发送给queueName为sbb的队列
    public String queue(String msg) {
        System.out.println("MessageListener: 收到一条消息:" + msg);
        return "收到一条消息:" + msg;
    }

	// sub/pub模式
    @JmsListener(destination = "Lakers", containerFactory = "jmsListenerContainerTopicFactory")
    public void topic(String msg) {
        System.out.println(msg);
    }

}
(五) ActiveMQ控制台展示
5.1 Queue
5.1.1 消息正常消费

消费正常的状态,Messages Enqueued = Messages Dequeued
5.1.2 消息未消费

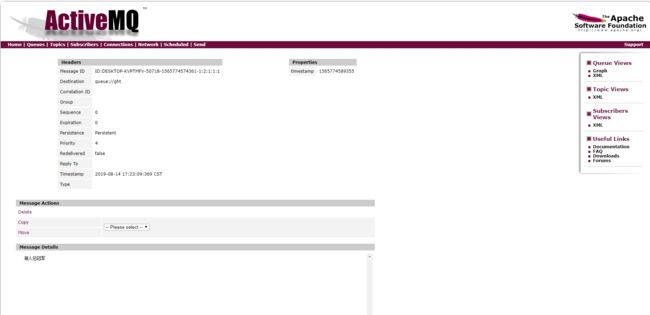
点击含有未消费的队列名称,也就是上图中的ght,详情如下图,如果有很多消息未消费,就会有多条消息。正常消费的队列,下图会为空。

点击Message ID,下面会有Message Details。
5.2 Topic
5.2.1 消息正常消费
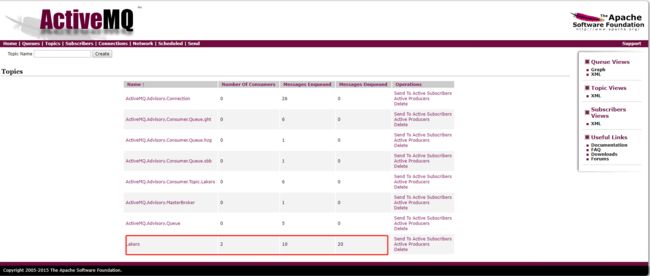
两个消费者订阅了Lakers,Messages Enqueued = 10,Messages Dequeued = 20。
5.2.2 消息未正常消费
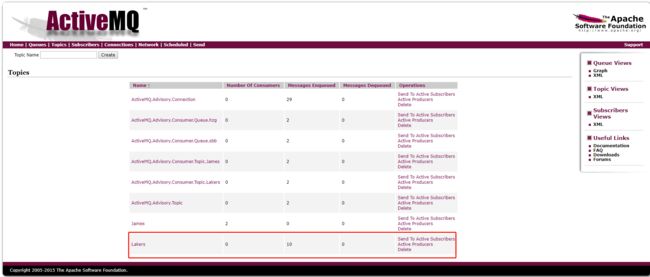
Messages Enqueued = 10,Messages Dequeued = 0,未正常消费。
(六) 彩蛋
1)目前存在一个问题,没有在代码里面,获取未消费的消息在队列里面的数量。
2)相信细心的读者,已经发现了,笔者是詹姆斯的球迷,喊出响亮的口号:湖人总冠军。喜欢的读者点赞哦。
