React Native学习心得
- 目前通过《React Native移动开发实战-向洪治版》进行基础学习
- 结合网址进行学习:https://reactnative.cn/
- 讨论社区:https://www.facebook.com/groups/react.native.community
- React Native - 调试技巧及调试菜单说明(模拟器调试、真机调试):http://www.hangge.com/blog/cache/detail_1480.html
- 样式:https://reactnative.cn/docs/layout-props/
- 图标库地址:https://oblador.github.io/react-native-vector-icons/
一、配置环境
- mac安装环境
可以根据书12页进行参考,也可以根据网站https://reactnative.cn/docs/getting-started.html,主要还是参考网站配置环境
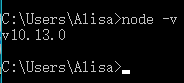
1.安装完node之后检查电脑是否安装node
通过cd,返回到最根目录,然后如下操作
node -vmac电脑

2.安装npm
npm install -g react-native-cli安装完node之后设置下npm镜像
npm config set registry https://registry.npm.taobao.org --global
npm config set disturl https://npm.taobao.org/dist --global
3.安装yarn
brew install yarn4.mac电脑安装xcode
按照网站指示下载安装xcode
启动xcode之后,按照下图点击
mac安装完成
- windows安装环境
可以根据书12页进行参考,也可以根据网站https://reactnative.cn/docs/getting-started.html,主要还是参考网站配置环境
windows下可以参考https://blog.csdn.net/zeping891103/article/details/85769957
1.安装完node之后检查电脑是否安装node
通过cd,返回到最根目录,然后如下操作
node -vwindows电脑
2.安装npm
npm install -g yarnnpm install -g yarn react-native-cli安装完node之后设置下npm镜像
npm config set registry https://registry.npm.taobao.org --global
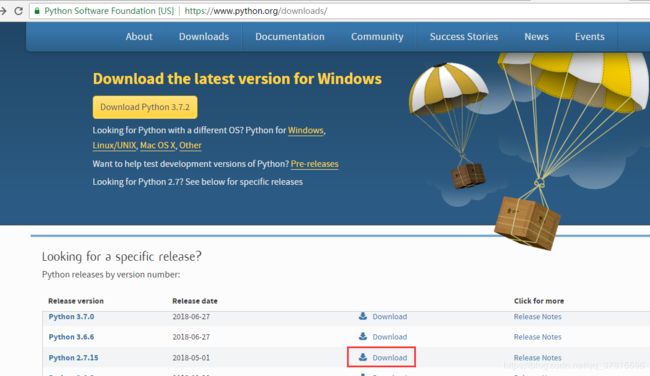
npm config set disturl https://npm.taobao.org/dist --global3.安装Python2
下载网址:https://www.python.org/downloads/
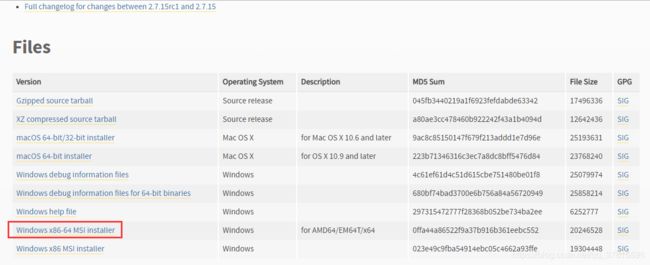
选择合适的版本点击下载
点击下载后跳到如下新页面,再次点击适合自己的电脑版本,即可下载成功,按照指示安装即可
4.检查安装的java版本( JDK 的版本必须是 1.8(目前不支持 1.9 及更高版本)
java -version
- mac创建新项目
1.创建时遇见如下问题:

报上面那个错误,说明在安装过程中,某个命令行工具没有安装成功,依次检查一下
最后发现是react-native-cli没有安装成功
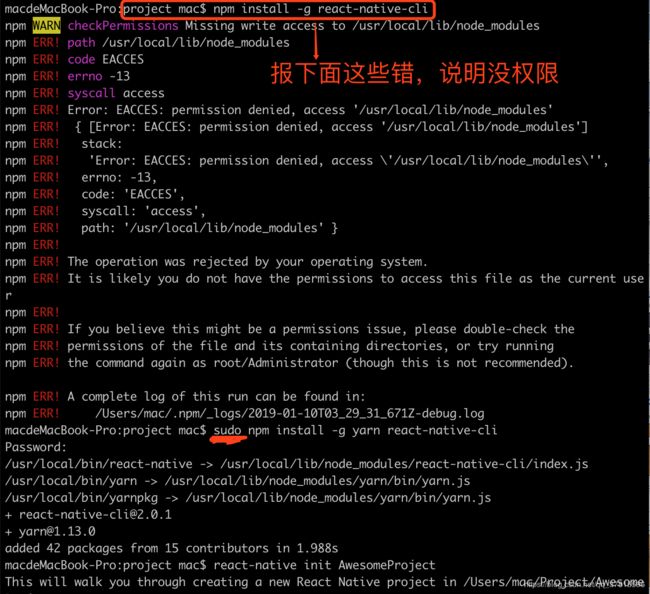
2.创建新项目

一直没有创建成功,说明环境没有配置好,由于mac电脑在安装完xcode之后,ios环境也随之安装好了。目前需要安装andriod环境

配置 ANDROID_HOME 环境变量时,在终端下使用vi ~/.bash_profile命令创建或编辑
创建成功后将
export ANDROID_HOME=$HOME/Library/Android/sdk
export PATH=$PATH:$ANDROID_HOME/tools
export PATH=$PATH:$ANDROID_HOME/tools/bin
export PATH=$PATH:$ANDROID_HOME/platform-tools
export PATH=$PATH:$ANDROID_HOME/emulator复制进去,然后输入:wq,将.bash_profile文件进行的编辑操作进行保存后退出。如果路径不同,则将刚刚复制的第一行代码修改一下路径即可
在官网中将目标平台修改为andriod,按照提示进行操作
- 在ios上运行
react-native init AwesomeProjectcd AwesomeProject
react-native run-ios运行后,出现报错:
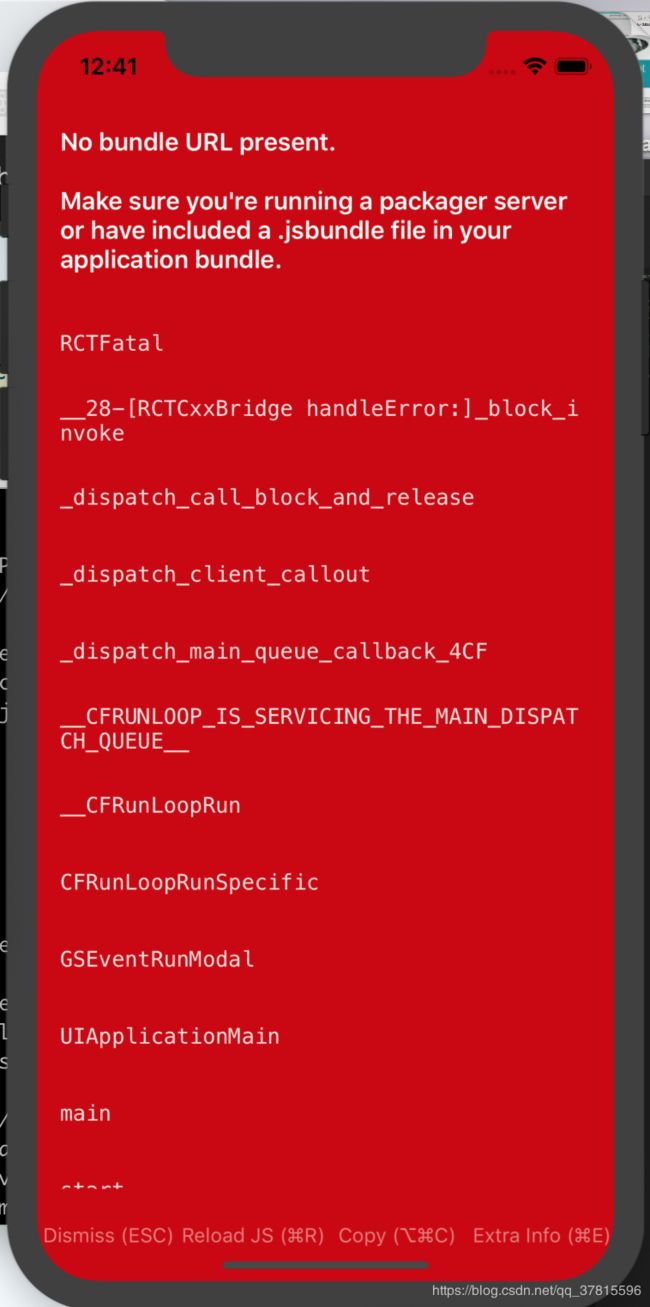
解决办法:https://www.crifan.com/react_native_ios_run_again_error_no_bundle_url_present/
暂时取消全局网络代理,改为自动模式即可。或者将自动模式关闭一下,退出当前模拟器,退出终端,运行成功后,再打开自动模式即可解决
成功运行后,界面上跳出一个手机的模型,页面显示内容
页面停留一会后,自动跳转到页面
终于把ios开发配置好了,开森一下下
- 在andriod上运行
1.创建一个虚拟设备
首先打开安装的 Android Studio,用它打开我们上面创建的AwesomeProject下面的-"android"目录(下面会出现报错,需要"Android SDK Build-Tools"选项,mac电脑确保选中了 React Native 所必须的28.0.3版本)
(下面会出现报错,需要"Android SDK Build-Tools"选项,windows确保选中了 React Native 所必须的27.0.3版本)

点击上面的按钮后,弹出新的窗口
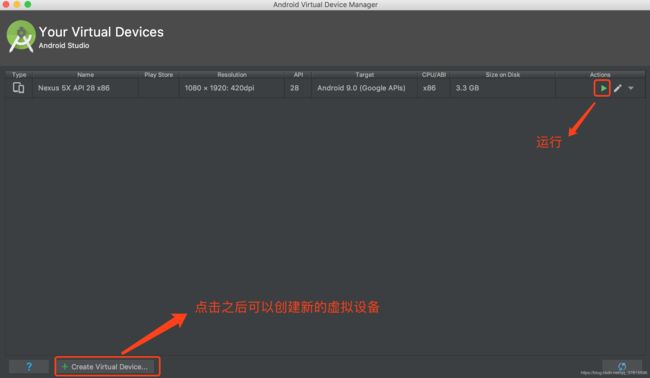
创建需要的手机型号,然后
cd AwesomeProject
react-native run-android
出现如下问题,下面提示是java version安装版本的问题
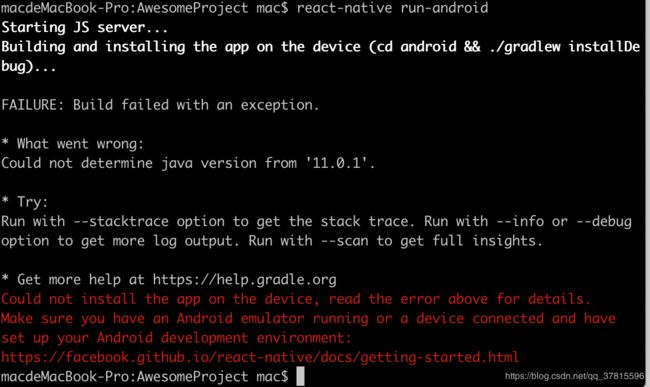
React Native 需要 Java Development Kit [JDK] 1.8(暂不支持 1.9 及更高版本)
ls /Library/Java/JavaVirtualMachines/即可查看你电脑中装了哪些jdk版本。卸载不合适的jdk版本
sudo rm -rf /Library/Java/JavaVirtualMachines/你需要卸载的版本号.jdk
运行后首先跳出界面

几秒之后自动跳转
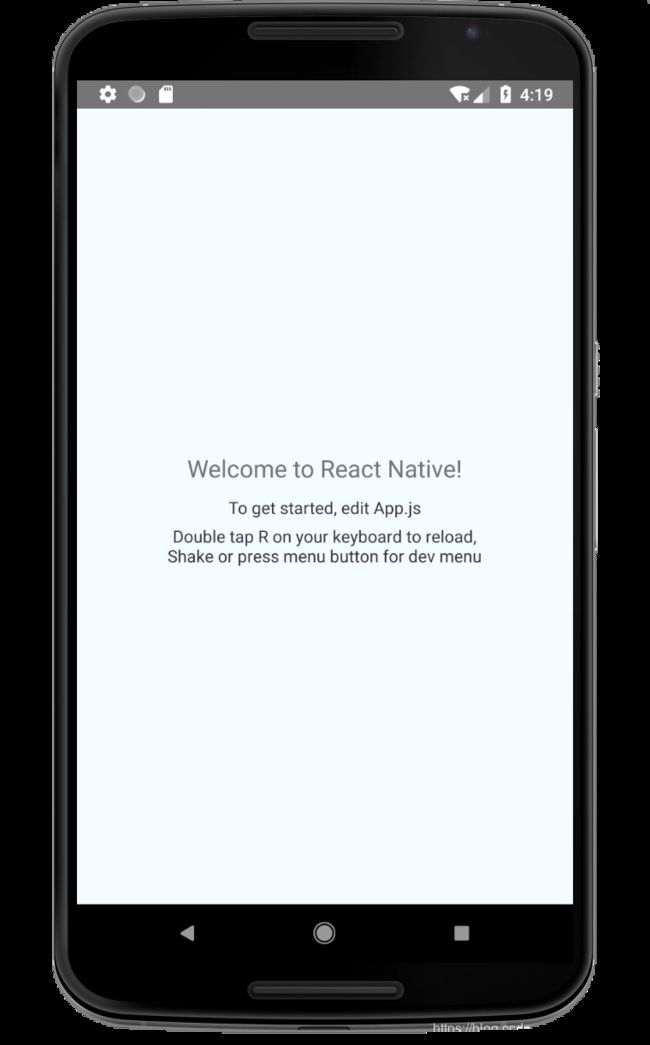
到此,andriod的环境配置成功。小小开心一下下。
- windows上配置andriod环境遇到的问题
问题1:
解决方案,看链接https://stackoverflow.com/questions/47739777/android-studio-avd-emulator-process-finished-with-exit-code-1/47739865
打开sdk management ,然后Unistal and install the Android Emulator
问题2:
运行之后,不报错,但是页面没有跳转出来:
更新了一下Android Studio这个软件就解决了
二、应用
- 小demo
执行react-native init nativeProject创建react-native项目
然后将整个项目拖入到vscode(根据个人喜好决定,本人比较习惯vscode)找到App.js,并进行简单的修改
import React, { Component } from 'react';
import { Text, View, Image } from 'react-native';
const styles = {
  text:{
    color:'blue',
    fontWeight:'bold',
    fontSize:30
  },
  view:{
    alignItems:'center',
    border:'1px solid red',
    marginTop:50
  }
}
class Greeting extends Component {
  constructor(props){
    super(props);
    this.state={isShowingText:true};
    setInterval(() => {
      this.setState(()=>{
        return {isShowingText:!this.state.isShowingText}
      })
    }, 1000);
  }
  render() {
    if(!this.state.isShowingText){
      return null;
    }
    return (

        Hello {this.props.name}!

    );
  }
}
class App extends Component {
  render() {
    let pic = {
      uri: 'https://upload.wikimedia.org/wikipedia/commons/d/de/Bananavarieties.jpg'
    };
    return (


    );
  }
}
export default App
修改之后,在vscode中保存,然后react-native run-ios或者react-native run-android,在ios或者andriod中运行项目。
react-native run-ios
react-native run-android
进行其他修改操作后,点击手机模拟器,分别进行页面刷新,不同手机刷新方法如下:
ios: 'Press Cmd+R to reload,\n' + 'Cmd+D or shake for dev menu',
android:
'Double tap R on your keyboard to reload,\n' +
'Shake or press menu button for dev menu',
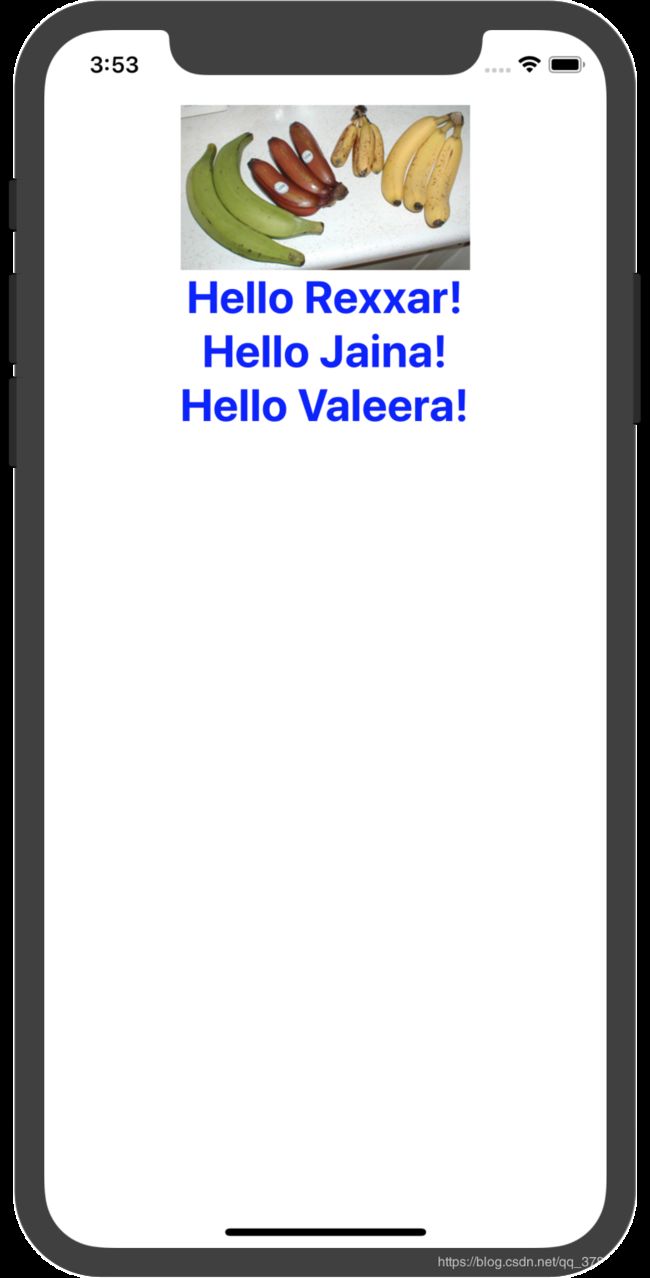 如左图所示,小demo已经完成。
- demo2:使用Flexbox布局,处理文本输入,处理触摸事件

import React, { Component } from 'react';
import { Platform, Button, Text, View, TextInput, TouchableHighlight, TouchableOpacity, TouchableNativeFeedback, TouchableWithoutFeedback } from 'react-native';
const styles = {
container: {
flex: 2,
justifyContent: 'center',
padding: 60,
alignItems: 'center'
},
button: {
marginBottom: 30,
width: 260,
alignItems: 'center',
backgroundColor: '#2196F3'
},
buttonText: {
padding: 20,
color: 'white'
}
}
class App extends Component {
constructor(props) {
super(props);
this.state = { text: '' }
}
_onPressButton() {
alert('You tapped the button!')
}
_onLongPressButton() {
alert('You long-pressed the button!')
}
render() {
return (
this.setState({ text })} />
{this.state.text.split(' ').map((word) => word && '?').join(' ')}
TouchableHighlight
TouchableOpacity
{Platform.OS === "android" ?
TouchableNativeFeedback
: 当前是iOS系统
TouchableWithoutFeedback
Touchable with Long Press
);
}
}
export default App- demo3:使用滚动视图
利用
import React, { Component } from 'react';
import { ScrollView, Image, Text } from 'react-native';
class App extends Component {
  render() {
    return (

        Scroll me plz


    );
  }
}
export default App- demo4:使用长列表
FlatList更适于长列表数据,且元素个数可以增删。必须的两个属性是data和renderItem。data是列表的数据源,而renderItem则从数据源中逐个解析数据,然后返回一个设定好格式的组件来渲染。
import React, { Component } from 'react';
import { FlatList, View, Text } from 'react-native';
const styles = {
container: {
flex: 1,
paddintTop: 22
},
item: {
padding: 10,
fontSize: 18,
height: 44,
},
}
class App extends Component {
render() {
return (
{item.key} }
/>
);
}
}
export default App如果要渲染的是一组需要分组的数据,也许还带有分组标签的,那么SectionList将是个不错的选择
import React, { Component } from 'react';
import { SectionList, View, Text } from 'react-native';
const styles = {
container: {
flex: 1,
paddintTop: 22
},
sectionHeader: {
paddingTop: 120,
paddingLeft: 10,
paddingRight: 10,
paddingBottom: 2,
fontSize: 14,
fontWeight: 'bold',
backgroundColor: 'rgba(247,247,247,1.0)'
},
item: {
padding: 10,
fontSize: 18,
height: 44,
},
}
class App extends Component {
render() {
return (
{item} }
renderSectionHeader={({ section }) => {section.title} }
keyExtractor={(item, index) => index}
/>
);
}
}
export default App- demo5示例教程:电影列表

import React, { Component } from 'react';
import { Image, View, Text, FlatList } from 'react-native';
const styles = {
  container: {
    flex: 1,
    flexDirection:'row',
    justifyContent: 'center',
    alignItems: 'center',
    backgroundColor: '#F5FCFF'
  },
  thumbnail: {
    width: 53,
    height: 81
  },
  rightContainer: {
    flex:1,
  },
  title:{
    fontSize:20,
    marginBottom:8,
    textAlign:'center'
  },
  year:{
    textAlign:'center'
  },
  list:{
    paddingTop:20,
    backgroundColor:'#F5FCFF'
  }
}
const MOVIES_DATA = [
  {
    title: '标题1',
    year: '2015',
    posters: { thumbnail: 'http://i.imgur.com/UePbdph.jpg' }
  },
  {
    title: '标题2',
    year: '2015',
    posters: { thumbnail: 'http://i.imgur.com/UePbdph.jpg' }
  },
  {
    title: '标题3',
    year: '2015',
    posters: { thumbnail: 'http://i.imgur.com/UePbdph.jpg' }
  },
  {
    title: '标题4',
    year: '2015',
    posters: { thumbnail: 'http://i.imgur.com/UePbdph.jpg' }
  }
]
class App extends Component {
  render() {
    return (
      item.id}
      keyExtractor={(item, index) => index.toString()}
       />
    );
  }
  renderMovie({item}){
    return(


          {item.title}
          {item.year}


    )
  }
}
export default App - React Native调试:
首先通过链接http://www.hangge.com/blog/cache/detail_1480.html学习到各个调试技巧,本人最喜欢的调试方法是(mac电脑):
1.先在手机模拟器端command + D,弹出调试菜单
2.调试菜单中,选择Debug JS Remotely
3.选择后,React Native 会启动 Chrome 浏览器,并且打开一个 http://localhost:8081/debugger-ui 的新标签。
4.command+option+i,打开Chrome的开发者工具进行调试
- demo6判断当前是ios还是andriod
ios 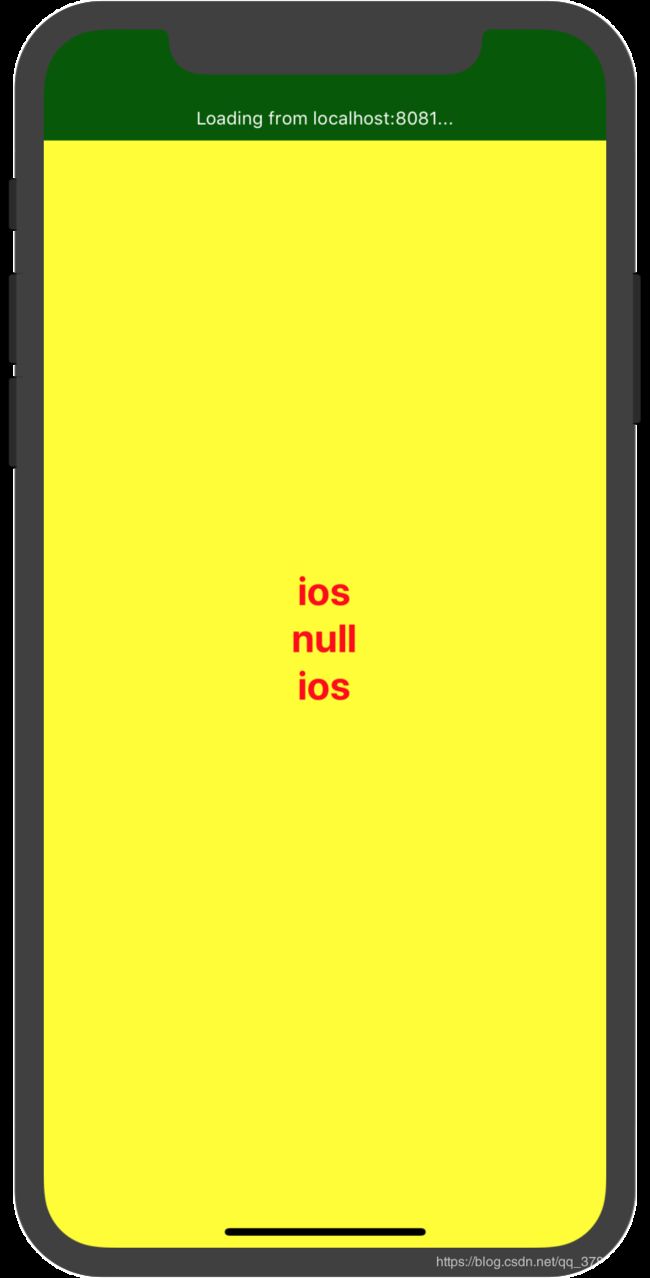 andriod
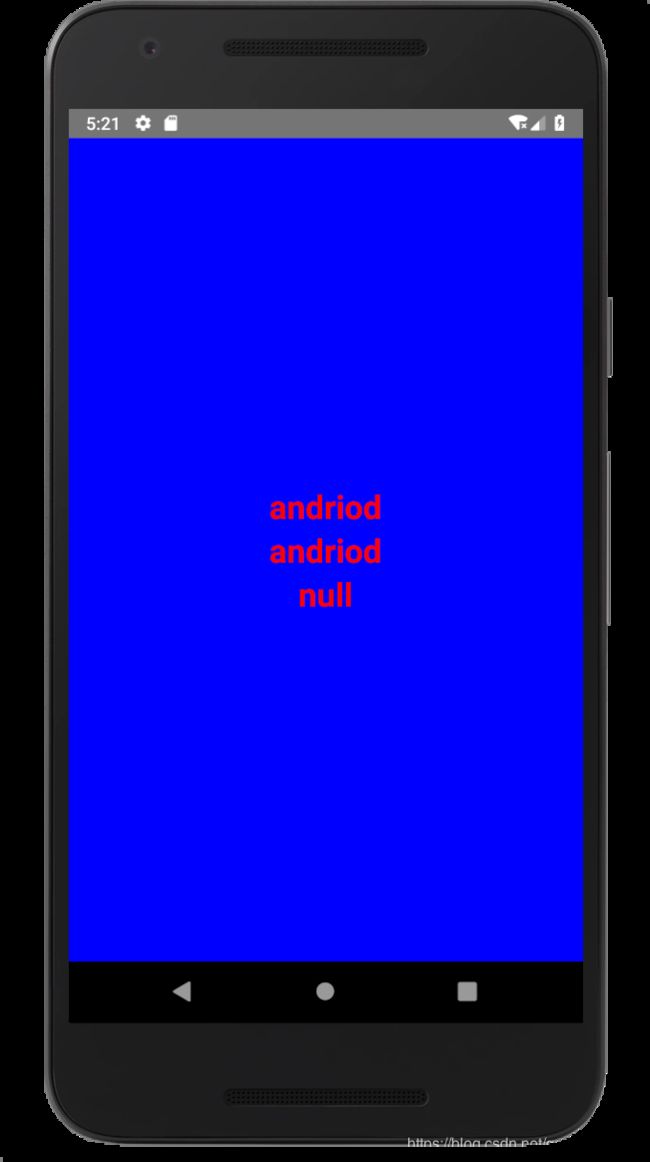
import React, { Component } from 'react';
import { Platform, View, Text } from 'react-native';
const styles={
  container:{
    flex:1,
    justifyContent:'center',
    alignItems:'center',
    ...Platform.select({
      ios:{
        backgroundColor:'yellow'
      },
      android: {
        backgroundColor: "blue"
      }
    })
  },
  textstyle:{
    color:'red',
    fontSize:26,
    fontWeight:'bold'
  },
}
class App extends Component {
  render() {
    const iosVersion = parseInt(Platform.Version,10);
    console.log('iosVersion',typeof iosVersion)
    console.log('iosVersion',iosVersion)
    return (

          {Platform.OS==='ios'?'ios':'android'}
          {Platform.Version>=25?'android':'null'}
          {iosVersion<25?'ios':'null'}

    );
  }
}
export default App
综上所述:通过Platform.OS来判断当前平台是最简单的
- demo7图片
- demo8
import React, { Component } from 'react';
import { View, Text, Animated, Image } from 'react-native';
class Home extends Component {
  static navigationOptions = {
    // 设置 title
    title: "首页"
  };
  state = {
    fadeAnim: new Animated.Value(0),  // 透明度初始值设为0
  }
  componentDidMount() {
    Animated.timing(                  // 随时间变化而执行动画
      this.state.fadeAnim,            // 动画中的变量值
      {
        toValue: 1,                   // 透明度最终变为1,即完全不透明
        duration: 10000,              // 让动画持续一段时间
      }
    ).start();                        // 开始执行动画
  }
  render() {
    let { fadeAnim } = this.state;
    return (

        {this.props.children}

    );
  }
}
// 然后你就可以在组件中像使用`View`那样去使用`FadeInView`了
class App extends React.Component {
  render() {
    return (


          Fading in


    )
  }
}
export default Home
- demo9动画
App.js
import React, { Component } from 'react';
import { View, Text, Animated } from 'react-native';
class FadeInView extends Component {
  state={
    fadeAnim:new Animated.Value(0),//透明度初始值设为0
  }
  componentDidMount(){
    Animated.timing(
      this.state.fadeAnim,
      {
        toValue:1,
        duration:10000,
      }
    ).start();
  }
  render() {
    return (
      {this.props.children}
    );
  }
}
class Home extends Component {
  render() {
    return (


        Fadding in


    );
  }
}
export default Home
- demo10 Picker, Switch, TextInput, Modal使用
import React, { Component } from 'react';
import { View, Text, Picker, Switch, TextInput, Modal, TouchableHighlight } from 'react-native';
class Home extends Component {
  constructor(props) {
    super(props);
    this.state = {
      language: this.props.defaultVal,
      swicthValue1: true,
      swicthValue2: false,
      text: 'TextInput组件',
      modalVisible: false
    }
  }
  _switch1 = () => {
    return (
       {
          //当开关状态改变了,一定要修改value的值,不然最终无法改变状态
          console.log('onValueChange1 =' + value);
          this.setState({
            swicthValue1: value
          })
        }}
        testID={'one'}
        thumbColor={'#ff1111'} />
    )
  };
  _switch2 = () => {
    return (
       {
          //当开关状态改变了,一定要修改value的值,不然最终无法改变状态
          console.log('onValueChange2 =' + value);
          this.setState({
            swicthValue2: value
          })
        }}
        testID={'two'}
        thumbColor={'#11ff11'} />
    )
  };
  _switch3 = () => {
    return (
       {
          //当开关状态改变了,一定要修改value的值,不然最终无法改变状态
          console.log('onValueChange2 =' + value);
          this.setState({
            swicthValue2: value
          })
        }}
        testID={'two'}
        thumbColor={'#f1ff11'}
        disabled={true} />
    )
  };
  setModalVisible(visible) {
    this.setState({ modalVisible: visible });
  }
  render() {
    return (

         this.setState({ language: itemValue })}>


          {this._switch1()}
          {this._switch2()}
          下面的switch设置disabled为true,无法点击,但是可以设置value的值来改变状态
          {this._switch3()}

         this.setState({ text })} value={this.state.text} />

           { alert("Modal has been closed."); }}>


                学习modal使用!
                 { this.setModalVisible(!this.state.modalVisible);}}>
                  Hide Modal


           { this.setModalVisible(true);}}>
            Show Modal


    );
  }
}
export default Home
- HTML元素与React Native组件对比
| HTML | React Native |
| div | View |
| img | Image |
| span,p | Text |
| li,ol | ListView |
输入框组件:TextInput
滚动窗口组件:ScrollView
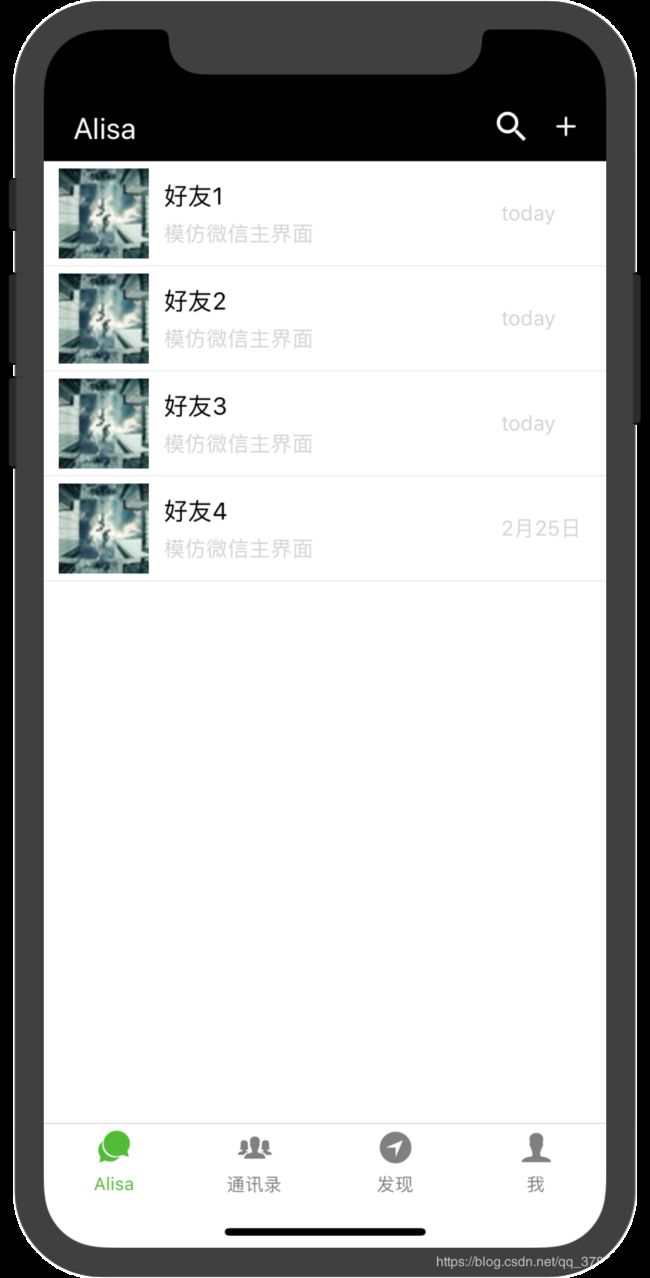
- demo11模仿微信
文件结构图、页面效果图

App.js
import React, { Component } from 'react';
import Route from './src/config/route'
class App extends Component {
render() {
return (
route.js
import { createBottomTabNavigator, createStackNavigator, createAppContainer } from "react-navigation";
import React from 'react';
// 引入页面组件
import Home from '../screens/home/Home'
import Details from '../screens/Details'
import Tabnavigation1 from '../screens/tab1/Tabnavigation1'
import Tabnavigation2 from '../screens/tab2/Tabnavigation2'
import Tabnavigation3 from '../screens/tab3/Tabnavigation3'
import Ionicons from 'react-native-vector-icons/Ionicons';
// 配置路由
const HomeStack = createStackNavigator({
Home: Home,
Details: Details
},
{
initialRouteName: 'Home',
defaultNavigationOptions: {
headerStyle: {
backgroundColor: '#010101',
},
headerTintColor: '#fff',
headerTitleStyle: {
fontWeight: 'bold',
},
}
}
);
const Tab1Stack = createStackNavigator({
Tabnavigation1: Tabnavigation1
},
{
defaultNavigationOptions: {
headerStyle: {
backgroundColor: '#010101',
},
headerTintColor: '#fff',
headerTitleStyle: {
fontWeight: 'bold',
},
}
}
);
const Tab2Stack = createStackNavigator({
Tabnavigation2: Tabnavigation2
},
{
defaultNavigationOptions: {
headerStyle: {
backgroundColor: '#010101',
},
headerTintColor: '#fff',
headerTitleStyle: {
fontWeight: 'bold',
},
}
}
);
const Tab3Stack = createStackNavigator({
Tabnavigation3: Tabnavigation3
},
{
defaultNavigationOptions: {
headerStyle: {
backgroundColor: '#010101',
},
headerTintColor: '#fff',
headerTitleStyle: {
fontWeight: 'bold',
},
}
}
);
const AppNavigator = createBottomTabNavigator(
{
HomeStack: {
screen: HomeStack,
navigationOptions: {
tabBarLabel: "Alisa",
tabBarIcon: ({ tintColor, focused }) => (
Home.js
import React, { Component } from 'react';
import { View, Text, Image, FlatList, TouchableHighlight } from 'react-native';
import Ionicons from 'react-native-vector-icons/Ionicons';
import HomeStyle from './HomeStyle'
const CHAT_DATA = [
{
title: '好友1',
content: '模仿微信主界面',
time: 'today',
posters: { thumbnail: 'http://i.imgur.com/UePbdph.jpg' }
},
{
title: '好友2',
content: '模仿微信主界面',
time: 'today',
posters: { thumbnail: 'http://i.imgur.com/UePbdph.jpg' }
},
{
title: '好友3',
content: '模仿微信主界面',
time: 'today',
posters: { thumbnail: 'http://i.imgur.com/UePbdph.jpg' }
},
{
title: '好友4',
content: '模仿微信主界面',
time: '2月25日',
posters: { thumbnail: 'http://i.imgur.com/UePbdph.jpg' }
}
]
class Chat extends Component {
render() {
return (
item.id}
keyExtractor={(item, index) => index.toString()}
/>
);
}
renderChat({ item }) {
return (
{item.title}
{item.content}
{item.time}
)
}
}
class RightTitle extends Component {
render() {
return (
);
}
}
class Home extends Component {
static navigationOptions = {
// headerTitle:"Alisa",
headerLeft: Alisa ,
headerRight:
this.props.navigation.push("Details")} underlayColor="white">
);
}
}
export default Home
HomeStyle.js
import React from 'react';
import {
    StyleSheet
} from 'react-native';

export default StyleSheet.create(
    {
        leftTitle: {
            fontSize: 20,
            color: '#fff',
            marginLeft: 20
        },
        rightIcon1: {
            color: "#fff",
            marginRight: 20
        },
        rightIcon2: {
            color: "#fff",
            marginRight: 20
        },
        chatbox: {
            flex: 1,
            flexDirection: 'row',
            backgroundColor: '#fff',
            borderBottomColor:"#eee",
            borderBottomWidth:1,
            height:70,
            alignItems: 'center'
        },
        thumbnail: {
            width: 60,
            height: 60,
            marginLeft:10,
        },
        contentbox:{
            width:'60%',
            marginLeft:10,
            flexDirection:'column'
        },
        title: {
            fontSize: 16,
            marginBottom: 8,
            textAlign: 'center',
            textAlign:'left'
        },
        content:{
            color:'#d3d3d3',
            textAlign:'left'
        },
        timebox:{
            flexDirection:'row',
        },
        time: {
            color:'#d3d3d3'
        }
    }
);
Details.js
import React, { Component } from 'react';
import { View, Text, Button } from 'react-native';
const styles = {
container: {
flex: 1,
justifyContent: 'center',
alignItems: 'center'
}
}
class Details extends Component {
static navigationOptions = {
headerTitle:"聊天信息"
};
render() {
return (
Details Screen
);
}
}
export default Details
Tabnavigation1.js
import React, { Component } from 'react';
import { View, ART } from 'react-native';
import Tab1Style from './Tab1Style'
const { Surface, Shape, Path, Group, Text } = ART;
class Tabnavigation1 extends Component {
  static navigationOptions = {
    headerTitle: "通讯录"
  };
  render() {
    const linePath = Path().moveTo(1, 1).lineTo(300, 1);
    const juxingPath = new Path().moveTo(1, 1).lineTo(1, 99).lineTo(99, 99).lineTo(99, 1).close();
    const textPath = new Path().moveTo(40, 40).lineTo(99, 10)
    return (

        {/* 绘制直线、虚线、矩形、文本,此处如果有Text,会与下方Text报错重复定义 */}


          Text


            Group


    );
  }
}
export default Tabnavigation1
Tab1Style.js
import React from 'react';
import {
    StyleSheet
} from 'react-native';

export default StyleSheet.create(
    {
        container: {
            flex: 1,
            justifyContent: 'center',
            alignItems: 'center',
            backgroundColor: '#F5FCFF',
        }
    }
);
Tabnavigation2.js
import React, { Component } from 'react';
import { StyleSheet, View, Text, TouchableHighlight, Image, Dimensions } from 'react-native';
import ImagePicker from 'react-native-image-picker';
import Tab2Style from './Tab2Style'
const BadgeData = {
data: [
{
icon: "http://i.imgur.com/UePbdph.jpg",
title: "Alisa分享"
},
{
icon: "http://i.imgur.com/UePbdph.jpg",
"title": "开心网分享"
},
{
icon: "http://i.imgur.com/UePbdph.jpg",
title: "QQ分享"
},
{
icon: "http://i.imgur.com/UePbdph.jpg",
title: "QQ空间分享"
},
{
icon: "http://i.imgur.com/UePbdph.jpg",
title: "QQ微博分享"
},
{
icon: "http://i.imgur.com/UePbdph.jpg",
title: "人人网分享"
},
{
icon: "http://i.imgur.com/UePbdph.jpg",
title: "微信分享"
},
{
icon: "http://i.imgur.com/UePbdph.jpg",
title: "微博分享"
},
{
icon: "http://i.imgur.com/UePbdph.jpg",
title: "朋友圈分享"
}
]
}
//屏幕的宽度
const width = Dimensions.get('window').width;
//定义一些全局的变量
const cols = 3;
const boxW = 100;
const vMargin = (width - cols * boxW) / (cols + 1);
const hMargin = 25;
//设置样式
const styles = StyleSheet.create({
container: {
// 确定主轴的方向
flexDirection: 'row',
// 一行显示不完的话换行显示
flexWrap: 'wrap'
},
outViewStyle: {
// 设置侧轴的对齐方式
alignItems: 'center',
width: boxW,
height: boxW,
marginLeft: vMargin,
marginTop: hMargin
},
iconStyle: {
width: 80,
height: 80,
marginBottom: 5
},
mainTitleStyle: {
}
});
const photoOptions = {
title: '请选择',
quality: 0.8,
cancelButtonTitle: '取消',
takePhotoButtonTitle: '拍照',
chooseFromLibraryButtonTitle: '选择相册',
allowsEditing: true,
noData: false,
storageOptions: {
skipBackup: true,
path: 'images'
}
};
class ImagePickerView extends Component {
constructor(props) {
super(props);
this.state = {
avatarSource: null
};
this.choosePicker = this.choosePicker.bind(this)
}
choosePicker() {
ImagePicker.showImagePicker(photoOptions, (response) => {
if (response.didCancel) {
console.log('User cancelled image picker');
}
else if (response.error) {
console.log('ImagePicker Error: ', response.error);
}
else if (response.customButton) {
console.log('User tapped custom button: ', response.customButton);
}
else {
let source = { uri: response.uri };
// You can also display the image using data:
// let source = { uri: 'data:image/jpeg;base64,' + response.data };
this.setState({
avatarSource: source
});
}
});
}
render() {
return (
相机 & 相册
)
}
}
class Tabnavigation2 extends Component {
static navigationOptions = {
headerTitle: "发现"
};
render() {
return (
Tabnavigation2
{/*返回6个包*/}
{this.renderAllBadge()}
);
}
// 返回所有的包
renderAllBadge() {
// 定义数组装所有的子组件
let allBadge = [];
// 遍历json数据
for (let i = 0; i < BadgeData.data.length; i++) {
// 取出每一个数据对象
let badge = BadgeData.data[i];
// 装入数据
allBadge.push(
{/*
{badge.title}
);
}
// 返回数组
return allBadge;
}
}
export default Tabnavigation2Tab2Style.js
import React from 'react';
import {
    StyleSheet
} from 'react-native';

export default StyleSheet.create(
    {
        container: {
            flex: 1,
            justifyContent: 'center',
            alignItems: 'center',
            backgroundColor:'#fff'
        },
        imgbox: {
            flex: 1,
            marginTop: 20,
            alignItems: 'center'
        },
        button: {
            marginTop: 20,
            backgroundColor: '#808080',
            height: 35,
            width: 140,
            borderRadius: 5,
            justifyContent: 'center',
            alignItems: 'center'
        },
        imageStyle: {
            height: 180,
            width: 250,
            marginTop: 30,
            alignSelf: 'center'
        }
    }
);
Tabnavigation3.js
import React, { Component } from 'react';
import { View, Text, FlatList, } from 'react-native';
import Tab3Style from './Tab3Style'
import Ionicons from 'react-native-vector-icons/Ionicons';
const INBOX_DATA = [
  {
    title: 'Severe Warning',
    content: '0 of 1 Task Completed',
    time: '6:07 PM'
  },
  {
    title: 'Severe Warning',
    content: '1 of 1 Task Completed',
    time: 'Yesterday'
  },
  {
    title: 'Moderate Warning',
    content: '',
    time: 'Yesterday'
  },
  {
    title: 'Hello',
    content: '',
    time: 'Jan 21'
  }
]
class Inbox extends Component {
  render() {
    return (
      item.id}
        keyExtractor={(item, index) => index.toString()}
      />
    );
  }
  renderInbox({ item }) {
    return (


          {item.title}
          {item.content}


          {item.time}


    )
  }
}
class Tabnavigation3 extends Component {
  static navigationOptions = {
    headerTitle: "我"
  };
  render() {
    return (


            Inbox


    );
  }
}
export default Tabnavigation3
Tab3Style.js
import React from 'react';
import {
    StyleSheet
} from 'react-native';

export default StyleSheet.create(
    {
        totalbox:{
            display:"flex"
        },
        box1:{
            height:'40%',
            borderBottomColor:"#eee",
            borderBottomWidth:1,
            flexDirection:'row',
            alignItems: 'center',
            padding:20,
            width:'100%'
        },
        box1_content1:{
            width:'30%'
        },
        title:{
            fontSize:40,
            fontWeight:'bold'
        },
        box1_content2:{
            flexDirection:'row',
            width:'70%',
            justifyContent:'flex-end'
        },
        rightIcon1: {
            color: "#747474",
            marginRight: 20
        },
        rightIcon2: {
            color: "#a526fb",
            marginRight: 20
        },
    }
);
- demo12