Android系统启动之Zygote
前段时间在看Android9.0的PackageManagerService的源码,看着看着就在想PackageManagerService是如何被启动的,发现它是被SystemServer启动的,然后就又想SystemServer又是怎么被创建的呢,就一步步跟代码,发现SystemServer是从zygote进程fork出来的,想把最近了解的内容总结下,于是就有了这篇文章(如果再跟下去你会发现zygote又是从init进程fork出来的)
zygote 是什么
简单地说,它是一个进程。如果稍微再详细点的话,它是孵化其他Android应用进程的进程。
zygote进程如何被创建的
前面我们知道zygote进程能孵化其他Android进程,那么zygote进程又是由谁孵化的呢?我们知道Android是基于Linux内核,而Linux的第一个用户级进程为init进程(PID等于1),所以很容易联想到zygote进程很有可能就是init进程孵化出来的,实际上也确实如此。下面我们就看下zygote孵化的过程,过程主要包括:
- init 进程解析init.rc文件
- zygote孵化
init进程解析
system/core/init/init.cpp
system/core/init/init.h
system/core/init/action_manager.h
system/core/init/action_manager.cpp
system/core/init/service.h
system/core/init/service.cpp
system/core/init/parser.h
system/core/init/parser.cpp
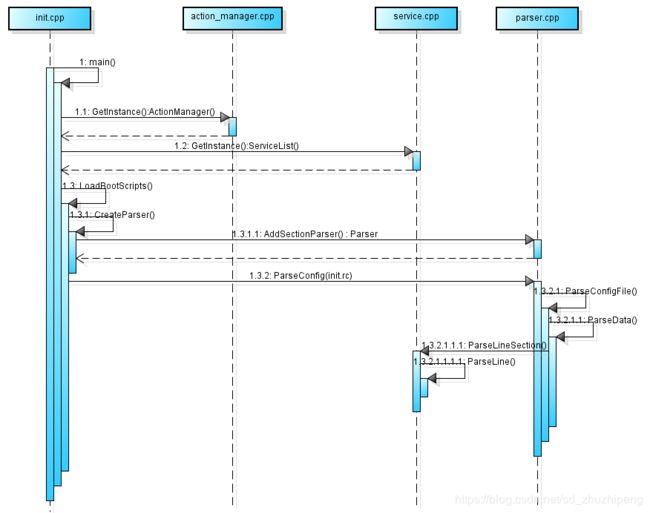
下面就是init进程解析init.rc文件时与zygote相关的过程:
//system/core/init/init.cpp
int main(int argc, char** argv) {
    //省略部分无关代码......
    const BuiltinFunctionMap function_map;
    Action::set_function_map(&function_map);

    subcontexts = InitializeSubcontexts();

    ActionManager& am = ActionManager::GetInstance();
    ServiceList& sm = ServiceList::GetInstance();
    //开始解析初始化脚本文件
    LoadBootScripts(am, sm);

    // Turning this on and letting the INFO logging be discarded adds 0.2s to
    // Nexus 9 boot time, so it's disabled by default.
    if (false) DumpState();
    //省略部分无关代码......

    return 0;
}

static void LoadBootScripts(ActionManager& action_manager, ServiceList& service_list) {
    //创建不通的解析器,包括ActionParser、ImportParser和ServiceParser
    Parser parser = CreateParser(action_manager, service_list);
    //判断是否有配置ro.boot.init_rc属性
    std::string bootscript = GetProperty("ro.boot.init_rc", "");
    if (bootscript.empty()) {
        //如果没有配置ro.boot.init_rc属性,则解析init.rc
        parser.ParseConfig("/init.rc");
        //后面的几个if语句判断对应的路径是否有配置文件,如果有则把路径加入容器
        if (!parser.ParseConfig("/system/etc/init")) {
            late_import_paths.emplace_back("/system/etc/init");
        }
        if (!parser.ParseConfig("/product/etc/init")) {
            late_import_paths.emplace_back("/product/etc/init");
        }
        if (!parser.ParseConfig("/odm/etc/init")) {
            late_import_paths.emplace_back("/odm/etc/init");
        }
        if (!parser.ParseConfig("/vendor/etc/init")) {
            late_import_paths.emplace_back("/vendor/etc/init");
        }
    } else {
        parser.ParseConfig(bootscript);
    }
}
我们看下init.rc文件内容,由于篇幅原因,还是省略了部分内容;
#system/core/rootdir/init.rc

import /init.environ.rc
import /init.usb.rc
import /init.${ro.hardware}.rc
import /vendor/etc/init/hw/init.${ro.hardware}.rc
import /init.usb.configfs.rc
import /init.${ro.zygote}.rc

on early-init
    # Set init and its forked children's oom_adj.
    write /proc/1/oom_score_adj -1000

    # Disable sysrq from keyboard
    write /proc/sys/kernel/sysrq 0

    # Set the security context of /adb_keys if present.
    restorecon /adb_keys

    # Set the security context of /postinstall if present.
    restorecon /postinstall

    # Mount cgroup mount point for cpu accounting
    mount cgroup none /acct nodev noexec nosuid cpuacct
    mkdir /acct/uid

    # root memory control cgroup, used by lmkd
    mkdir /dev/memcg 0700 root system
    mount cgroup none /dev/memcg nodev noexec nosuid memory
    # app mem cgroups, used by activity manager, lmkd and zygote
    mkdir /dev/memcg/apps/ 0755 system system
    # cgroup for system_server and surfaceflinger
    mkdir /dev/memcg/system 0550 system system

    start ueventd
    .......
文件开头import了其他的rc文件,init.${ro.zygote}.rc就是zygote的有关的初始化脚本,ro.zygote属性可以通过getprop ro.zygote 查看机型对应的属性,比如下面就是32位的机型初始化脚本文件。
#system/core/rootdir/init.zygote32.rc

service zygote /system/bin/app_process -Xzygote /system/bin --zygote --start-system-server
    class main
    priority -20
    user root
    group root readproc reserved_disk
    socket zygote stream 660 root system
    onrestart write /sys/android_power/request_state wake
    onrestart write /sys/power/state on
    onrestart restart audioserver
    onrestart restart cameraserver
    onrestart restart media
    onrestart restart netd
    onrestart restart wificond
    writepid /dev/cpuset/foreground/tasks
service的格式如下:
service [ ]*
zygote进程的启动就是通过service命令“/system/bin/app_process -Xzygote /system/bin --zygote --start-system-server”。有关rc文件的更多内容可以参考system/core/init/README.md文件
在前面的时序图中,我们了解到解析过程会调用Parser::ParseData函数,在这个过程中就是根据不同类型采用对应的parser来解析
//system/core/init/parse.cpp

void Parser::ParseData(const std::string& filename, const std::string& data, size_t* parse_errors) {
    // TODO: Use a parser with const input and remove this copy
    std::vector data_copy(data.begin(), data.end());
    data_copy.push_back('\0');

    parse_state state;
    state.line = 0;
    state.ptr = &data_copy[0];
    state.nexttoken = 0;

    SectionParser* section_parser = nullptr;
    int section_start_line = -1;
    std::vector args;

    auto end_section = [&] {
        if (section_parser == nullptr) return;

        if (auto result = section_parser->EndSection(); !result) {
            (*parse_errors)++;
            LOG(ERROR) << filename << ": " << section_start_line << ": " << result.error();
        }

        section_parser = nullptr;
        section_start_line = -1;
    };

    for (;;) {
        switch (next_token(&state)) {
            case T_EOF:
                end_section();
                return;
            case T_NEWLINE:
                state.line++;
                if (args.empty()) break;
                // If we have a line matching a prefix we recognize, call its callback and unset any
                // current section parsers.  This is meant for /sys/ and /dev/ line entries for
                // uevent.
                for (const auto& [prefix, callback] : line_callbacks_) {
                    if (android::base::StartsWith(args[0], prefix)) {
                        end_section();

                        if (auto result = callback(std::move(args)); !result) {
                            (*parse_errors)++;
                            LOG(ERROR) << filename << ": " << state.line << ": " << result.error();
                        }
                        break;
                    }
                }
                //section_parsers_是个map集合,数据初始化在init.cpp的CreateParser()函数中
                if (section_parsers_.count(args[0])) {
                    end_section();
                    section_parser = section_parsers_[args[0]].get();
                    section_start_line = state.line;
                    if (auto result =
                            section_parser->ParseSection(std::move(args), filename, state.line);
                        !result) {
                        (*parse_errors)++;
                        LOG(ERROR) << filename << ": " << state.line << ": " << result.error();
                        section_parser = nullptr;
                    }
                } else if (section_parser) {
                    if (auto result = section_parser->ParseLineSection(std::move(args), state.line);
                        !result) {
                        (*parse_errors)++;
                        LOG(ERROR) << filename << ": " << state.line << ": " << result.error();
                    }
                }
                args.clear();
                break;
            case T_TEXT:
                args.emplace_back(state.text);
                break;
        }
    }
}
//system/core/init/service.cpp
Result ServiceParser::ParseLineSection(std::vector&& args, int line) {
    return service_ ? service_->ParseLine(std::move(args)) : Success();
}

Result Service::ParseLine(const std::vector& args) {
    static const OptionParserMap parser_map;
    auto parser = parser_map.FindFunction(args);

    if (!parser) return parser.error();
    //执行真正的命令,比如zygote.rc的“/system/bin/app_process -Xzygote /system/bin --zygote --start-system-server”
    return std::invoke(*parser, this, args);
}
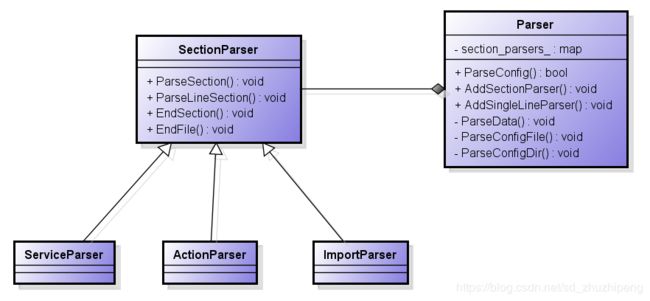
最后附上解析器相关的类关系图
zygote启动
在了解init.rc解析后,我们再看下zygote进程对应的app_main.cpp文件的main函数执行过程
//app_main.cpp
int main(int argc, char* const argv[])
{
    if (!LOG_NDEBUG) {
      String8 argv_String;
      for (int i = 0; i < argc; ++i) {
        argv_String.append("\"");
        argv_String.append(argv[i]);
        argv_String.append("\" ");
      }
      ALOGV("app_process main with argv: %s", argv_String.string());
    }
    //创建AppRuntime对象runtime(AppRuntime继承自AndroidRuntime)
    AppRuntime runtime(argv[0], computeArgBlockSize(argc, argv));
    //省略部分代码
    //...........
    if (zygote) {
        //这里会调用ZygoteInit.java的main()方法
        runtime.start("com.android.internal.os.ZygoteInit", args, zygote);
    } else if (className) {
        runtime.start("com.android.internal.os.RuntimeInit", args, zygote);
    } else {
        fprintf(stderr, "Error: no class name or --zygote supplied.\n");
        app_usage();
        LOG_ALWAYS_FATAL("app_process: no class name or --zygote supplied.");
    }
}
main()函数主要作用是创建java虚拟机并调用ZygoteInit.java类的main()方法,而又是怎么实现在C++中调用到Java层的ZygoteInit.main()方法的呢,这就要看下runtime.start("com.android.internal.os.ZygoteInit", args, zygote)具体的实现,看下start()函数的具体实现
//AndroidRuntime.cpp
void AndroidRuntime::start(const char* className, const Vector& options, bool zygote)
{
    ALOGD(">>>>>> START %s uid %d <<<<<<\n",
            className != NULL ? className : "(unknown)", getuid());

    static const String8 startSystemServer("start-system-server");

    /*
     * 'startSystemServer == true' means runtime is obsolete and not run from
     * init.rc anymore, so we print out the boot start event here.
     */
    for (size_t i = 0; i < options.size(); ++i) {
        if (options[i] == startSystemServer) {
           /* track our progress through the boot sequence */
           const int LOG_BOOT_PROGRESS_START = 3000;
           LOG_EVENT_LONG(LOG_BOOT_PROGRESS_START,  ns2ms(systemTime(SYSTEM_TIME_MONOTONIC)));
        }
    }

    const char* rootDir = getenv("ANDROID_ROOT");
    if (rootDir == NULL) {
        rootDir = "/system";
        if (!hasDir("/system")) {
            LOG_FATAL("No root directory specified, and /android does not exist.");
            return;
        }
        setenv("ANDROID_ROOT", rootDir, 1);
    }

    //const char* kernelHack = getenv("LD_ASSUME_KERNEL");
    //ALOGD("Found LD_ASSUME_KERNEL='%s'\n", kernelHack);

    /* start the virtual machine */
    JniInvocation jni_invocation;
    jni_invocation.Init(NULL);
    JNIEnv* env;
    //创建虚拟机
    if (startVm(&mJavaVM, &env, zygote) != 0) {
        return;
    }
    onVmCreated(env);

    /*
     * Register android functions.
     */
    if (startReg(env) < 0) {
        ALOGE("Unable to register all android natives\n");
        return;
    }

    /*
     * We want to call main() with a String array with arguments in it.
     * At present we have two arguments, the class name and an option string.
     * Create an array to hold them.
     */
    jclass stringClass;
    jobjectArray strArray;
    jstring classNameStr;

    stringClass = env->FindClass("java/lang/String");
    assert(stringClass != NULL);
    strArray = env->NewObjectArray(options.size() + 1, stringClass, NULL);
    assert(strArray != NULL);
    classNameStr = env->NewStringUTF(className);
    assert(classNameStr != NULL);
    env->SetObjectArrayElement(strArray, 0, classNameStr);

    for (size_t i = 0; i < options.size(); ++i) {
        jstring optionsStr = env->NewStringUTF(options.itemAt(i).string());
        assert(optionsStr != NULL);
        env->SetObjectArrayElement(strArray, i + 1, optionsStr);
    }

    /*
     * Start VM.  This thread becomes the main thread of the VM, and will
     * not return until the VM exits.
     */
    char* slashClassName = toSlashClassName(className != NULL ? className : "");
    jclass startClass = env->FindClass(slashClassName);
    if (startClass == NULL) {
        ALOGE("JavaVM unable to locate class '%s'\n", slashClassName);
        /* keep going */
    } else {
        //JNI的方式得到startClass的main()方法的jmethodID
        jmethodID startMeth = env->GetStaticMethodID(startClass, "main",
            "([Ljava/lang/String;)V");
        if (startMeth == NULL) {
            ALOGE("JavaVM unable to find main() in '%s'\n", className);
            /* keep going */
        } else {
            //这里就实现了调用startClass的main()方法
            env->CallStaticVoidMethod(startClass, startMeth, strArray);

#if 0
            if (env->ExceptionCheck())
                threadExitUncaughtException(env);
#endif
        }
    }
    free(slashClassName);

    ALOGD("Shutting down VM\n");
    if (mJavaVM->DetachCurrentThread() != JNI_OK)
        ALOGW("Warning: unable to detach main thread\n");
    if (mJavaVM->DestroyJavaVM() != 0)
        ALOGW("Warning: VM did not shut down cleanly\n");
}
zygote 作用
接下来,我们看下ZygoteInit.main()方法里面都做了些什么
//ZygoteInit.java
public static void main(String argv[]) {
       ZygoteServer zygoteServer = new ZygoteServer();

       // Mark zygote start. This ensures that thread creation will throw
       // an error.
       ZygoteHooks.startZygoteNoThreadCreation();

       // Zygote goes into its own process group.
       try {
           Os.setpgid(0, 0);
       } catch (ErrnoException ex) {
           throw new RuntimeException("Failed to setpgid(0,0)", ex);
       }

       final Runnable caller;
       try {
           // Report Zygote start time to tron unless it is a runtime restart
           if (!"1".equals(SystemProperties.get("sys.boot_completed"))) {
               MetricsLogger.histogram(null, "boot_zygote_init",
                       (int) SystemClock.elapsedRealtime());
           }

           String bootTimeTag = Process.is64Bit() ? "Zygote64Timing" : "Zygote32Timing";
           TimingsTraceLog bootTimingsTraceLog = new TimingsTraceLog(bootTimeTag,
                   Trace.TRACE_TAG_DALVIK);
           bootTimingsTraceLog.traceBegin("ZygoteInit");
           RuntimeInit.enableDdms();

           boolean startSystemServer = false;
           String socketName = "zygote";
           String abiList = null;
           boolean enableLazyPreload = false;
           for (int i = 1; i < argv.length; i++) {
               if ("start-system-server".equals(argv[i])) {
                   startSystemServer = true;
               } else if ("--enable-lazy-preload".equals(argv[i])) {
                   enableLazyPreload = true;
               } else if (argv[i].startsWith(ABI_LIST_ARG)) {
                   abiList = argv[i].substring(ABI_LIST_ARG.length());
               } else if (argv[i].startsWith(SOCKET_NAME_ARG)) {
                   socketName = argv[i].substring(SOCKET_NAME_ARG.length());
               } else {
                   throw new RuntimeException("Unknown command line argument: " + argv[i]);
               }
           }

           if (abiList == null) {
               throw new RuntimeException("No ABI list supplied.");
           }
           //创建socket
           zygoteServer.registerServerSocket(socketName);
           // In some configurations, we avoid preloading resources and classes eagerly.
           // In such cases, we will preload things prior to our first fork.
           if (!enableLazyPreload) {
               bootTimingsTraceLog.traceBegin("ZygotePreload");
               EventLog.writeEvent(LOG_BOOT_PROGRESS_PRELOAD_START,
                   SystemClock.uptimeMillis());
               preload(bootTimingsTraceLog);
               EventLog.writeEvent(LOG_BOOT_PROGRESS_PRELOAD_END,
                   SystemClock.uptimeMillis());
               bootTimingsTraceLog.traceEnd(); // ZygotePreload
           } else {
               Zygote.resetNicePriority();
           }

           // Do an initial gc to clean up after startup
           bootTimingsTraceLog.traceBegin("PostZygoteInitGC");
           gcAndFinalize();
           bootTimingsTraceLog.traceEnd(); // PostZygoteInitGC

           bootTimingsTraceLog.traceEnd(); // ZygoteInit
           // Disable tracing so that forked processes do not inherit stale tracing tags from
           // Zygote.
           Trace.setTracingEnabled(false, 0);

           // Zygote process unmounts root storage spaces.
           Zygote.nativeUnmountStorageOnInit();

           // Set seccomp policy
           Seccomp.setPolicy();

           ZygoteHooks.stopZygoteNoThreadCreation();

           if (startSystemServer) {
               //fork SystemServer进程
               Runnable r = forkSystemServer(abiList, socketName, zygoteServer);

               // {@code r == null} in the parent (zygote) process, and {@code r != null} in the
               // child (system_server) process.
               if (r != null) {
                   r.run();
                   return;
               }
           }

           Log.i(TAG, "Accepting command socket connections");

           // The select loop returns early in the child process after a fork and
           // loops forever in the zygote.
           caller = zygoteServer.runSelectLoop(abiList);
       } catch (Throwable ex) {
           Log.e(TAG, "System zygote died with exception", ex);
           throw ex;
       } finally {
           zygoteServer.closeServerSocket();
       }

       // We're in the child process and have exited the select loop. Proceed to execute the
       // command.
       if (caller != null) {
           caller.run();
       }
   }
在ZygoteInit.main()方法中主要做了两件事:
-
fork SystemServer进程;
-
在一个循环中等待命令fork 新的进程,该功能的实现是在ZygoteServer.runSelectLoop()方法中,该方法是一个无限循环,等待socket连接,然后根据连接中的参数fork新的进程,fork的过程与 fork SystemServer的过程类似
fork SystemServer
在ZygoteInit.forkSystemServer()方法中会设置SystemServer的参数,然后调用Zygote.forkSystemServer()方法
//ZygoteInit.java
private static Runnable forkSystemServer(String abiList, String socketName,
           ZygoteServer zygoteServer) {
       long capabilities = posixCapabilitiesAsBits(
           OsConstants.CAP_IPC_LOCK,
           OsConstants.CAP_KILL,
           OsConstants.CAP_NET_ADMIN,
           OsConstants.CAP_NET_BIND_SERVICE,
           OsConstants.CAP_NET_BROADCAST,
           OsConstants.CAP_NET_RAW,
           OsConstants.CAP_SYS_MODULE,
           OsConstants.CAP_SYS_NICE,
           OsConstants.CAP_SYS_PTRACE,
           OsConstants.CAP_SYS_TIME,
           OsConstants.CAP_SYS_TTY_CONFIG,
           OsConstants.CAP_WAKE_ALARM
       );
       /* Containers run without this capability, so avoid setting it in that case */
       if (!SystemProperties.getBoolean(PROPERTY_RUNNING_IN_CONTAINER, false)) {
           capabilities |= posixCapabilitiesAsBits(OsConstants.CAP_BLOCK_SUSPEND);
       }
       /* Hardcoded command line to start the system server */
       String args[] = {
           "--setuid=1000",
           "--setgid=1000",
           "--setgroups=1001,1002,1003,1004,1005,1006,1007,1008,1009,1010,1018,1021,1023,1032,3001,3002,3003,3006,3007,3009,3010",
           "--capabilities=" + capabilities + "," + capabilities,
           "--nice-name=system_server",
           "--runtime-args",
           "com.android.server.SystemServer",
       };
       ZygoteConnection.Arguments parsedArgs = null;

       int pid;

       try {
           parsedArgs = new ZygoteConnection.Arguments(args);
           ZygoteConnection.applyDebuggerSystemProperty(parsedArgs);
           ZygoteConnection.applyInvokeWithSystemProperty(parsedArgs);

           /* Request to fork the system server process */
           //fork systemserver,Zygote.forSystemServer()调用了Zygote.nativeForkSystemServer()方法,该JNI方法具体实现在com_android_internal_os_Zygote.cpp中
           pid = Zygote.forkSystemServer(
                   parsedArgs.uid, parsedArgs.gid,
                   parsedArgs.gids,
                   parsedArgs.debugFlags,
                   null,
                   parsedArgs.permittedCapabilities,
                   parsedArgs.effectiveCapabilities);
       } catch (IllegalArgumentException ex) {
           throw new RuntimeException(ex);
       }

       /* For child process */
       //pid =0 表示当前在子进程中
       if (pid == 0) {
           if (hasSecondZygote(abiList)) {
               waitForSecondaryZygote(socketName);
           }

           zygoteServer.closeServerSocket();
           return handleSystemServerProcess(parsedArgs);
       }

       return null;
   }
Zygote.forkSystemServer()具体在com_android_internal_os_Zygote.cpp实现就不展开了,最终就是通过调用bionic(/bionic/libc/bionic/fork.cpp)库中的fork.cpp中的fork()函数。有点一点需要注意,当调用一次fork()函数会在父进程和子进程中各返回一次,在子进程的返回的是0,在父进程中返回的是子进程id。有关fork()函数请参考fork()函数,最后附上zygote main()函数的时序图。
