Okio简化处理IO操作
Okio底层通过两种包含多种能力的类提供丰富的API。它们是ByteStrings 和 Buffers。
ByteStrings
这个类提供了丰富的编码和解码操作,比如hex, base64, and UTF-8。
Buffers
它提供了字节缓冲区操作,类似队列结果,从头部读取数据,写入的数据添加到尾部。
由于内部高效的算法,ByteStrings和Buffer很大程度上节约了CPU资源和内存。
Okio有自己的流类型,叫做Source和Sink。Source类似java io中的InputStream,Sink类似java io中的OutputStream,但是又有一些关键的不同点:
1、Timeouts
读写提供了超时检查
2、接口实现很简单
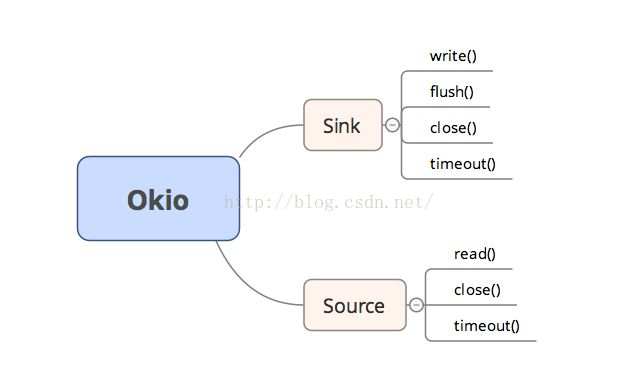
Source只定义了三个方法:read(),close(),timeout().
3、使用更加简单
BufferedSource和BufferedSink基本上提供了你需要的任何功能
Okio中有两个关键的接口,Sink和Source,这两个接口都继承了Closeable接口;而Sink可以简单的看做OutputStream,Source可以简单的看做InputStream。而这两个接口都是支持读写超时设置的。结构图如下
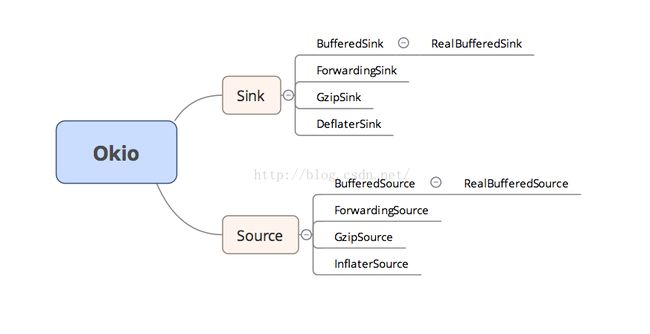
它们各自有一个支持缓冲区的子类接口,BufferedSink和BufferedSource,而BufferedSink有一个实现类RealBufferedSink,BufferedSource有一个实现类RealBufferedSource;此外,Sink和Source它门还各自有一个支持gzip压缩的实现类GzipSink和GzipSource;一个具有委托功能的抽象类ForwardingSink和ForwardingSource;还有一个实现类便是InflaterSource和DeflaterSink,这两个类主要用于压缩,为GzipSink和GzipSource服务;整体的结构图如下
BufferedSink中定义了一系列写入缓存区的方法,比如write方法写byte数组,writeUtf8写字符串,还有一些列的writeByte,writeString,writeShort,writeInt,writeLong,writeDecimalLong等等方法;
BufferedSource定义的方法和BufferedSink极为相似,只不过一个是写一个是读,基本上都是一一对应的,如readUtf8,readByte,readString,readShort,readInt等等等等。这两个接口中的方法有兴趣的点源码进去看就可以了。
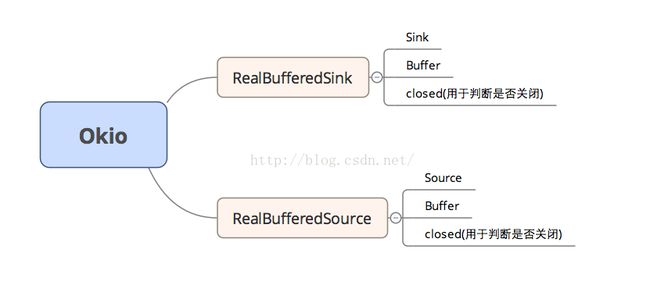
而这两个支持缓冲区的接口的实现类RealBufferedSink和RealBufferedSource都是通过包装一个Sink+Buffer或者Source+Buffer来进行实现的。如下图所示
拿RealBufferedSink来举例,实际调用的write的一系列方法,都是直接的对成员变量buffer进行的操作,当写入buffer成功后,最后会调用一个方法将buffer中的内容写入到sink中去,我们随便拿一个方法看一下
@Override public BufferedSink writeShort(int s) throws IOException {
if (closed) throw new IllegalStateException("closed");
buffer.writeShort(s);
return emitCompleteSegments();
}@Override public BufferedSink emitCompleteSegments() throws IOException {
if (closed) throw new IllegalStateException("closed");
long byteCount = buffer.completeSegmentByteCount();
if (byteCount > 0) sink.write(buffer, byteCount);
return this;
}这两个实现类的内部的所有方法都是类似的,这里不一一展开。
而这一切的背后都是一个叫做Buffer的类在支持着缓冲区,Buffer是BufferedSink和BufferedSource的实现类,因此它既可以用来读数据,也可以用来写数据,其内部使用了一个Segment和SegmentPool,维持着一个链表,其循环利用的机制和Android中Message的利用机制是一模一样的。
/**
 * A collection of unused segments, necessary to avoid GC churn and zero-fill.
 * This pool is a thread-safe static singleton.
 */
final class SegmentPool {
  /** The maximum number of bytes to pool. */
  // TODO: Is 64 KiB a good maximum size? Do we ever have that many idle segments?
  static final long MAX_SIZE = 64 * 1024; // 64 KiB.

  /** Singly-linked list of segments. */
  static Segment next;

  /** Total bytes in this pool. */
  static long byteCount;

  private SegmentPool() {
  }

  static Segment take() {
    synchronized (SegmentPool.class) {
      if (next != null) {
        Segment result = next;
        next = result.next;
        result.next = null;
        byteCount -= Segment.SIZE;
        return result;
      }
    }
    return new Segment(); // Pool is empty. Don't zero-fill while holding a lock.
  }

  static void recycle(Segment segment) {
    if (segment.next != null || segment.prev != null) throw new IllegalArgumentException();
    if (segment.shared) return; // This segment cannot be recycled.
    synchronized (SegmentPool.class) {
      if (byteCount + Segment.SIZE > MAX_SIZE) return; // Pool is full.
      byteCount += Segment.SIZE;
      segment.next = next;
      segment.pos = segment.limit = 0;
      next = segment;
    }
  }
}而Okio暴露给外部使用的类便是Okio这个类,其内部有大量的静态方法,包括通过一个Source获得BufferedSource,通过一个Sink获得一个BufferedSink。这个过程很简单,我们调用Okio的buffer方法即可返回我们需要的,如下
Okio.buffer(source);
Okio.buffer(sink);Okio.sink(File file);
Okio.appendingSink(File file);//内容可追加
Okio.sink(Path path, OpenOption... options);
Okio.sink(OutputStream out);
Okio.sink(Socket socket);
Okio.source(File file);
Okio.source(Path path, OpenOption... options);
Okio.source(InputStream in);
Okio.source(Socket socket);下面举两个案例来简单说明如何使用Okio。
1、文件读写
//写入数据到文件中
Sink sink = Okio.sink(file);
BufferedSink bufferedSink = Okio.buffer(sink);
bufferedSink.writeUtf8("我是一个中国人");
bufferedSink.close();

//从文件中读取数据
Source source = Okio.source(file);
BufferedSource bufferedSource = Okio.buffer(source);
String data = bufferedSource.readUtf8();
bufferedSource.close();
2、Gzip压缩和读取
//zip压缩
GzipSink gzipSink = new GzipSink(Okio.sink(file));
BufferedSink bufferedSink = Okio.buffer(gzipSink);
bufferedSink.writeUtf8("this is zip file");
bufferedSink.flush();
bufferedSink.close();

//读取zip
GzipSource gzipSource = new GzipSource(Okio.source(file));
BufferedSource bufferedSource = Okio.buffer(gzipSource);
String s = bufferedSource.readUtf8();
bufferedSource.close();

