嵌入式笔记2
本次学习的事如何看电路图点亮LED灯,如下:

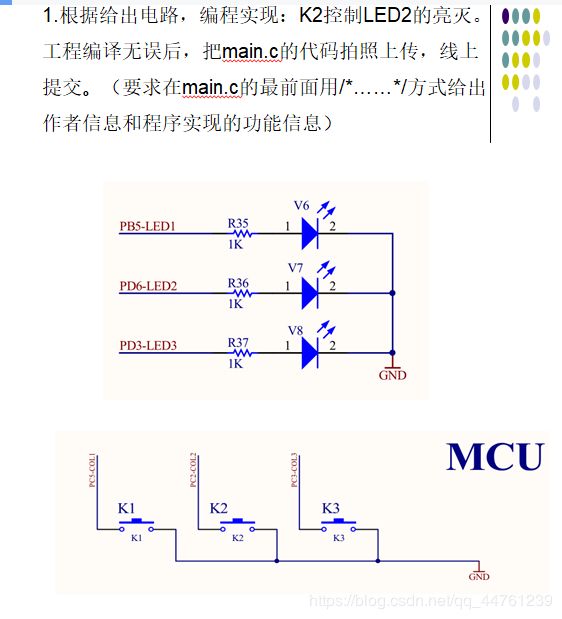
k2是PC2引脚,LED2是PD6,我们要编写的程序需要应用到这两个引脚的函数参数,下面是程序
方法一:(没有模块化)
main.c
#include"stm32f10x.h"
void Delay(u32 ncount);
int main()
{
	GPIO_InitTypeDef p;
	RCC_APB2PeriphClockCmd(RCC_APB2Periph_GPIOD|RCC_APB2Periph_GPIOC,ENABLE);
	p.GPIO_Pin=GPIO_Pin_6;
	p.GPIO_Mode=GPIO_Mode_Out_PP;
	p.GPIO_Speed=GPIO_Speed_2MHz;
	GPIO_Init(GPIOD,&p);
	p.GPIO_Pin=GPIO_Pin_2;
	p.GPIO_Mode=GPIO_Mode_IPU;
	GPIO_Init(GPIOC,&p);
  GPIO_ResetBits(GPIOD,GPIO_Pin_6);
while(1){
		if(GPIO_ReadInputDataBit(GPIOC,GPIO_Pin_2)==0)
			Delay(0xAFFFFF);
		  if(GPIO_ReadInputDataBit(GPIOC,GPIO_Pin_2)==0){
				while(GPIO_ReadInputDataBit(GPIOC,GPIO_Pin_2)==0);
				 if(GPIO_ReadOutputDataBit(GPIOD,GPIO_Pin_6)==0)
					 GPIO_SetBits(GPIOD,GPIO_Pin_6);
				 else
					 GPIO_ResetBits(GPIOD,GPIO_Pin_6);
			}
  }
}
void Delay(u32 ncount)
{
	for(;ncount!=0;ncount--);
}
方法二:(代码模块化,按键1三个LED是闪烁,按键2控制LED2亮)
工程文件夹新建两个文件夹,如图:

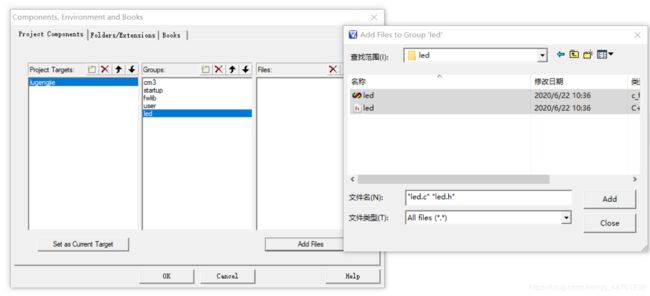
在keil4里面新建一个test,点击保存,命名为led.c,保存到led文件夹中


把新建的文件添加到工程目录中

同理,后面的led.h,key.c,key.h创建的方法是一样的,这里就不重复说明了
各个模块的代码如下:
main.c
#include "stm32f10x.h"
#include "led.h"
#include "key.h"

void Delay(__IO uint32_t nCount);

int main(void)
{
  SystemInit();
	LED_Config();
	Key_Config();

	while(1)
	{
		KeyScan();
		switch(num)
	{
		case 1:
		for(;;){
		    	LED1_ON_OFF();
				Delay(0xfffff);
				LED2_ON_OFF();
				Delay(0xfffff);
				LED3_ON_OFF();
				Delay(0xfffff);
				KeyScan();
			if(num==1||num==2||num==3) break;
			}
		case 2:
			for(;;){
				LED2_ON_OFF();
				Delay(0xdffff);
				KeyScan();
			if(num==1||num==3) break;
			}
			else
			{
				LED1_ON_OFF();
				Delay(0xdffff);
				LED2_ON_OFF();
				Delay(0xdffff);
				LED3_ON_OFF();
				Delay(0xdffff);
				KeyScan();
			}
	}
	}
}

void Delay(__IO uint32_t nCount)
{
   for(; nCount != 0; nCount--);
}
led.c
#include "led.h"
#include "stm32f10x.h"

void LED_Config(void)
{
  GPIO_InitTypeDef GPIO_InitStructure;

  RCC_APB2PeriphClockCmd(RCC_APB2Periph_GPIOB | RCC_APB2Periph_GPIOD , ENABLE);

  GPIO_InitStructure.GPIO_Pin = GPIO_Pin_5;
  GPIO_InitStructure.GPIO_Mode = GPIO_Mode_Out_PP;
  GPIO_InitStructure.GPIO_Speed = GPIO_Speed_50MHz;

  GPIO_Init(GPIOB, &GPIO_InitStructure);

  GPIO_InitStructure.GPIO_Pin = GPIO_Pin_6|GPIO_Pin_3;
  GPIO_InitStructure.GPIO_Speed = GPIO_Speed_50MHz;
  GPIO_InitStructure.GPIO_Mode = GPIO_Mode_Out_PP;

  GPIO_Init(GPIOD, &GPIO_InitStructure);
	LED_ALL_OFF();
}
led.h
#ifndef _LED_H
#define _LED_H

#include "stm32f10x.h"

#define LED1_ON() GPIO_SetBits(GPIOB, GPIO_Pin_5);
#define LED1_OFF() GPIO_ResetBits(GPIOB, GPIO_Pin_5);

#define LED2_ON() GPIO_SetBits(GPIOD, GPIO_Pin_6);
#define LED2_OFF() GPIO_ResetBits(GPIOD, GPIO_Pin_6);

#define LED3_ON() GPIO_SetBits(GPIOD, GPIO_Pin_3);
#define LED3_OFF() GPIO_ResetBits(GPIOD, GPIO_Pin_3);

#define LED_ALL_OFF() {GPIO_ResetBits(GPIOB, GPIO_Pin_5);GPIO_ResetBits(GPIOD, GPIO_Pin_3|GPIO_Pin_6); }
#define LED_ALL_ON() {GPIO_SetBits(GPIOB, GPIO_Pin_5);GPIO_SetBits(GPIOD, GPIO_Pin_3|GPIO_Pin_6); }

#define LED3_ON_OFF()		GPIO_WriteBit(GPIOD,GPIO_Pin_3, (BitAction)(1 - GPIO_ReadOutputDataBit(GPIOD,GPIO_Pin_3)))
#define LED2_ON_OFF()		GPIO_WriteBit(GPIOD,GPIO_Pin_6, (BitAction)(1 - GPIO_ReadOutputDataBit(GPIOD,GPIO_Pin_6)))
#define LED1_ON_OFF()		GPIO_WriteBit(GPIOB,GPIO_Pin_5, (BitAction)(1 - GPIO_ReadOutputDataBit(GPIOB,GPIO_Pin_5)))

void LED_Config(void);
#endif
key.c
#include "stm32f10x.h"

void KeyDelay(u32 Count)
{
	for(;Count!=0;Count--);

}
int num;

int flag=0;

void Key_Config(void)
{
	GPIO_InitTypeDef GPIO_InitStructure;
	RCC_APB2PeriphClockCmd(RCC_APB2Periph_GPIOC , ENABLE);

	GPIO_InitStructure.GPIO_Pin = GPIO_Pin_5|GPIO_Pin_2| GPIO_Pin_3;
	GPIO_InitStructure.GPIO_Mode = GPIO_Mode_IPU;
	GPIO_Init(GPIOC, &GPIO_InitStructure);

}
void KeyScan(void)
{
   num=0;
   	 if(GPIO_ReadInputDataBit(GPIOC,GPIO_Pin_5)==0){
	  	KeyDelay(0x3ffff);
				if(GPIO_ReadInputDataBit(GPIOC,GPIO_Pin_5)==0)
					{
						while(GPIO_ReadInputDataBit(GPIOC,GPIO_Pin_5)==0);
						num=1;
						goto n_exit;
					}
	  }
   	 else if(GPIO_ReadInputDataBit(GPIOC,GPIO_Pin_2)==0){
	  	KeyDelay(0x3ffff);	//°´¼üÏû¶¶¶¯
				if(GPIO_ReadInputDataBit(GPIOC,GPIO_Pin_2)==0)
					{
						while(GPIO_ReadInputDataBit(GPIOC,GPIO_Pin_2)==0);
						num=2;
						goto n_exit;
					}
	  }
   n_exit:;
}
key.h
#ifndef __KEY_H
#define __KEY_H
#include "stm32f10x.h"

extern int num;
extern int flag;

void Key_Config(void);
void KeyScan(void);
#endif
最后编译的时候在C/C++中药添加 led 以及 key 的路径
注:如果不进行这一步,是编译不了的,会出错


总结:代码模块化是主函数的函数更简洁,看起来条理性更清晰,写代码时候最好还是模块化,养成练好的编程习惯对自己很有帮助