树莓派3B+摄像头使用
本文为参加无人驾驶车课程学习整理的笔记,致谢毕滢老师!
一.测试摄像头是否可用
打开树莓派的终端程序,输入
cd Desktop
raspistill -o imagejpg #注意是字母o,而不是数字0
摄像头会打开几秒
拍一-张照片命名为image.jpg
存在树莓派桌面
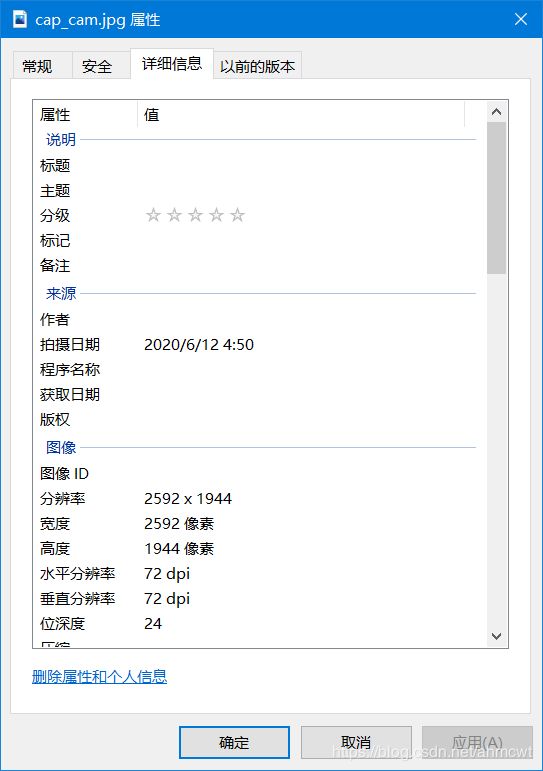
摄像头以最大分辨率拍摄一张照片
2592x1944
二.命令行控制树莓派摄像头一raspistill
pi@raspberrypi:~/Desktop $ raspistill

"raspistill" Camera App (commit 6e6a2c859a17 Tainted)

Runs camera for specific time, and take JPG capture at end if requested

usage: raspistill [options]

Image parameter commands

-q, --quality	: Set jpeg quality <0 to 100>
-r, --raw	: Add raw bayer data to jpeg metadata
-l, --latest	: Link latest complete image to filename
-t, --timeout	: Time (in ms) before takes picture and shuts down (if not specified, set to 5s)
-th, --thumb	: Set thumbnail parameters (x:y:quality) or none
-d, --demo	: Run a demo mode (cycle through range of camera options, no capture)
-e, --encoding	: Encoding to use for output file (jpg, bmp, gif, png)
-x, --exif	: EXIF tag to apply to captures (format as 'key=value') or none
-tl, --timelapse	: Timelapse mode. Takes a picture every ms. %d == frame number (Try: -o img_%04d.jpg)
-fp, --fullpreview	: Run the preview using the still capture resolution (may reduce preview fps)
-k, --keypress	: Wait between captures for a ENTER, X then ENTER to exit
-s, --signal	: Wait between captures for a SIGUSR1 or SIGUSR2 from another process
-g, --gl	: Draw preview to texture instead of using video render component
-gc, --glcapture	: Capture the GL frame-buffer instead of the camera image
-bm, --burst	: Enable 'burst capture mode'
-dt, --datetime	: Replace output pattern (%d) with DateTime (MonthDayHourMinSec)
-ts, --timestamp	: Replace output pattern (%d) with unix timestamp (seconds since 1970)
-fs, --framestart	: Starting frame number in output pattern(%d)
-rs, --restart	: JPEG Restart interval (default of 0 for none)

GL parameter commands

-gs, --glscene	: GL scene square,teapot,mirror,yuv,sobel,vcsm_square
-gw, --glwin	: GL window settings <'x,y,w,h'>

Common Settings commands

-?, --help	: This help information
-w, --width	: Set image width
-h, --height	: Set image height
-o, --output	: Output filename  (to write to stdout, use '-o -'). If not specified, no file is saved
-v, --verbose	: Output verbose information during run
-cs, --camselect	: Select camera . Default 0
-md, --mode	: Force sensor mode. 0=auto. See docs for other modes available
-gps, --gpsdexif	: Apply real-time GPS information to output (e.g. EXIF in JPG, annotation in video (requires libgps.so.23)

Preview parameter commands

-p, --preview	: Preview window settings <'x,y,w,h'>
-f, --fullscreen	: Fullscreen preview mode
-op, --opacity	: Preview window opacity (0-255)
-n, --nopreview	: Do not display a preview window
-dn, --dispnum	: Display on which to display the preview window (dispmanx/tvservice numbering)

Image parameter commands

-sh, --sharpness	: Set image sharpness (-100 to 100)
-co, --contrast	: Set image contrast (-100 to 100)
-br, --brightness	: Set image brightness (0 to 100)
-sa, --saturation	: Set image saturation (-100 to 100)
-ISO, --ISO	: Set capture ISO
-vs, --vstab	: Turn on video stabilisation
-ev, --ev	: Set EV compensation - steps of 1/6 stop
-ex, --exposure	: Set exposure mode (see Notes)
-fli, --flicker	: Set flicker avoid mode (see Notes)
-awb, --awb	: Set AWB mode (see Notes)
-ifx, --imxfx	: Set image effect (see Notes)
-cfx, --colfx	: Set colour effect (U:V)
-mm, --metering	: Set metering mode (see Notes)
-rot, --rotation	: Set image rotation (0-359)
-hf, --hflip	: Set horizontal flip
-vf, --vflip	: Set vertical flip
-roi, --roi	: Set region of interest (x,y,w,d as normalised coordinates [0.0-1.0])
-ss, --shutter	: Set shutter speed in microseconds
-awbg, --awbgains	: Set AWB gains - AWB mode must be off
-drc, --drc	: Set DRC Level (see Notes)
-st, --stats	: Force recomputation of statistics on stills capture pass
-a, --annotate	: Enable/Set annotate flags or text
-3d, --stereo	: Select stereoscopic mode
-dec, --decimate	: Half width/height of stereo image
-3dswap, --3dswap	: Swap camera order for stereoscopic
-ae, --annotateex	: Set extra annotation parameters (text size, text colour(hex YUV), bg colour(hex YUV), justify, x, y)
-ag, --analoggain	: Set the analog gain (floating point)
-dg, --digitalgain	: Set the digital gain (floating point)
-set, --settings	: Retrieve camera settings and write to stdout


Notes

Exposure mode options :
off,auto,night,nightpreview,backlight,spotlight,sports,snow,beach,verylong,fixedfps,antishake,fireworks

Flicker avoid mode options :
off,auto,50hz,60hz

AWB mode options :
off,auto,sun,cloud,shade,tungsten,fluorescent,incandescent,flash,horizon,greyworld

Image Effect mode options :
none,negative,solarise,sketch,denoise,emboss,oilpaint,hatch,gpen,pastel,watercolour,film,blur,saturation,colourswap,washedout,posterise,colourpoint,colourbalance,cartoon

Metering Mode options :
average,spot,backlit,matrix

Dynamic Range Compression (DRC) options :
off,low,med,high

pi@raspberrypi:~/Desktop $
利用raspistill命令拍摄照片
直接在终端输入raspistill即可查看所有raspistill的命令选项
常用选项
-vf上下翻转
-hf左右翻转
1.raspistill -vf -hf -o image.jpg
2.间隔一定时间拍摄一张照片
raspistill -t 30000 -tl 2000 -o image%04d.jpg #(表示4位数,不够4位时用0补充)
raspistill -t 10000 -tl 2000 -o tp%2d.jpg(错,2前面少0,当图片数在个位时文件名会成为中间有空格的如tp 0.jpg,在后续操作中易出故障,虽然如此命名,也能拍照保存)
(tp%2d.jpg,自动命名,2表示两位数,%和d是不能少的,否则不能正常命名致停拍,tp 0.jpg)
(注意:
realvnc viewer连树莓派后文件管理器闪退:(网上查得是由于树莓派在读写文件的时候异常掉电所致)
运行命令重装pcmanfm:
sudo apt-get install --reinstall pcmanfm
在调试树莓派摄像头的时候遇到,在桌面建一文件夹,储存拍摄图片,拍完之后,打开桌面文件夹时,闪退.
树莓派关机最好使用命令进行关机
sudo poweroff
sudo poweroff三.命令行控制树莓派摄像头一 raspivid
使用树莓派摄像头拍摄视频
raspivid -o video.h264 -t 6000
拍摄- -段长度为6000ms的视频
并存为video.h264
播放保存下来的视频
omxplayer video.h264
四.使用Python预览摄像头数据 --vnc设置
点击树莓派任务栏右上角的VNC图标“
点击选项菜单选择Options
选择Troubleshooting
打勾Enable experimental direct capture mode
点OK保存
设置才能预览.
五.使用Python预览摄像头数据一 picamera库
关于picamera安装,参考:picamera 1.10 教程及api中文简译(一)(https://blog.csdn.net/talkxin/article/details/50499950)
关于picamera的使用,参考:python picamera入门(https://blog.csdn.net/u012005313/article/details/51439448)
注意,自己新建文件时,千万不能命名为picamera.py
要想关闭红灯显示的话,可以设置camera.led = False。(其实好像没啥用)
from picamera import PiCamera
import time
camera = PiCamera()
camera.start_preview()
time.sleep(10)
camera.stop_preview()
捕获图像
camera.capture('image.jpg')
如果发现图像倒了,可以用rotation=180来调正.这个rotation用过一次之后,就保持着,再次用的时候,不加这一句,效果也是正的,可能也是需要类似释放端口的操作.
六.使用Python控制摄像头一一旋转
from picamera import PiCamera
import time
camera = PiCamera()
camera.rotation = 180
camera.start_preview()
time.sleep(10)
camera.stop_preview()
七.使用Python控制摄像头一翻转
#coding=utf-8
from picamera import PiCamera
import time
camera = PiCamera()
camera.vflip = True
camera.hflip = True
'''
vflip = True则上下翻转
hflip = True则左右翻转
'''
camera.start_preview()
time.sleep(10)
camera.stop_preview()
八.使用Python控制摄像头一控制分辨率
from picamera import PiCamera
import time
camera = PiCamera()
camera.resolution = (1280, 720)
camera.start_preview()
time.sleep(10)
camera.stop_preview()
静态照片最大分辨率为2592x 1944
视频最大分辨率为1920x1080
最小分辨率为64x 64
九.使用Python控制摄像头一控制亮度
from picamera import PiCamera
import time
camera = PiCamera()
camera.brightness = 70
camera.start_preview()
time.sleep(10)
camera.stop_preview()
默认亮度是50
可设置范围是0~100
根据现场实际情况调节
十.使用Python控制摄像头一设定帧率
from picamera import PiCamera
import time
camera = PiCamera()
camera.framerate = 30
camera.start_preview()
time.sleep(10)
camera.stop_preview()
小车在行驶时,实际使用约15帧.
十一.使用Python控制摄像头一控制对比度
from picamera import PiCamera
import time
camera = PiCamera()
camera.start_preview()
for i in range(100):
camera.annotate_text = "Contrast: %s" % i
camera.contrast = i
time.sleep(0.1)
camera.stop_preview()
关于%s,属于python格式化输出控制方面的知识,可参考:
Python基本格式化输出
https://blog.csdn.net/abby1559/article/details/79960249
Python格式化输出 %s %d %f
https://blog.csdn.net/meccaendless/article/details/78042754?ops_request_misc=%257B%2522request%255Fid%2522%253A%2522159204806019195239853160%2522%252C%2522scm%2522%253A%252220140713.130102334.pc%255Fblog.%2522%257D&request_id=159204806019195239853160&biz_id=0&utm_medium=distribute.pc_search_result.none-task-blog-2~blog~first_rank_v1~rank_blog_v1-1-78042754.pc_v1_rank_blog_v1&utm_term=%E6%A0%BC%E5%BC%8F%E5%8C%96
[干货]Python字符串格式化的四种姿势
https://blog.csdn.net/ning13481193737/article/details/80948501
(文章来源:https://realpython.com/python-string-formatting/
作者:Dan Bader
作者github:https://github.com/dbader
作者推特:https://twitter.com/dbader_org
作者YouTube:https://dbader.org/youtube
作者官网:https://dbader.org/)
annotate_text可以在画面上添加文字
通过改变alpha的值,可以修改摄像头拍摄图像的透明度
camera.start_preview(alpha=200)sleep(10)camera.stop_preview()
alpha的取值范围为0-255
十二.查看摄像头特效--image_effect
#coding=utf-8
from picamera import PiCamera
import time
camera = PiCamera()

#camera.image_effect = 'cartoon'
#查看所有特效
camera.start_preview()
i=1
for effect in camera.IMAGE_EFFECTS:
    camera.image_effect = effect
    #%-20s,表示20个占位符,负号表示居左,s表示输出的是字符.
    camera.annotate_text="Effect:%-20s %-20s"% (effect,i)
    i+=1
    time.sleep(1)

#time.sleep(10)
camera.stop_preview()
查看摄像头特效第二种写法with:
#coding=utf-8
#from picamera import PiCamera
import picamera
import time
#camera = PiCamera()
#摄像头特效
#camera.image_effect = 'cartoon'
#查看所有特效
with picamera.PiCamera() as camera:
	camera.start_preview()
	i=0
	tx_name=[]
	for effect in camera.IMAGE_EFFECTS:
		camera.image_effect = effect
		#%-20s,表示20个占位符,负号表示居左,s表示输出的是字符.
		i+=1
		camera.annotate_text="Effect:%-20s %-20s"% (effect,i)

		#tx=tx.append([str(i),effect])

		#camera.capture('tx_%s%s.jpg'%(effect,i))

		time.sleep(1)
		#time.sleep(10)
		tx_name.append([i,effect])
	print(tx_name)
	#下面两行查看当前python版本
	import sys
	sys.version
	camera.stop_preview()
在搜查资料的过程中,看到有:
树莓派摄像头使用常用命令及代码(0https://blog.csdn.net/oAlevel/article/details/98666162),这篇文章代码与所学接近,整理较好,可参考.
from picamera import PiCamera
import time

camera = PiCamera()
#左右上下翻转
camera.vflip = True
camera.hflip = True
#控制分辨率
#照片最大分辨率2592*1944
#视频最大分辨率1920*1080
#最小分辨率64*64
camera.resolution = (1280,720)
#控制亮度,默认亮度是50,范围是0-100
camera.brightness = 70
camera.framerate = 15

for i in range(100):
    camera.annotate_text ="Contrast: %s"%i
    camera.contrast = i
    time.sleep(0.1)
#摄像头特效
camera.image_effect = 'cartoon'
#查看所有特效
for effect in camera.IMAGE_EFFECTS:
    camera.image_effect = effect
    camera.annotate_text="Effect:%s"% effect
    time.sleep(2)

#保存照片
camera.capture('cam_cap.jpg')
camera.rotation = 180
for i in range(5):
    time.sleep(1)
    camera.capture('cam_cap%s.jpg'%i)

#保存视频
camera.start_recording('video.h264')
time.sleep(10)
camera.stop_recording()


camera.start_preview()
time.sleep(10)
camera.stop_preview()
#精简代码 自动配置资源访问语句
with picamera.PiCamera() as camera:
    camera.start_recording('video.h264')
    camera.wait_recording(120)
    camera.stop_recording()
with open(text.txt") as file:
    text_data = file.read()
关于picamera,可参考:https://blog.csdn.net/talkxin/article/details/50504147?utm_source=blogxgwz8
camera每次调用后都需要通过close释放掉picamera的资源:
import time
import picamera
camera = picamera.PiCamera()
try:
camera.start_preview()
time.sleep(10)
camera.stop_preview()
finally:
camera.close()
python的with语句块,开启picamera执行会自动最后释放掉资源(据说是隐形调用close())
import time
import picamera
with picamera.PiCamera() as camera:
camera.start_preview()
# 将led指示灯设置为关闭
camera.led = False
#实际测试红灯依然会亮
time.sleep(10)
camera.stop_preview()
import picamera

with picamera.PiCamera() as camera:
    # 将led指示灯设置为关闭
    camera.led = False
    # 这时拍照时指示灯不会亮起
    # 实际测试红灯依然会亮
    camera.capture('foo.jpg')
下面的例子重点是看
camera.capture_sequence([
        'image%02d.jpg' % i
        for i in range(frames)
        ], use_video_port=True)
这句,通过使用生成器表达式来提供要处理的文件名,而不是手动指定每个单独的文件名:(不换行形式如下)
camera.capture_sequence(['image%02d.jpg' % i for i in range(frames)], use_video_port=True)
注意这里输出文件名部分用的是[ ],但这样处理文件有局限,适合固定数量的.对于任意数量的,可用yield构造一个函数处理文件名.
#capture_sequence()它特别适合于快速捕获固定数量的帧,如以下示例所示,它捕获5张图像的“连拍”:
#参阅https://picamera.readthedocs.io/en/release-1.13/recipes2.html#rapid-capture-and-processing
import picamera
import time

frames = 60

with picamera.PiCamera() as camera:
    camera.resolution = (1024, 768)
    camera.framerate = 30
    camera.start_preview()
    # Give the camera some warm-up time
    time.sleep(2)
    start = time.time()
    #给保存的文件起名,
    camera.capture_sequence(['image%02d.jpg' % i for i in range(frames)], use_video_port=True)
    finish = time.time()
print('Captured %d frames at %.2ffps' % (
    frames,
    frames / (finish - start)))
#上面这句形式也可不换行:print('Captured %d frames at %.2ffps' % (frames,frames / (finish - start)))
含yield的文件名生成器filenames(),每被访问一次生成输出一个文件名.
import time
import picamera

frames = 60

def filenames():
    frame = 0
    while frame < frames:
        yield 'image%02d.jpg' % frame
        frame += 1

with picamera.PiCamera(resolution='720p', framerate=30) as camera:
    camera.start_preview()
    # Give the camera some warm-up time
    time.sleep(2)
    start = time.time()
    camera.capture_sequence(filenames(), use_video_port=True)
    finish = time.time()
print('Captured %d frames at %.2ffps' % (
    frames,
    frames / (finish - start)))
十三.录制视频文件--start_recording
import picamera
with picamera.PiCamera() as camera:
camera.resolution = (640, 480)
camera.start_recording('my_video.h264')
camera.wait_recording(60)
camera.stop_recording()
请注意,这里使用的方法是wait_recording,而不是time.sleep(),虽然功能上与time.sleep相同,但是wait_recording会不断的监听错误的抛出(比如磁盘空间不足),一旦出现错误会立即暂停捕获图像,来处理当前的错误,而不是在sleep以后才进行处理。用time.sleep来替代wait_recording方法的话,这种错误只能在stop_recording()后才能被处理,在sleep期间不能及时处理.这可能导致未能及时处理错误,导致图像数据捕获失败。(参考:https://blog.csdn.net/talkxin/article/details/50504601,4.11)
使用Python控制摄像头一 保存视频
from picamera import PiCamera
import time
camera = PiCamera()
camera.rotation = 180
camera.start_preview()
camera.start_recording('video.h264')
time.sleep(10)
camera.stop_recording()
camera.stop_preview()
关于picamera
在win10上安装picamera不成功,提示: File "C:\Users\38016\AppData\Local\Temp\pip-install-e_9ojzf0\picamera\setup.py", line 113, in run
raise ValueError('Unable to open /proc/cpuinfo')
ValueError: Unable to open /proc/cpuinfo
.....
而/proc/cpuinfo等文件夹是linux下的,. win10h 不支持安装这个.
参阅:原文档:https://picamera.readthedocs.io/en/release-1.13/
_Raspberry Pi: https://www.raspberrypi.org/
_camera: https://www.raspberrypi.org/learning/getting-started-with-picamera/
_PyPI: https://pypi.python.org/pypi/picamera/
_documentation: https://picamera.readthedocs.io/
_source code: https://github.com/waveform80/picamera
_bug tracker: https://github.com/waveform80/picamera/issues
_BSD license: https://opensource.org/licenses/BSD-3-Clause
GETTING STARTED WITH PICAMERA(python picamera入门)(图文俱全,但部分内容较旧,可能与现版本不太一致,以实际为准,只作参考.)
http://blog.csdn.net/u012005313/article/details/51439448
十四.白平衡模式
可以用camera.AWB_MODES循环展示多个白平衡模式
camera.exposure_mode可以设置曝光,可选参数有:off,auto,night,nightpreview,nightpreview,spotlight,sports,snow,beach,verylong,fixedfps,antishake,fireworks。预设是auto
import picamera
from picamera import Color
color=Color
awb_mode_name=[]

i=0
with picamera.PiCamera() as camera:
	camera.start_preview()
	for awbmode in camera.AWB_MODES:
		camera.awb_mode=awbmode
		i+=1
		camera.annotate_background = color('blue')
		camera.annotate_foreground = color('yellow')
		camera.annotate_text='Awb_mode:%s %i'%(awbmode,i)
		awb_mode_name.append([i,awbmode])
		time.sleep(1)
	print(i)
	print(awb_mode_name)
	camera.stop_preview()
十五.曝光模式(参阅https://picamera.readthedocs.io/en/release-1.13/api_camera.html#picamera.PiCamera.exposure_mode)
可以用camera.EXPOSURE_MODES循环展示多个曝光模式
import picamera

#查看曝光模式
i=0
from picamera import Color
color=Color
exposure_mode_name=[]
with picamera.PiCamera() as camera:
	camera.start_preview()
	for exposuremode in camera.EXPOSURE_MODES:
		camera.exposure_mode = exposuremode
		i+=1
		camera.annotate_background = color('blue')
		camera.annotate_foreground = color('yellow')
		camera.annotate_text='Awb_mode:%s %i'%(exposuremode,i)
		exposure_mode_name.append([i,exposuremode])
		time.sleep(1)
	print(i)
	print(exposure_mode_name)
	camera.stop_preview()
十六.高级一点的内容Custom outputs
对视频拍摄中每帧的处理构造一个自定义的输出类(参考https://picamera.readthedocs.io/en/release-1.13/recipes2.html#custom-outputs)
每拍摄一帧都会进来write处理
camera.start_recording(MyOut,format='mjpeg')

import picamera

class MyOutput(object):
    def __init__(self):
        self.size = 0
    def write(self, s):
        self.size += len(s)
    def flush(self):
        print('%d bytes would have been written' % self.size)

with picamera.PiCamera() as camera:
    camera.resolution = (640, 480)
    camera.framerate = 60
    camera.start_recording(MyOutput(), format='h264')
    camera.wait_recording(10)
    camera.stop_recording()
十七.实时保存每张照片
对视频拍摄中每一-帧做处理
神奇的数字: ffd8
代表一个JPG图片的开始
参阅:https://picamera.readthedocs.io/en/release-1.13/recipes2.html#rapid-capture-and-processing下第4个例
#实时保存第张照片
import io
import time
import picamera

class SplitFrames(object):
    def __init__(self):
        self.frame_num = 0
        self.output = None

    def write(self, buf):
        if buf.startswith(b'\xff\xd8'):
            # Start of new frame; close the old one (if any) and
            # open a new output
            if self.output:
                self.output.close()
            self.frame_num += 1
            self.output = io.open('image%02d.jpg' % self.frame_num, 'wb')
        self.output.write(buf)

with picamera.PiCamera(resolution='720p', framerate=30) as camera:
    camera.start_preview()
    # Give the camera some warm-up time
    time.sleep(2)
    output = SplitFrames()
    start = time.time()
    camera.start_recording(output, format='mjpeg')
    camera.wait_recording(2)
    camera.stop_recording()
    finish = time.time()
print('Captured %d frames at %.2ffps' % (
    output.frame_num,
    output.frame_num / (finish - start)))
十八.实时处理每张照片
采用多线程的方式
使用Python的threading
每接受到一-帧,放入一个空闲的线程进行处理
分析官方例程:

