微服务注册与发现Eureka介绍
1.Eureka简介
Eureka是Netflix开源的服务发现组件,本身是一个基于REST的服务。它包含Server和Client两部分。SpringCloud将它集成在子项目Spring Cloud Netflix中,从而实现微服务的注册与发现。
2.Eureka原理
在分析Eureka的原理之前,先来了解一下Region和Availability Zone,如图所示。

Region和Availability Zone均是AWS的概念。其中,Region表示AWS中的地理位置,每个Region都有多个Availability Zone,各个Region之间完全隔离。AWS通过这种方式实现了最大的容错和稳定性。
Spring Cloud 默认使用的Region是us-east-1,在非AWS环境下,可以将Availability Zone理解成机房,将Region理解为跨机房的Eureka集群。

此图来自Eureka官方的架构图,比较详细地描述了Eureka集群的工作原理。
- Application Service 服务提供者。
- Application Client 服务消费者。
- Make Remote Client 调用RESTful API的行为。
- us-east-1c、us-east-1d等都是zone,它们都属于us-east-1这个region。
Eureka的服务发现包含两大组件,服务端发现组件(Eureka Server)和客户端发现组件(Eureka Client)。服务端发现组件也被称之为服务注册中心,主要提供了服务的注册功能,而客户端发现组件主要用于处理服务的注册与发现。
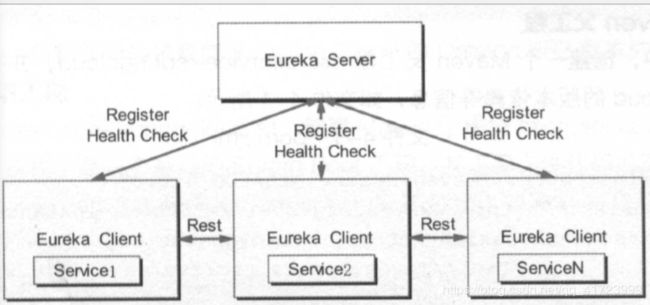
如图,当客户端服务通过注解等方式嵌入到程序的代码运行时,客户端发现组件就会向注册中心注册自身提供的服务,并周期性地发送心跳来更新服务(默认时间为30s,如果连续三次心跳都不能够发现服务,那么Eureka就会将这个服务节点从服务注册表中移除)。与此同时,客户端发现组件还会从服务端查询当前注册的服务信息并缓存到本地,即使Eureka Server出现了问题,客户端组件也可以通过缓存中的信息调用服务节点的服务,各个服务之间会通过注册中心的注册信息以Rest方式来实现调用,并且可以直接通过服务名进行调用。
Eureka的服务发现机制包含了3个角色:服务注册中心,服务提供者和服务消费者。

- 各个微服务启动时,将自己的网络地址等信息注册到服务发现组件中,服务发现组件会存储这些信息。
- 服务消费者可以从服务发现组件查询服务提供者的网络地址,并使用该地址调用服务提供者的接口。
- 各个微服务与服务发现组件使用一定机制(例如心跳)通信。服务发现组件如长时间无法与某微服务实例通信,就会注销该实例。
- 微服务网络地址发生变更(例如实例增减或者ip端口发生变化等)时,会重新注册到服务发现组件,使用这种方式,服务消费者就无须人工修改提供者的网络地址了。
综上,服务发现组件应具备一下功能:
- 服务注册表:是服务发现组件的核心,它用来记录各个微服务的信息,例如微服务的名称、IP、端口等。服务注册表提供查询API和管理API,查询API用于查询可用的微服务实例,管理API用于服务的注册与注销。
- 服务注册与服务发现:服务注册是指微服务在启动时,将自己的信息注册到服务发现组件上的过程。服务发现是指查询可用微服务列表及其网络地址的机制。
- 服务检查:服务发现组件使用一定机制定时检测已注册的服务,如发现某实例长时间无法访问,就会从服务注册表中移除该实例。
代码案例
一.搭建父工程
1.创建maven父工程microservice-springcloud。
2.在pom.xml中注入springCloud依赖。
    4.0.0
    pom

        org.springframework.boot
        spring-boot-starter-parent
        1.5.3.RELEASE


    com.mhc
    microservice-springcloud
    0.0.1-SNAPSHOT
    microservice-springcloud
    Demo project for Spring Boot


        UTF-8
        UTF-8
        1.8


            org.springframework.cloud
            spring-cloud-dependencies
            Dalston.SR3
            pom
            import


                org.springframework.boot
                spring-boot-maven-plugin
二.搭建服务端工程
1.创建maven子模块microservice-eureka-server作为服务端工程。
2.在pom.xml中注入eureka server依赖
        microservice-springcloud
        com.mhc
        0.0.1-SNAPSHOT
        ../microservice-springcloud/pom.xml

    4.0.0

    microservice-eureka-server


            org.springframework.cloud
            spring-cloud-starter-netflix-eureka-server
            1.4.3.RELEASE
3.配置服务端的yml文件
server:
  port: 8081    #端口号
eureka:
  instance:
    hostname: localhost  #实例名称
  client:
    register-with-eureka: false   #本身为注册中心,设置为false表示不需要向自己注册自己的服务
    fetch-registry: false         #本身为注册中心,不需要检索服务
    service-url:
      defaultZone: http://${eureka.instance.hostname}:${server.port}/eureka/  #注册中心的地址
4.在启动类添加@EnableEurekaServer注解
package com.mhc.microserviceeurekaservice;

import org.springframework.boot.SpringApplication;
import org.springframework.boot.autoconfigure.SpringBootApplication;
import org.springframework.cloud.netflix.eureka.server.EnableEurekaServer;

@SpringBootApplication
@EnableEurekaServer
public class MicroserviceEurekaServer {
    public static void main(String[] args) {
        SpringApplication.run(MicroserviceEurekaServer.class, args);
    }

}
5.启动应用,查看信息。在浏览器中输入访问地址http://localhost:8081即可看到Eureka的信息面板。

三.搭建客户端工程
1.创建子模块microservice-eureka-client
2.在pom.xml文件中注入eureka client依赖
        microservice-springcloud
        com.mhc
        0.0.1-SNAPSHOT
        ../microservice-springcloud/pom.xml

    4.0.0

    microservice-eureka-client


            org.springframework.cloud
            spring-cloud-starter-netflix-eureka-client
            1.4.3.RELEASE
3.配置yml文件
server:
  port: 8082
eureka:
  instance:
    prefer-ip-address: true   #是否显示主机的ip
  client:
    service-url:
      defaultZone: http://localhost:8081/eureka/  #指定eureka的服务端地址
spring:
  application:
    name: microservice-eureka-client  #指定应用名称
4.在启动类添加@EnableEurekaClient注解
package com.mhc.microserviceeurekaclient;

import com.mhc.microserviceeurekaclient.configure.ServiceInfoUtil;
import org.springframework.boot.SpringApplication;
import org.springframework.boot.autoconfigure.SpringBootApplication;
import org.springframework.cloud.netflix.eureka.EnableEurekaClient;
import org.springframework.web.bind.annotation.GetMapping;
import org.springframework.web.bind.annotation.PathVariable;
import org.springframework.web.bind.annotation.RestController;

@SpringBootApplication
@EnableEurekaClient
@RestController
public class MicroserviceEurekaClientApplication {

    public static void main(String[] args) {
        SpringApplication.run(MicroserviceEurekaClientApplication.class, args);
    }

    @GetMapping("/hello")
    public String hello(){
        System.out.println(ServiceInfoUtil.getPort());
        return "HelloWorld";
    }

}
5.启动该微服务,在注册中心可以看到此服务已被注册。

四.搭建测试工程
1.创建子模块microservcie-eureka -test。
2.在pom.xml文件中注入EurekaClient注解
        microservice-springcloud
        com.mhc
        0.0.1-SNAPSHOT
        ../microservice-springcloud/pom.xml

    4.0.0

    microserviceeurekatest


            org.springframework.cloud
            spring-cloud-starter-netflix-eureka-client
            1.4.3.RELEASE
3.配置yml文件
server:
  port: 8084
eureka:
  instance:
    prefer-ip-address: true   #是否显示主机的ip
  client:
    service-url:
      defaultZone: http://localhost:8081/eureka/  #指定eureka的服务端地址
spring:
  application:
    name: microservice-eureka-test  #指定应用名称
4.创建RestTemplate模板调用对象
package com.mhc.microserviceeurekatest.configure;

import org.springframework.cloud.client.loadbalancer.LoadBalanced;
import org.springframework.context.annotation.Bean;
import org.springframework.stereotype.Component;
import org.springframework.web.client.RestTemplate;

@Component
public class RestTemplateConfigure {

    /**
     * 配置RestTemplate模板对象
     * @return
     */
    @Bean
    //@LoadBalanced  //默认轮询负载均衡
    public RestTemplate restTemplate(){
        return  new RestTemplate();
    }
}
5.在启动类添加@EnableEurekaClient注解,注入RestTemplate对象实现服务调用
package com.mhc.microserviceeurekatest;

import org.springframework.beans.factory.annotation.Autowired;
import org.springframework.boot.SpringApplication;
import org.springframework.boot.autoconfigure.SpringBootApplication;
import org.springframework.cloud.netflix.eureka.EnableEurekaClient;
import org.springframework.web.bind.annotation.GetMapping;
import org.springframework.web.bind.annotation.RestController;
import org.springframework.web.client.RestTemplate;

@SpringBootApplication
@EnableEurekaClient
//@RibbonClient(name="microservice-eureka-client",configuration = RibbonConfiguration.class)
@RestController
public class MicroserviceEurekaTestApplication {

    @Autowired
    private RestTemplate restTemplate;

    public static void main(String[] args)  {
        SpringApplication.run(MicroserviceEurekaTestApplication.class, args);
    }

    @GetMapping("/hello")
    public String hello(){
        return restTemplate.getForObject("http://microservice-eureka-client/hello",String.class);
    }

}
6.启动此服务,在浏览器中访问,实现服务间的调用。
Eureka Server的高可用
在线上生产环境中,Eureka Client会定时连接Eureka Server,获取服务注册表中的信息并缓存到本地,微服务在消费远程API时总是使用本地缓存中的数据,因此一般来说,即使Eureka Server发生宕机,也不会影响到服务之间的调用,但如果Eureka Server宕机时,某些微服务也出现了不可用的情况,Eureka Client中的缓存若不被更新,就可能会影响到微服务的调用,甚至影响到整个应用系统的高可用性。因此,在生产环境中,通常会部署一个高可用的Eureka Server集群。
Eureka Server可以通过运行多个实例并相互注册的方式实现高可用部署,Eureka Server实例会彼此增量的同步消息,从而确保所有数据节点数据保持一致。
1.复制microservice-eureka-server服务,将ArtifactId修改为microservuce-eureka-server1.
2.配置系统的hosts文件
127.0.0.1 peer1 peer2
3.将application.yml修改如下:让两个节点的Eureka Server相互注册。
spring:
  application:
    name: microservice-eureka-server1
---
spring:
  #指定profile=peer1
  profiles: peer1
server:
  port: 8081
eureka:
  instance:
    #指定当profile=peer1时  主机名是peer1
    hostname: peer1
  client:
    service-url:
      #将自己注册到peer2这个eurekas上面去
      defaultZone: http://localhost:8085/eureka/
---
spring:
  profiles: peer2
server:
  port: 8085
eureka:
  instance:
    hostname: peer2
  client:
    service-url:
      defaultZone: http://localhost:8081/eureka/
使用连字符(---)将该application.yml文件分为三段。第二段和第三度分别为spring.properties指定了一个值,该值表示它所在的那段内容应用在哪个profile里,第一段由于并未指定spring.profiles,因此这段内容会对所有的Profile生效。
当然,微服务即使只是配置Eureka Server集群中的某个节点,也能正常注册到Eureka Server集群,因为多个Eureka Server之间的数据会相互同步。
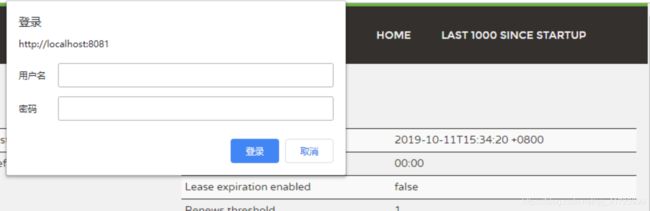
Eureka Server添加用户认证
Eureka Server是允许匿名访问的,也可以设置登录才能访问。
1.创建子模块microservice-eureka-security
2.在pom.xml中注入spring-boot-starter-security的依赖,该依赖为Eureka Server提供用户认证的能力。
            org.springframework.boot
            spring-boot-starter-security
3.配置application.yml文件
security:
  basic:
    enabled: true
  user:
    name: root
    password: 123
4.启动登录