基于javaswing实现PC端课堂点名程序详细设计
1.系统分析
本系统是基于PC/windows10/Eclipse/Jcreator Pro/JBuild/JDK1.8环境下开发设计的,编写是采用java语言,主要体现了对学生随机点名提问情况的考核和统计记录功能,该系统简单易用,运行稳定,使用者可以直接导入班级学生名单(Excel),导入后可进行随机点名并记录成绩,该系统可适用于高校课堂教学使用。
2.功能描述
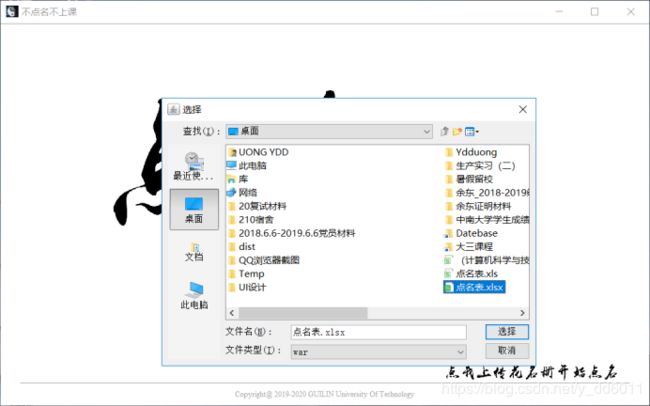
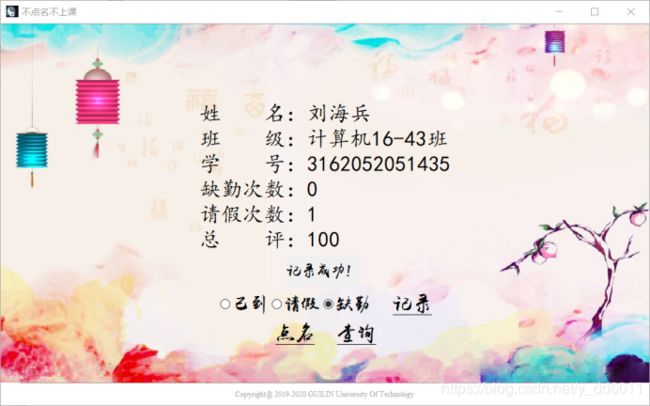
教师进入系统界面后,可找到已经准备好的点名册路径并上传至系统,待上传成功后,会有“上传成功”的提示,此时可以随时准备开始点名。点击“开始点名”后,系统后台会随机抽取名单内的学生信息,显示在屏幕中央,并在屏幕中央有对应的出勤情况(每种情况对应有一定的分值),当教师为该生选择某种出勤情况时,后台会记录其对应的得分,并在最终得分处进行相应的处理。
数据描述
输入要求:
要求用户已有其要点名的人员名单的Excel文件
输出要求:
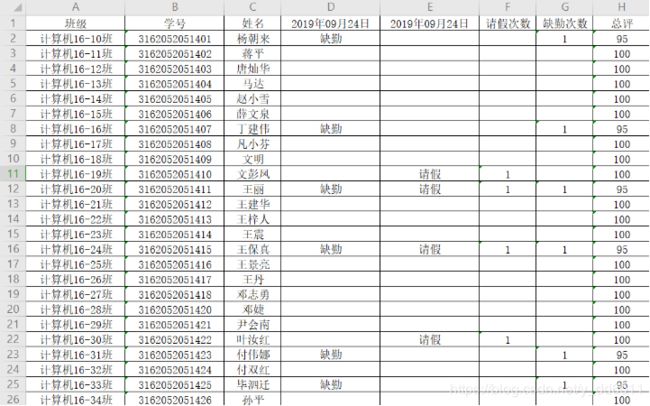
当用户启动点名系统开始点名后,可根据学生考勤情况进行相应的记录并将记录写回原有的Excel文件中,且每点名一次就会产生一列记录情况,并进行相应的考勤情况统计和考勤得分更新。
运行环境要求:
因为java具有跨平台性,所以我们开发的点名程序在任何PC端操作系统都可以运行,由于部分运行换环境没有java运行环境,只要附带精简之后的JRE,不仅软件占内存小,而且通过批处理命令start jre/bin/javaw -jar yourName.jar保证在任何PC端操作系统下可以运行。
3.系统概要设计
3.1系统模块图
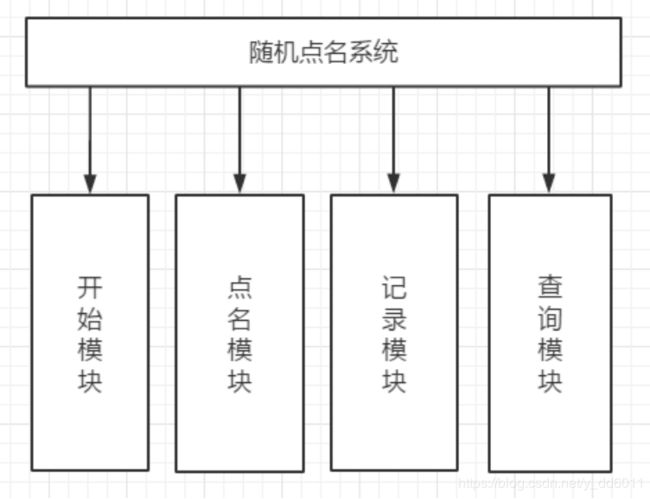
3.2系统主要流程

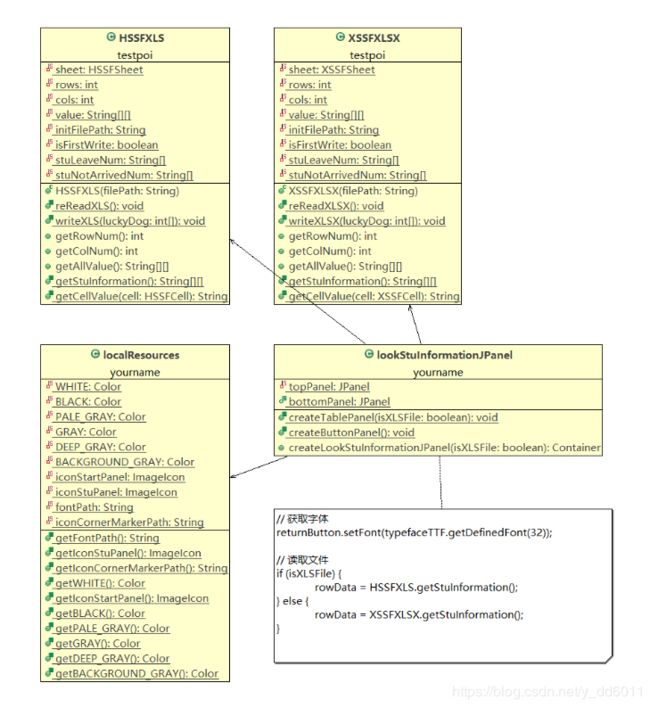
3.3随机点名系统类图
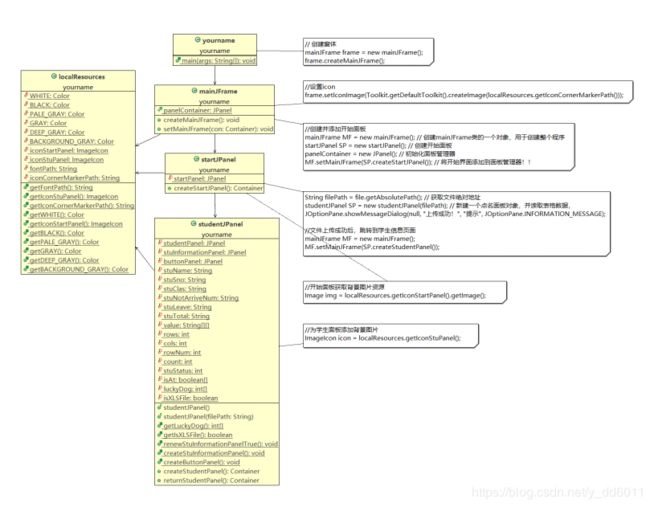
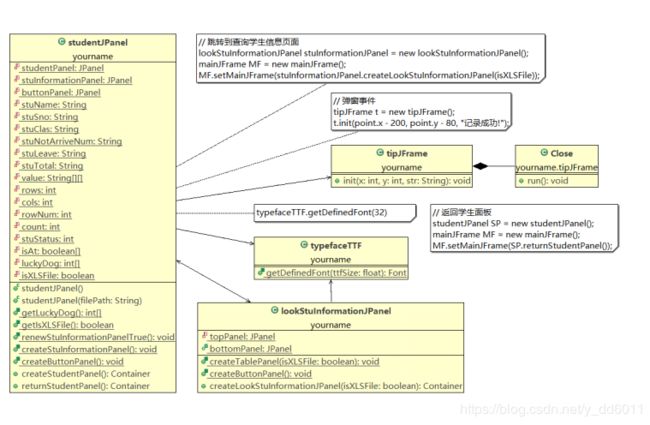
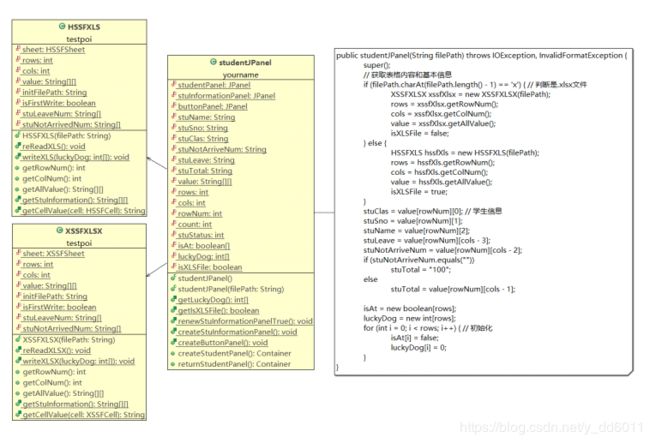
4.详细设计
4.1程序结构图
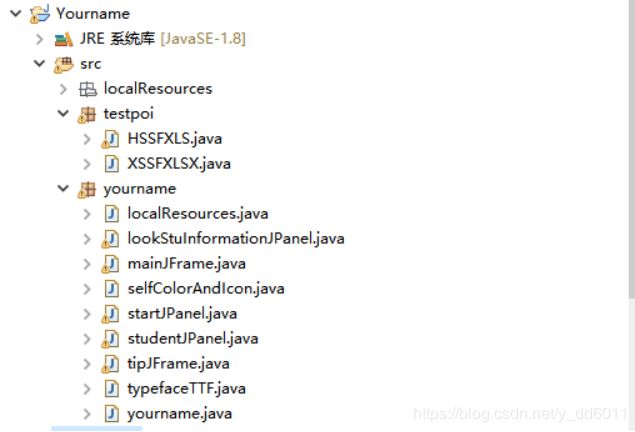
4.2程序文件清单
1.yourname类,程序开始(yourname.java):
1.1main函数调用mainJFrame类,创建一个程序框架Frame
2.mainJFrame类(mainJFrame.java):
2.1createMainJFrame函数就是创建整个应用程序的框
2.1.1 splitTopLine页面顶部的分割线
2.1.2 panelContainer面板用来显示所有信息
2.1.3 bottomLinePanel页面底部文字上面的分割线
2.1.4 copyright页面底部的文字声明
2.1.5每次所谓刷新页面都是刷新panelContainer面板来实现的
2.2setMainJFrame刷新页面
2.2.1传入新的面板,然后将新面板添加到框架panelContainer面板中,达到刷新页面的效果。
3.startJPanel类(startJPanel.java):
3.1createStartJPanel函数,创建开始页面
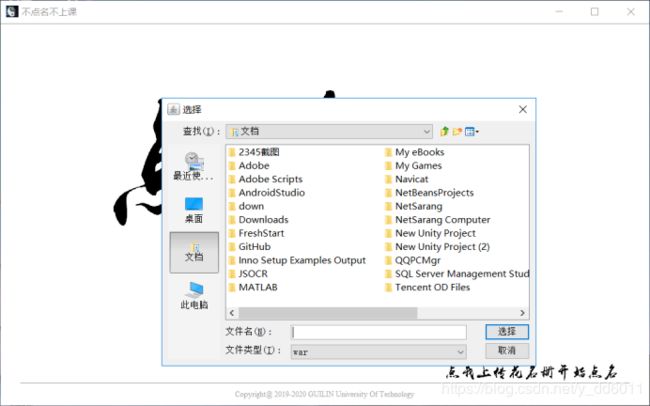
3.2它有一个鼠标点击监听事假,只要有鼠标点击页面,就会弹出上传文件的窗口,。如果传入的文件合理,就跳转到学生信息页面,否则提示“上传失败”,另外,提示“上传成功”后,会获得表格文件的绝对地址,在跳转到学生信息页面时会将这个绝对地址一并传过去。
4.studentJPanel类(studentJPanel.java):
4.1这个类就是获取学生信息并显示学生信息的面板,以及有一些按钮来操作的
4.2在第一生声明这个类的时候,必须传入一个文件地址filePath,并判断它是xls文件还是xlsx文件,从而判别是调用HSSFXLS还是调用XSSFXLSX类,调用之后就获取了整个表格的信息了,比如:行数、列数、整个表格的信息(一个二维String数组)
4.3createStudentPanel函数创建学生面板,学生面板主要有学生信息面板stuInformationPanel和按钮面板buttonPanel两部分构成
5.lookStuInformationJPanel类(lookStuInformationJPanel.java):
5.1.lookStuInformationJPanel类被studentJPanel类“查询”按钮来调用
5.2这个面板由上部分的table面板和下面的按钮面板构成
6.HSSFXLS和XSSFXLSX类主要是对Excel表格的操作
7.localResources类主要存放本地的资源,如:图片和字体,还有自定义的颜色
8.typefaceTTF类是自定义的字体,返回本地字体
9.tipJFrame类是弹窗。
4.3程序设计说明
4.3.1主要数据结构
(1)int[] luckyDog; // luckyDog[2] = 1表明第二位学生状态为“已到”
学生的状态有四种:0 1 2 3 分别表示未点名、已到、请假、缺勤
(2)luckyDog赋值(核心代码如下):
JLabel recordLabel = new JLabel("记录");
recordLabel.addMouseListener(new MouseAdapter() { // 鼠标点击监听事件
    @Override
    public void mouseClicked(MouseEvent e) {
        luckyDog[rowNum] = stuStatus; // 将由单选按钮获取的值赋值给luckyDog
    }
});
(3)luckyDog写入表格(核心代码如下):
if (j == cols - 3) { // 添加的新列
    if (i == 0) {  // 第一行
        Calendar calendar = Calendar.getInstance();
        SimpleDateFormat dateFormat = new SimpleDateFormat("yyyy年MM月dd日");
        String data = dateFormat.format(calendar.getTime());
        cell.setCellValue(data); // 第一行设置为当天的日期
    } else {
        switch (luckyDog[i]) {
            case 0: // 没有点到
                cell.setCellValue("");
                break;
            case 1: // 学生已到
                cell.setCellValue("已到");
                break;
            case 2: // 学生请假
                cell.setCellValue("请假");
                break;
            case 3: // 学生缺勤
                cell.setCellValue("缺勤");
                break;
        }
    }
}
4.3.2调用的函数及控件
(1)操作Excel表格的函数主要来源于POI包,主要操作如下:
1.XSSFXLSX(String filePath)// 构造函数 传入文件绝对地址,构建一个表格对象
2.reReadXLSX()// 这个函数也是读取表格内容,用于打开表格之后,再重读表格内容的
3.writeXLSX(Elempty data)// 写数据:传入此次点名的数据,那些学生被点名了,那些没有
4.getRowNum(String filePath)// 获取表格的行数
5.getColNum()// 获取列数
6.getAllValue()// 获取整个表格的内容
7.getStuInformation()// 获取学生信息的基本信息
8.getCellValue(XSSFCell cell)// 判断单元的数据类型,将转化为字符串类型,并返回数据
(2)对于界面的控件主要基于java.awt.* 和javax.swing.* ,主要使用类型如下:
1.JFrame frame = new JFrame(“不点名不上课”); // 创建框架
2.JPanel bottomLinePanel = new JPanel(); // 创建面板
3.JSeparator splitTopLine = new javax.swing.JSeparator(); // 分割线
4.JLabel copyright = new JLabel(“Copyright@2019-2020 GUILIN University Of Technology”);
5.JRadioButton arrivedRadioButton = new JRadioButton(“已到”); // 单选按钮
6.ButtonGroup radioButtonGroup = new ButtonGroup(); // 设置成安选按钮组
7.JTable table = new JTable(new DefaultTableModel(newData, columnName));// 创建表格
8.JScrollPane scrollPane = new JScrollPane(table); // 创建包含表格的滚动窗格
(3)关于页面刷新(比如从studentJPanel跳转到lookStuInformationJPanel):
//1.先申请lookStuInformationJPanel的一个对象
lookStuInformationJPanel stuInformationJPanel = new lookStuInformationJPanel();
//2.创建一个新的面板容器,来装lookStuInformationJPanel
Container newPanel = stuInformationJPanel.createLookStuInformationJPanel(isXLSFile);
//3.申请一个mainJFrame类(主框架)的对象
mainJFrame MF = new mainJFrame();
//4.将新面板更新到主框架内
MF.setMainJFrame(newPanel);
4.4各模块详细设计
4.4.1界面元素设计
(1)为panel添加背景:
// 开始界面的图片展示
startPanel = new JPanel() {
@Override // 重载paintComponent画图函数
	protected void paintComponent(Graphics g) {
		Image img = localResources.getIconStartPanel().getImage();
		g.drawImage(img, 0, 0, startPanel.getWidth(),
				startPanel.getHeight(), localResources.getIconStartPanel().getImageObserver		());
	}
};
(2)给标签label添加下划线:
//点名标签
JLabel selectStuNameLabel = new JLabel("点名") {
	@Override // 画下划线
	public void paint(Graphics g) {
		super.paint(g);
		Rectangle r = g.getClipBounds();
		g.drawLine(0, r.height - getFontMetrics(getFont()).getDescent() + 5,
				getFontMetrics(getFont()).stringWidth(getText()), r.height
				- getFontMetrics(getFont()).getDescent() + 5);
	}
};
(3)引用本地字体typefaceTTF.getDefinedFont(32):
public static Font getDefinedFont(float ttfSize) {
	Font definedFont = null;
	InputStream inputStream = null;
	BufferedInputStream bufferedInputStream = null;
	try {
		inputStream = new FileInputStream(new File(localResources.getFontPath()));
		bufferedInputStream = new BufferedInputStream(inputStream);
		definedFont = Font.createFont(Font.TRUETYPE_FONT, inputStream);
		definedFont = definedFont.deriveFont(ttfSize); // 设置字体大小
	} catch (FontFormatException | IOException e) {
	} finally {
		try {
			if (null != bufferedInputStream) {
				bufferedInputStream.close();
			}
			if (null != inputStream) {
				inputStream.close();
			}
		} catch (IOException e) {
		}
	}
	return definedFont;
}
(4)本地资源引用,方便修改:
Color WHITE = new Color(16777215);
ImageIcon iconStartPanel = new ImageIcon("src\\localResources\\startPanel.jpg");
ImageIcon iconStuPanel = new ImageIcon("src\\localResources\\studentPanel.jpg");
String fontPath = "src\\localResources\\禹卫书法行书简体(新优化版).ttf";
String iconCornerMarkerPath = "src\\localResources\\markerIcon.jpg";

public static String getFontPath() {
	return fontPath;
}
public static ImageIcon getIconStuPanel() {
	return iconStuPanel;
}
public static String getIconCornerMarkerPath() {
	return iconCornerMarkerPath;
}
public static Color getWHITE() {
	return WHITE;
}
public static ImageIcon getIconStartPanel() {
	return iconStartPanel;
}
(5)利用一些小元素美化页面,如分割线,页面底部的版权文字说明等
4.4.2界面布局设计
主要采用BoxLayout和GridBagLayout布局
(1)BoxLayout例示(两端与程序框架留有距离的分割线)
JPanel bottomLinePanel = new JPanel();
// 设置水平添加控件
bottomLinePanel.setLayout(new BoxLayout(bottomLinePanel, BoxLayout.X_AXIS));
bottomLinePanel.add(Box.createHorizontalStrut(32)); // 添加一个占位结构体
JSeparator splitBottomLine = new javax.swing.JSeparator(); // 创建分割线
bottomLinePanel.add(splitBottomLine);
bottomLinePanel.add(Box.createHorizontalStrut(32));
(2)GridBagLayout例示(学生信息显示页面按钮布局)
GridBagLayout gridBag = new GridBagLayout(); // 网格布局
GridBagConstraints constraints = null; // 布局属性
buttonPanel = new JPanel(gridBag);

//依次添加按钮
constraints = new GridBagConstraints();
constraints.gridx = 0;
constraints.gridy = 0;
gridBag.addLayoutComponent(arrivedRadioButton, constraints);

constraints = new GridBagConstraints();
constraints.gridx = 1;
constraints.gridy = 0;
gridBag.addLayoutComponent(leaveRadioButton, constraints);

constraints = new GridBagConstraints();
constraints.gridx = 2;
constraints.gridy = 0;
gridBag.addLayoutComponent(notArrivedRadioButton, constraints);

constraints = new GridBagConstraints();
constraints.gridx = 3;
constraints.gridy = 0;
gridBag.addLayoutComponent(recordLabel, constraints);

constraints = new GridBagConstraints();
constraints.gridx = 1;
constraints.gridy = 1;
gridBag.addLayoutComponent(selectStuNameLabel, constraints);

constraints = new GridBagConstraints();
constraints.gridx = 2;
constraints.gridy = 1;
gridBag.addLayoutComponent(queryLabel, constraints);

buttonPanel.add(arrivedRadioButton);
buttonPanel.add(leaveRadioButton);
buttonPanel.add(notArrivedRadioButton);
buttonPanel.add(recordLabel);
buttonPanel.add(selectStuNameLabel);
buttonPanel.add(queryLabel);
4.4.3开始模块设计
开始模块只要一个面板元素,为其添加了背景图片和一个鼠标点击监听事件。鼠标点击监听事件,只要有鼠标点击页面,就会弹出上传文件的窗口,。如果传入的文件合理,就跳转到学生信息页面,否则提示“上传失败”,另外,提示“上传成功”后,会获得表格文件的绝对地址,在跳转到学生信息页面时会将这个绝对地址一并传过去。
public Container createStartJPanel() {
	// 开始界面的图片展示
	startPanel = new JPanel() {
		protected void paintComponent(Graphics g) {
			Image img = localResources.getIconStartPanel().getImage();
			g.drawImage(img, 0, 0, startPanel.getWidth(),
					startPanel.getHeight(), localResources.getIconStartPanel().getImageObserver());
		}
	};
// 开始面板的鼠标相应事件
	startPanel.addMouseListener(new MouseAdapter() {
		@Override
		public void mouseClicked(MouseEvent e) {
			System.out.println("kaishi");
			JFileChooser jfc = new JFileChooser();
			jfc.setFileSelectionMode(JFileChooser.FILES_ONLY);
			jfc.setMultiSelectionEnabled(true);
			jfc.setFileFilter(new FileNameExtensionFilter("war", "xlsx", "xls"));
			jfc.showDialog(new JLabel(), "选择");
			try {
				File file = jfc.getSelectedFile(); // 用户选择的文件
				String filePath = file.getAbsolutePath(); // 获取文件绝对地址
				studentJPanel SSP = new studentJPanel(filePath); // 新建一个点名面板对象,并读取表格数据,
				JOptionPane.showMessageDialog(null, "上传成功!", "提示", JOptionPane.INFORMATION_MESSAGE);
				//文件上传成功后,跳转到学生信息页面
				mainJFrame MF = new mainJFrame();
				MF.setMainJFrame(SSP.createStudentPanel());
			} catch (NullPointerException es) {
				JOptionPane.showMessageDialog(null, "上传失败!", "提示", JOptionPane.ERROR_MESSAGE);
			} catch (IOException | InvalidFormatException ex) {
				Logger.getLogger(startJPanel.class.getName()).log(Level.SEVERE, null, ex);
			}
		}
	});
	return startPanel; // 返回开始面板
}
4.4.4点名模块设计
点名模块主要是为“点名”添加相应相应事件,随机抽查学生,更新信息等,这里创建一个新的线程来实现更新信息。
//点名标签
JLabel selectStuNameLabel = new JLabel("点名");
selectStuNameLabel.addMouseListener(new MouseAdapter() {
	@Override
	public void mouseClicked(MouseEvent e) {
// 刷新学生信息页面(开线程)
			new renewStuInformationPanelThread().start();
	}
});

//开线程,刷新页面
class renewStuInformationPanelThread extends Thread { //封装成函数,在按钮监听事件了调用
	@SuppressWarnings("deprecation")
	public void run() {
		for (int i = 0; i < 32; i++) {
			try {
				renewStuInformationPanelTrue(); // 更新学生信息页面函数
				Thread.sleep(35);// 线程暂停35MS
			} catch (InterruptedException e) {
			}
		}
		isAt[rowNum] = true; // 标记该学生,不会在下次点名的时候再次点到他
		count++; // 计数器,全部学生被点之后,就不会再点名了,防止死循环
	}
}

// 更新学生信息页面函数
public static void renewStuInformationPanelTrue() {
	if (count == rows - 1) {
		JOptionPane.showMessageDialog(null, "全部学生已经点过了", "提示", JOptionPane.INFORMATION_MESSAGE);
		return;
	}
	Random random = new Random();
	while (true) { //去重
		rowNum = random.nextInt(rows - 1) + 1; //产生一个随机数
		if (isAt[rowNum] == false) { //判断学生有没有被点,值为false则没被点了,跳出
			break;
		}
	}
	// 重新赋值
stuClas = value[rowNum][0];
	stuSno = value[rowNum][1];
	stuName = value[rowNum][2];
	stuLeave = value[rowNum][cols - 3];
	stuNotArriveNum = value[rowNum][cols - 2];
	if(stuNotArriveNum.equals("")) stuTotal = "100";
	else stuTotal = value[rowNum][cols - 1];

// 更新页面
	stuInformationPanel.removeAll();
	createStuInformationPanel(); // 重新添加组件
	stuInformationPanel.setOpaque(false);
	stuInformationPanel.validate();
	stuInformationPanel.repaint();
}
4.4.5记录模块设计
//记录标签
JLabel recordLabel = new JLabel("记录");
recordLabel.addMouseListener(new MouseAdapter() { // 鼠标点击监听事件
	@Override
	public void mouseClicked(MouseEvent e) {
		Point point = java.awt.MouseInfo.getPointerInfo().getLocation(); // 获取鼠标坐标
		tipJFrame t = new tipJFrame();
		t.init(point.x - 200, point.y - 80, "记录成功!"); // 弹窗事件
		luckyDog[rowNum] = stuStatus; // 记录学生状态
	}
});
4.4.6查询模块设计
为了达到是查询数据时最新的,每次查询前都先保存点名记录
//查询标签
JLabel queryLabel = new JLabel("查询");
queryLabel.addMouseListener(new MouseAdapter() {
	@Override
	public void mouseClicked(MouseEvent e) {
		try { // 查询前先回写数据
			if (isXLSFile) { // 判断文件类型,调用相应的类
				HSSFXLS.writeXLS(luckyDog);
			} else {
				XSSFXLSX.writeXLSX(luckyDog);
			}
		} catch (IOException ex) {
			Logger.getLogger(studentJPanel.class.getName()).log(Level.SEVERE, null, ex);
		}

		Point point = java.awt.MouseInfo.getPointerInfo().getLocation();
		tipJFrame t = new tipJFrame();
		t.init(point.x - 120, point.y - 50, "数据已更新!"); // 弹窗
// 跳转到查询学生信息页面
		lookStuInformationJPanel stuInformationJPanel = new lookStuInformationJPanel();
		mainJFrame MF = new mainJFrame();
		MF.setMainJFrame(stuInformationJPanel.createLookStuInformationJPanel(isXLSFile));
	}
});
4.4.7弹窗设计
// 弹窗初始化
public void init(int x, int y, String str) {
	JLabel tip = new JLabel(str);
	tip.setFont(typefaceTTF.getDefinedFont(24));
	tip.setOpaque(false);
	this.add(tip);
	this.setLocation(x, y);
	this.setUndecorated(true); // 除去边框
	this.pack();
	this.setVisible(true);
	new Close().start();
}

/**
* 开线程
*/
public class Close extends Thread {
	public void run() {
		try {
			Thread.sleep(660); // 线程暂停660MS
		} catch (InterruptedException e) {
		}
		dispose(); // 销毁弹窗
	}
}
5.随机点名系统的实现与测试
5.1导入学生信息功能测试

图5-1 程序运行开始界面
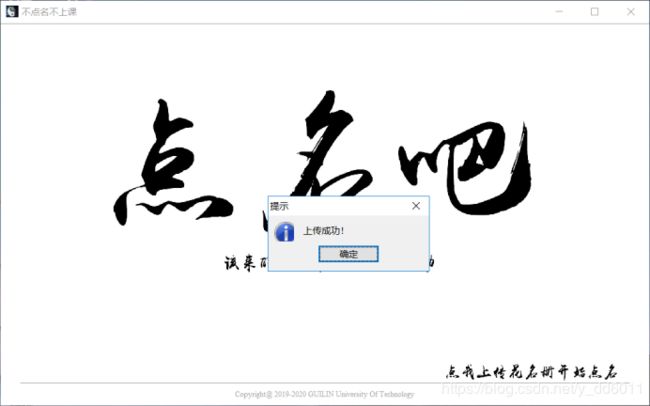
图5-4 文件上传成功
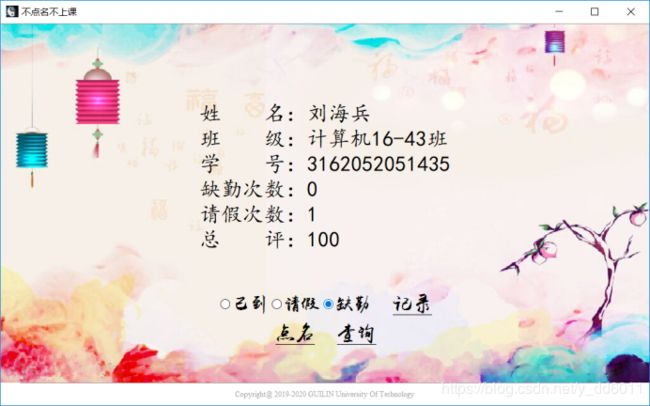
5.2随机点名及记录记录给分功能测试
图5-7 初始进入查询界面

图5-8 查询界面
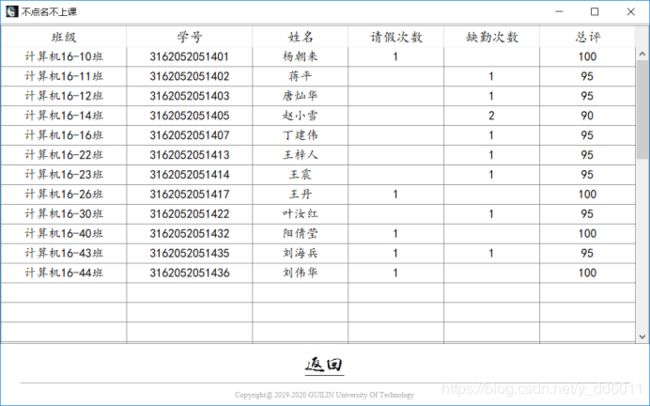
5.3其他功能测试
图5-9 上传文件弹窗
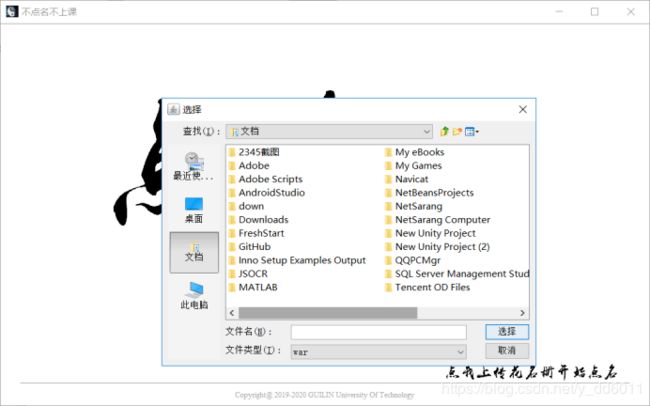
图5-10 文件上传失败弹窗
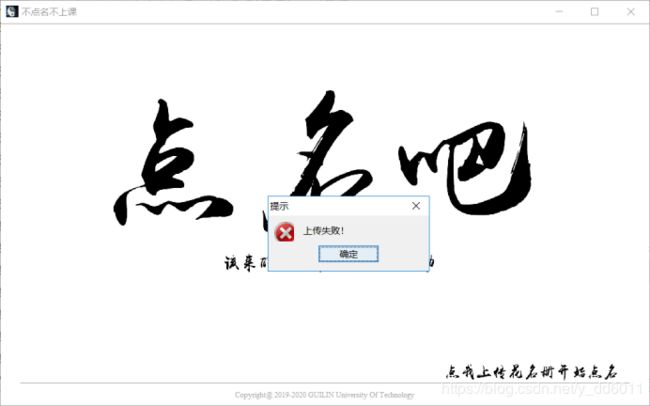
图5-11 点名页面
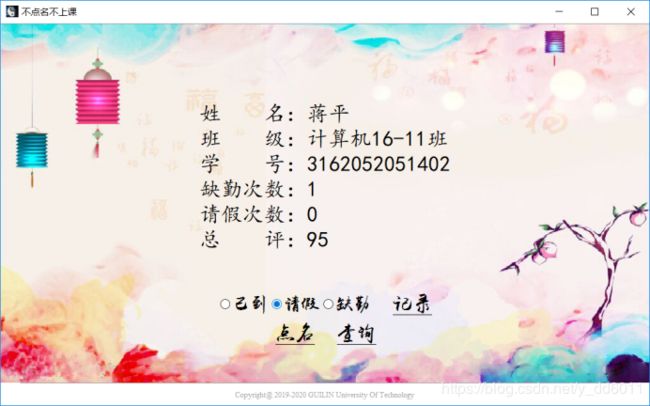
图5-12 关闭应用程序,温馨提示弹窗
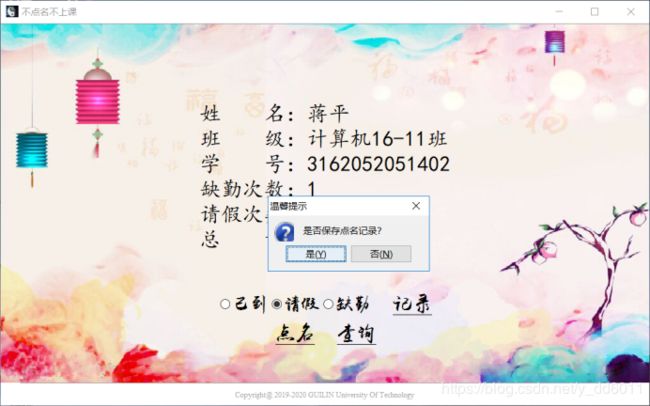
图5-13 初始Excel表格内容
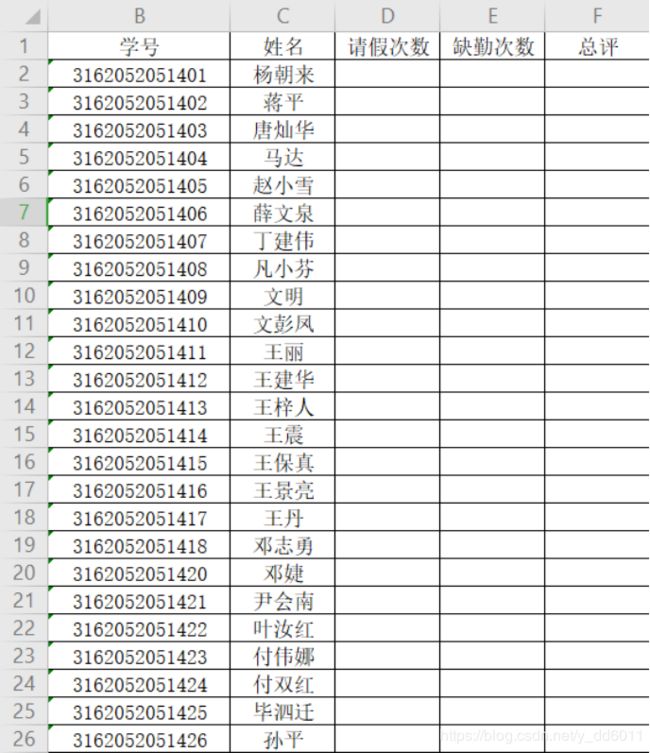
图5-14 使用软件点名2次之后Excel表格内容
最后附上项目文件链接:https://pan.baidu.com/s/1yyy7d5iSuwodLwg-OxJtiw
提取码:kwc1
