iOS UI入门——使用Objective-C和Swift实现自定义的UITableViewCell
接着上篇的UITableViewCell的基类,这里自定义的UITableViewCell都继承上篇的BaseTableViewCell。
Objective-C代码:
自定义cell:
#import "CustomTableViewCell.h"

@interface CustomTableViewCell ()

@property(nonatomic,strong) UIImageView * avatarImageView;
@property(nonatomic,strong) UILabel * nicknameLabel;
@property(nonatomic,strong) UILabel * genderLabel;
@property(nonatomic,strong) UILabel * signLabel;

@end

@implementation CustomTableViewCell

-(void)setupUI{
    [self.contentView addSubview:self.avatarImageView];
    [self.contentView addSubview:self.nicknameLabel];
    [self.contentView addSubview:self.genderLabel];
    [self.contentView addSubview:self.signLabel];
}

//需要在.h中声明
-(void)updateUI:(NSDictionary *)dic{
    self.avatarImageView.image = [UIImage imageNamed:dic[@"avatar"]];
    self.nicknameLabel.text = dic[@"nickname"];
    self.genderLabel.text = [NSString stringWithFormat:@"%@岁 %@",dic[@"age"],dic[@"gender"]];
    self.signLabel.text = dic[@"sign"];
}

-(UIImageView *)avatarImageView{
    if (!_avatarImageView) {
        _avatarImageView = [[UIImageView alloc] initWithFrame:CGRectMake(10, 10, 60, 60)];
        _avatarImageView.layer.cornerRadius = 30;
        _avatarImageView.layer.masksToBounds = YES;
    }
    return _avatarImageView;
}

-(UILabel *)nicknameLabel{
    if (!_nicknameLabel) {
        _nicknameLabel = [[UILabel alloc] initWithFrame:CGRectMake(80, 10, 150, 20)];
        _nicknameLabel.font = [UIFont systemFontOfSize:16];
    }
    return _nicknameLabel;
}

-(UILabel *)genderLabel{
    if (!_genderLabel) {
        _genderLabel = [[UILabel alloc] initWithFrame:CGRectMake(80, 30, 150, 20)];
        _genderLabel.font = [UIFont systemFontOfSize:15];
        _genderLabel.textColor = [UIColor magentaColor];
    }
    return _genderLabel;
}

-(UILabel *)signLabel{
    if (!_signLabel) {
        _signLabel = [[UILabel alloc] initWithFrame:CGRectMake(80, 50, 220, 20)];
        _signLabel.font = [UIFont systemFontOfSize:14];
        _signLabel.lineBreakMode = NSLineBreakByTruncatingTail;
        _signLabel.textColor = [UIColor lightGrayColor];
    }
    return _signLabel;
}

- (void)awakeFromNib {
    [super awakeFromNib];
    // Initialization code
}

- (void)setSelected:(BOOL)selected animated:(BOOL)animated {
    [super setSelected:selected animated:animated];

    // Configure the view for the selected state
}

@end
ViewController中调用,先import自定义的CustomTableViewCell类,这里主要给出cellForRowAtIndexPath代理方法的实现:
-(UITableViewCell *)tableView:(UITableView *)tableView cellForRowAtIndexPath:(NSIndexPath *)indexPath{
    //设置cell的复用
    CustomTableViewCell * cell = [tableView dequeueReusableCellWithIdentifier:@"ID"];
    if (!cell) {
        //初始化cell
        cell = [[CustomTableViewCell alloc] initWithStyle:UITableViewCellStyleDefault reuseIdentifier:@"ID"];
        //设置每行在被选中时的样式
        cell.selectionStyle = UITableViewCellSelectionStyleBlue;
        //设置右边显示样式
        cell.accessoryType = UITableViewCellAccessoryDisclosureIndicator;
    }
    //更新cell
    [cell updateUI:self.dataArray[indexPath.row]];
    //显示cell
    return cell;
}
Swift代码:
自定义cell代码:
import UIKit

class CustomTableViewCell: BaseTableViewCell {

    override func awakeFromNib() {
        super.awakeFromNib()
        // Initialization code
    }

    override func setupUI() {
        self.contentView.addSubview(self.avatarImageView)
        self.contentView.addSubview(self.nicknameLabel)
        self.contentView.addSubview(self.genderLabel)
        self.contentView.addSubview(self.signLabel)
    }

    func updateUI(dic:NSDictionary) {
        self.avatarImageView.image = UIImage.init(named: (dic["avatar"] as? String)!)
        self.nicknameLabel.text = dic["nickname"] as? String
        self.genderLabel.text = String.init(format: "%@岁 %@", (dic["age"] as? String)!,(dic["gender"] as?String)!)
        self.signLabel.text = dic["sign"] as? String
    }

    lazy var avatarImageView: UIImageView = {
        let imageView = UIImageView.init(frame: CGRect.init(x: 10, y: 10, width: 60, height: 60))
        imageView.layer.cornerRadius = 30
        imageView.layer.masksToBounds = true
        return imageView
    }()

    lazy var nicknameLabel: UILabel = {
        let label = UILabel.init(frame: CGRect.init(x: 80, y: 10, width: 150, height: 20))
        label.font = UIFont.systemFont(ofSize: 16)
        return label
    }()

    lazy var genderLabel: UILabel = {
        let label = UILabel.init(frame: CGRect.init(x: 80, y: 30, width: 150, height: 20))
        label.font = UIFont.systemFont(ofSize: 15)
        label.textColor = UIColor.magenta
        return label
    }()

    lazy var signLabel: UILabel = {
        let label = UILabel.init(frame: CGRect.init(x: 80, y: 50, width: 220, height: 20))
        label.font = UIFont.systemFont(ofSize: 14)
        label.textColor = UIColor.lightGray
        return label
    }()

    override func setSelected(_ selected: Bool, animated: Bool) {
        super.setSelected(selected, animated: animated)

        // Configure the view for the selected state
    }

}
ViewController中调用,不需要import,cellForRowAtIndexPath代理方法实现的代码:
    func tableView(_ tableView: UITableView, cellForRowAt indexPath: IndexPath) -> UITableViewCell {
        //设置cell的复用,这里注意,一定要加上as? CustomTableViewCell,否则可能无法调用updateUI方法
        var cell = tableView.dequeueReusableCell(withIdentifier: "ID") as? CustomTableViewCell
        if cell == nil {
            //初始化cell
            cell = CustomTableViewCell.init(style: UITableViewCellStyle.default, reuseIdentifier: "ID")
            //设置每行在被选中时的样式
            cell?.selectionStyle = UITableViewCellSelectionStyle.blue
            //设置右边显示样式
            cell?.accessoryType = UITableViewCellAccessoryType.disclosureIndicator
        }
        //更新cell
        cell?.updateUI(dic: (self.dataArray[indexPath.row] as? NSDictionary)!)
        //显示cell
        return cell!
    }
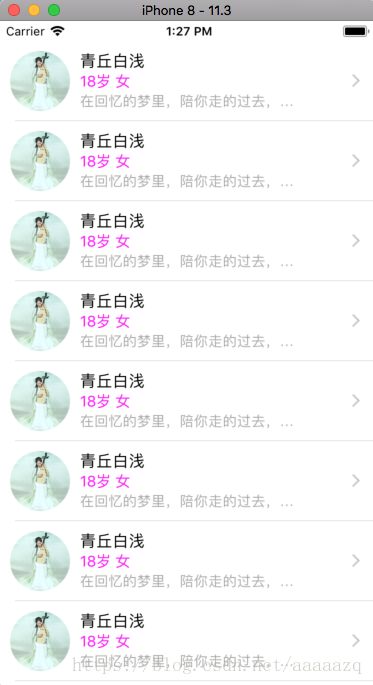
效果图:

demo下载地址:https://download.csdn.net/download/aaaaazq/10514014