我们在进行Android的ndk开发时,由于C代码不好调试,我们往往采用日志记录的方式进行跟踪调试代码,比较麻烦,而且一旦C代码crash,很难直接定位到哪里出了问题。这里作者分享一个开源工程【 google-breakpad 】的使用,希望能对大家的C代码调试增加一点思路。
备注:
1)由于google-breakpad的分析对平台有兼容性要求,作者在ubuntu13.10 x64上进行google-breakpad的学习。
2)后续源代码工程放到github上面。
google-breakpad的下载
我们可以直接访问官方网站【 https://code.google.com/p/google-breakpad/source/checkout 】来下载代码,很简单,直接用命令行checkout即可。
svn checkout http://google-breakpad.googlecode.com/svn/trunk/ google-breakpad-read-only |
如下图:

下载完成后进入下载的目录,可以发现里面有几个介绍文件,如下图,非常重要,我们就按照这个来一步一步的整合。
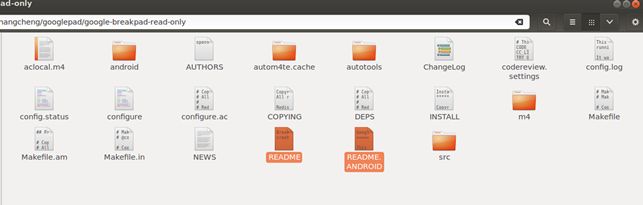
这里我把【 README.ANDROID 】文件贴出来,我们后续的学习都是根据这个文件的介绍一步步来的。
README.ANDROID:
Google Breakpad for Android |
=========================== |
This document explains how to use the Google Breakpad client library |
on Android, and later generate valid stack traces from the minidumps |
This release supports ARM, x86 and MIPS based Android systems. |
I. Building the client library: |
=============================== |
The Android client is built as a static library that you can |
link into your own Android native code. There are two ways to |
I.1. Building with ndk-build: |
----------------------------- |
If you're using the ndk-build build system, you can follow |
1/ Include android/google_breakpad/Android.mk from your own |
This can be done either directly, or using ndk-build's |
2/ Link the library to one of your modules by using: |
LOCAL_STATIC_LIBRARIES += breakpad_client |
NOTE: The client library requires a C++ STL implementation, |
which you can select with APP_STL in your Application.mk |
It has been tested succesfully with both STLport and GNU libstdc++ |
II.1. Building with a standalone Android toolchain: |
--------------------------------------------------- |
All you need to do is configure your build with the right 'host' |
value, and disable the processor and tools, as in: |
$GOOGLE_BREAKPAD_PATH/configure --host=arm-linux-androideabi \ |
The library will be under src/client/linux/libbreakpad_client.a |
You can also use 'make check' to run the test suite on a connected |
Android device. This requires the Android 'adb' tool to be in your |
II. Using the client library in Android: |
======================================== |
The usage instructions are very similar to the Linux ones that are |
found at http://code.google.com/p/google-breakpad/wiki/LinuxStarterGuide |
1/ You need to include "client/linux/handler/exception_handler.h" from a C++ |
2/ If you're not using ndk-build, you also need to: |
- add the following to your compiler include search paths: |
$GOOGLE_BREAKPAD_PATH/src |
$GOOGLE_BREAKPAD_PATH/src/common/android/include |
- add -llog to your linker flags |
Note that ndk-build does that for your automatically. |
3/ Keep in mind that there is no /tmp directory on Android. |
If you use the library from a regular Android applications, specify a |
path under your app-specific storage directory. An alternative is to |
store them on the SDCard, but this requires a specific permission. |
For a concrete example, see the sample test application under |
android/sample_app. See its README for more information. |
III. Getting a stack trace on the host: |
======================================= |
This process is similar to other platforms, but here's a quick example: |
1/ Retrieve the minidumps on your development machine. |
2/ Dump the symbols for your native libraries with the 'dump_syms' tool. |
This first requires building the host version of Google Breakpad, then |
dump_syms $PROJECT_PATH/obj/local/$ABI/libfoo.so > libfoo.so.sym |
3/ Create the symbol directory hierarchy. |
The first line of the generated libfoo.so.sym will have a "MODULE" |
entry that carries a hexadecimal version number, e.g.: |
MODULE Linux arm D51B4A5504974FA6ECC1869CAEE3603B0 test_google_breakpad |
Note: The second field could be either 'Linux' or 'Android'. |
Extract the version number, and a 'symbol' directory, for example: |
$PROJECT_PATH/symbols/libfoo.so/$VERSION/ |
Copy/Move your libfoo.sym file there. |
4/ Invoke minidump_stackwalk to create the stack trace: |
minidump_stackwalk $MINIDUMP_FILE $PROJECT_PATH/symbols |
Note that various helper scripts can be found on the web to automate these |
IV. Verifying the Android build library: |
======================================== |
If you modify Google Breakpad and want to check that it still works correctly |
on Android, please run the android/run-checks.sh script which will do all |
necessary verifications for you. This includes: |
- Rebuilding the full host binaries. |
- Rebuilding the full Android binaries with configure/make. |
- Rebuilding the client library unit tests, and running them on a device. |
- Rebuilding the client library with ndk-build. |
- Building, installing and running a test crasher program on a device. |
- Extracting the corresponding minidump, dumping the test program symbols |
and generating a stack trace. |
- Checking the generated stack trace for valid source locations. |
For more details, please run: |
android/run-checks.sh –help-all |
google-breakpad的使用
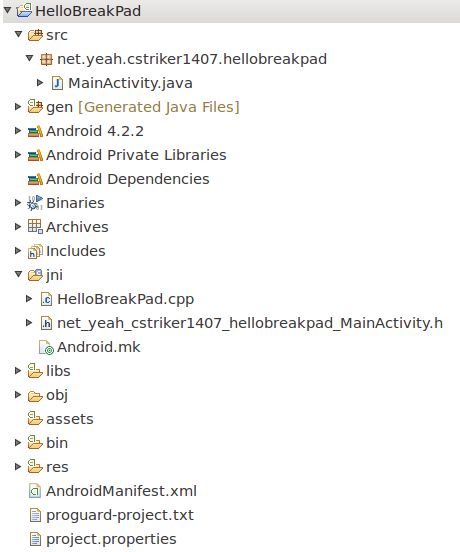
为了简单起见,我们先建立一个最简单的Android的JNI工程【 HelloBreakPad 】,如下图所示:
核心代码如下:
MainActivity.java:
public class MainActivity extends Activity |
System.loadLibrary("HelloBreakPad"); |
private native int native_call(); |
protected void onCreate(Bundle savedInstanceState) |
super.onCreate(savedInstanceState); |
setContentView(R.layout.activity_main); |
button1 = (Button)findViewById(R.id.button1); |
button1.setOnClickListener(new OnClickListener() { |
public void onClick(View v) |
Toast.makeText(MainActivity.this,""+ native_call(), Toast.LENGTH_SHORT).show(); |
net_yeah_cstriker1407_hellobreakpad_MainActivity.h:
#ifndef _Included_net_yeah_cstriker1407_hellobreakpad_MainActivity |
#define _Included_net_yeah_cstriker1407_hellobreakpad_MainActivity |
JNIEXPORT jint JNICALL Java_net_yeah_cstriker1407_hellobreakpad_MainActivity_native_1call |
HelloBreakPad.cpp:
#include "net_yeah_cstriker1407_hellobreakpad_MainActivity.h" |
JNIEXPORT jint JNICALL Java_net_yeah_cstriker1407_hellobreakpad_MainActivity_native_1call |
(JNIEnv *env, jobject obj) |
Android.mk:
LOCAL_PATH := $(call my-dir) |
LOCAL_MODULE := HelloBreakPad |
LOCAL_SRC_FILES := HelloBreakPad.cpp |
include $(BUILD_SHARED_LIBRARY) |
一切正常的话,这个工程就可以运行起来。此时,我们在这个工程上加入google-breakpad:
1)将 google-breakpad 源代码里面的src文件夹拷贝到 HelloBreakPad 的jni目录下,将 google-breakpad-read-only/android/google_breakpad 下的【 android.mk 】文件拷贝到相同目录下,需要注意的是里面有些代码是冗余的,可以删除,这里为了简单起见,作者简单的全部拷贝过来。
2)修改 HelloBreakPad 的 jni/andorid.mk ,按照要求增加代码,最后如下:
MY_ROOT_PATH := $(call my-dir) |
include $(MY_ROOT_PATH)/googlebreakpad/Android.mk |
LOCAL_PATH := $(MY_ROOT_PATH) |
LOCAL_MODULE := HelloBreakPad |
LOCAL_SRC_FILES := HelloBreakPad.cpp |
LOCAL_STATIC_LIBRARIES += breakpad_client |
include $(BUILD_SHARED_LIBRARY) |
3)增加一个Application.mk 文件,内容如下:
APP_STL := stlport_static |
修改后的工程目录如下图所示:
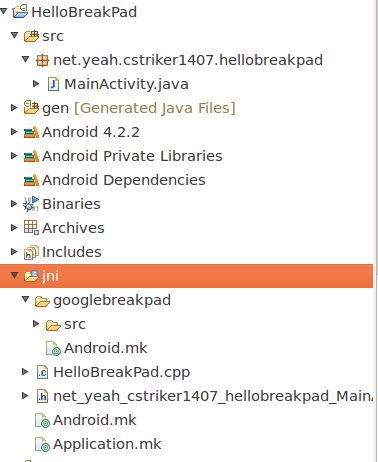
请注意,googlebreakpad文件夹和HelloBreakPad.cpp,Application.mk同一级别目录,src文件夹和Android.mk同一级别目录。
编译工程,如果正常的话会出现:
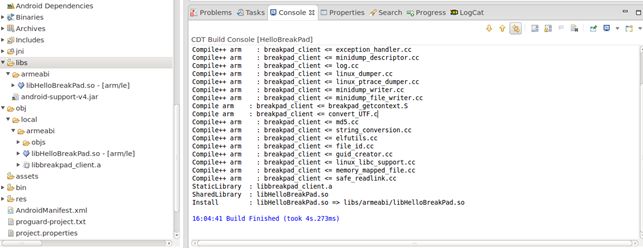
此时,google-breakpad的代码就合入了我们的工程,我们需要在自己的业务代码里使用它。
修改HelloBreakPad.cpp,增加文件处理,改后文件如下:
#include "net_yeah_cstriker1407_hellobreakpad_MainActivity.h" |
#include "googlebreakpad/src/client/linux/handler/exception_handler.h" |
#include "googlebreakpad/src/client/linux/handler/minidump_descriptor.h" |
JNIEXPORT jint JNICALL Java_net_yeah_cstriker1407_hellobreakpad_MainActivity_native_1call |
(JNIEnv *env, jobject obj) |
google_breakpad::MinidumpDescriptor descriptor("/mnt/sdcard/hellobreakpad"); |
google_breakpad::ExceptionHandler eh(descriptor, NULL, NULL, NULL, true, -1); |
注意:这里为了简单起见,将crash文件直接写到sd卡里面。而且代码里面有明显的bug~。
修改AndroidManifest.xml,增加sd卡写权限:
<uses-permission android:name="android.permission.MOUNT_UNMOUNT_FILESYSTEMS" /> |
<uses-permission android:name="android.permission.WRITE_EXTERNAL_STORAGE" /> |
在sd卡里面手动增加一个文件夹hellobreakpad,编译运行程序,点击按钮,会发现程序crash,然后sd卡里面出现了crash文件,如下图,将文件取出,保存好,如下图:

crash文件的处理
crash文件的处理有点麻烦,需要使用一些工具。因此这里我们还需要在ubuntu上编译google-breakpad。
最简单的google-breakpad的编译命令是:进入/google-breakpad-read-only目录,编译,先 ./configure 然后 make 即可。
但是作者在编译时遇到了automake1.14找不到的问题,作者的系统是 ubuntu14.10 x64,在作者系统里面没有这个工具,apt-get也获取不到,最后下载了automake1.14源码进行编译安装,下载地址:
【 https://launchpad.net/ubuntu/trusty/+source/automake-1.14/1:1.14-2ubuntu1/+files/automake-1.14_1.14.orig.tar.xz 】。
编译安装方法也很简单:./configure 然后 make 然后make install 即可。里面可能会需要root权限,sudo即可。
当我们对 google-breakpad-read-only make成功之后我们会在/google-breakpad-read-only/src/tools/linux/dump_syms下面找到可执行文件【 dump_syms 】,根据README.ANDROID文件的指导,我们把 HelloBreakPad工程/obj/local/armabi/下的libHelloBreakPad.so 取出来,执行命令:
./dump_syms libHelloBreakPad.so > libHelloBreakPad.so.sym |
这里务必注意so取的是obj目录下的,不是libs目录下的。
使用head命令,获取verson:
head libHelloBreakPad.so.sym |
会有大概如下输出:
MODULE Linux arm 37FD215018996EE5DCEA7C51DB89D1570 libHelloBreakPad.so |
根据 README.ANDROID 的指引,我们将生成的 libHelloBreakPad.so.sym 文件放入文件夹:【 /HelloBreakPad/symbols/libHelloBreakPad.so/37FD215018996EE5DCEA7C51DB89D1570/ 】里面。
sym文件放好之后,进入google-breakpad-read-only/src/processor/目录,找到可执行文件minidump_stackwalk。为了简单,我将这个可执行文件和sd卡下面的crash文件全部放入symbols文件夹下面,如下图:

执行命令:
./minidump_stackwalk 089db057-1c2c-94d0-68f468a8-02dfa8d2.dmp ./ > result.txt |
我们打开result.txt文件,就可以发现异常出现在:HelloBreakad.cpp的第19行。如下图:
