Android布局管理器-详细解析布局实现
-
写完博客的总结 : 以前没有弄清楚的概念清晰化
1. 父容器与本容器属性 : android_layout...属性是本容器的属性, 定义在这个布局管理器的LayoutParams内部类中, 每个布局管理器都有一个LayoutParams内部类, android:... 是父容器用来控制子组件的属性. 如android:layout_gravity 是控制组件本身的对齐方式, android:gravity是控制本容器子组件的对齐方式;
2.
布局管理器都是以ViewGroup为基类派生出来的; 使用布局管理器可以适配不同手机屏幕的分辨率,尺寸大小;
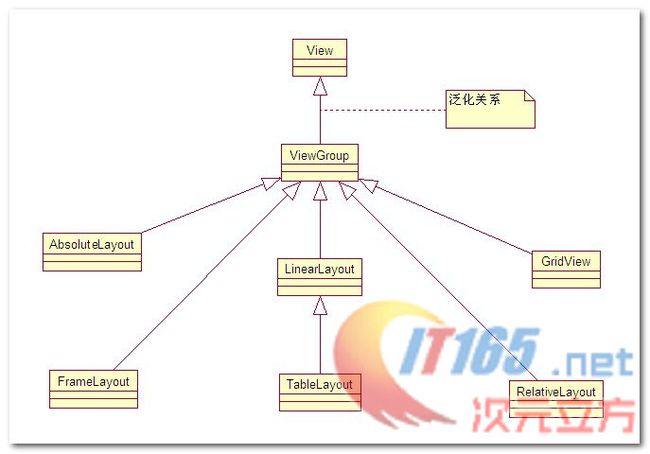
布局管理器之间的继承关系 :
在上面的UML图中可以看出, 绝对布局 帧布局 网格布局 相对布局 线性布局是直接继承ViewGroup,表格布局是继承的LinearLayout;
一. 线性布局(LinearLayout)
1. 线性布局作用
作用 : 线性布局会将容器中的组件一个一个排列起来, LinearLayout可以控制组件 横向 或者 纵向 排列, 通过android:orientation属性控制;
不换行属性 : 线性布局中的组件不会自动换行, 如果组件一个一个排列到尽头之后, 剩下的组件就不会显示出来;
2. LinearLayout常用属性
(1)基线对齐
xml属性 : android:baselineAligned;
设置方法 : setBaselineAligned(boolean b);
作用 : 如果该属性为false, 就会阻止该布局管理器与其子元素的基线对齐;
(2)设分隔条
xml属性 : android:divider;
设置方法 : setDividerDrawable(Drawable);
作用 : 设置垂直布局时两个按钮之间的分隔条;
(3)对齐方式(控制内部子元素)
xml属性 : android:gravity;
设置方法 : setGravity(int);
作用 : 设置布局管理器内组件(子元素)的对齐方式,
支持的属性 :
top, bottom, left, right,
center_vertical(垂直方向居中), center_horizontal(水平方向居中),
fill_vertical(垂直方向拉伸), fill_horizontal(水平方向拉伸),
center, fill,
clip_vertical, clip_horizontal;
可以同时指定多种对齐方式 : 如 left|center_vertical 左侧垂直居中;
(4)权重最小尺寸
xml属性 : android:measureWithLargestChild;
设置方法 : setMeasureWithLargestChildEnable(boolean b);
作用 : 该属性为true的时候, 所有带权重的子元素都会具有最大子元素的最小尺寸;
(5) 排列方式
xml属性 : android:orientation;
设置方法 : setOrientation(int i);
作用 : 设置布局管理器内组件排列方式, 设置为horizontal(水平),vertical(垂直), 默认为垂直排列;
3. LinearLayout子元素控制
LinearLayout的子元素, 即LinearLayout中的组件, 都受到LinearLayout.LayoutParams控制, 因此LinearLayout包含的子元素可以执行下面的属性.
(1) 对齐方式
xml属性 : android:layout_gravity;
作用 : 指定该元素在LinearLayout(父容器)的对齐方式, 也就是该组件本身的对齐方式, 注意要与android:gravity区分, ;
(2) 所占权重
xml属性 : android:layout_weight;
作用 : 指定该元素在LinearLayout(父容器)中所占的权重, 例如都是1的情况下, 那个方向(LinearLayout的orientation方向)长度都是一样的;
4. 控制子元素排列 与 在父元素中排列
控制本身元素属性与子元素属性 :
设备组件本身属性 : 带layout的属性是设置本身组件属性, 例如 android:layout_gravity设置的是本身的对其方式;
设置子元素属性 : 不带layout的属性是设置其所包含的子元素, 例如android:gravity 设置的是该容器子组件的对齐方式;
LayoutParams属性 : 所有的布局管理器都提供了相应的LayoutParams内部类, 这些内部类用于控制该布局本身, 如 对齐方式 layout_gravity, 所占权重 layout_weight, 这些属性用于设置本元素在父容器中的对齐方式;
容器属性 : 在android:后面没有layout的属性基本都是容器属性, android:gravity作用是指定指定本元素包含的子元素的对齐方式, 只有容器才支持这个属性;
5. 常见用法
(1) 获取LinearLayout的宽高
a. 组件外无法获取组件宽高
下面的两种情况都是针对 View.getHeight() 和 View.getWidth() 方法 :
组件外无法获取 : 调用View.getHeight() 和View.getWidth()方法 是获取不到组件的宽度和高度的, 这两个方法返回的是0, Android的运行机制决定了无法在组件外部使用getHeight()和getWidth()方法获取宽度和高度;
组件内可以获取 : 在自定义的类中可以在View的类中通过调用这两个方法获取该View子类组件的宽和高;
b. 组件外部获取View对象宽高方法
外部获取 : 使用View.getMeasuredWidth() 和View.getMeasuredHeight()方法可以获取组件的宽和高, 在调用这个方法之前, 必须先调用View.measure()方法, 才可以, 否则也获取不到组件的宽高;
注意(特例) : 如果组件宽度或高度设置为 fill_parent, 使用 getMeasuredHeight() 等方法获取宽度和高度的时候, 并且组件中含有子元素时, 所获取的实际值是这些组件所占的最小宽度和最小高度.(没看懂)
示例:
1.View view = getLayoutInflater().inflate(R.layout.main,null);2.LinearLayout layout = (LinearLayout) view.findViewById(R.id.linearlayout);3.//调用测量方法, 调用了该方法之后才能通过getMeasuredHeight()等方法获取宽高4.layout.measure(0,0);5.//获取宽度6.intwidth = layout.getMeasuredWidth();7.//获取高度8.intheight = layout.getMeasuredHeight();
c. 获取布局文件中组件的宽高
从LayoutParams中获取 : 调用View.getLayoutParams().width 和 View.getLayoutParams().height 获取宽高, 如果宽高被设定为 fill_parent, match_parent, warp_content 时, 这两个两边直接回返回 FILL_PARENT, MATCH_PARENT, WARP_CONTENT常量值;
规律 : 从View.getLayoutParams()中获取 width, height 值, 在布局xml文件中设置的是什么, 获取的时候就得到的是什么;
(2) 在LinearLayout中添加分隔线
a. 使用ImageView添加(低版本3.0以下)
垂直布局 横向宽度填满 : 如果布局是vertical, 那么设置一个ImageView宽度fill_parent, 高度2dp, 设置一个背景色;
水平布局 纵向高度填满 : 如果布局时horizontal, 那么设置一个ImageView宽度2dp, 高度fill_parent, 设置一个背景色;
1.2.android:layout_width="fill_parent"3.android:layout_height="2dp"4.android:background="#F00"/>
b. 使用xml属性添加(3.0以上版本)
设置LinearLayout标签的 android:showDividers属性, 该属性有四个值 :
none :不显示分隔线;
beginning : 在LinearLayout开始处显示分隔线;
middle : 在LinearLayout中每两个组件之间显示分隔线;
end : 在LinearLayout结尾处显示分隔线;
设置android:divider属性, 这个属性的值是一个Drawable的id;
c. 使用代码添加(3.0以上版本)
设置显示分隔线样式 : linearLayout.setShowDividers(), 设置android:showDividers属性;
设置分隔线图片 : linearLayout.setDividerDrawable(), 设置android:divider属性;
6. 实际案例
(1) 按钮排列
要点 :
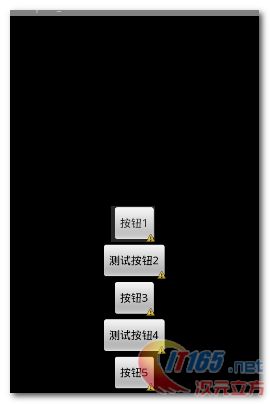
底部 + 水平居中 对齐属性 : 左边的LinearLayout的android:gravity 属性为bottom|center_horizontal;
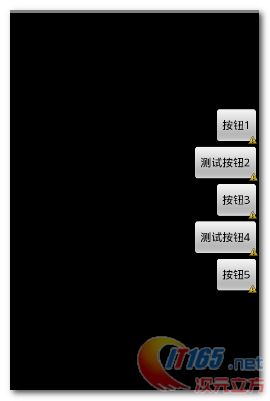
右部 + 垂直居中 对齐属性 : 右边的LinearLayout的android:gravity 属性为right|center_vertical;
代码 :
01."1.0"encoding="utf-8"?>02."http://schemas.android.com/apk/res/android"03.android:layout_width="fill_parent"04.android:layout_height="fill_parent"05.android:orientation="vertical"06.android:gravity="bottom|center_horizontal">07.08.android:layout_width="wrap_content"09.android:layout_height="wrap_content"10.android:text="按钮1"/>11.12.android:layout_width="wrap_content"13.android:layout_height="wrap_content"14.android:text="测试按钮2"/>15.16.android:layout_width="wrap_content"17.android:layout_height="wrap_content"18.android:text="按钮3"/>19.20.android:layout_width="wrap_content"21.android:layout_height="wrap_content"22.android:text="测试按钮4"/>23.24.android:layout_width="wrap_content"25.android:layout_height="wrap_content"26.android:text="按钮5"/>27.
子元素对齐 : 通过修改 android:gravity 属性来控制LinearLayout中子元素的排列情况;左边的图的属性为 bottom|center_horizontal , 右边的android:gravity的属性值为 right|center_vertical;
(2) 三个按钮各自对齐
三个水平方向的按钮, 分别左对齐, 居中对齐, 右对齐 :
要点 :
水平线性布局 : 最顶层的LinearLayout的orientation是horizontal水平的;
等分三个线性布局 : 第二层的LinearLayout的orientation是vertical垂直的, 并且宽度是fill_parent , 依靠权重分配宽度;
设置按钮对齐方式 : 按钮的android:layout_gravity属性根据需求 left, center, right, 默认为left;
代码 :
01."1.0"encoding="utf-8"?>02."http://schemas.android.com/apk/res/android"03.android:layout_width="fill_parent"04.android:layout_height="fill_parent"05.android:orientation="horizontal">06.07.08.android:layout_width="fill_parent"09.android:layout_weight="1"10.android:layout_height="wrap_content"11.android:orientation="vertical"12.android:background="#f00">13.14.android:layout_height="wrap_content"15.android:text="按钮1"/>16.17.18.19.android:layout_width="fill_parent"20.android:layout_weight="1"21.android:layout_height="wrap_content"22.android:orientation="vertical"23.android:background="#0f0">24.25.android:layout_height="wrap_content"26.android:text="按钮2"27.android:layout_gravity="center"/>28.29.30.31.android:layout_width="fill_parent"32.android:layout_weight="1"33.android:layout_height="wrap_content"34.android:orientation="vertical"35.android:background="#00f">36.37.android:layout_height="wrap_content"38.android:text="按钮3"39.android:layout_gravity="right"/>40.41.42.
二. 相对布局RelativeLayout
相对布局容器中, 子组件的位置总是相对兄弟组件, 父容器来决定的;
1. RelativeLayout支持的属性
(1) 对齐方式
xml属性 : android:gravity;
设置方法 : setGravity(int);
作用 : 设置布局容器内子元素的对齐方式, 注意与android:layout_gravity区分, 后者是设置组件本身元素对齐方式;
(2) 忽略对齐方式
xml属性 : android:ignoreGravity;
设置方法 : setIgnoreGravity(int);
作用 : 设置该组件不受gravity属性影响, 因为gravity属性影响容器内所有的组件的对齐方式, 设置了之后, 该组件就可以例外;
2. LayoutParams属性
(1) 只能设置boolean值的属性
这些属性都是相对父容器的, 确定是否在父容器中居中(水平, 垂直), 是否位于父容器的 上下左右 端;
是否水平居中 : android:layout_centerHorizontal;
是否垂直居中 : android:layout_centerVertical;
是否位于中央 : android:layout_centerInParent;
是否底端对齐 : android:layout_alignParentBottom;
是否顶端对齐 : android:layout_alignParentTop;
是否左边对齐 : android:layout_alignParentLeft;
是否右边对齐 : android:layout_alignParentRight;
(2) 只能设置其它组件id的属性
位于所给id组件左侧 : android:layout_toLeftOf;
位于所给id组件右侧 : android:layout_toRightOf;
位于所给id组件的上边 : android:layout_above;
位于所给id组件的下方 : android:layout_below;
与所给id组件顶部对齐 : android:layout_alignTop;
与所给id组件底部对齐 : android:layout_alignBottom;
与所给id组件左边对齐 : android:layout_alignLeft;
与所给id组件右边对齐 : android:layout_alignRight;
3. 梅花布局效果
五个按钮排成梅花形状, 梅花处于正中心, 效果图如下 :
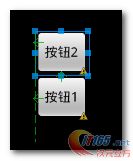
两个按钮, 如果只有 android:layout_above="@+id/bt1" 会是这种情况 :
加上 android:layout_alignLeft="@+id/bt1"就会成为这种情况 :
要点 :
注意每个组件的属性, 先要确定方位, 在进行对齐, 组件左边界对齐, 组件上边界对齐;
代码 :
01."1.0"encoding="utf-8"?>02."http://schemas.android.com/apk/res/android"03.android:layout_width="fill_parent"04.android:layout_height="fill_parent">05.06.07.android:id="@+id/bt1"08.android:layout_width="wrap_content"09.android:layout_height="wrap_content"10.android:text="按钮1"11.android:layout_centerInParent="true"/>12.13.14.android:id="@+id/bt2"15.android:layout_width="wrap_content"16.android:layout_height="wrap_content"17.android:text="按钮2"18.android:layout_above="@+id/bt1"19.android:layout_alignLeft="@+id/bt1"/>20.21.22.android:id="@+id/bt3"23.android:layout_width="wrap_content"24.android:layout_height="wrap_content"25.android:text="按钮3"26.android:layout_centerInParent="true"27.android:layout_below="@+id/bt1"28.android:layout_alignLeft="@+id/bt1"/>29.30.31.android:id="@+id/bt4"32.android:layout_width="wrap_content"33.android:layout_height="wrap_content"34.android:text="按钮4"35.android:layout_centerInParent="true"36.android:layout_toLeftOf="@+id/bt1"37.android:layout_alignTop="@+id/bt1"/>38.39.40.android:id="@+id/bt5"41.android:layout_width="wrap_content"42.android:layout_height="wrap_content"43.android:text="按钮5"44.android:layout_centerInParent="true"45.android:layout_toRightOf="@+id/bt1"46.android:layout_alignTop="@+id/bt1"/>47.48.
4. 相对布局常用方法
(1) 获取屏幕中一个组件的位置
创建数组 : 要先创建一个整型数组, 数组大小2位; 这个数组传入getLocationOnScreen()方法;
将位置信息传入数组 : 可以调用View.getLocationOnScreen()方法, 返回的是一个数组 int[2], int[0] 是横坐标, int[1] 是纵坐标;
01.//获取组件02.Button b = (Button)this.findViewById(R.id.Button01);03.//创建数组, 将该数组传入getLocationOnScreen()方法04.intlocations[] =newint[2];05.//获取位置信息06.b.getLocationOnScreen(locations);07.//获取宽度08.intwidth = locations[0];09.//获取高度10.intheight = locations[1];
(2) LayoutParams的使用设置所有属性
属性设置方法少 : Android SDK中View类只提供了很少用于设置属性的方法,大多数属性没有直接对应的获得和设置属性值的方法, 看起来貌似不是很好用;
使用LayoutParams设置属性值 : Android中可以对任何属性进行设置, 这里我们需要一个LayoutParams对象, 使用这个LayoutParams.addRule()方法, 可以设置所有组件的属性值; 设置完之后调用View.setLayoutParams()方法, 传入刚才创建的LayoutParams对象, 并更新View的相应的LayoutParams属性值, 向容器中添加该组件;
代码中动态设置布局属性 :
a. 创建LayoutParams对象
b. 调用LayoutParams对象的addRule()方法设置对应属性;
c. 调用View.setLayoutParams()方法将设置好的LayoutParams对象设置给组件;
d. 调用addView方法将View对象设置到布局中去;
使用代码设置android:layout_toRightOf 和 android:layout_below属性 :
01.//装载布局文件02.RelativeLayout relativeLayout = (RelativeLayout) getLayoutInflater().inflate(R.layout.relative,null);03.//装载要动态添加的布局文件04.Button button = (Button) relativeLayout.findViewById(R.id.bt1);05.//创建一个LayoutParams对象06.LayoutParams layoutParams =newLayoutParams(LayoutParams.WRAP_CONTENT, LayoutParams.WRAP_CONTENT);07.//设置android:layout_toRightOf属性08.layoutParams.addRule(RelativeLayout.RIGHT_OF, R.id.bt2);09.//设置android:layout_below10.layoutParams.addRule(RelativeLayout.BELOW, R.id.bt2);11.//更新Button按钮的属性12.button.setLayoutParams(layoutParams);13.//向布局中动态添加按钮14.relativeLayout.addView(button);
三. 帧布局FrameLayout
帧布局容器为每个组件创建一个空白区域, 一个区域成为一帧, 这些帧会根据FrameLayout中定义的gravity属性自动对齐;
1. 绘制霓虹灯布局
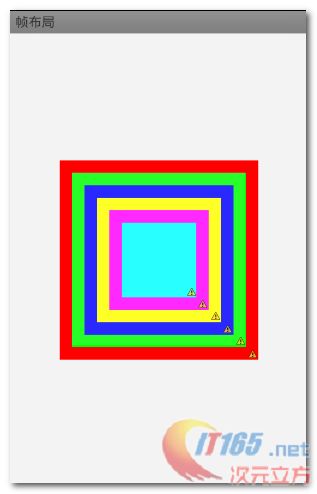
绘制一个霓虹灯效果的层叠布局, 如下图 :
要点 :
后挡前 : 后面的View组件会遮挡前面的View组件,越在前面, 被遮挡的概率越大;
界面居中 : 将所有的TextView组件的对齐方式 android:layout_gravity 设置为center;
正方形 : 所有的TextView都设置android:height 和 android:width 属性, 用来设置其宽高, 这里设置成正方形, 宽高一样, 后面的组件比前面的边长依次少40;
颜色 : 每个TextView的背景都设置成不一样的;
代码 :
01."1.0"encoding="utf-8"?>02."http://schemas.android.com/apk/res/android"03.android:layout_width="match_parent"04.android:layout_height="match_parent">05.06.07.android:id="@+id/tv_1"08.android:layout_width="wrap_content"09.android:layout_height="wrap_content"10.android:layout_gravity="center"11.android:width="320px"12.android:height="320px"13.android:background="#f00"/>14.15.android:id="@+id/tv_2"16.android:layout_width="wrap_content"17.android:layout_height="wrap_content"18.android:layout_gravity="center"19.android:width="280px"20.android:height="280px"21.android:background="#0f0"/>22.23.android:id="@+id/tv_3"24.android:layout_width="wrap_content"25.android:layout_height="wrap_content"26.android:layout_gravity="center"27.android:width="240px"28.android:height="240px"29.android:background="#00f"/>30.31.android:id="@+id/tv_4"32.android:layout_width="wrap_content"33.android:layout_height="wrap_content"34.android:layout_gravity="center"35.android:width="200px"36.android:height="200px"37.android:background="#ff0"/>38.39.android:id="@+id/tv_5"40.android:layout_width="wrap_content"41.android:layout_height="wrap_content"42.android:layout_gravity="center"43.android:width="160px"44.android:height="160px"45.android:background="#f0f"/>46.47.android:id="@+id/tv_6"48.android:layout_width="wrap_content"49.android:layout_height="wrap_content"50.android:layout_gravity="center"51.android:width="120px"52.android:height="120px"53.android:background="#0ff"/>54.55.
2. 使用代码使上面的霓虹灯效果动起来
(1) 图片效果
(2) 颜色资源
创建颜色资源, 在跟节点
下面创建 子节点, color属性标签 name 自定义, 子文本为颜色代码; (3) 定时器控制handler
创建Handler对象, 实现handleMessage()方法, 在这个方法中循环设置 TextView对象的颜色变量, 使用color[(i + currentColor)%colors.length]每调用一次, 就将所有的TextView颜色依次调换一次;
在onCreate()方法中, 开启一个定时器Timer, 每隔0.2s就调用一个handler中的方法, 这样动态的霓虹灯代码就显示出来了.
(4) 代码
颜色资源代码 :
01."1.0"encoding="utf-8"?>02.03."color1">#f0004."color2">#0f005."color3">#00f06."color4">#ff007."color5">#f0f08."color6">#0ff09.
代码 :
01.packagecom.example.framelayout;02.03.importjava.util.Timer;04.importjava.util.TimerTask;05.06.importandroid.app.Activity;07.importandroid.os.Bundle;08.importandroid.os.Handler;09.importandroid.os.Message;10.importandroid.widget.TextView;11.12.publicclassMainActivityextendsActivity {13.14.//这个变量用来控制霓虹灯颜色变化15.privateintcurrentColor =0;16.//颜色对应的资源id17.finalint[] colors =newint[]{18.R.color.color1,19.R.color.color2,20.R.color.color3,21.R.color.color4,22.R.color.color5,23.R.color.color624.};25.//View组件对应的资源id26.finalint[] names =newint[]{27.R.id.tv_1,28.R.id.tv_2,29.R.id.tv_3,30.R.id.tv_4,31.R.id.tv_5,32.R.id.tv_633.};34.35.//组件数组36.TextView[] views =newTextView[names.length];37.38.//定义这个Handler, 为了在定时器中固定调用handleMessage方法39.Handler handler =newHandler(){40.publicvoidhandleMessage(Message msg) {41.if(msg.what ==0x123){42.for(inti =0; i < names.length; i ++){43.views[i].setBackgroundResource(colors[(i + currentColor) % names.length]);44.}45.currentColor ++;46.}47.};48.};49.50.@Override51.publicvoidonCreate(Bundle savedInstanceState) {52.super.onCreate(savedInstanceState);53.setContentView(R.layout.frame);54.//初始化组件数组55.for(inti =0; i < names.length; i ++){56.views[i] = (TextView) findViewById(names[i]);57.}58.//每隔0.2秒更换一次颜色59.newTimer().schedule(newTimerTask() {60.@Override61.publicvoidrun() {62.handler.sendEmptyMessage(0x123);63.}64.},0,200);65.}66.}3. 三个水平方向的按钮分别左对齐,居中对齐,右对齐
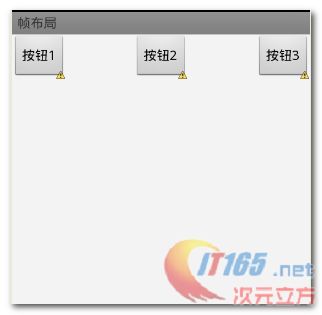
要点 : 给FrameLayout中的三个按钮分别设置 不同的layout_gravity,left , center_horizontal,right, 就能设置成上图的样式;
代码 :
01."1.0"encoding="utf-8"?>02."http://schemas.android.com/apk/res/android"03.android:layout_width="match_parent"04.android:layout_height="match_parent">05.06.07.android:layout_width="wrap_content"08.android:layout_height="wrap_content"09.android:text="按钮1"10.android:layout_gravity="left"/>11.12.13.android:layout_width="wrap_content"14.android:layout_height="wrap_content"15.android:text="按钮2"16.android:layout_gravity="center_horizontal"/>17.18.19.android:layout_width="wrap_content"20.android:layout_height="wrap_content"21.android:text="按钮3"22.android:layout_gravity="right"/>23.24.
四. 表格布局TableLayout
1. 表格布局的一些概念
继承关系 : 表格布局继承了LinearLayout, 其本质是线性布局管理器;
控制组件 : 表格布局采用 行, 列 形式管理子组件, 但是并不需要声明有多少 行列, 只需要添加TableRow 和 组件 就可以控制表格的行数和列数, 这一点与网格布局有所不同, 网格布局需要指定行列数;
增加行的方法 :
a. TableRow增加行列 : 向TableLayout中添加一个TableRow,一个TableRow就是一个表格行, 同时TableRow也是容器, 可以向其中添加子元素, 每添加一个组件, 就增加了一列;
b. 组件增加行 : 如果直接向TableLayout中添加组件, 就相当于直接添加了一行;
列宽 : TableLayout中, 列的宽度由该列最宽的单元格决定, 整个表格的宽度默认充满父容器本身;
2. 单元格行为方式
(1) 行为方式概念
a. 收缩 :Shrinkable, 如果某列被设为Shrinkable, 那么该列所有单元格宽度可以被收缩, 保证表格能适应父容器的宽度;
b. 拉伸 :Stretchable, 如果某列被设为Stretchable, 那么该列所有单元格的宽度可以被拉伸, 保证表格能完全填满表格剩余空间;
d. 隐藏 :Collapsed, 如果某列被设置成Collapsed, 那么该列所有单元格会被隐藏;
(2) 行为方式属性
a. 隐藏
xml属性 : android:collapsedColumns;
设置方法 : setColumnCollapsed(int, boolean);
作用 : 设置需要被隐藏的列的序号, 在xml文件中, 如果隐藏多列, 多列序号间用逗号隔开;
b. 拉伸
xml属性 : android:stretchColumns;
设置方法 : setStretchAllColumns(boolean);
作用 : 设置允许被拉伸的列的序列号, xml文件中多个序列号之间用逗号隔开;
c. 收缩
xml属性 : android:shrinkableColumns;
设置方法 : setShrinkableAllColumns(boolean);
作用 : 设置允许被收缩的列的序号, xml文件中, 多个序号之间可以用逗号隔开;
3. 表格布局实例
实现要点 :
独自一行按钮 : 向TableLayout中添加按钮, 这个按钮就会独自占据一行;
收缩按钮: 在TableLayout标签中, 设置android:stretchable属性标签, 属性值是要收缩的列, 注意,列标从0开始;
拉伸按钮 : 在TableLayout标签中,设置android:shrinkable属性标签, 属性值是要拉伸的列, 注意, 列表从0开始;
代码 :
001."http://schemas.android.com/apk/res/android"002.xmlns:tools="http://schemas.android.com/tools"003.android:orientation="vertical"004.android:layout_width="match_parent"005.android:layout_height="match_parent">006.007.008.009.010.android:layout_width="fill_parent"011.android:layout_height="wrap_content"012.android:shrinkColumns="1"013.android:stretchColumns="2">014.015.016.017.android:layout_width="fill_parent"018.android:layout_height="wrap_content"019.android:text="独自一行的按钮"/>020.021.022.023.android:layout_width="wrap_content"024.android:layout_height="wrap_content"025.android:text="普通的按钮"/>026.027.android:layout_width="wrap_content"028.android:layout_height="wrap_content"029.android:text="收缩的按钮"/>030.031.android:layout_width="wrap_content"032.android:layout_height="wrap_content"033.android:text="拉伸的按钮"/>034.035.036.037.038.039.040.android:layout_width="fill_parent"041.android:layout_height="wrap_content"042.android:collapseColumns="1">043.044.045.android:layout_width="fill_parent"046.android:layout_height="wrap_content"047.android:text="独自一行的按钮"/>048.049.050.051.android:layout_width="wrap_content"052.android:layout_height="wrap_content"053.android:text="普通按钮1"/>054.055.android:layout_width="wrap_content"056.android:layout_height="wrap_content"057.android:text="普通按钮2"/>058.059.android:layout_width="wrap_content"060.android:layout_height="wrap_content"061.android:text="普通按钮3"/>062.063.064.065.066.067.068.android:layout_height="wrap_content"069.android:layout_width="fill_parent"070.android:stretchColumns="1,2">071.072.073.android:layout_width="fill_parent"074.android:layout_height="wrap_content"075.android:text="独自占一行的按钮"/>076.077.078.079.080.android:layout_width="wrap_content"081.android:layout_height="wrap_content"082.android:text="普通按钮1"/>083.084.android:layout_width="wrap_content"085.android:layout_height="wrap_content"086.android:text="拉伸的按钮"/>087.088.android:layout_width="wrap_content"089.android:layout_height="wrap_content"090.android:text="拉伸的按钮"/>091.092.093.094.095.096.097.android:layout_width="wrap_content"098.android:layout_height="wrap_content"099.android:text="普通的按钮"/>100.101.android:layout_width="wrap_content"102.android:layout_height="wrap_content"103.android:text="拉伸的按钮"/>104.105.106.107.108.109.110.
五. 网格布局
1. 网格布局介绍
网格布局时Android4.0版本才有的, 在低版本使用该布局需要导入对应支撑库;
GridLayout将整个容器划分成rows * columns个网格, 每个网格可以放置一个组件. 还可以设置一个组件横跨多少列, 多少行. 不存在一个网格放多个组件情况;
2. 网格布局常用属性
(1) 设置对齐模式
xml属性 : android:alignmentMode;
设置方法 : setAlignmentMode(int);
作用 : 设置网格布局管理器的对齐模式
(2) 设置列数
xml属性 : android:columnCount;
设置方法 : setColumnCount(int);
作用 : 设置该网格布局的列数;
(3) 设置是否保留列序列号
xml属性 : android:columnOrderPreserved;
设置方法 : setColumnOrderPreserved(boolean);
作用 : 设置网格容器是否保留列序列号;
(4) 设置行数
xml属性 : android:rowCount;
设置方法 : setRowCount(int);
作用 : 设置该网格的行数;
(5) 设置是否保留行序列号
xml属性 : android:rowOrderPreserved;
设置方法 : setRowOrderPreserved(int);
作用 : 设置该网格容器是否保留行序列号;
(6) 页边距
xml属性 : android:useDefaultMargins;
设置方法 : setUseDefaultMargins(boolean);
作用 : 设置该布局是否使用默认的页边距;
3. GridLayout的LayoutParams属性
(1) 设置位置列
xml属性 : android:layout_column;
作用 : 设置子组件在GridLayout的哪一列;
(2) 横向跨列
xml属性 : android:layout_columnSpan;
作用 : 设置该子组件在GridLayout中横向跨几列;
(3) 占据空间方式
xml属性 : android:layout_gravity;
设置方法 : setGravity(int);
作用 : 设置该组件采用何种方式占据该网格的空间;
(4) 设置行位置
xml属性 : android:layout_row;
作用 : 设置该子组件在GridLayout的第几行;
(5) 设置横跨行数
xml属性 : android:layout_rowSpan;
作用 : 设置该子组件在GridLayout纵向横跨几行;
4. 实现一个计算机界面
(1) 布局代码
设置行列 : 设置GridLayout的android:rowCount为6, 设置android:columnCount为4, 这个网格为 6行 * 4列 的;
设置横跨四列 : 设置TextView和按钮横跨四列 android:layout_columnSpan 为4, 列的合并 就是占了一行;
textView的一些设置 :
设置textView中的文本与边框有5像素间隔 : android:padding = "5px";
代码 :
01."http://schemas.android.com/apk/res/android"02.xmlns:tools="http://schemas.android.com/tools"03.android:layout_width="match_parent"04.android:layout_height="match_parent"05.android:rowCount="6"06.android:columnCount="4"07.android:id="@+id/root">08.09.13.14.android:layout_width="match_parent"15.android:layout_height="wrap_content"16.android:layout_columnSpan="4"17.android:textSize="50sp"18.android:layout_marginLeft="4px"19.android:layout_marginRight="4px"20.android:padding="5px"21.android:layout_gravity="right"22.android:background="#eee"23.android:textColor="#000"24.android:text="0"/>25.26.27.android:layout_width="match_parent"28.android:layout_height="wrap_content"29.android:layout_columnSpan="4"30.android:text="清除"/>31.32.
(2) Activity代码
将组件设置给GridLayout网格流程 :
指定组件所在行 : GridLayout.Spec rowSpec = GridLayout.spec(int);
指定组件所在列 : GridLayout.Spec columnSpec = GridLayout.spec(int);
创建LayoutParams对象 : GridLayout.LayoutParams params = new GridLayout.LayoutParams(rowSpec, columnSpec);
指定组件占满容器 : params.setGravity(Gravity.FILL);
将组件添加到布局中 : gridLayout.addView(view, params);
代码 :
01.packagecom.example.caculator;02.03.importandroid.app.Activity;04.importandroid.os.Bundle;05.importandroid.view.Gravity;06.importandroid.widget.Button;07.importandroid.widget.GridLayout;08.importandroid.widget.GridLayout.LayoutParams;09.importandroid.widget.GridLayout.Spec;10.11.publicclassMainActivityextendsActivity {12.13.privateGridLayout gridLayout;14.//需要放到按钮上的字符串15.String chars[] =newString[]{16."7","8","9","/",17."4","5","6","*",18."1","2","3","-",19.".","0","=","+"20.};21.22.@Override23.publicvoidonCreate(Bundle savedInstanceState) {24.super.onCreate(savedInstanceState);25.setContentView(R.layout.activity_main);26.27.gridLayout = (GridLayout) findViewById(R.id.root);28.for(inti =0; i < chars.length; i ++){29.Button button =newButton(this);30.button.setText(chars[i]);31.
