Spring Cloud Netflix服务搭建详解(一):服务的注册与发现
文章目录
- 简介
- 导航:
- 创建统一的依赖管理
- 概述
- 创建依赖管理项目
- 服务注册与发现
- 概述
- 创建服务注册中心
- Application
- application.yml
- 操作界面
- 创建服务提供者
- 概述
- POM
- Application
- application.yml
- Controller
- 创建服务消费者(Ribbon)
- 概述
- Ribbon 简介
- 准备工作
- 创建服务消费者
- Application
- application.yml
- Configuration
- 创建测试用的 Service
- 创建测试用的 Controller
- 测试访问
- 此时的架构
- 附
- 在 IDEA 中配置一个工程启动多个实例
- 步骤一
- 步骤二
- 步骤三
- 创建服务消费者(Feign)
- 概述
- 创建服务消费者
- Application
- application.yml
- 创建 Feign 接口
- 创建测试用的 Controller
- 测试访问
- 下文预告:
- [熔断器限流和路由网关管理《Spring Cloud Netflix服务搭建详解(下)》](https://blog.csdn.net/jk418756/article/details/87553565)
简介
Spring Cloud 是一个相对比较新的微服务框架,2016 才推出 1.0 的 Release 版本. 但是其更新特别快,几乎每 1-2 个月就有一次更新,虽然 Spring Cloud 时间最短, 但是相比 Dubbo 等 RPC 框架, Spring Cloud 提供的全套的分布式系统解决方案。
Spring Cloud 为开发者提供了在分布式系统(配置管理,服务发现,熔断,路由,微代理,控制总线,一次性 Token,全居琐,Leader 选举,分布式 Session,集群状态)中快速构建的工具,使用 Spring Cloud 的开发者可以快速的启动服务或构建应用、同时能够快速和云平台资源进行对接。
导航:
1.spring could简介
2. 创建统一的依赖管理
3.服务注册与发现
4.创建服务提供者
5.创建服务消费者(Ribbon)
6.创建服务消费者(Feign)123132
创建统一的依赖管理
概述
Spring Cloud 项目都是基于 Spring Boot 进行开发,并且都是使用 Maven 做项目管理工具。在实际开发中,我们一般都会创建一个依赖管理项目作为 Maven 的 Parent 项目使用,这样做可以极大的方便我们对 Jar 包版本的统一管理。
创建依赖管理项目
创建一个工程名为 hello-spring-cloud-dependencies 的项目,pom.xml 配置文件如下:
<project xmlns="http://maven.apache.org/POM/4.0.0" xmlns:xsi="http://www.w3.org/2001/XMLSchema-instance"
         xsi:schemaLocation="http://maven.apache.org/POM/4.0.0 http://maven.apache.org/xsd/maven-4.0.0.xsd">
    <modelVersion>4.0.0modelVersion>

    <parent>
        <groupId>org.springframework.bootgroupId>
        <artifactId>spring-boot-starter-parentartifactId>
        <version>2.0.2.RELEASEversion>
    parent>

    <groupId>com.funtlgroupId>
    <artifactId>hello-spring-cloud-dependenciesartifactId>
    <version>1.0.0-SNAPSHOTversion>
    <packaging>pompackaging>

    <name>hello-spring-cloud-dependenciesname>
    <url>http://www.funtl.comurl>
    <inceptionYear>2018-NowinceptionYear>

    <properties>

        <java.version>1.8java.version>
        <project.build.sourceEncoding>UTF-8project.build.sourceEncoding>
        <project.reporting.outputEncoding>UTF-8project.reporting.outputEncoding>


        <spring-cloud.version>Finchley.RELEASEspring-cloud.version>
    properties>

    <dependencyManagement>
        <dependencies>
            <dependency>
                <groupId>org.springframework.cloudgroupId>
                <artifactId>spring-cloud-dependenciesartifactId>
                <version>${spring-cloud.version}version>
                <type>pomtype>
                <scope>importscope>
            dependency>
        dependencies>
    dependencyManagement>

    <build>
        <plugins>

            <plugin>
                <groupId>org.apache.maven.pluginsgroupId>
                <artifactId>maven-compiler-pluginartifactId>
                <configuration>
                    <showWarnings>trueshowWarnings>
                configuration>
            plugin>


            <plugin>
                <groupId>org.apache.maven.pluginsgroupId>
                <artifactId>maven-jar-pluginartifactId>
                <configuration>
                    <archive>
                        <addMavenDescriptor>falseaddMavenDescriptor>
                    archive>
                configuration>
                <executions>
                    <execution>
                        <configuration>
                            <archive>
                                <manifest>

                                    <addDefaultImplementationEntries>trueaddDefaultImplementationEntries>
                                    <addDefaultSpecificationEntries>trueaddDefaultSpecificationEntries>
                                    <addClasspath>trueaddClasspath>
                                manifest>
                            archive>
                        configuration>
                    execution>
                executions>
            plugin>


            <plugin>
                <groupId>org.apache.maven.pluginsgroupId>
                <artifactId>maven-resources-pluginartifactId>
            plugin>


            <plugin>
                <groupId>org.apache.maven.pluginsgroupId>
                <artifactId>maven-install-pluginartifactId>
            plugin>


            <plugin>
                <groupId>org.apache.maven.pluginsgroupId>
                <artifactId>maven-clean-pluginartifactId>
            plugin>


            <plugin>
                <groupId>org.apache.maven.pluginsgroupId>
                <artifactId>maven-antrun-pluginartifactId>
            plugin>


            <plugin>
                <groupId>org.apache.maven.pluginsgroupId>
                <artifactId>maven-dependency-pluginartifactId>
            plugin>
        plugins>

        <pluginManagement>
            <plugins>

                <plugin>
                    <groupId>org.apache.maven.pluginsgroupId>
                    <artifactId>maven-javadoc-pluginartifactId>
                    <executions>
                        <execution>
                            <phase>prepare-packagephase>
                            <goals>
                                <goal>jargoal>
                            goals>
                        execution>
                    executions>
                plugin>


                <plugin>
                    <groupId>net.alchim31.mavengroupId>
                    <artifactId>yuicompressor-maven-pluginartifactId>
                    <version>1.5.1version>
                    <executions>
                        <execution>
                            <phase>prepare-packagephase>
                            <goals>
                                <goal>compressgoal>
                            goals>
                        execution>
                    executions>
                    <configuration>
                        <encoding>UTF-8encoding>
                        <jswarn>falsejswarn>
                        <nosuffix>truenosuffix>
                        <linebreakpos>30000linebreakpos>
                        <force>trueforce>
                        <includes>
                            <include>**/*.jsinclude>
                            <include>**/*.cssinclude>
                        includes>
                        <excludes>
                            <exclude>**/*.min.jsexclude>
                            <exclude>**/*.min.cssexclude>
                        excludes>
                    configuration>
                plugin>
            plugins>
        pluginManagement>


        <resources>
            <resource>
                <directory>src/main/javadirectory>
                <excludes>
                    <exclude>**/*.javaexclude>
                excludes>
            resource>
            <resource>
                <directory>src/main/resourcesdirectory>
            resource>
        resources>
    build>

    <repositories>
        <repository>
            <id>aliyun-reposid>
            <name>Aliyun Repositoryname>
            <url>http://maven.aliyun.com/nexus/content/groups/publicurl>
            <releases>
                <enabled>trueenabled>
            releases>
            <snapshots>
                <enabled>falseenabled>
            snapshots>
        repository>

        <repository>
            <id>sonatype-reposid>
            <name>Sonatype Repositoryname>
            <url>https://oss.sonatype.org/content/groups/publicurl>
            <releases>
                <enabled>trueenabled>
            releases>
            <snapshots>
                <enabled>falseenabled>
            snapshots>
        repository>
        <repository>
            <id>sonatype-repos-sid>
            <name>Sonatype Repositoryname>
            <url>https://oss.sonatype.org/content/repositories/snapshotsurl>
            <releases>
                <enabled>falseenabled>
            releases>
            <snapshots>
                <enabled>trueenabled>
            snapshots>
        repository>

        <repository>
            <id>spring-snapshotsid>
            <name>Spring Snapshotsname>
            <url>https://repo.spring.io/snapshoturl>
            <snapshots>
                <enabled>trueenabled>
            snapshots>
        repository>
        <repository>
            <id>spring-milestonesid>
            <name>Spring Milestonesname>
            <url>https://repo.spring.io/milestoneurl>
            <snapshots>
                <enabled>falseenabled>
            snapshots>
        repository>
    repositories>

    <pluginRepositories>
        <pluginRepository>
            <id>aliyun-reposid>
            <name>Aliyun Repositoryname>
            <url>http://maven.aliyun.com/nexus/content/groups/publicurl>
            <releases>
                <enabled>trueenabled>
            releases>
            <snapshots>
                <enabled>falseenabled>
            snapshots>
        pluginRepository>
    pluginRepositories>
project>
parent:继承了 Spring Boot 的 Parent,表示我们是一个 Spring Boot 工程
package:pom,表示该项目仅当做依赖项目,没有具体的实现代码
spring-cloud-dependencies:在 properties 配置中预定义了版本号为 Finchley.RC1 ,表示我们的 Spring Cloud 使用的是 F 版
build:配置了项目所需的各种插件
repositories:配置项目下载依赖时的第三方库
在实际开发中,我们所有的项目都会依赖这个 dependencies 项目,整个项目周期中的所有第三方依赖的版本也都由该项目进行管理。
服务注册与发现
概述
在这里,我们需要用的组件是 Spring Cloud Netflix 的 Eureka,Eureka 是一个服务注册和发现模块
创建服务注册中心
其 pom.xml 文件配置如下:
<project xmlns="http://maven.apache.org/POM/4.0.0" xmlns:xsi="http://www.w3.org/2001/XMLSchema-instance"
         xsi:schemaLocation="http://maven.apache.org/POM/4.0.0 http://maven.apache.org/xsd/maven-4.0.0.xsd">
    <modelVersion>4.0.0modelVersion>

    <parent>
        <groupId>com.funtlgroupId>
        <artifactId>hello-spring-cloud-dependenciesartifactId>
        <version>1.0.0-SNAPSHOTversion>
        <relativePath>../hello-spring-cloud-dependencies/pom.xmlrelativePath>
    parent>

    <artifactId>hello-spring-cloud-eurekaartifactId>
    <packaging>jarpackaging>

    <name>hello-spring-cloud-eurekaname>
    <url>http://www.funtl.comurl>
    <inceptionYear>2018-NowinceptionYear>

    <dependencies>

        <dependency>
            <groupId>org.springframework.bootgroupId>
            <artifactId>spring-boot-starter-testartifactId>
            <scope>testscope>
        dependency>


        <dependency>
            <groupId>org.springframework.cloudgroupId>
            <artifactId>spring-cloud-starter-netflix-eureka-serverartifactId>
        dependency>

    dependencies>

    <build>
        <plugins>
            <plugin>
                <groupId>org.springframework.bootgroupId>
                <artifactId>spring-boot-maven-pluginartifactId>
                <configuration>
                    <mainClass>com.funtl.hello.spring.cloud.eureka.EurekaApplicationmainClass>
                configuration>
            plugin>
        plugins>
    build>
project>
Application
启动一个服务注册中心,只需要一个注解 @EnableEurekaServer
package com.funtl.hello.spring.cloud.eureka;

import org.springframework.boot.SpringApplication;
import org.springframework.boot.autoconfigure.SpringBootApplication;
import org.springframework.cloud.netflix.eureka.server.EnableEurekaServer;

@SpringBootApplication
@EnableEurekaServer
public class EurekaApplication {
    public static void main(String[] args) {
        SpringApplication.run(EurekaApplication.class, args);
    }
}
application.yml
Eureka 是一个高可用的组件,它没有后端缓存,每一个实例注册之后需要向注册中心发送心跳(因此可以在内存中完成),在默认情况下 Erureka Server 也是一个 Eureka Client ,必须要指定一个 Server。
spring:
  application:
    name: hello-spring-cloud-eureka

server:
  port: 8761

eureka:
  instance:
    hostname: localhost
  client:
    registerWithEureka: false
    fetchRegistry: false
    serviceUrl:
      defaultZone: http://${eureka.instance.hostname}:${server.port}/eureka/
通过 eureka.client.registerWithEureka:false 和 fetchRegistry:false 来表明自己是一个 Eureka Server.
操作界面
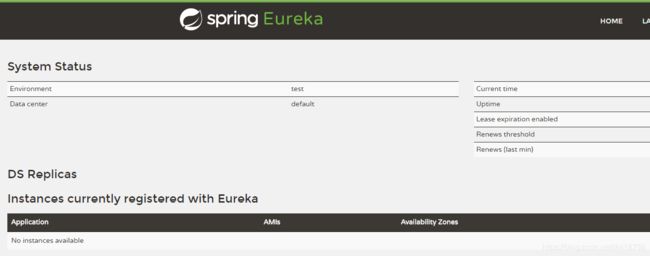
Eureka Server 是有界面的,启动工程,打开浏览器访问:
创建服务提供者
概述
当 Client 向 Server 注册时,它会提供一些元数据,例如主机和端口,URL,主页等。Eureka Server 从每个 Client 实例接收心跳消息。 如果心跳超时,则通常将该实例从注册 Server 中删除。
POM
<project xmlns="http://maven.apache.org/POM/4.0.0" xmlns:xsi="http://www.w3.org/2001/XMLSchema-instance"
         xsi:schemaLocation="http://maven.apache.org/POM/4.0.0 http://maven.apache.org/xsd/maven-4.0.0.xsd">
    <modelVersion>4.0.0modelVersion>

    <parent>
        <groupId>com.funtlgroupId>
        <artifactId>hello-spring-cloud-dependenciesartifactId>
        <version>1.0.0-SNAPSHOTversion>
        <relativePath>../hello-spring-cloud-dependencies/pom.xmlrelativePath>
    parent>

    <artifactId>hello-spring-cloud-service-adminartifactId>
    <packaging>jarpackaging>

    <name>hello-spring-cloud-service-adminname>
    <url>http://www.funtl.comurl>
    <inceptionYear>2018-NowinceptionYear>

    <dependencies>

        <dependency>
            <groupId>org.springframework.bootgroupId>
            <artifactId>spring-boot-starter-testartifactId>
            <scope>testscope>
        dependency>


        <dependency>
            <groupId>org.springframework.cloudgroupId>
            <artifactId>spring-cloud-starter-netflix-eureka-serverartifactId>
        dependency>

    dependencies>

    <build>
        <plugins>
            <plugin>
                <groupId>org.springframework.bootgroupId>
                <artifactId>spring-boot-maven-pluginartifactId>
                <configuration>
                    <mainClass>com.funtl.hello.spring.cloud.service.admin.ServiceAdminApplicationmainClass>
                configuration>
            plugin>
        plugins>
    build>
project>
Application
通过注解 @EnableEurekaClient 表明自己是一个 Eureka Client.
package com.funtl.hello.spring.cloud.service.admin;

import org.springframework.boot.SpringApplication;
import org.springframework.boot.autoconfigure.SpringBootApplication;
import org.springframework.cloud.netflix.eureka.EnableEurekaClient;

@SpringBootApplication
@EnableEurekaClient
public class ServiceAdminApplication {
    public static void main(String[] args) {
        SpringApplication.run(ServiceAdminApplication.class, args);
    }
}
application.yml
spring:
  application:
    name: hello-spring-cloud-service-admin

server:
  port: 8762

eureka:
  client:
    serviceUrl:
      defaultZone: http://localhost:8761/eureka/
注意: 需要指明 spring.application.name,这个很重要,这在以后的服务与服务之间相互调用一般都是根据这个 name
Controller
package com.funtl.hello.spring.cloud.service.admin.controller;

import org.springframework.beans.factory.annotation.Value;
import org.springframework.web.bind.annotation.RequestMapping;
import org.springframework.web.bind.annotation.RequestMethod;
import org.springframework.web.bind.annotation.RequestParam;
import org.springframework.web.bind.annotation.RestController;

@RestController
public class AdminController {

    @Value("${server.port}")
    private String port;

    @RequestMapping(value = "hi", method = RequestMethod.GET)
    public String sayHi(@RequestParam(value = "message") String message) {
        return String.format("Hi,your message is : %s i am from port : %s", message, port);
    }
}
启动工程,打开 http://localhost:8761 ,即 Eureka Server 的网址:
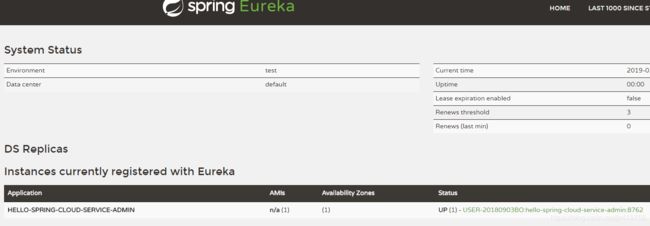
你会发现一个服务已经注册在服务中了,服务名为 HELLO-SPRING-CLOUD-SERVICE-ADMIN ,端口为 8762
这时打开 http://localhost:8762/hi?message=HelloSpring ,你会在浏览器上看到 :
Hi,your message is :“HelloSpring” i am from port:8762
创建服务消费者(Ribbon)
概述
在微服务架构中,业务都会被拆分成一个独立的服务,服务与服务的通讯是基于 http restful 的。Spring cloud 有两种服务调用方式,一种是 ribbon + restTemplate,另一种是 feign。在这一篇文章首先讲解下基于 ribbon + rest。
Ribbon 简介
Ribbon 是一个负载均衡客户端,可以很好的控制 http 和 tcp 的一些行为。
准备工作
启动服务提供者(本教程案例工程为:hello-spring-cloud-service-admin),端口号为:8762
修改配置文件的端口号为:8763,启动后在 Eureka 中会注册两个实例,这相当于一个小集群
创建服务消费者
创建一个工程名为 hello-spring-cloud-web-admin-ribbon 的服务消费者项目,pom.xml 配置如下:
<project xmlns="http://maven.apache.org/POM/4.0.0" xmlns:xsi="http://www.w3.org/2001/XMLSchema-instance"
         xsi:schemaLocation="http://maven.apache.org/POM/4.0.0 http://maven.apache.org/xsd/maven-4.0.0.xsd">
    <modelVersion>4.0.0modelVersion>

    <parent>
        <groupId>com.funtlgroupId>
        <artifactId>hello-spring-cloud-dependenciesartifactId>
        <version>1.0.0-SNAPSHOTversion>
        <relativePath>../hello-spring-cloud-dependencies/pom.xmlrelativePath>
    parent>

    <artifactId>hello-spring-cloud-web-admin-ribbonartifactId>
    <packaging>jarpackaging>

    <name>hello-spring-cloud-web-admin-ribbonname>
    <url>http://www.funtl.comurl>
    <inceptionYear>2018-NowinceptionYear>

    <dependencies>

        <dependency>
            <groupId>org.springframework.bootgroupId>
            <artifactId>spring-boot-starter-webartifactId>
        dependency>
        <dependency>
            <groupId>org.springframework.bootgroupId>
            <artifactId>spring-boot-starter-tomcatartifactId>
        dependency>
        <dependency>
            <groupId>org.springframework.bootgroupId>
            <artifactId>spring-boot-starter-thymeleafartifactId>
        dependency>
        <dependency>
            <groupId>org.springframework.bootgroupId>
            <artifactId>spring-boot-starter-actuatorartifactId>
        dependency>
        <dependency>
            <groupId>org.springframework.bootgroupId>
            <artifactId>spring-boot-starter-testartifactId>
            <scope>testscope>
        dependency>


        <dependency>
            <groupId>org.springframework.cloudgroupId>
            <artifactId>spring-cloud-starter-netflix-eureka-serverartifactId>
        dependency>
        <dependency>
            <groupId>org.springframework.cloudgroupId>
            <artifactId>spring-cloud-starter-netflix-ribbonartifactId>
        dependency>


        <dependency>
            <groupId>net.sourceforge.nekohtmlgroupId>
            <artifactId>nekohtmlartifactId>
        dependency>
    dependencies>

    <build>
        <plugins>
            <plugin>
                <groupId>org.springframework.bootgroupId>
                <artifactId>spring-boot-maven-pluginartifactId>
                <configuration>
                    <mainClass>com.funtl.hello.spring.cloud.web.admin.ribbon.WebAdminRibbonApplicationmainClass>
                configuration>
            plugin>
        plugins>
    build>
project>
主要是增加了 Ribbon 的依赖
<dependency>
    <groupId>org.springframework.cloudgroupId>
    <artifactId>spring-cloud-starter-netflix-ribbonartifactId>
dependency>
Application
通过 @EnableDiscoveryClient 注解注册到服务中心
package com.funtl.hello.spring.cloud.web.admin.ribbon;

import org.springframework.boot.SpringApplication;
import org.springframework.boot.autoconfigure.SpringBootApplication;
import org.springframework.cloud.client.discovery.EnableDiscoveryClient;

@SpringBootApplication
@EnableDiscoveryClient
public class WebAdminRibbonApplication {
    public static void main(String[] args) {
        SpringApplication.run(WebAdminRibbonApplication.class, args);
    }
}
application.yml
设置程序端口号为:8764
spring:
  application:
    name: hello-spring-cloud-web-admin-ribbon
  thymeleaf:
    cache: false
    mode: LEGACYHTML5
    encoding: UTF-8
    servlet:
      content-type: text/html

server:
  port: 8764

eureka:
  client:
    serviceUrl:
      defaultZone: http://localhost:8761/eureka/
Configuration
配置注入 RestTemplate 的 Bean,并通过 @LoadBalanced 注解表明开启负载均衡功能
package com.funtl.hello.spring.cloud.web.admin.ribbon.config;

import org.springframework.cloud.client.loadbalancer.LoadBalanced;
import org.springframework.context.annotation.Bean;
import org.springframework.context.annotation.Configuration;
import org.springframework.web.client.RestTemplate;

@Configuration
public class RestTemplateConfiguration {

    @Bean
    @LoadBalanced
    public RestTemplate restTemplate() {
        return new RestTemplate();
    }
}
创建测试用的 Service
在这里我们直接用的程序名替代了具体的 URL 地址,在 Ribbon 中它会根据服务名来选择具体的服务实例,根据服务实例在请求的时候会用具体的 URL 替换掉服务名,代码如下:
package com.funtl.hello.spring.cloud.web.admin.ribbon.service;

import org.springframework.beans.factory.annotation.Autowired;
import org.springframework.stereotype.Service;
import org.springframework.web.client.RestTemplate;

@Service
public class AdminService {

    @Autowired
    private RestTemplate restTemplate;

    public String sayHi(String message) {
        return restTemplate.getForObject("http://HELLO-SPRING-CLOUD-SERVICE-ADMIN/hi?message=" + message, String.class);
    }
}
创建测试用的 Controller
package com.funtl.hello.spring.cloud.web.admin.ribbon.controller;

import com.funtl.hello.spring.cloud.web.admin.ribbon.service.AdminService;
import org.springframework.beans.factory.annotation.Autowired;
import org.springframework.web.bind.annotation.RequestMapping;
import org.springframework.web.bind.annotation.RequestMethod;
import org.springframework.web.bind.annotation.RequestParam;
import org.springframework.web.bind.annotation.RestController;

@RestController
public class AdminController {

    @Autowired
    private AdminService adminService;

    @RequestMapping(value = "hi", method = RequestMethod.GET)
    public String sayHi(@RequestParam String message) {
        return adminService.sayHi(message);
    }
}
测试访问
在浏览器上多次访问 http://localhost:8764/hi?message=HelloRibbon
浏览器交替显示:
Hi,your message is :“HelloRibbon” i am from port:8762
Hi,your message is :“HelloRibbon” i am from port:8763
请求成功则表示我们已经成功实现了负载均衡功能来访问不同端口的实例
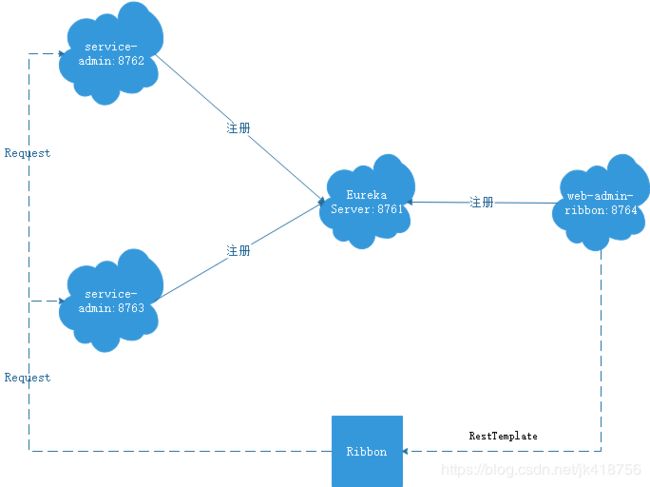
此时的架构
一个服务注册中心,Eureka Server,端口号为:8761
service-admin 工程运行了两个实例,端口号分别为:8762,8763
web-admin-ribbon 工程端口号为:8764
web-admin-ribbon 通过 RestTemplate 调用 service-admin 接口时因为启用了负载均衡功能故会轮流调用它的 8762 和 8763 端口
附
在 IDEA 中配置一个工程启动多个实例
步骤一
点击 Run -> Edit Configurations…
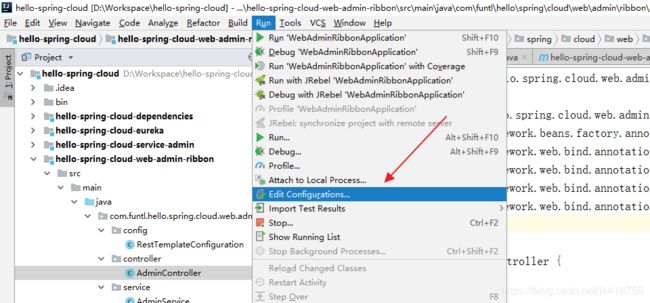
步骤二
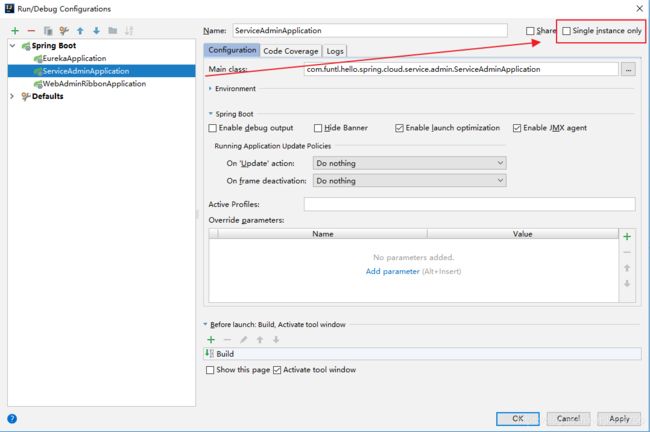
选择需要启动多实例的项目并去掉 Single instance only 前面的勾
步骤三
通过修改 application.yml 配置文件的 server.port 的端口,启动多个实例,需要多个端口,分别进行启动即可。
创建服务消费者(Feign)
概述
Feign 是一个声明式的伪 Http 客户端,它使得写 Http 客户端变得更简单。使用 Feign,只需要创建一个接口并注解。它具有可插拔的注解特性,可使用 Feign 注解和 JAX-RS 注解。Feign 支持可插拔的编码器和解码器。Feign 默认集成了 Ribbon,并和 Eureka 结合,默认实现了负载均衡的效果
Feign 采用的是基于接口的注解
Feign 整合了 ribbon
创建服务消费者
创建一个工程名为 hello-spring-cloud-web-admin-feign 的服务消费者项目,pom.xml 配置如下:
    4.0.0


        com.funtl
        hello-spring-cloud-dependencies
        1.0.0-SNAPSHOT
        ../hello-spring-cloud-dependencies/pom.xml


    hello-spring-cloud-web-admin-feign
    jar

    hello-spring-cloud-web-admin-feign
    http://www.funtl.com
    2018-Now


            org.springframework.boot
            spring-boot-starter-web


            org.springframework.boot
            spring-boot-starter-tomcat


            org.springframework.boot
            spring-boot-starter-thymeleaf


            org.springframework.boot
            spring-boot-starter-actuator


            org.springframework.boot
            spring-boot-starter-test
            test


            org.springframework.cloud
            spring-cloud-starter-netflix-eureka-server


            org.springframework.cloud
            spring-cloud-starter-openfeign


            net.sourceforge.nekohtml
            nekohtml


                org.springframework.boot
                spring-boot-maven-plugin

                    com.funtl.hello.spring.cloud.web.admin.feign.WebAdminFeignApplication
主要是增加了 Feign 的依赖
<dependency>
    <groupId>org.springframework.cloudgroupId>
    <artifactId>spring-cloud-starter-openfeignartifactId>
dependency>
Application
通过 @EnableFeignClients 注解开启 Feign 功能
package com.funtl.hello.spring.cloud.web.admin.feign;

import org.springframework.boot.SpringApplication;
import org.springframework.boot.autoconfigure.SpringBootApplication;
import org.springframework.cloud.client.discovery.EnableDiscoveryClient;
import org.springframework.cloud.openfeign.EnableFeignClients;

@SpringBootApplication
@EnableDiscoveryClient
@EnableFeignClients
public class WebAdminFeignApplication {
    public static void main(String[] args) {
        SpringApplication.run(WebAdminFeignApplication.class, args);
    }
}
application.yml
设置程序端口号为:8765
spring:
  application:
    name: hello-spring-cloud-web-admin-feign
  thymeleaf:
    cache: false
    mode: LEGACYHTML5
    encoding: UTF-8
    servlet:
      content-type: text/html

server:
  port: 8765

eureka:
  client:
    serviceUrl:
      defaultZone: http://localhost:8761/eureka/
创建 Feign 接口
通过 @FeignClient(“服务名”) 注解来指定调用哪个服务。代码如下:
package com.funtl.hello.spring.cloud.web.admin.feign.service;

import org.springframework.cloud.openfeign.FeignClient;
import org.springframework.web.bind.annotation.RequestMapping;
import org.springframework.web.bind.annotation.RequestMethod;
import org.springframework.web.bind.annotation.RequestParam;

@FeignClient(value = "hello-spring-cloud-service-admin")
public interface AdminService {

    @RequestMapping(value = "hi", method = RequestMethod.GET)
    public String sayHi(@RequestParam(value = "message") String message);
}
创建测试用的 Controller
package com.funtl.hello.spring.cloud.web.admin.feign.controller;

import com.funtl.hello.spring.cloud.web.admin.feign.service.AdminService;
import org.springframework.beans.factory.annotation.Autowired;
import org.springframework.web.bind.annotation.RequestMapping;
import org.springframework.web.bind.annotation.RequestMethod;
import org.springframework.web.bind.annotation.RequestParam;
import org.springframework.web.bind.annotation.RestController;

@RestController
public class AdminController {

    @Autowired
    private AdminService adminService;

    @RequestMapping(value = "hi", method = RequestMethod.GET)
    public String sayHi(@RequestParam String message) {
        return adminService.sayHi(message);
    }
}
测试访问
在浏览器上多次访问 http://localhost:8765/hi?message=HelloFeign
浏览器交替显示:
Hi,your message is :“HelloFeign” i am from port:8762
Hi,your message is :“HelloFeign” i am from port:8763
请求成功则表示我们已经成功实现了 Feign 功能来访问不同端口的实例
