打地鼠小游戏
- 1Toast 提示
- Android的提示机制
- 1.1Toast提示
- 1.1.1 使用Toast步骤
- 1.1.2 Toast重要方法
- 1.1.3 Toast操作演示
- 1.1.4 示例源码
- 1.1.5 在类文件创建控件
- 2 Dialog对话框
- 2.1 AlertDialog 的构建
- 2.1.1 AlertDialog.Builder 重要方法
- 2.1.2操作演示
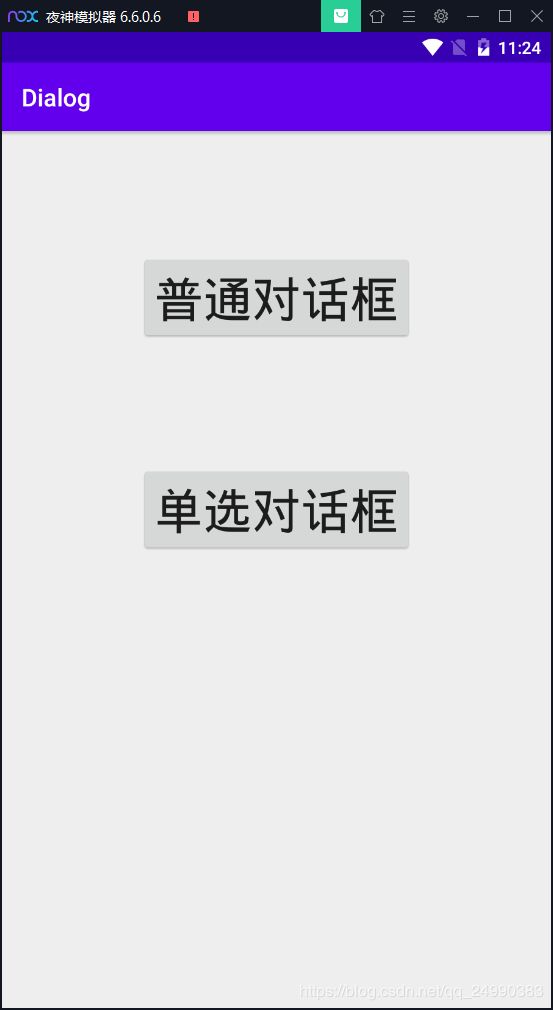
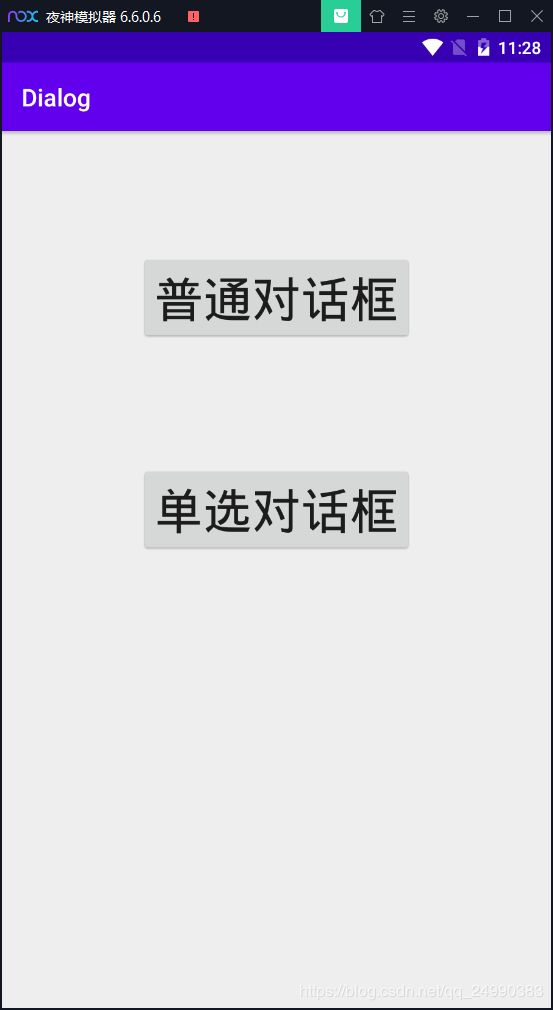
- 2.1.3 效果演示(普通对话框+单选对话框)
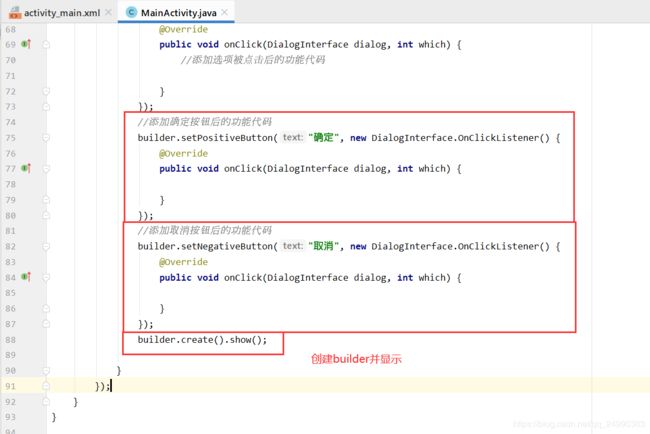
- 2.1.4 示例源码
- 2.2 课后思考(多选对话框+Toast提示单选对话框用户所选择的选项)
- 3 Menu菜单
- 3.1简介
- 3.2 Menu步骤
- 3.3 示例源码
- 3.4 作业
- 4 Spinner下拉列表框
- 4.1 Spinner 步骤
- 4.2 Adapter适配器
- 4.2 操作演示
- 4.2.1 步骤
- 4.2.2 总结
- 4.2.3 示例源码
- 5 打地鼠小游戏App的设计与实现
- 5.1 功能简介
- 5.2 设计思路
- 5.2.1 Thread线程和Handler消息处理机制(处理地鼠随机出现)
- 5.2.2 步骤细化
- 5.3 操作演示
- 5.4 示例源码
1Toast 提示
Android的提示机制
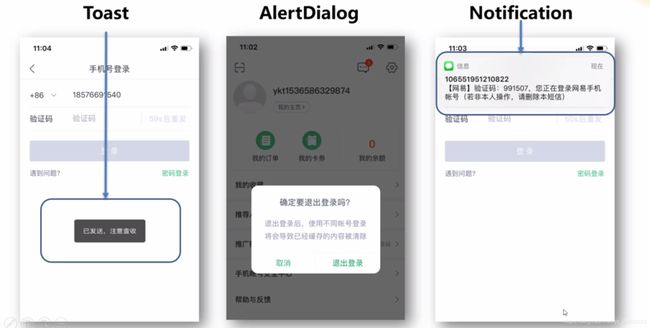
1.1Toast提示
Toast(消息提示框)是轻量级信息提醒机制,显示在应用程序界面的最上层。一般用于提示一些不那么引人注目,但是又希望用户看见的消息,无需用户自己维护它的消失。
- 没有对应的控件
- 没有控制按钮
- 不会获得焦点
- 自动消失
- 用于显示快速提示信息
1.1.1 使用Toast步骤
1.创建Toast对象
①通过构造方法 new Toast()
②通过makeText方法;设置显示内容,显示时长
2.设置消息提示的样式
①自定义位置:setGravity()方法
②自定义图片
③…
3.显示消息
①通过show()方法
1.1.2 Toast重要方法
| 方法 |
public static Toast makeText(Context context ,CharSequence text,int duration) |
| 作用 |
创建一个Toast |
| 说明 |
第一个参数:当前的上下文环境 |
|
第二个参数:要显示的字符串。也可是R.string中字符串ID |
|
第三个参数:显示时间的长短。LENFTH_LONG(长5秒左右)和LENGTH_SHORT(短3秒左右) |
| 示例 |
Toast t = Toast.makeText(MainActivity.this,“这是我的第一条Toast!”,Toast.LENGTH_SHORT); |
|
Toast t = Toast.makeText(this,R.string.hello_world,Toast.LENGTH_LONG); |
| 方法 |
public void show() |
| 作用 |
显示Toast |
| 示例 |
Toast t = Toast.makeText(MainActivity.this,“这是我的第一片面包”,Toast.LENGTH_SHORT); |
| 方法 |
public void setGravity(int gravity,int xOffset,int yOfffset) |
| 作用 |
设置Toast的位置 |
| 说明 |
第一个参数:设置toast在屏幕中显示的位置 |
|
第二个参数:相对于第一个参数设置toast位置的横向X轴的偏移量,正数向右偏移,负数向左偏移 |
| 示例 |
toast.setGravity(Gravity.CENTER,0,0); |
1.1.3 Toast操作演示
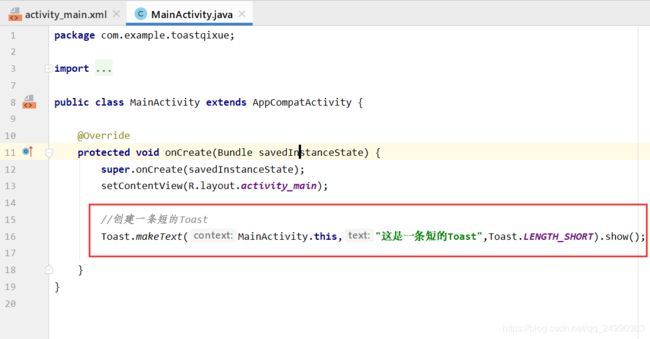
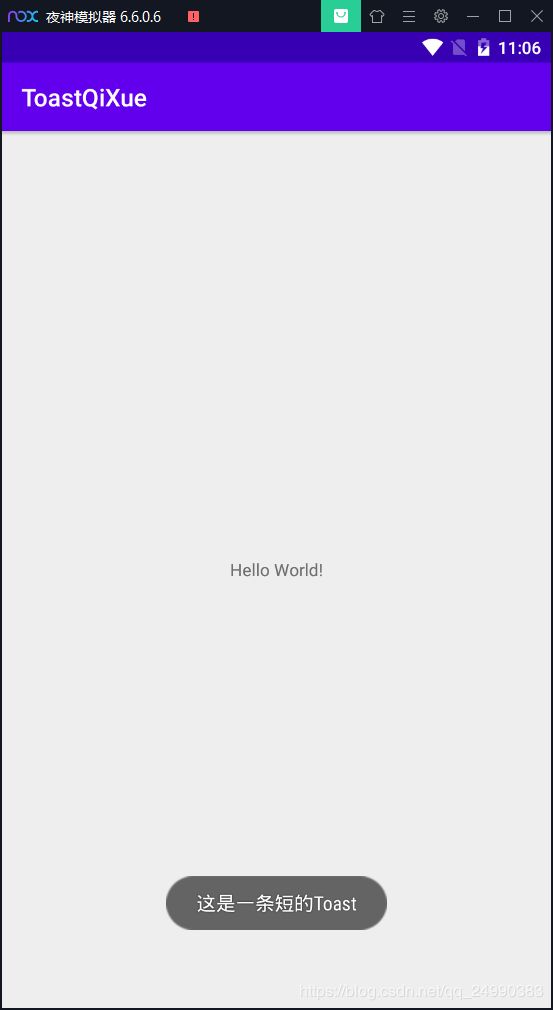
1.在页面创建时显示一条短的Toast
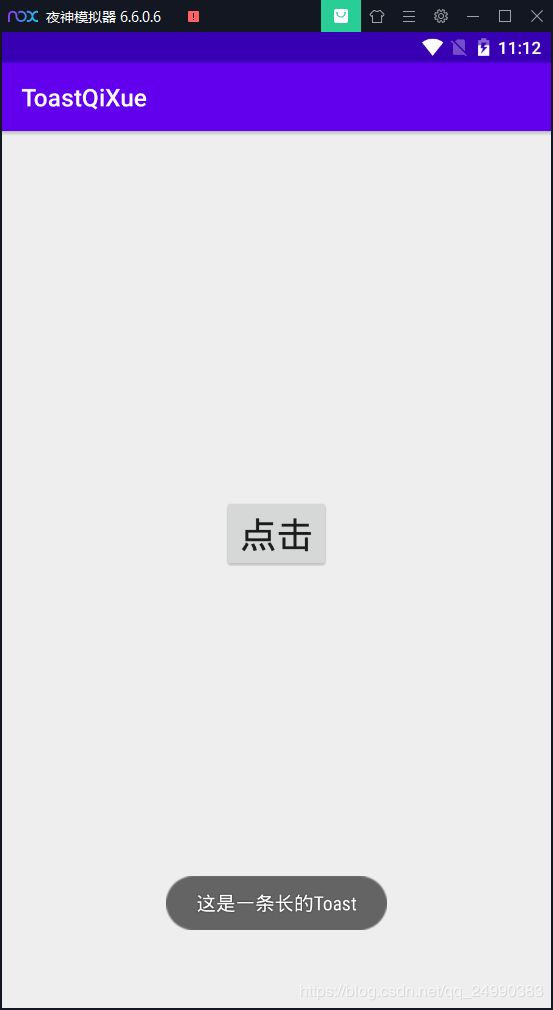
2.通过点击按钮显示一条长的Toast
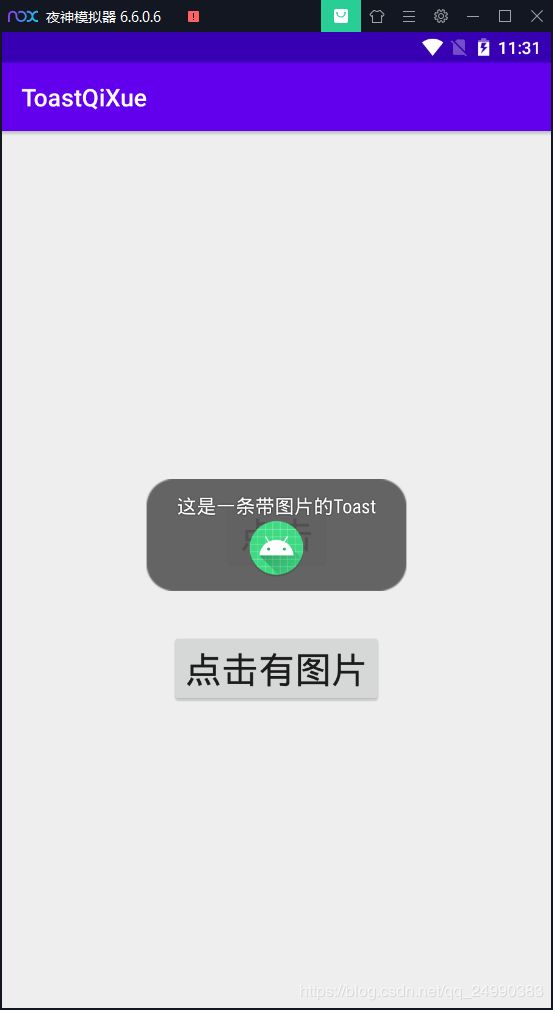
3.通过点击按钮显示一条居中的带图片的Toast

点击按钮显示(显示的时间更长)

1.1.4 示例源码
<?xml version="1.0" encoding="utf-8"?>
<LinearLayout xmlns:android="http://schemas.android.com/apk/res/android"
xmlns:app="http://schemas.android.com/apk/res-auto"
xmlns:tools="http://schemas.android.com/tools"
android:layout_width="match_parent"
android:layout_height="match_parent"
tools:context=".MainActivity"
android:orientation="vertical">
<Button
android:id="@+id/button_1"
android:layout_width="wrap_content"
android:layout_height="wrap_content"
android:text="点击"
android:textSize="30dp"
android:layout_gravity="center"
android:layout_marginTop="300dp"
/>
<Button
android:id="@+id/button_2"
android:layout_width="wrap_content"
android:layout_height="wrap_content"
android:text="点击有图片"
android:textSize="30dp"
android:layout_gravity="center"
android:layout_marginTop="50dp"
/>
</LinearLayout>

package com.example.toastqixue;
import androidx.appcompat.app.AppCompatActivity;
import android.os.Bundle;
import android.view.Gravity;
import android.view.View;
import android.widget.Button;
import android.widget.ImageView;
import android.widget.LinearLayout;
import android.widget.Toast;
public class MainActivity extends AppCompatActivity {
Button btn_1 ;
Button btn_2;
@Override
protected void onCreate(Bundle savedInstanceState) {
super.onCreate(savedInstanceState);
setContentView(R.layout.activity_main);
Toast.makeText(MainActivity.this,"这是一条短的Toast",Toast.LENGTH_SHORT).show();
btn_1 =findViewById(R.id.button_1);
btn_1.setOnClickListener(new View.OnClickListener() {
@Override
public void onClick(View v) {
Toast.makeText(MainActivity.this,"这是一条长的Toast",Toast.LENGTH_LONG).show();
}
});
btn_2=findViewById(R.id.button_2);
btn_2.setOnClickListener(new View.OnClickListener() {
@Override
public void onClick(View v) {
Toast toast= Toast.makeText(MainActivity.this,"这是一条带图片的Toast",Toast.LENGTH_LONG);
toast.setGravity(Gravity.CENTER,0,0);
ImageView image1 = new ImageView(MainActivity.this);
image1.setImageResource(R.mipmap.ic_launcher_round);
LinearLayout toastview=(LinearLayout)toast.getView();
toastview.addView(image1);
toast.show();
}
});
}
}
1.1.5 在类文件创建控件
重点:完全不在布局界面activity_main.xml上创建控件,直接在MainActivity.java里创建控件的方法
ImageView image1 = new ImageView(MainActivity.this);
image1.setImageResource(R.mipmap.ic_launcher_round);
2 Dialog对话框
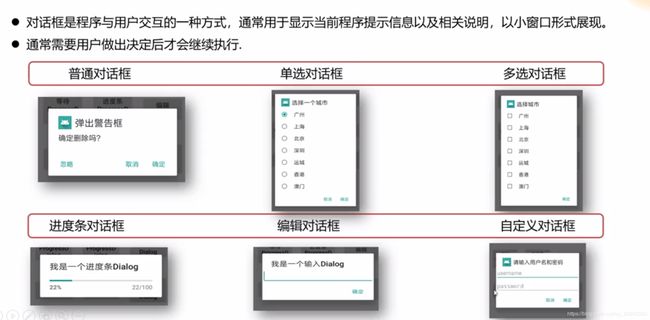
- 对话框是程序与用户交互的一种方式,通常用于显示当前程序提示信息以及相关说明,以小窗口形式展现。
- 通常需要用户做出决定后才会执行。
2.1 AlertDialog 的构建
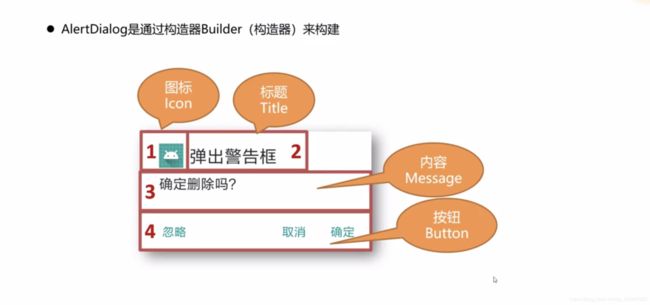
2.1.1 AlertDialog.Builder 重要方法
| 方法 |
AlertDialog.Builder setlcon (int iconld) |
| 作用 |
设定对话框的图标,其中参数为图标的资源ID,返回值为AlertDialog.Builder类的对象。 |
| 说明 |
AlertDialog类的子类,它可以在对话框上提供一些按钮供用户选择。Builder类是AlertDialog类的内部类,它的主要作用是用来创建AlertDialog类的对象的,可以把它理解为AlertDialog的构造器。下同 |
| 方法 |
AlertDialog.Builder setTitle(CharSequence title) |
| 作用 |
设定对话框的标题。其中参数为对话框的标题字符串,返回值为AlertDialog.Builder类的对象。 |
| 方法 |
AlertDialog.Builder setMessage(CharSequence message) |
| 作用 |
设定对话框的内容。其中参数为对话框的提示内容字符串,返回值为AlertDialog.Builder类的对象。 |
| 方法 |
AlertDialog.Builder setPositiveButton(CharSequence text,DialogInterface.OnClickListener listener) |
| 作用 |
设定对话框上的“确定(肯定)”按钮。其中参数text为按钮上显示的文本,listener为该按钮的单击事件监听器,返回值为AlertDialog.Builder类的对象。 |
| 方法 |
AlertDialog.Builder setNegativeButton(CharSequence text,DialogInterface.OnClickListener listener) |
| 作用 |
设定对话框上的“取消(否定)”按钮。其中参数text为按钮上显示的文本,listener为该按钮的单击事件监听器,返回值为AlertDialog.Builder类的对象。 |
| 方法 |
AlertDialog.Builder setNeutralButton(CharSequence text,DialogInterface.OnClickListener listener) |
| 作用 |
设定对话框上的“忽视(中立)”按钮。其中参数text为按钮上显示的文本,listener为该按钮的单击事件监听器,返回值为AlertDialog.Builder类的对象 |
| 方法 |
AlertDialog create() |
| 作用 |
创建一个对话框,返回值为AlertDialog类的对象。 |
| 方法 |
AlertDialog show() |
| 作用 |
显示一个对话框,返回值为AlertDialog类的对象。 |
| 方法 |
public AlertDialog.Bulider setSingleChoiceltems(CharSequence[] items,int checkedltem,android.content.DialogInterface.OnClickListener listener |
| 作用 |
设定单选列表 |
|
1.第一个参数指定我们要显示的一组下拉单选框的数据集合 |
|
2.第二个参数代表索引,指定默认哪一个单选框被勾选上 |
|
3.第三个参数给每一个单选项绑定一个监听器 |
| 方法 |
public AlertDialog.Builder setMultiChoiceItems(CharSequence[] items,boolean[] checkedltems,android.content.DialogInterface.OnMultiChoiceClickListener listener) |
| 作用 |
设定多选列表。 |
|
1.第一个参数指定我们要显示的一组下拉多选框的数据集合 |
|
2.第二个参数代表哪几个选项被选择,如果是null,则表示一个都不选择,如果希望指定哪一个多选选择框被选择,需要传递一个boolean[]数组进来,其长度要和第一个参数的长度相同,例如{true,false,false,true} |
|
3.第三个参数给每一个多选项绑定一个监听器 |
2.1.2操作演示
-
1. 通过点击按钮显示一个普通Dialog


-
2. 通过点击按钮显示一个单选Dialog

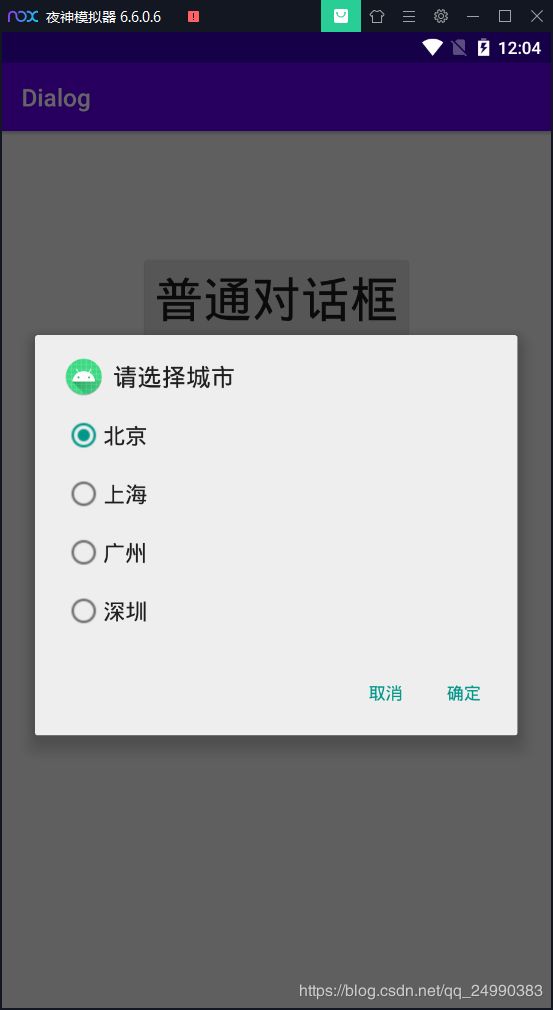
2.1.3 效果演示(普通对话框+单选对话框)
 点击普通对话框按钮
 选择取消,返回原界面
 选择确定,退出程序
- 2. 通过点击按钮显示一个单选Dialog,AlertDialog.Bulider setSingleChoiceltems方法第二个参数为 0,所以默认单选在第一个“北京”
2.1.4 示例源码
package com.example.dialog;
import androidx.appcompat.app.AppCompatActivity;
import android.app.AlertDialog;
import android.content.DialogInterface;
import android.os.Bundle;
import android.view.View;
import android.widget.Button;
public class MainActivity extends AppCompatActivity {
Button btn_1;
Button btn_2;
@Override
protected void onCreate(Bundle savedInstanceState) {
super.onCreate(savedInstanceState);
setContentView(R.layout.activity_main);
btn_1 =findViewById(R.id.button_1);
btn_2 =findViewById(R.id.button_2);
btn_1.setOnClickListener(new View.OnClickListener() {
@Override
public void onClick(View v) {
AlertDialog.Builder builder = new AlertDialog.Builder(MainActivity.this);
builder.setIcon(R.mipmap.ic_launcher_round);
builder.setTitle("温馨提示");
builder.setMessage("确定要退出吗?");
builder.setPositiveButton("确定", new DialogInterface.OnClickListener() {
@Override
public void onClick(DialogInterface dialog, int which) {
finish();
}
});
builder.setNegativeButton("取消", new DialogInterface.OnClickListener() {
@Override
public void onClick(DialogInterface dialog, int which) {
}
});
builder.create().show();
}
});
btn_2.setOnClickListener(new View.OnClickListener() {
@Override
public void onClick(View v) {
AlertDialog.Builder builder = new AlertDialog.Builder(MainActivity.this);
builder.setIcon(R.mipmap.ic_launcher_round);
builder.setTitle("请选择城市");
final String[] cities={"北京","上海","广州","深圳"};
builder.setSingleChoiceItems(cities, 0, new DialogInterface.OnClickListener() {
@Override
public void onClick(DialogInterface dialog, int which) {
}
});
builder.setPositiveButton("确定", new DialogInterface.OnClickListener() {
@Override
public void onClick(DialogInterface dialog, int which) {
}
});
builder.setNegativeButton("取消", new DialogInterface.OnClickListener() {
@Override
public void onClick(DialogInterface dialog, int which) {
}
});
builder.create().show();
}
});
}
}
<?xml version="1.0" encoding="utf-8"?>
<LinearLayout xmlns:android="http://schemas.android.com/apk/res/android"
xmlns:app="http://schemas.android.com/apk/res-auto"
xmlns:tools="http://schemas.android.com/tools"
android:layout_width="match_parent"
android:layout_height="match_parent"
android:orientation="vertical"
tools:context=".MainActivity">
<Button
android:id="@+id/button_1"
android:layout_width="wrap_content"
android:layout_height="wrap_content"
android:text="普通对话框"
android:textAllCaps="false"
android:layout_gravity="center"
android:layout_marginTop="100dp"
android:textSize="40dp"/>
<Button
android:id="@+id/button_2"
android:layout_width="wrap_content"
android:layout_height="wrap_content"
android:text="单选对话框"
android:textAllCaps="false"
android:layout_gravity="center"
android:layout_marginTop="100dp"
android:textSize="40dp"/>
</LinearLayout>
2.2 课后思考(多选对话框+Toast提示单选对话框用户所选择的选项)
2.2.1 操作
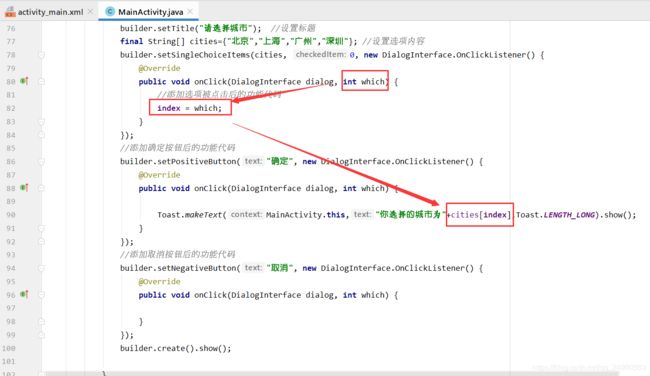
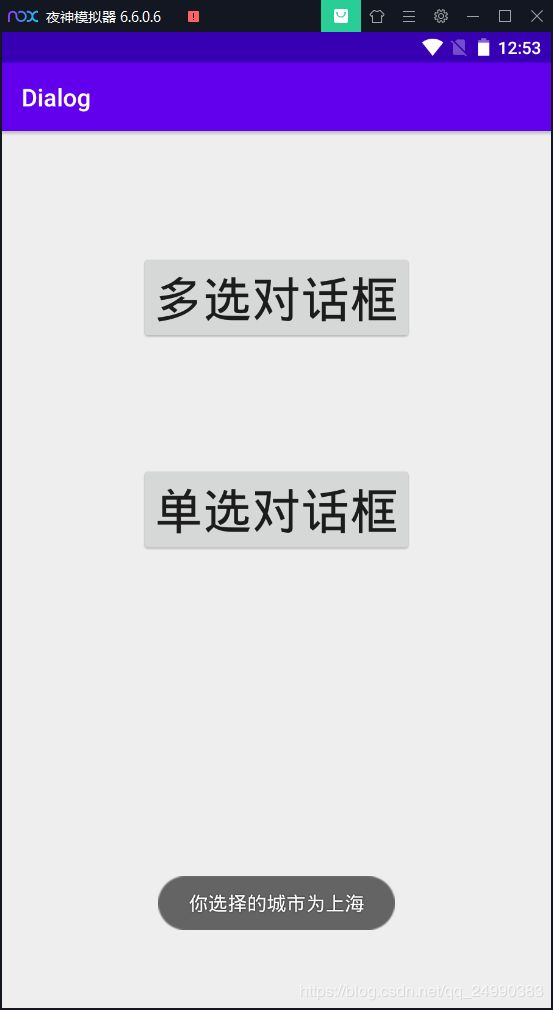
- 1.增加功能,在单选框选择城市后,在点击“确定”后显示一条Toast,内容为:您选择了***
难点在于如何获取用户选择的选项信息,在单选框监听事件中,自动生成的代码段里的形参 int which为用户选择的选项下标
 效果
效果

- 2.通过点击按钮显示一个多选Dialog
使用方法setMultiChoiceItems

效果:因为初始boolean[]数组初始值为{true,false,false,true};所以默认选择了前两位

2.2.2 作业源码
package com.example.dialog;
import androidx.appcompat.app.AppCompatActivity;
import android.app.AlertDialog;
import android.content.DialogInterface;
import android.os.Bundle;
import android.view.View;
import android.widget.Button;
import android.widget.Toast;
public class MainActivity extends AppCompatActivity {
Button btn_1;
Button btn_2;
int index;
@Override
protected void onCreate(Bundle savedInstanceState) {
super.onCreate(savedInstanceState);
setContentView(R.layout.activity_main);
btn_1 =findViewById(R.id.button_1);
btn_2 =findViewById(R.id.button_2);
btn_1.setOnClickListener(new View.OnClickListener() {
@Override
public void onClick(View v) {
AlertDialog.Builder builder = new AlertDialog.Builder(MainActivity.this);
builder.setIcon(R.mipmap.ic_launcher_round);
builder.setTitle("请选择动物");
final String[] animals={"兔子","小狗","小猫","小熊"};
boolean[] right={true,false,false,true};
builder.setMultiChoiceItems(animals, right, new DialogInterface.OnMultiChoiceClickListener() {
@Override
public void onClick(DialogInterface dialog, int which, boolean isChecked) {
}
});
builder.setPositiveButton("确定", new DialogInterface.OnClickListener() {
@Override
public void onClick(DialogInterface dialog, int which) {
Toast.makeText(MainActivity.this,"选择成功",Toast.LENGTH_LONG).show();
}
});
builder.setNegativeButton("取消", new DialogInterface.OnClickListener() {
@Override
public void onClick(DialogInterface dialog, int which) {
}
});
builder.create().show();
}
});
btn_2.setOnClickListener(new View.OnClickListener() {
@Override
public void onClick(View v) {
String str1;
AlertDialog.Builder builder = new AlertDialog.Builder(MainActivity.this);
builder.setIcon(R.mipmap.ic_launcher_round);
builder.setTitle("请选择城市");
final String[] cities={"北京","上海","广州","深圳"};
builder.setSingleChoiceItems(cities, 0, new DialogInterface.OnClickListener() {
@Override
public void onClick(DialogInterface dialog, int which) {
index = which;
}
});
builder.setPositiveButton("确定", new DialogInterface.OnClickListener() {
@Override
public void onClick(DialogInterface dialog, int which) {
Toast.makeText(MainActivity.this,"你选择的城市为"+cities[index],Toast.LENGTH_LONG).show();
}
});
builder.setNegativeButton("取消", new DialogInterface.OnClickListener() {
@Override
public void onClick(DialogInterface dialog, int which) {
}
});
builder.create().show();
}
});
}
}
<?xml version="1.0" encoding="utf-8"?>
<LinearLayout xmlns:android="http://schemas.android.com/apk/res/android"
xmlns:app="http://schemas.android.com/apk/res-auto"
xmlns:tools="http://schemas.android.com/tools"
android:layout_width="match_parent"
android:layout_height="match_parent"
android:orientation="vertical"
tools:context=".MainActivity">
<Button
android:id="@+id/button_1"
android:layout_width="wrap_content"
android:layout_height="wrap_content"
android:text="多选对话框"
android:textAllCaps="false"
android:layout_gravity="center"
android:layout_marginTop="100dp"
android:textSize="40dp"/>
<Button
android:id="@+id/button_2"
android:layout_width="wrap_content"
android:layout_height="wrap_content"
android:text="单选对话框"
android:textAllCaps="false"
android:layout_gravity="center"
android:layout_marginTop="100dp"
android:textSize="40dp"/>
</LinearLayout>
3 Menu菜单
3.1简介

3.2 Menu步骤
1.创建布局界面
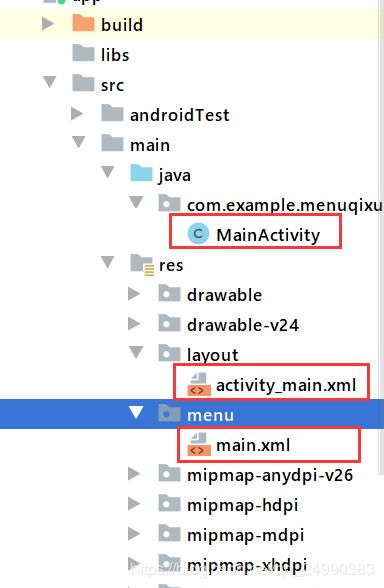
2.创建菜单资源文件
3.添加选项菜单
4.指定选项被选择时应做的处理
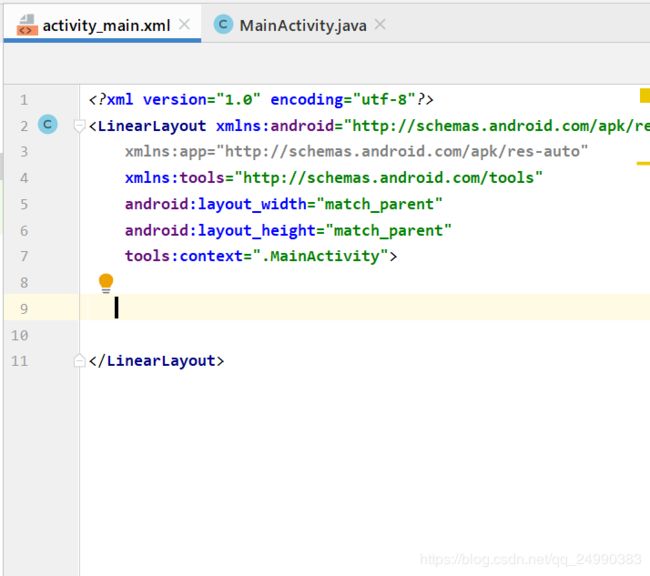
1.创建布局界面
创建新项目,将布局改为线性布局
 2.创建菜单资源文件


 做菜单的第一个项,起名为“添加”
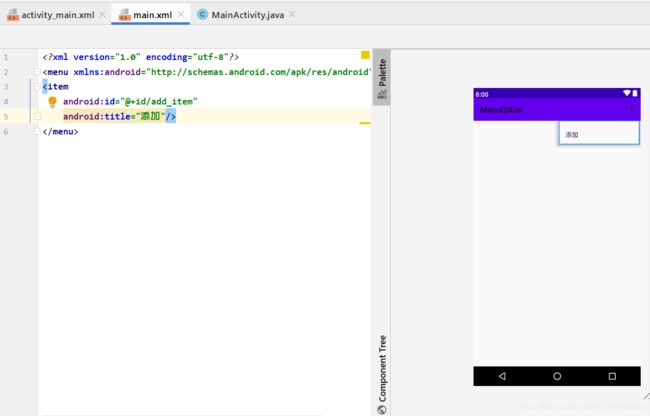 第二种方法
第二种方法
 用同样的方法添加剩下的
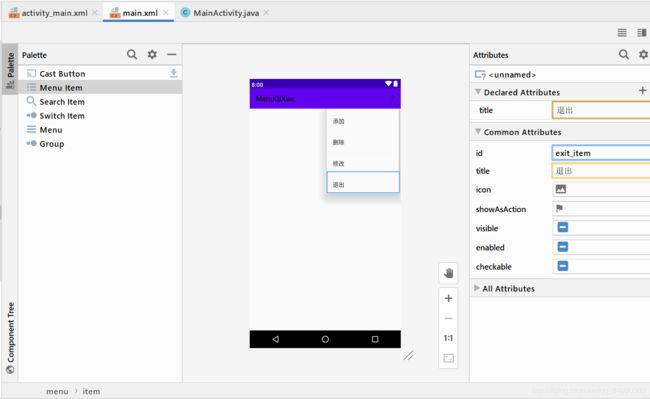
最终结果如图
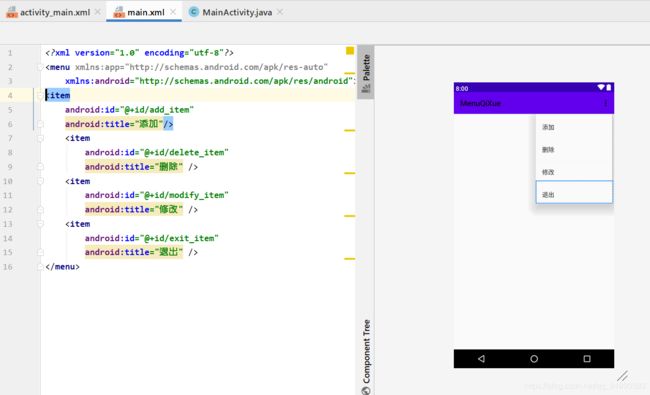
目前是运行起来无法显示效果,因为没有添加显示
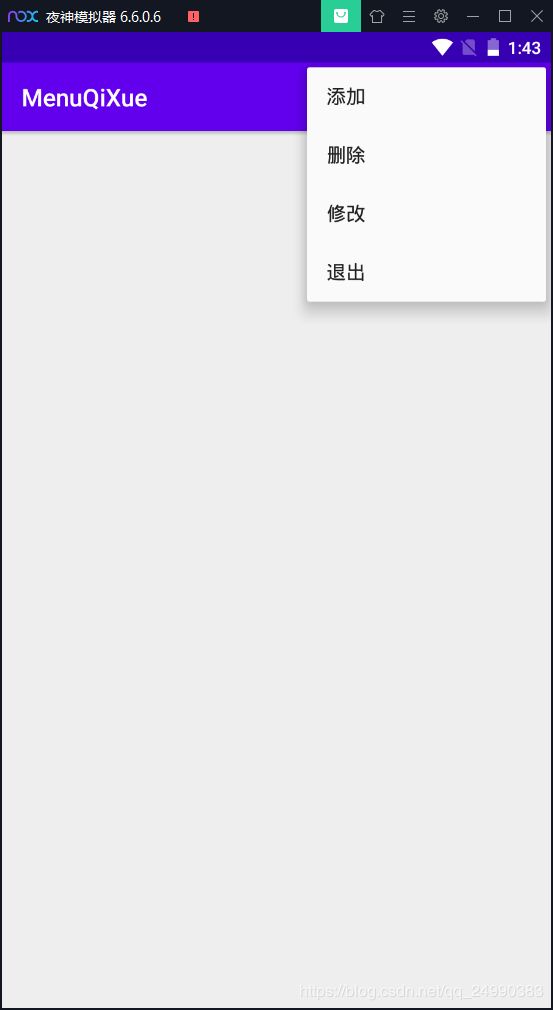
 3.添加选项菜单
需要用到这个方法
| 方法 |
Activity类:public boolean onCreateOptionsMenu(Menu menu) |
| 作用 |
系统创建选项菜单时调用的方法,参数menu就是Activity 的选项菜单对象,返回值为true表示需要显示菜单,否则菜单不显示 |
| 说明 |
要创建选项菜单,就需要重写该方法,在方法中对menu对象进行操作 |
在MainActivity.java中

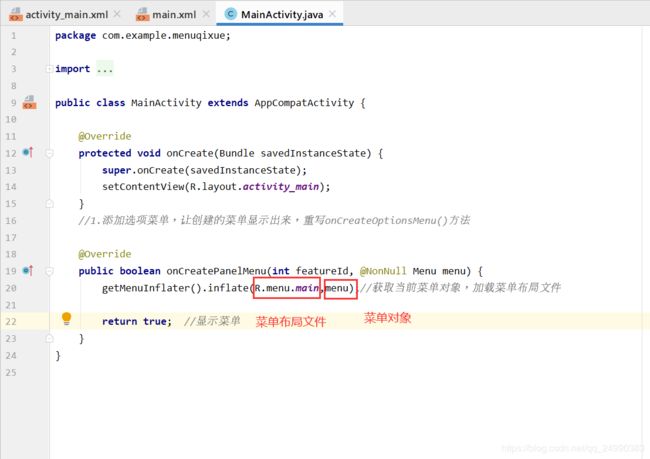

效果
4.指定选择项被选择时应做的处理
| 方法 |
Activity类:public boolean onOptionsltemSelected(Menultem item) |
| 作用 |
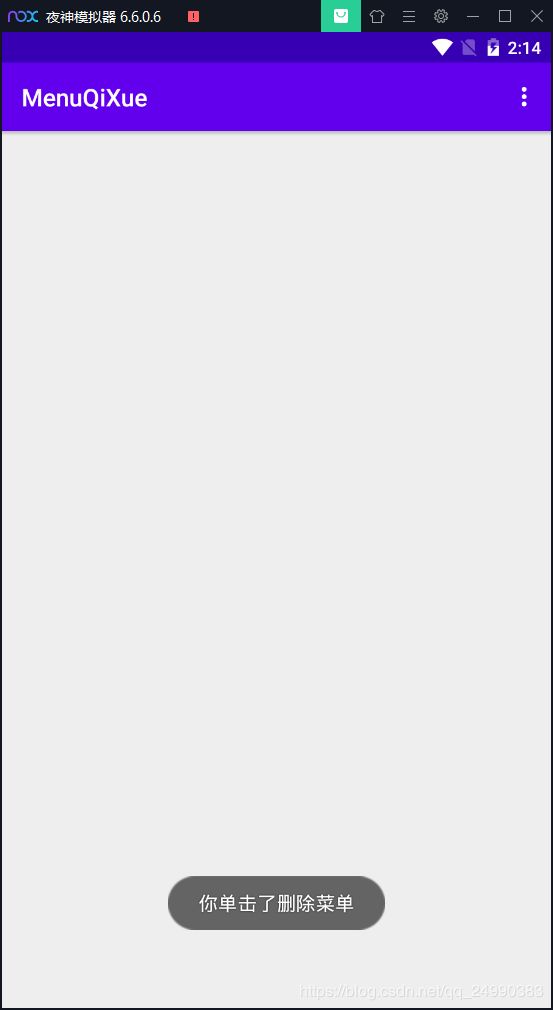
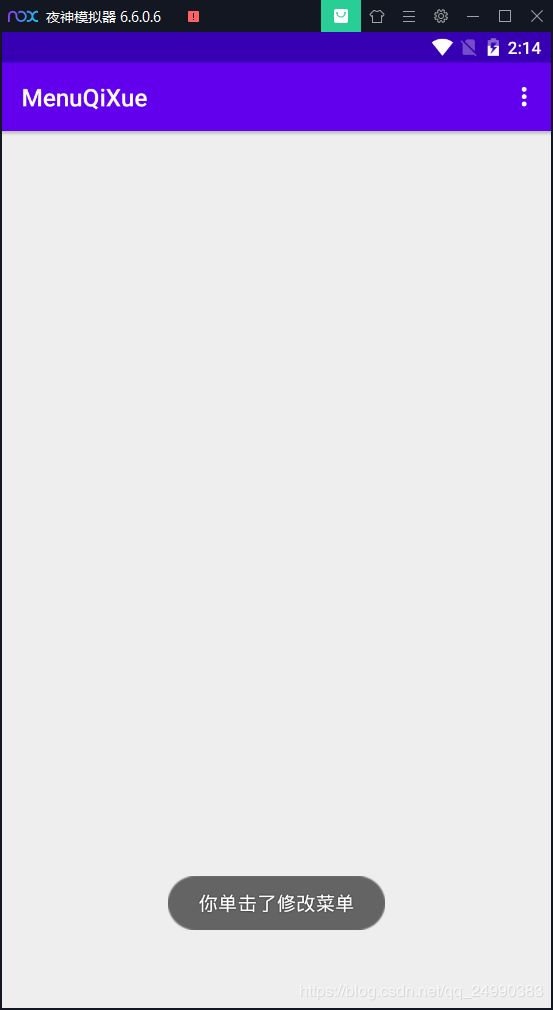
单击菜单项后会自动触发该方法 |
| 说明 |
参数说明:item参数是被单击的菜单项,返回值: |
|
- 如果任务全部已经处理完,则返回true |
|
-如果希望将菜单项点击的事件传递下去,继续触发其他处理,则返回false |
|
-如果采用return super.onOptionsltemSelected(item);则返回值为false,即系统缺省返回false |
 效果
效果
 分别点击菜单项


3.3 示例源码
package com.example.menuqixue;
import androidx.annotation.NonNull;
import androidx.appcompat.app.AppCompatActivity;
import android.os.Bundle;
import android.view.Menu;
import android.view.MenuItem;
import android.widget.Toast;
public class MainActivity extends AppCompatActivity {
@Override
protected void onCreate(Bundle savedInstanceState) {
super.onCreate(savedInstanceState);
setContentView(R.layout.activity_main);
}
@Override
public boolean onCreatePanelMenu(int featureId, @NonNull Menu menu) {
getMenuInflater().inflate(R.menu.main,menu);
return true;
}
@Override
public boolean onOptionsItemSelected(@NonNull MenuItem item) {
switch(item.getItemId()){
case R.id.add_item:
Toast.makeText(MainActivity.this,"你单击了添加菜单",Toast.LENGTH_LONG).show();
break;
case R.id.delete_item:
Toast.makeText(MainActivity.this,"你单击了删除菜单",Toast.LENGTH_LONG).show();
break;
case R.id.exit_item:
finish();
break;
case R.id.modify_item:
Toast.makeText(MainActivity.this,"你单击了修改菜单",Toast.LENGTH_LONG).show();
break;
default:
}
return true;
}
}
<?xml version="1.0" encoding="utf-8"?>
<LinearLayout xmlns:android="http://schemas.android.com/apk/res/android"
xmlns:app="http://schemas.android.com/apk/res-auto"
xmlns:tools="http://schemas.android.com/tools"
android:layout_width="match_parent"
android:layout_height="match_parent"
tools:context=".MainActivity">
</LinearLayout>
<?xml version="1.0" encoding="utf-8"?>
<menu xmlns:app="http://schemas.android.com/apk/res-auto"
xmlns:android="http://schemas.android.com/apk/res/android">
<item
android:id="@+id/add_item"
android:title="添加"/>
<item
android:id="@+id/delete_item"
android:title="删除" />
<item
android:id="@+id/modify_item"
android:title="修改" />
<item
android:id="@+id/exit_item"
android:title="退出" />
</menu>
3.4 作业
- 在点击删除菜单项后,显示一个对话框
效果
在上述代码的case R.id.exit_item: finish();处改为
case R.id.exit_item:
AlertDialog.Builder builder = new AlertDialog.Builder(MainActivity.this);
builder.setIcon(R.mipmap.ic_launcher_round);
builder.setTitle("温馨提示");
builder.setMessage("确定要退出吗?");
builder.setPositiveButton("确定", new DialogInterface.OnClickListener() {
@Override
public void onClick(DialogInterface dialog, int which) {
finish();
}
});
builder.setNegativeButton("取消", new DialogInterface.OnClickListener() {
@Override
public void onClick(DialogInterface dialog, int which) {
}
});
builder.create().show();
break;
4 Spinner下拉列表框
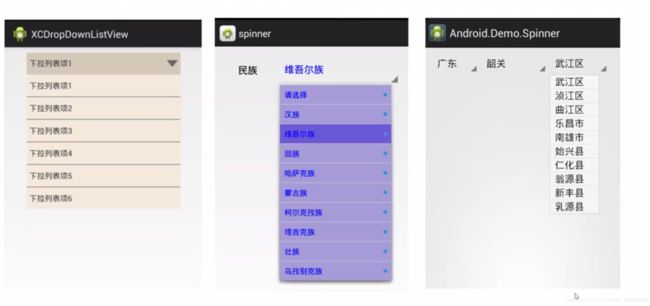
4.1 Spinner 步骤
1.定义对象
2.绑定控件
3.设置下拉列表项
4.创建适配器
5.让控件显示数据
4.2 Adapter适配器
4.2.1 简介
适配器是连接控件与数据的桥梁,几种常用的Adapter:
- 1.ArrayAdapter:数组适配器.是最简单的Adapter,适用于列表项中单一文本的情况;
- 2.SimpleAdapter:每一个列表项中可以含有不同的子控件
- 3.SimpleCursorAdapter:数据源为数据库

4.2.2 重要方法
| 方法 |
ArrayAdapter构造方法:ArrayAdapter(Context context,int textViewResourceld,T[] object) |
| 作用 |
ArrayAdapter构造方法 |
| 说明 |
参数: |
|
1.context:当前Activity 的环境 |
|
2.textViewResourceld:以什么样的方式(布局)显示数据; |
|
3.Objects:要显示的数据,即为适配器需要连接的数组数据。 |
| 方法 |
Spinner类的方法:public void setAdapter(SpinnerAdater adapter) |
| 作用 |
设定控件所使用的适配器 |
| 说明 |
adapter 为提供给控件的适配器 |
| 方法 |
public void setOnItemSelectedListener(AdapterView.OnItemSelectedListener listener) |
| 作用 |
用于监听Spinner选项被选中的事物,该方法是Spinner控件从其父类AdapterView中继承得到的 |
| 说明 |
Listener是监听器 |
4.2 操作演示
4.2.1 步骤
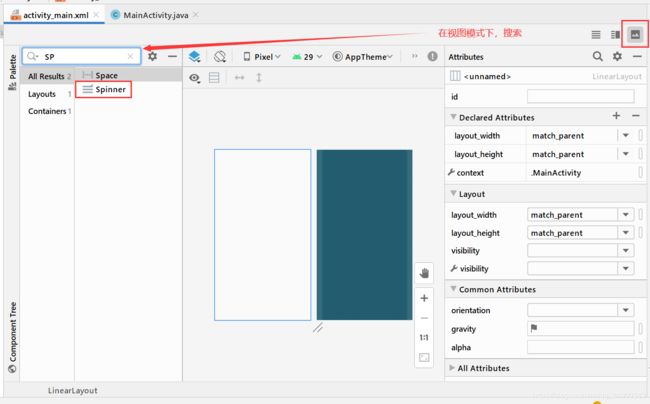
1.activity_main.xml中拖动Spinner控件
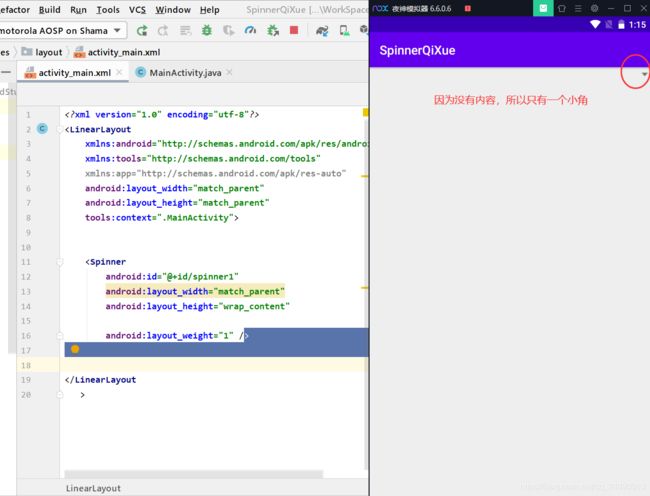
 2.运行一下,因为没有内容,所以只有一个下拉框的下角
 3.在MainActivity.java文件中编写Spinner的内容
 效果
效果

4.编辑Spinner下拉框内容被单击后的触发事件,修改参数为arg0,arg1,arg2,arg3
 效果如图,选择哪个项,则出现该项对应的提示消息

4.2.2 总结
1.定义对象Spinner spin1;
2.绑定控件spin1=findViewById(R.id.spinner1);
3.设置下拉列表项String [] arr1={"全部","纪录片","漫画","音乐","舞蹈","游戏"};
4.创建适配器
 ArrayAdapter<String> adapter1 = new ArrayAdapter<String>(MainActivity.this,
                android.R.layout.simple_spinner_item,arr1);
5.让控件Spinner显示数据 spin1.setAdapter(adapter1);
6.添加触发事件setOnItemSelectedListener()方法
4.2.3 示例源码
package com.example.spinnerqixue;
import androidx.appcompat.app.AppCompatActivity;
import android.os.Bundle;
import android.view.View;
import android.widget.AdapterView;
import android.widget.ArrayAdapter;
import android.widget.Spinner;
import android.widget.TextView;
import android.widget.Toast;
public class MainActivity extends AppCompatActivity {
Spinner spin1;
@Override
protected void onCreate(Bundle savedInstanceState) {
super.onCreate(savedInstanceState);
setContentView(R.layout.activity_main);
spin1=findViewById(R.id.spinner1);
String [] arr1={"全部","纪录片","漫画","音乐","舞蹈","游戏"};
ArrayAdapter<String> adapter1 = new ArrayAdapter<String>(MainActivity.this,
android.R.layout.simple_spinner_item,arr1);
spin1.setAdapter(adapter1);
spin1.setOnItemSelectedListener(new AdapterView.OnItemSelectedListener() {
@Override
public void onItemSelected(AdapterView<?> arg0, View arg1, int arg2, long arg3) {
TextView text1 = (TextView) arg1;
String str1 = text1.getText().toString();
Toast.makeText(MainActivity.this,str1,Toast.LENGTH_LONG).show();
}
@Override
public void onNothingSelected(AdapterView<?> parent) {
}
});
}
}
<?xml version="1.0" encoding="utf-8"?>
<LinearLayout
xmlns:android="http://schemas.android.com/apk/res/android"
xmlns:tools="http://schemas.android.com/tools"
xmlns:app="http://schemas.android.com/apk/res-auto"
android:layout_width="match_parent"
android:layout_height="match_parent"
tools:context=".MainActivity">
<Spinner
android:id="@+id/spinner1"
android:layout_width="match_parent"
android:layout_height="wrap_content"
android:layout_weight="1" />
</LinearLayout>
5 打地鼠小游戏App的设计与实现
5.1 功能简介
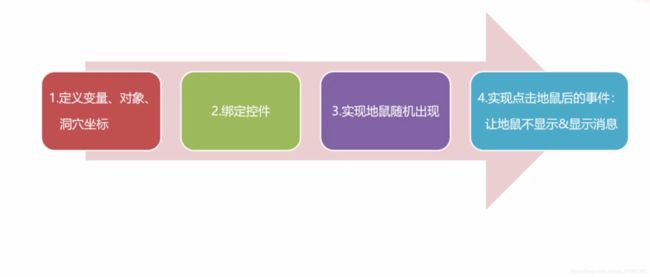
- 在窗体上放置一张有多个“洞穴”的背景图片,然后在每个洞穴处随机显示地鼠
- 用户用鼠标点击出现的地鼠,如果点击到了,则该地鼠不再显示在该洞穴,显示在其他洞穴,同时在屏幕上通过消息提示框显示打到了几只地鼠。
5.2 设计思路
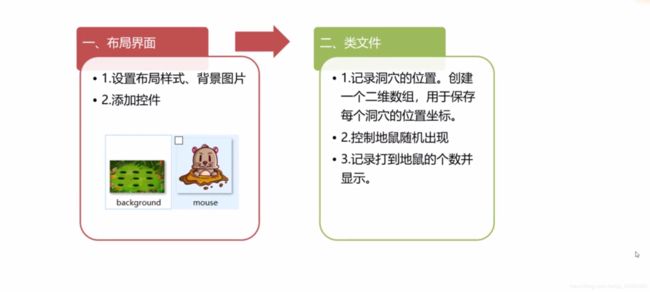
5.2.1 Thread线程和Handler消息处理机制(处理地鼠随机出现)
复习线程概念。 区分线程和进程:
在安卓中,一个安卓应用就是一个进程,每个应用在各自的进程中运行。线程是比进程更小的独立运行的基本单位,一个进程可以包含多个线程。
- 在Android中子线程不允许操作主线程中的组件
- 必须在子线程中更新UI组件,应该怎么办?
(通过Handler消息处理机制)
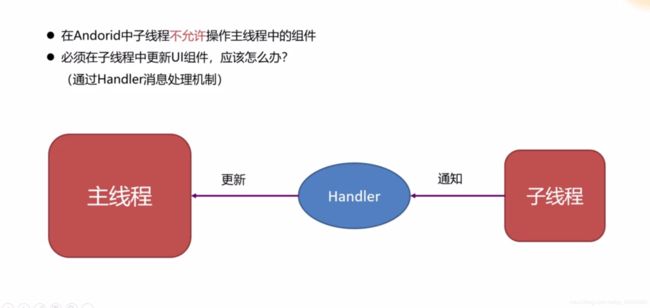 Android中线程之间的消息传递也称异步消息处理机制,主要由Message、Handler、MessageQueue和Looper来完成。
- Message:消息
- Message用于封装消息,它的arg1和arg2是用来存放整型数据的;what是用来保存消息标示的;obj是Object类型的任意对象;
- Handler:消息处理器
- Handler主要用于发送和处理消息。通常,在子线程中调用sendMessage()方法发送消息。在主线程中执行handleMessage()方法处理消息。消息的发送和处理是异步执行的,不能期望消息发送之后,Handler能立即处理消息。
- MessageQueue:消息队列
- 通过Handler发送的消息都保存在消息队列中,等待被处理。
- Looper:消息循环
5.2.2 步骤细化
5.3 操作演示
在布局文件中进行下列操作
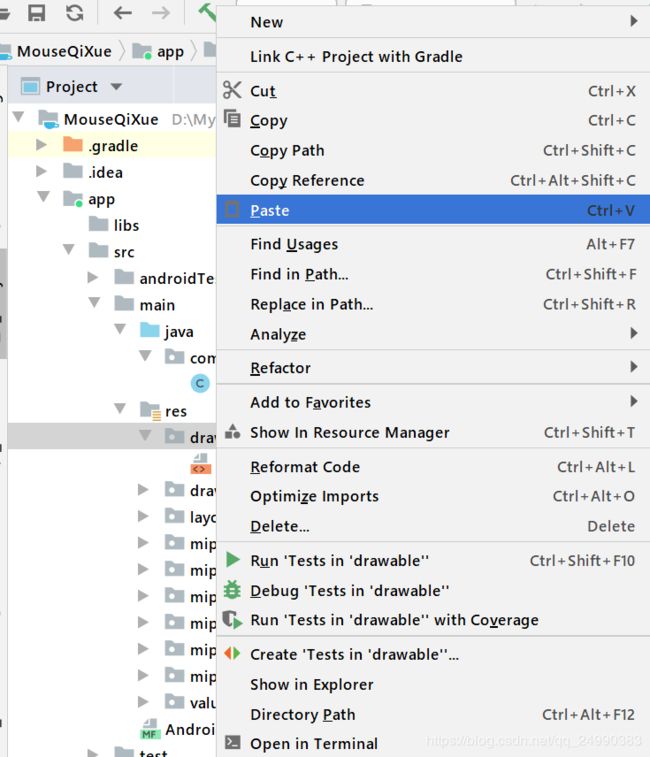
 1.将所需图片,地鼠和背景图粘贴进drawable目录中
 在activity_main.xml中
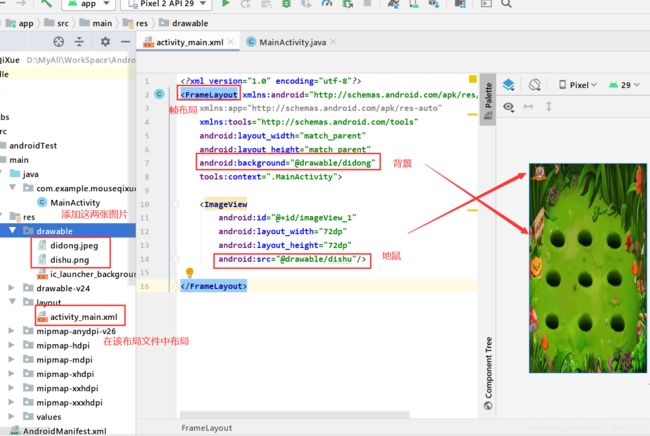
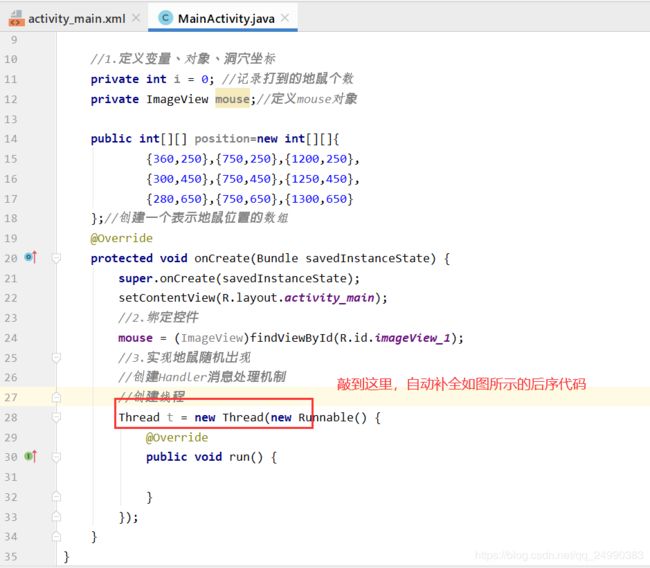

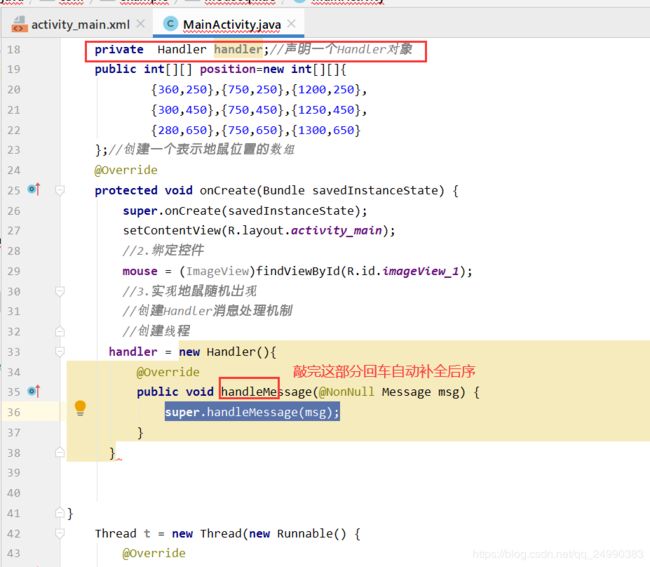
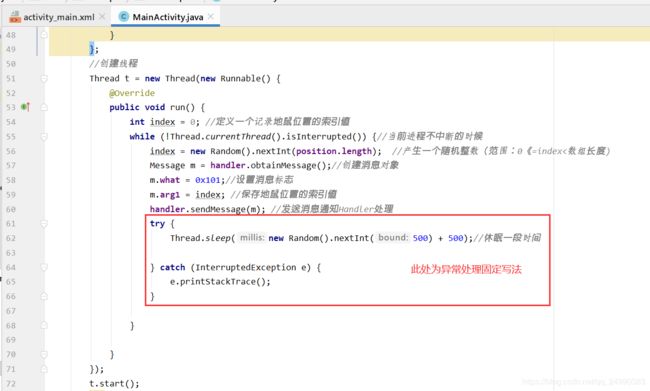


可以看到,目前敲的情况,有一些问题1.竖版不匹配,2.地鼠位置也有些问题3.不想要上边框
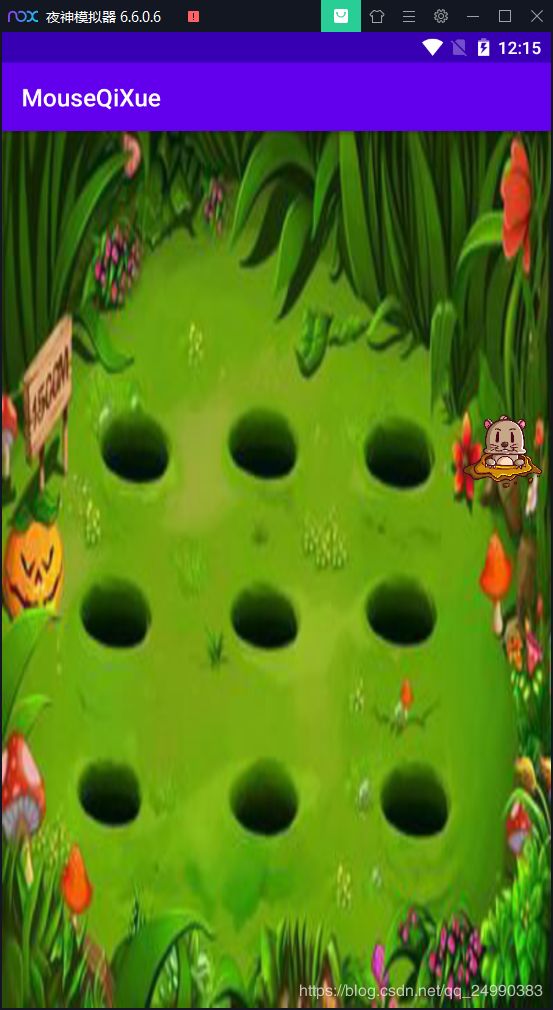 手动旋转屏幕后
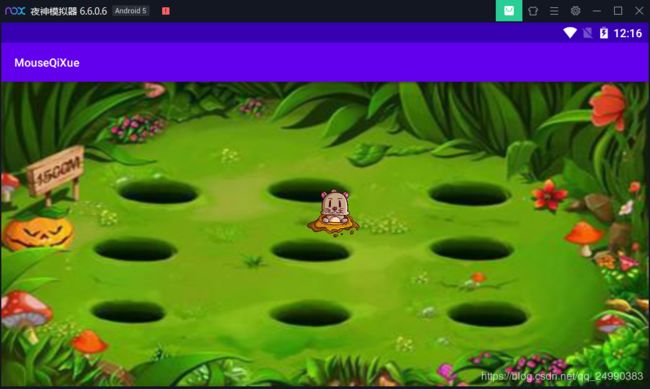 解决方法1.去掉顶部栏
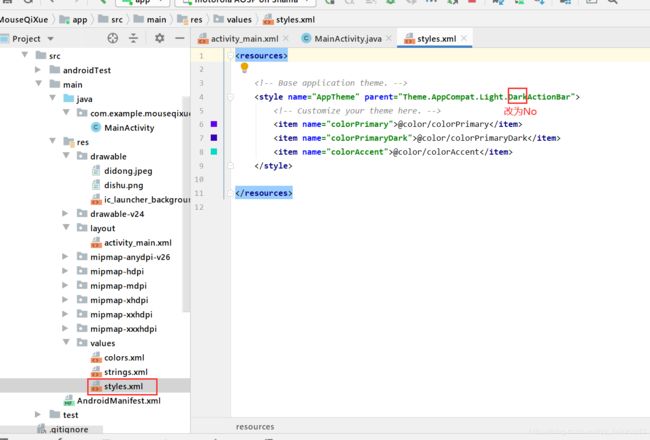 展示为全屏,但还有时间栏
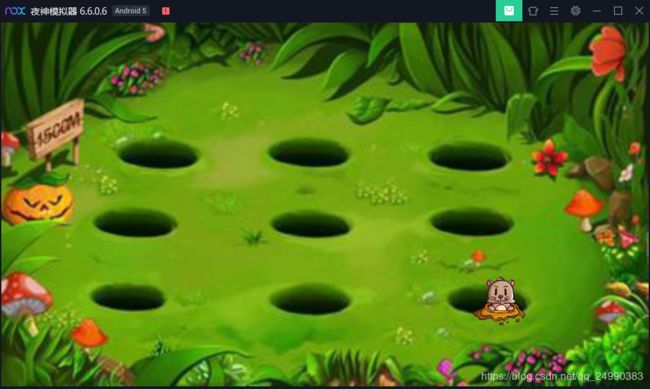
 通过点击洞穴位置来定位数值

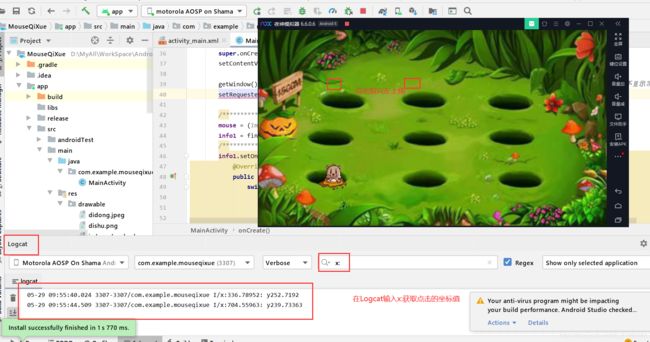
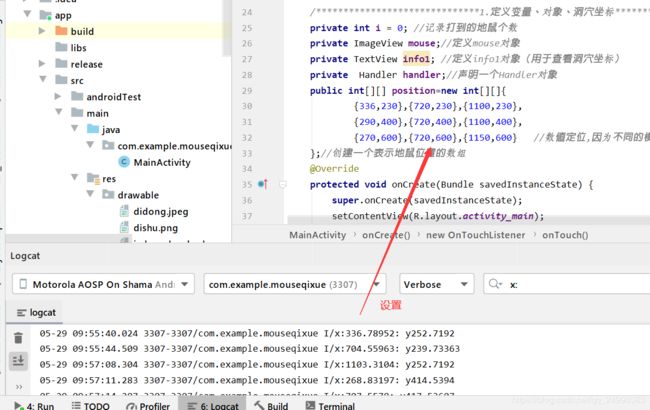
如图所示,地鼠位置正常
5.4 示例源码
package com.example.mouseqixue;
import androidx.annotation.NonNull;
import androidx.appcompat.app.AppCompatActivity;
import android.content.pm.ActivityInfo;
import android.os.Bundle;
import android.os.Handler;
import android.os.Message;
import android.util.Log;
import android.view.MotionEvent;
import android.view.View;
import android.view.WindowManager;
import android.widget.ImageView;
import android.widget.TextView;
import android.widget.Toast;
import java.util.Random;
import static android.content.pm.ActivityInfo.SCREEN_ORIENTATION_LANDSCAPE;
public class MainActivity extends AppCompatActivity {
private int i = 0;
private ImageView mouse;
private TextView info1;
private Handler handler;
public int[][] position=new int[][]{
{336,252},{704,239},{1103,252},
{268,414},{720,400},{1106,419},
{265,600},{710,603},{1160,614}
};
@Override
protected void onCreate(Bundle savedInstanceState) {
super.onCreate(savedInstanceState);
setContentView(R.layout.activity_main);
getWindow().setFlags(WindowManager.LayoutParams.FLAG_FULLSCREEN,WindowManager.LayoutParams.FLAG_FULLSCREEN);
setRequestedOrientation(ActivityInfo.SCREEN_ORIENTATION_LANDSCAPE);
mouse = (ImageView) findViewById(R.id.imageView_1);
info1 = findViewById(R.id.info);
handler = new Handler() {
@Override
public void handleMessage(@NonNull Message msg) {
int index;
if (msg.what == 0x101) {
index = msg.arg1;
mouse.setX(position[index][0]);
mouse.setY(position[index][1]);
mouse.setVisibility(View.VISIBLE);
}
super.handleMessage(msg);
}
};
Thread t = new Thread(new Runnable() {
@Override
public void run() {
int index = 0;
while (!Thread.currentThread().isInterrupted()) {
index = new Random().nextInt(position.length);
Message m = handler.obtainMessage();
m.what = 0x101;
m.arg1 = index;
handler.sendMessage(m);
try {
Thread.sleep(new Random().nextInt(500) + 500);
} catch (InterruptedException e) {
e.printStackTrace();
}
}
}
});
t.start();
mouse.setOnTouchListener(new View.OnTouchListener() {
@Override
public boolean onTouch(View v, MotionEvent event) {
v.setVisibility(View.INVISIBLE);
i++;
Toast.makeText(MainActivity.this,"打到"+i+"只地鼠!",Toast.LENGTH_LONG).show();
return false;
}
});
}
}
<?xml version="1.0" encoding="utf-8"?>
<FrameLayout xmlns:android="http://schemas.android.com/apk/res/android"
xmlns:app="http://schemas.android.com/apk/res-auto"
xmlns:tools="http://schemas.android.com/tools"
android:layout_width="match_parent"
android:layout_height="match_parent"
android:background="@drawable/didong"
tools:context=".MainActivity">
<ImageView
android:id="@+id/imageView_1"
android:layout_width="72dp"
android:layout_height="72dp"
android:src="@drawable/dishu"/>
<TextView
android:id="@+id/info"
android:layout_width="fill_parent"
android:layout_height="fill_parent"/>
</FrameLayout>
图片didong

图片dishu


 点击普通对话框按钮
 选择取消,返回原界面
 选择确定,退出程序
 效果
效果


 2.创建菜单资源文件


 做菜单的第一个项,起名为“添加”
 第二种方法
第二种方法 用同样的方法添加剩下的

 3.添加选项菜单


 2.运行一下,因为没有内容,所以只有一个下拉框的下角
 3.在MainActivity.java文件中编写Spinner的内容
 效果
效果
 效果如图,选择哪个项,则出现该项对应的提示消息
 Android中线程之间的消息传递也称异步消息处理机制,主要由Message、Handler、MessageQueue和Looper来完成。
 1.将所需图片,地鼠和背景图粘贴进drawable目录中
 在activity_main.xml中


 手动旋转屏幕后
 解决方法1.去掉顶部栏
 展示为全屏,但还有时间栏
 通过点击洞穴位置来定位数值


