从头开始搭建hexo+github+hexo-theme-next主题博客(高级设置)
参照博客:http://shenzekun.cn/hexo%E7%9A%84next%E4%B8%BB%E9%A2%98%E4%B8%AA%E6%80%A7%E5%8C%96%E9%85%8D%E7%BD%AE%E6%95%99%E7%A8%8B.html
再次先感谢前辈的分享
主要有以下33种:
- 在右上角或者左上角实现fork me on github
- 添加RSS
- 添加动态背景
- 实现点击出现桃心效果
- 修改文章内链接文本样式
- 修改文章底部的那个带#号的标签
- 在每篇文章末尾统一添加“本文结束”标记
- 修改作者头像并旋转
- 博文压缩
- 修改``代码块自定义样式
- 侧边栏社交小图标设置
- 主页文章添加阴影效果
- 在网站底部加上访问量
- 添加热度
- 网站底部字数统计
- 添加 README.md 文件
- 设置网站的图标Favicon
- 实现统计功能
- 添加顶部加载条
- 在文章底部增加版权信息
- 添加网易云跟帖(跟帖关闭,已失效,改为来必力)
- 隐藏网页底部powered By Hexo / 强力驱动
- 修改网页底部的桃心
- 文章加密访问
- 添加jiathis分享
- 博文置顶
- 修改字体大小
- 修改打赏字体不闪动
- 侧边栏推荐阅读
- 自定义鼠标样式
- 为博客加上萌萌的宠物
- DaoVoice 在线联系
- 点击爆炸效果
以上是我在前辈的博客上看到的将要实现的功能,接下来我想自己也实现以上功能,尽力实现所有功能:
1:在右上角或者左上角实现fork me on github
点击这里或者这里挑选自己喜欢的样式,并复制代码。 例如,我是复制如下代码:
然后粘贴刚才复制的代码到themes/next/layout/_layout.swig文件中(放在的下面),并把href改为你的github地址
2:添加RSS
在/blog-generator目录下打开git bash,输入命令:
$ npm install --save hexo-generator-feed
接下来打开hexo配置文件_config.yml
在末尾添加:
# Extensions
## Plugins: http://hexo.io/plugins/
plugins: hexo-generate-feed然后打开配置文件里面的_config.yml,在里面配置为如下样子:(就是在rss:的后面加上/atom.xml,注意在冒号后面要加一个空格)
# Set rss to false to disable feed link.
# Leave rss as empty to use site's feed link.
# Set rss to specific value if you have burned your feed already.
rss: /atom.xml3. 添加动态背景
打开 主题配置文件_config.yml,在里面修改canvas_nest为true如下代码:
# Canvas-nest
canvas_nest: true
4. 实现点击出现桃心效果
在/blog-generator/themes/hexo-theme-next/source/js/src下新建文件 clicklove.js ,接着把该链接下的代码拷贝粘贴到 clicklove.js 文件中。
代码如下:
!function(e,t,a){function n(){c(".heart{width: 10px;height: 10px;position: fixed;background: #f00;transform: rotate(45deg);-webkit-transform: rotate(45deg);-moz-transform: rotate(45deg);}.heart:after,.heart:before{content: '';width: inherit;height: inherit;background: inherit;border-radius: 50%;-webkit-border-radius: 50%;-moz-border-radius: 50%;position: fixed;}.heart:after{top: -5px;}.heart:before{left: -5px;}"),o(),r()}function r(){for(var e=0;e在/blog-generator/themes/hexo-theme-next/layout/_layout.swig文件末尾添加:
5. 修改文章内链接文本样式
(这个我感觉没什么,所以并没有实现)
6. 修改文章底部的那个带#号的标签
修改模板/blog-generator/themes/hexo-theme-next/layout/_macro/post.swig,搜索 rel="tag">#,
将 # 换成
7. 在每篇文章末尾统一添加“本文结束”标记
在路径 /blog-generator/themes/hexo-theme-next/layout/_macro 中新建 passage-end-tag.swig 文件,并添加以下内容:
    {% if not is_index %}
        -------------本文结束感谢您的阅读-------------
    {% endif %}
接着打开/blog-generator/themes/hexo-theme-next/layout/_macro/post.swig文件,在post-body 之后, post-footer 之前添加如下代码(post-footer之前两个DIV):
  {% if not is_index %}
    {% include 'passage-end-tag.swig' %}
  {% endif %}
然后打开主题配置文件(_config.yml),在末尾添加:
# 文章末尾添加“本文结束”标记
passage_end_tag:
  enabled: true
8. 修改作者头像并旋转
(感觉这个效果不太喜欢)
9. 博文压缩
在站点的根目录下执行以下命令:
 npm install gulp -g
 npm install gulp-minify-css gulp-uglify gulp-htmlmin gulp-htmlclean gulp --save
在/blog-generator/目录下新建文件gulpfile.js,gulpfile.js中代码如下
var gulp = require('gulp');
var minifycss = require('gulp-minify-css');
var uglify = require('gulp-uglify');
var htmlmin = require('gulp-htmlmin');
var htmlclean = require('gulp-htmlclean');
// 压缩 public 目录 css
gulp.task('minify-css', function() {
    return gulp.src('./public/**/*.css')
        .pipe(minifycss())
        .pipe(gulp.dest('./public'));
});
// 压缩 public 目录 html
gulp.task('minify-html', function() {
  return gulp.src('./public/**/*.html')
    .pipe(htmlclean())
    .pipe(htmlmin({
         removeComments: true,
         minifyJS: true,
         minifyCSS: true,
         minifyURLs: true,
    }))
    .pipe(gulp.dest('./public'))
});
// 压缩 public/js 目录 js
gulp.task('minify-js', function() {
    return gulp.src('./public/**/*.js')
        .pipe(uglify())
        .pipe(gulp.dest('./public'));
});
// 执行 gulp 命令时执行的任务
gulp.task('default', [
    'minify-html','minify-css','minify-js'
]);
生成博文是执行 hexo g && gulp 就会根据 gulpfile.js 中的配置,对 public 目录中的静态资源文件进行压缩。
可以看看这个博客:https://blog.csdn.net/qq_31975963/article/details/83034450
10. 修改``代码块自定义样式
(这个也不准备实现)
11. 侧边栏社交小图标设置
打开主题配置文件(_config.yml),找到social节点,(||后面就是对应的图标名称)
social:
  GitHub: https://github.com/JohnDoeo || github
  E-Mail: [email protected] || envelope
  Google: https://myaccount.google.com/?utm_source=OGB&tab=kk&utm_medium=act || google
  StackOverflow: https://stackexchange.com/users/15388439/johndoeo || stack-overflow
  简书: https://www.jianshu.com/u/b2b2c5277c37 || book
  掘金: https://juejin.im/user/5b27c9f7e51d455887532b59 || spinner
  CSDN: https://blog.csdn.net/qq_40930491 || crosshairs
  Segmentfault: https://segmentfault.com/u/johndoeo || meh-o
  微博: https://weibo.com/3670383373/profile?rightmod=1&wvr=6&mod=personinfo || weibo
12. 主页文章添加阴影效果
(不是先)
打开\blog-generator\themes\hexo-theme-next\source\css\_custom\custom.styl,向里面加入:
// 主页文章添加阴影效果
 .post {
   margin-top: 60px;
   margin-bottom: 60px;
   padding: 25px;
   -webkit-box-shadow: 0 0 5px rgba(202, 203, 203, .5);
   -moz-box-shadow: 0 0 5px rgba(202, 203, 204, .5);
  }
13. 在网站底部加上访问量
打开\blog-generator\themes\hexo-theme-next\layout\_partials\footer.swig文件,在copyright前加上如下代码:
然后再合适的位置添加显示统计的代码:
本站访客数:
在这里有两中不同计算方式的统计代码:
- pv的方式,单个用户连续点击n篇文章,记录n次访问量
本站总访问量次
然后重启就能看到效果了
14. 添加热度
next主题集成leanCloud,打开\blog-generator\themes\hexo-theme-next/layout/_macro/post.swig,在画红线的区域添加℃:
然后打开,\blog-generator\themes\hexo-theme-next/languages/zh-Hans.yml,将画红框的改为热度就可以了
进入leancloud主页注册登陆,新建应用,新建class名称Counter,注意要选中无限制:
然后就在设置->应用key中有appid和appkey在主题配置文件中找到如下节点配置就可以了:
leancloud_visitors:
  enable: true
  app_id: yourAppid
  app_key: yourAppkey
效果如下:
15. 网站底部字数统计
切换到根目录下,然后运行如下代码
npm install hexo-wordcount --save
然后在/themes/next/layout/_partials/footer.swig文件尾部加上:
博客全站共{{ totalcount(site) }}字
16. 添加 README.md 文件
(这个不想多说了)
17. 设置网站的图标Favicon
在EasyIcon中找一张(32*32)的ico图标,或者去别的网站下载或者制作,并将图标名称改为favicon.ico,然后把图标放在/themes/hexo-theme-next/source/images里,并且修改主题配置文件:
# For example, you put your favicons into `hexo-site/source/images` directory.
# Then need to rename & redefine they on any other names, otherwise icons from Next will rewrite your custom icons in Hexo.
favicon:
  small: /images/favicon-16x16-next.png
  medium: /images/favicon-32x32-next.png
  apple_touch_icon: /images/apple-touch-icon-next.png
  safari_pinned_tab: /images/logo.svg
  #android_manifest: /images/manifest.json
  #ms_browserconfig: /images/browserconfig.xml
只需要把images目录下
favicon-16x16-next.png文件和
favicon-32x32-next.png文件替换成自己喜欢的就可以了
18. 实现统计功能
在根目录下安装 hexo-wordcount,运行:
npm install hexo-wordcount --save然后在主题配置文件配置修改如下:
# Post wordcount display settings
# Dependencies: https://github.com/willin/hexo-wordcount
post_wordcount:
  item_text: true
  wordcount: true
  min2read: true
  totalcount: false
  separated_meta: true
实现效果如下
19. 添加顶部加载条
直接打开主题配置文件把pace节点改为true就可以了,还有不同的样式:
# Progress bar in the top during page loading.
pace: true
# Themes list:
#pace-theme-big-counter
#pace-theme-bounce
#pace-theme-barber-shop
#pace-theme-center-atom
#pace-theme-center-circle
#pace-theme-center-radar
#pace-theme-center-simple
#pace-theme-corner-indicator
#pace-theme-fill-left
#pace-theme-flash
#pace-theme-loading-bar
#pace-theme-mac-osx
#pace-theme-minimal
# For example
# pace_theme: pace-theme-center-simple
pace_theme: pace-theme-minimal
20. 在文章底部增加版权信息
修改/themes/hexo-theme-next/layout/_macro/post-copyright.swig文件,删除原内容,添加下面内容:
-
{{ __('post.copyright.publish') + __('symbol.colon') }}
{{ page.date.format("YYYY年MM月DD日 - HH:mm") }}
-
{{ __('post.copyright.update') + __('symbol.colon') }}
{{ page.updated.format("YYYY年MM月DD日 - HH:mm") }}
-
{{ __('post.copyright.link') + __('symbol.colon') }}
{{ post.url | default(post.permalink) }}
-
{{ __('post.copyright.license_title') + __('symbol.colon') }}
{{ __('post.copyright.license_content', theme.post_copyright.license_url, theme.post_copyright.license) }}
注意:此处使用了/thremes/hexo-theme-next/languages/zh-Hans.yml文件中的配置,需要添加节点:
post:
  created: 创建于
  modified: 更新于
  sticky: 置顶
  posted: 发表于
  in: 分类于
  read_more: 阅读全文
  untitled: 未命名
  toc_empty: 此文章未包含目录
  visitors: 热度
  wordcount: 字数统计
  min2read: 阅读时长
  totalcount: Site words total count
  copyright:
    author: 本文作者
    publish: 发布时间
    update: 最后更新
    link: 本文链接
    license_title: 版权声明
    license_content: '本博客所有文章除特别声明外,均采用
      %s 许可协议。转载请注明出处!'
修改主题配置文件,修改如下:
# Declare license on posts
post_copyright:
  enable: true
  license: CC BY-NC-SA 3.0
  license_url: https://creativecommons.org/licenses/by-nc-sa/3.0/
就是直接把enable改为true就行了
21. 添加畅言评论
- 注册畅言 Go
-
将畅言密钥复制到NexT主题的配置文件
—config中,搜索changyan,填写下面的代码,注意替换成你的代码。
# changyan
changyan:
  enable: true
  appid: yourappid
  appkey: yourappkey
22. 隐藏网页底部powered By Hexo / 强力驱动
(这个个人感觉还挺好看的,所以就不隐藏了)
23. 修改网页底部的桃心(还不太知道到底是什么效果)
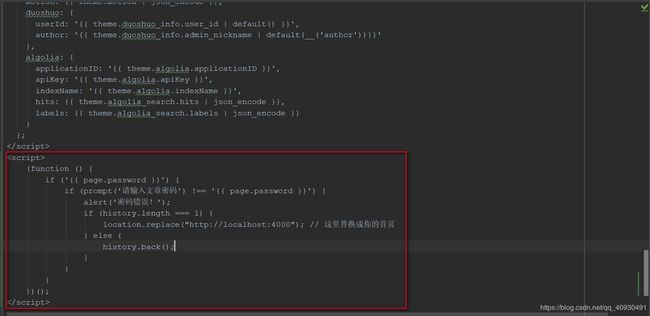
24. 文章加密访问
首先打开/themes/hexo-theme-next/layout/_partials/head.swig文件,在如下位置添加红框中的代码:
添加的代码如下:
25. 添加jiathis分享(这个我怎么都添加不了,不知道怎么回事)
原本按照参照博客做法无法实现分享功能,又看了看官方文档,发现更新后的直接在主题配置文件中把
baidushare节点的注释放开就好了,不过原来的button样式太难看,改成slide就好了,代码如下:
# Baidu Share
# Available value:
#    button | slide
# Warning: Baidu Share does not support https.
baidushare:
  type: slide
26. 博文置顶
使用的是top属性,top值越高,排序越在前,不设置top值得博文按照时间顺序排序。
修改Hexo文件夹下的node_modules/hexo-generator-index/lib/generator.js
打开在最后添加如下javascript代码
posts.data = posts.data.sort(function(a, b) {
if(a.top && b.top) { // 两篇文章top都有定义
    if(a.top == b.top) return b.date - a.date; // 若top值一样则按照文章日期降序排
    else return b.top - a.top; // 否则按照top值降序排
}
else if(a.top && !b.top) { // 以下是只有一篇文章top有定义,那么将有top的排在前面(这里用异或操作居然不行233)
    return -1;
}
else if(!a.top && b.top) {
    return 1;
}
else return b.date - a.date; // 都没定义按照文章日期降序排
---------------------
作者:DimpleMe
来源:CSDN
原文:https://blog.csdn.net/qq_32454537/article/details/79482920
版权声明:本文为博主原创文章,转载请附上博文链接!
在写文章的时候添加top属性就行了。
文章有多种属性,一个一个添加是不是很麻烦呢?
这个时候可以修改:HEXO博客的scaffolds\post.md
附上个人的post设置
---
title: {{ title }}
date: {{ date }}
tags:
password:
cotegories:
photos:
---
27. 修改字体大小
(这个目前不想修改)
28. 修改打赏字体不闪动
首先打开打赏功能:
修改/themes/hexo-theme-next/_config.yml文件打开一下注释:
# Reward
#reward_comment: 值是感觉好玩才打开打赏功能的!!! ##我这为什么把这里注释打开会报错???
wechatpay: /images/wechatpay.jpg
alipay: /images/alipay.jpg
#bitcoin: /images/bitcoin.png
注意:我这里把reward_comment的注释打开的话会报错:(目前我还没有解决办法)
修改文件/themes/hexo-theme-next/source/css/_common/components/post/post-reward.styl,然后注释其中的函数wechat:hover和alipay:hover,如下:
/* 注释文字闪动函数
 #wechat:hover p{
    animation: roll 0.1s infinite linear;
    -webkit-animation: roll 0.1s infinite linear;
    -moz-animation: roll 0.1s infinite linear;
}
 #alipay:hover p{
   animation: roll 0.1s infinite linear;
    -webkit-animation: roll 0.1s infinite linear;
    -moz-animation: roll 0.1s infinite linear;
}
*/
29. 侧边栏推荐阅读
打开主题配置文件修改成这样就行了(links里面写你想要的链接):
# Blogrolls
links_title: 推荐阅读
#links_layout: block
links_layout: inline
links:
  优设: http://www.uisdc.com/
  张鑫旭: http://www.zhangxinxu.com/
  Web前端导航: http://www.alloyteam.com/nav/
  前端书籍资料: http://www.36zhen.com/t?id=3448
  百度前端技术学院: http://ife.baidu.com/
  google前端开发基础: http://wf.uisdc.com/cn/
30. 自定义鼠标样式
(累了,这个不想搞了)
31.为博客加上萌萌的宠物
在查找资料的偶然间,我发现一个博客上有非常可爱的Live 2D模型,当时我就被打动了,马上开启审查元素,试图找出这个Live 2D模型的信息,可是找了半天没找到。最后通过截图->谷歌图片的方式,终于一层一层的找到了相关资料,我正好有一个Hexo博客,所以今天就来在博客上添加一波Live 2D模型!
首先,安装npm包:
npm install --save hexo-helper-live2d
1
然后在hexo的配置文件_config.yml中添加如下配置,详细配置可以参考文档:
live2d:
  enable: true
  scriptFrom: local
  pluginRootPath: live2dw/
  pluginJsPath: lib/
  pluginModelPath: assets/
  tagMode: false
  debug: false
  model:
    use: live2d-widget-model-shizuku
  display:
    position: right
    width: 150
    height: 300
  mobile:
    show: true
然后下载模型,模型名称可以到这里参考,一些模型的预览可以在这里。
npm install live2d-widget-model-shizuku
1
所有模型列表如下:
live2d-widget-model-chitose
live2d-widget-model-epsilon2_1
live2d-widget-model-gf
live2d-widget-model-haru/01 (use npm install --save live2d-widget-model-haru)
live2d-widget-model-haru/02 (use npm install --save live2d-widget-model-haru)
live2d-widget-model-haruto
live2d-widget-model-hibiki
live2d-widget-model-hijiki
live2d-widget-model-izumi
live2d-widget-model-koharu
live2d-widget-model-miku
live2d-widget-model-ni-j
live2d-widget-model-nico
live2d-widget-model-nietzsche
live2d-widget-model-nipsilon
live2d-widget-model-nito
live2d-widget-model-shizuku
live2d-widget-model-tororo
live2d-widget-model-tsumiki
live2d-widget-model-unitychan
live2d-widget-model-wanko
live2d-widget-model-z16
下载完之后,在Hexo根目录中新建文件夹live2d_models,然后在node_modules文件夹中找到刚刚下载的live2d模型,将其复制到live2d_models中,然后编辑配置文件中的model.use项,将其修改为live2d_models文件夹中的模型文件夹名称。
一切就绪之后,用hexo server命令启动服务器,稍等一下就可以看到右下角出现了一个可爱的萌萌哒的妹纸!本来录了一个GIF,可惜上传上来变成了PNG格式……想看动态图的话只能直接看我的博客了,不过因为所有东西都在Github上托管的原因,可能Live2D不能马上加载出来。
---------------------
作者:过了即是客
来源:CSDN
原文:https://blog.csdn.net/u011054333/article/details/82718910
版权声明:本文为博主原创文章,转载请附上博文链接!
32.DaoVoice 在线联系
(这个我也实现不了哇)
33.点击爆炸效果
(不想实现了)
终于完了,终于可以吃饭了。


