安卓基础:Activity基础、五大布局
Activity:
Activity是Android系统中的四大组件之一,可以用于显示View。它是一种可以包含用户界面的组件,主要用于和用户进行交互。
Activity是有生命周期的,每个Activity在其生命周期中最多可能会有四种状态:
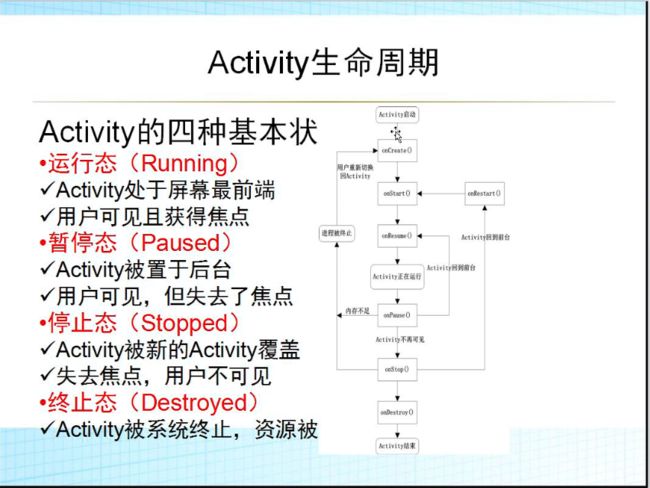
Activity的生命周期:
Activity有七个回调方法,覆盖了Activity生命周期的每一个环节:
1.onCreate():在Activity第一次被创建的时候调用,在这个方法中完成Activity的初始化操作
2.onStart():这个方法在Activity有不可见变为可见时调用
3.onResume():这个方法在Activity准备好和用户进行交互的时候调用,此时的Activity一定位于返回栈的栈顶,并且处于运行状态。
4.onPause():这个方法在系统准备去启动或者回复另一个Activity的时候调用。通常会在这个方法中将一些消耗CPU的资源释放掉,以及保存一些关键数据,但这个方法的执行速度一定要快,不然会影响到新的栈顶活动的使用
5.onStop():这个方法在Activity完全不可见的时候调用。它和onPause的主要区别在于,如果启动的新的Activity是一个对话框式的,那么onPause方法会得到执行,而onStop方法并不会执行
6.onDestroy():这个方法在活动被销毁之前调用,之后Activity的状态为销毁状态
7.onRestart():这个方法在Activity由停止状态变为运行状态之前调用,也就是活动背重新启动。
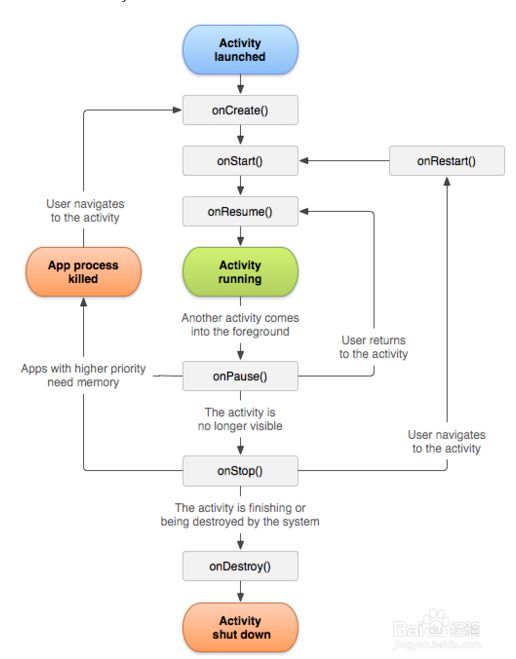
Activity生命周期的几个过程:
1.启动Activity:系统会先调用onCreate方法,然后调用onStart方法,最后调用onResume,Activity进入运行状态。
2.当前Activity被其他Activity覆盖其上或被锁屏:系统会调用onPause方法,暂停当前Activity的执行。
3.当前Activity由被覆盖状态回到前台或解锁屏:系统会调用onResume方法,再次进入运行状态。4.当前Activity转到新的Activity界面或按Home键回到主屏,自身退居后台:系统会先调用onPause方法,然后调用onStop方法,进入停滞状态。
5.用户后退回到此Activity:系统会先调用onRestart方法,然后调用onStart方法,最后调用onResume方法,再次进入运行状态。
6.当前Activity处于被覆盖状态或者后台不可见状态,即第2步和第4步,系统内存不足,杀死当前Activity,而后用户退回当前Activity:再次调用onCreate方法、onStart方法、onResume方法,进入运行状态。
7.用户退出当前Activity:系统先调用onPause方法,然后调用onStop方法,最后调用onDestory方法,结束当前Activity。
例子来观察Activity生命周期的过程:
//第一个Activity的布局
"http://schemas.android.com/apk/res/android"
xmlns:tools="http://schemas.android.com/tools"
android:layout_width="match_parent"
android:layout_height="match_parent"
android:paddingLeft="@dimen/activity_horizontal_margin"
android:paddingRight="@dimen/activity_horizontal_margin"
android:paddingTop="@dimen/activity_vertical_margin"
android:paddingBottom="@dimen/activity_vertical_margin" tools:context=".MainActivity"
android:id="@+id/TheFirst">
"@string/hello_world" android:layout_width="wrap_content"
android:layout_height="wrap_content"
android:id="@+id/textView" />
//第二个界面的布局
"1.0" encoding="utf-8"?>
"http://schemas.android.com/apk/res/android"
android:layout_width="match_parent"
android:layout_height="match_parent"
android:orientation="horizontal"
android:id="@+id/TheSecond"
>
//第一个界面的主程序,在Log.d中打印各种方法被调用的顺序
package com.example.administrator.myapplication;

import android.app.Activity;
import android.content.Intent;
import android.support.v7.app.AppCompatActivity;
import android.os.Bundle;
import android.util.Log;
import android.view.Menu;
import android.view.MenuItem;
import android.view.View;
import android.widget.Button;
import android.widget.Toast;

public class MainActivity extends Activity {

    @Override
    protected void onCreate(Bundle savedInstanceState) {
        super.onCreate(savedInstanceState);
        setContentView(R.layout.activity_main);
        Log.d("MyActivity","onCreate");
        Button bt = (Button) findViewById(R.id.button2);
        bt.setOnClickListener(new View.OnClickListener() {
            @Override
            public void onClick(View v) {
                Intent intent = new Intent(getApplicationContext(),SecondActivity.class);
                startActivity(intent);
            }
        });

    }

    @Override
    protected void onStart() {
        super.onStart();
        Log.d("MyActivity","onStart");
    }

    @Override
    protected void onResume() {
        super.onResume();
        Log.d("MyActivity","onResume");

    }

    @Override
    protected void onPause() {
        super.onPause();
        Log.d("MyActivity","onPause");
    }

    @Override
    protected void onStop() {
        super.onStop();
        Log.d("MyActivity","onStop");
    }

    @Override
    protected void onDestroy() {
        super.onDestroy();
        Log.d("MyActivity","onDestroy");
    }
}
//第二个界面的主程序
package com.example.administrator.myapplication;

import android.app.Activity;
import android.content.Intent;
import android.os.Bundle;
import android.util.Log;
import android.view.View;
import android.widget.Button;

/**
 * Created by Administrator on 2015/8/18.
 */
public class SecondActivity extends Activity{
    @Override
    protected void onCreate(Bundle savedInstanceState) {
        super.onCreate(savedInstanceState);
        setContentView(R.layout.second_layout);
        Log.d("MyActivity", "SecondActivity onCreate");
        Button bt = (Button) findViewById(R.id.button);


    }

    @Override
    protected void onStart() {
        super.onStart();
        Log.d("MyActivity", "SecondActivity onStart");
    }

    @Override
    protected void onResume() {
        super.onResume();
        Log.d("MyActivity","SecondActivity onResume");

    }

    @Override
    protected void onPause() {
        super.onPause();
        Log.d("MyActivity","SecondActivity onPause");
    }

    @Override
    protected void onStop() {
        super.onStop();
        Log.d("MyActivity","SecondActivity onStop");
    }

    @Override
    protected void onDestroy() {
        super.onDestroy();
        Log.d("MyActivity","SecondActivity onDestroy");
    }
}
//在mainfest中注册这两个Activity

"com.example.administrator.myapplication.MainActivity"
            android:label="@string/app_name" >

                "android.intent.action.MAIN" />

                "android.intent.category.LAUNCHER" />


        "com.example.administrator.myapplication.SecondActivity"
            android:theme="@android:style/Theme.Dialog">//把第二个界面设置成一个对话框
当第二个界面不是一对话框的形式出现时,也即是第二个界面启动后,第一个界面变为不可见时的运行结果为:
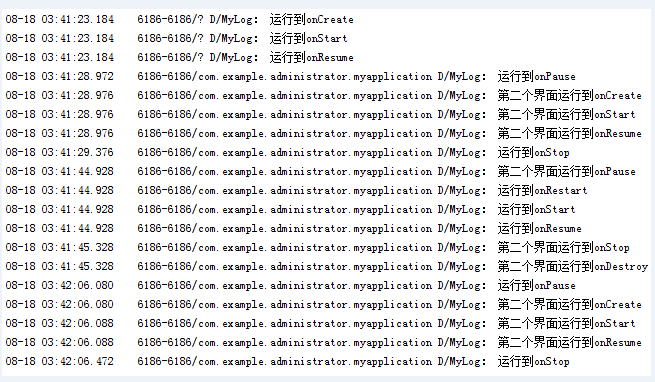
当第二个界面是以一个对话框的形式出现时,即第二个界面启动后,第一个界面仍然可见,运行结果为:

局面布局
1、LinearLayout线性布局:
orientation:默认是横向(horizontal)的,margin属性(离开周围),gravity(所有的)和LayoutGravity(我在父控件中怎样布局)
练习:
实现以下布局
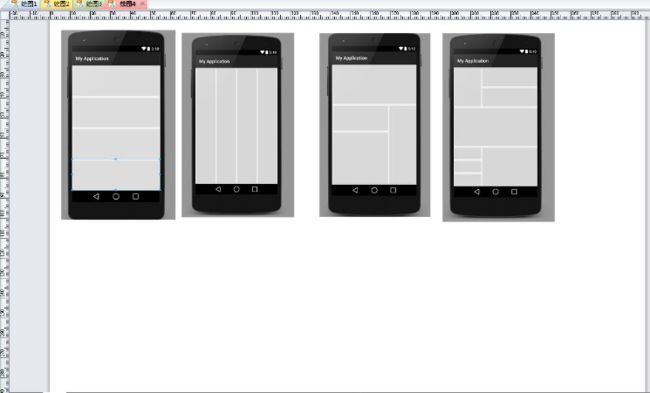
//第一个

<LinearLayout xmlns:android="http://schemas.android.com/apk/res/android"
    android:layout_width="match_parent"
    android:layout_height="match_parent"
    android:orientation="vertical"
    >
    <Button
        android:layout_width="match_parent"
        android:layout_height="0dp"
        android:layout_weight="1"
        />
    <Button
        android:layout_width="match_parent"
        android:layout_height="0dp"
        android:layout_weight="1"
        />
    <Button
        android:layout_width="match_parent"
        android:layout_height="0dp"
        android:layout_weight="1"
        />
    <Button
        android:layout_width="match_parent"
        android:layout_height="0dp"
        android:layout_weight="1"
        />

LinearLayout>
//第二个

<LinearLayout xmlns:android="http://schemas.android.com/apk/res/android"
    android:layout_width="match_parent"
    android:layout_height="match_parent"

    >
    <Button
        android:layout_width="0dp"
        android:layout_height="match_parent"
        android:layout_weight="1"
        />
    <Button
        android:layout_width="0dp"
        android:layout_height="match_parent"
        android:layout_weight="1"
        />

    <Button
        android:layout_width="0dp"
        android:layout_height="match_parent"
        android:layout_weight="1"/>

LinearLayout>
//第三个

<LinearLayout xmlns:android="http://schemas.android.com/apk/res/android"
    android:layout_width="match_parent"
    android:layout_height="match_parent"
    android:orientation="vertical"
    android:weightSum="3">

    <Button
        android:layout_width="match_parent"
        android:layout_height="0dp"
        android:layout_weight="1" />

    <LinearLayout
        android:layout_width="match_parent"
        android:layout_height="0dp"
        android:layout_weight="2"
        android:orientation="horizontal"
        android:weightSum="3">

        <LinearLayout
            android:layout_width="0dp"
            android:layout_height="match_parent"
            android:layout_weight="2"
            android:orientation="vertical"
            android:weightSum="3">

            <Button

                android:layout_width="match_parent"
                android:layout_height="0dp"
                android:layout_weight="1" />

            <Button
                android:layout_width="match_parent"
                android:layout_height="0dp"
                android:layout_weight="2" />

        LinearLayout>

        <Button
            android:layout_width="0dp"
            android:layout_height="match_parent"
            android:layout_weight="1" />
    LinearLayout>


LinearLayout>
//第四个

<LinearLayout xmlns:android="http://schemas.android.com/apk/res/android"
    android:layout_width="match_parent"
    android:layout_height="match_parent"
    android:orientation="vertical"
    android:weightSum="3"
    >
    <LinearLayout
        android:layout_width="match_parent"
        android:layout_height="0dp"
        android:layout_weight="1"
        android:weightSum="3">

        <Button
            android:layout_width="0dp"
            android:layout_weight="1"
            android:layout_height="match_parent" />
        <LinearLayout
            android:layout_width="0dp"
            android:layout_weight="2"
            android:layout_height="match_parent"
            android:orientation="vertical">
            <Button
                android:layout_width="match_parent"
                android:layout_height="0dp"
                android:layout_weight="1"/>
            <Button
                android:layout_width="match_parent"
                android:layout_height="0dp"
                android:layout_weight="1"/>

        LinearLayout>


    LinearLayout>
    <LinearLayout
        android:layout_width="match_parent"
        android:layout_height="0dp"
        android:layout_weight="1">
        <Button
            android:layout_width="match_parent"
            android:layout_height="match_parent" />

    LinearLayout>
    <LinearLayout
        android:layout_width="match_parent"
        android:layout_height="0dp"
        android:layout_weight="1"
        android:weightSum="3">
        <LinearLayout
            android:layout_width="0dp"
            android:layout_weight="1"
            android:layout_height="match_parent"
            android:orientation="vertical"
            android:weightSum="3">
            <Button
                android:layout_width="match_parent"
                android:layout_height="0dp"
                android:layout_weight="1"/>
            <Button
                android:layout_width="match_parent"
                android:layout_height="0dp"
                android:layout_weight="1"/>
            <Button
                android:layout_width="match_parent"
                android:layout_height="0dp"
                android:layout_weight="1"/>

        LinearLayout>
        <Button
            android:layout_width="0dp"
            android:layout_weight="2"
            android:layout_height="match_parent"
            />

    LinearLayout>

LinearLayout>
2、RelativeLayout相对布局:属性
alignParentLeft、Right、Bottom、Top=true相对于父空间的上下左右
centerHorizontal
+centerVertical=centerInParent相对于父空间的中间
toLeftOf、toRightOf、above、below向对于后面的ID的控件的上下左右
alignLeft、
layout_alignBaseLine基准线对齐
举例说明:
<RelativeLayout xmlns:android="http://schemas.android.com/apk/res/android"
    android:layout_width="match_parent"
    android:layout_height="match_parent"
    >
    <Button
        android:layout_width="wrap_content"
        android:layout_height="wrap_content"
        android:layout_alignParentRight="true"
        android:layout_alignParentBottom="true"
        android:text="button_1"
        android:id="@+id/button"
        />
    <Button
        android:layout_width="wrap_content"
        android:layout_height="wrap_content"
        android:layout_alignParentLeft="true"
        android:layout_alignParentBottom="true"
        android:text="button_2"
        android:id="@+id/button2"
        />
    <Button
        android:layout_width="wrap_content"
        android:layout_height="wrap_content"
        android:layout_alignParentRight="true"
        android:layout_alignParentTop="true"
        android:text="button_3"
        android:id="@+id/button3"
        />
    <Button
        android:layout_width="wrap_content"
        android:layout_height="wrap_content"
        android:layout_alignParentLeft="true"
        android:layout_alignParentTop="true"
        android:text="button_4"
        android:id="@+id/button4"
        />
    <Button
        android:layout_width="150dp"
        android:layout_height="150dp"
        android:layout_centerHorizontal="true"
        android:layout_centerVertical="true"
        android:text="Center"
        android:id="@+id/center"

        android:background="@color/material_deep_teal_200" />
    <Button
        android:layout_width="wrap_content"
        android:layout_height="wrap_content"
        android:layout_alignLeft="@id/center"
        android:text="bt5"
        />
    <Button
        android:layout_width="wrap_content"
        android:layout_height="wrap_content"
        android:layout_toLeftOf="@id/center"
        android:text="bt6"
        />
    <Button
        android:layout_width="wrap_content"
        android:layout_height="wrap_content"
        android:layout_alignBottom="@id/center"
        android:layout_alignLeft="@id/center"

        android:text="bt7"
        />
    <Button
        android:layout_width="wrap_content"
        android:layout_height="wrap_content"
        android:layout_alignTop="@id/center"
        android:layout_alignLeft="@id/center"

        android:text="bt8"
        />
    <Button
        android:layout_width="wrap_content"
        android:layout_height="wrap_content"

        android:layout_alignBaseline="@id/center"

        android:text="bt9"
        />

RelativeLayout>
结果:

3、FrameLayout帧布局:一层一层往上贴
重要属性(所有布局都适用):visibility
显示visible
invisible不显示,但占位置,
gone不显示,不占位置
<FrameLayout xmlns:android="http://schemas.android.com/apk/res/android"
    android:layout_width="match_parent"
    android:layout_height="match_parent">
    <Button
        android:layout_width="150dp"
        android:layout_height="300dp"
        android:text="button_1"

        />
    <Button
        android:layout_width="120dp"
        android:layout_height="120dp"
        android:text="button_2"/>

FrameLayout>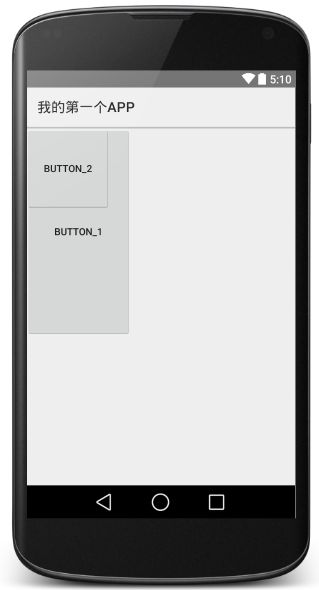
4、TableLayout表格布局:(不要求掌握,不常用)
stretchColumn
collapseColumn
5、AbsolutelyLayout绝对布局:直接按像素走(不推荐使用,因为手机像素不同)