iOS个人整理20-UITableViewCell自定义,cell高度的自适应(纯代码)
一、UITableViewCell的自定义
UITableVie中系统的Cell共提供了四种默认样式,
分别是:
UITableVieCellStyleDefault //只有一个label
UITableVieCellStyleValue1 //两个label
UITableVieCellStyleValue2 //两个label,布局不同于上面的
UITableVieCellStyleSubtitle //带副标题
但是在实际使⽤用过程中,Cell样式的布局上千差万别,
比如:


没错,聊天界面也是TableViewCell。
为了满足各种奇葩的需求和精美的设计,需要我们自定义cell
我们也就可以在一个tableView里放各种不同的Cell
方法也不复杂
首先创建一个继承于UITableViewCell的类CustomCell
在CustomCell.h中声明属性,这些属性就是要添加到自定义cell上的Label,ImageView等等
#import

@interface CustomCell : UITableViewCell

@property (nonatomic,retain)UILabel* nameLabel;//显示名字

@end
然后在CustomCell.m中对声明对属性写好懒加载
#import "CustomCell.h"

@implementation CustomCell


//姓名标签的初始化
-(UILabel *)nameLabel
{
    if (!_nameLabel) {
        _nameLabel = [[UILabel alloc]initWithFrame:CGRectMake(80, 10, 120, 30)];
        [self.contentView addSubview:_nameLabel];
    }
    return _nameLabel;
}

@end
最后在UITableView的注册单元格和填充单元格的代码中替换系统的UITableViewCell
 //注册单元格,在ViewDidLoad方法中

    [self.tableView registerClass:[CustomCell class] forCellReuseIdentifier:@"CELL"];


//重用队列,这在单元格填充的方法内
- (UITableViewCell *)tableView:(UITableView *)tableView cellForRowAtIndexPath:(NSIndexPath *)indexPath {

   //这里用CustomCell替换原来的UITableViewCell
CustomCell *cell = [tableView dequeueReusableCellWithIdentifier:@"CELL" forIndexPath:indexPath];总体思路就是这样,主要不同是这个cell怎么自定义,里面加多少label,imageView,怎么布局,就是个人的事了。
二、cell高度的自适应
有时候要根据内容调整cell的高度,要用到cell返回高度的代理方法
//返回高度的代理方法
-(CGFloat)tableView:(UITableView *)tableView heightForRowAtIndexPath:(NSIndexPath *)indexPath
还需要对内容的高度进行一定的计算,这里先提供一种计算文本宽高的方法
这是一个自写函数,核心是使用了系统的boundingRectWithSize:CGSizeMake(width,height) optins:() attributes:()context:方法
这个方法需要我们提供一个宽度一个高度,如果宽度设置为MaxFloat,高度给定,则最后计算出一个CGRect会根据内容content计算出相应的宽度。
同样,如果高度设置为MaxFloat,最后会计算出一个CGRect,其高度是根据content计算出的
options:这个参数比较重要
1.NSStringDrawingUsesLineFragmentOrigin:
绘制文本时使用 line fragement origin 而不是 baseline origin。
2.NSStringDrawingUsesFontLeading:
计算行高时使用行距。(字体大小+行间距=行距)
3.NSStringDrawingTruncatesLastVisibleLine:
如果文本内容超出指定的矩形限制,文本将被截去并在最后一个字符后加上省略号。如果没有指定NSStringDrawingUsesLineFragmentOrigin选项,则该选项被忽略。
4.计算布局时使用图元字形(而不是印刷字体)。
Use the image glyph bounds (instead of the typographic bounds) when computing layout.
1.NSKernAttributeName: @10 调整字句 kerning 字句调整
2.NSFontAttributeName : [UIFont systemFontOfSize:_fontSize] 设置字体
3.NSForegroundColorAttributeName :[UIColor redColor] 设置文字颜色
4.NSParagraphStyleAttributeName : paragraph 设置段落样式
5.NSMutableParagraphStyle *paragraph = [[NSMutableParagraphStyle alloc] init];
paragraph.alignment = NSTextAlignmentCenter;
6.NSBackgroundColorAttributeName: [UIColor blackColor] 设置背景颜色
7.NSStrokeColorAttributeName设置文字描边颜色,需要和NSStrokeWidthAttributeName设置描边宽度,这样就能使文字空心.
context:上下文。包括一些信息,例如如何调整字间距以及缩放。最终,该对象包含的信息将用于文本绘制。但是没用过,还不懂,该参数可为 nil 。
#pragma mark -- 计算宽窄的函数
-(float)autoCalculateWidthOrHeight:(float)height
                             width:(float)width
                          fontsize:(float)fontsize
                           content:(NSString*)content
{
    //计算出rect
    CGRect rect = [content boundingRectWithSize:CGSizeMake(width, height)
                                        options:NSStringDrawingUsesLineFragmentOrigin | NSStringDrawingUsesFontLeading
                                     attributes:@{NSFontAttributeName:[UIFont systemFontOfSize:fontsize]} context:nil];

    //判断计算的是宽还是高
    if (height == MAXFLOAT) {
        return rect.size.height;
    }
    else
        return rect.size.width;
}
有了上面这个看起来有点复杂的方法,我们就可以调用它计算出应有的宽或者高了
  //计算出nameLabel的宽度,高度为20,字体大小为17
    _nameWidth = [self autoCalculateWidthOrHeight:20 width:MAXFLOAT fontsize:17 content:name];
//
// RootTableViewController.m
#import "RootTableViewController.h"
#import "CustomTableViewCell.h"
@interface RootTableViewController ()
@property (nonatomic,retain)NSArray *contentArray;
@end
@implementation RootTableViewController
- (void)viewDidLoad {
[super viewDidLoad];
self.navigationItem.title = @"自定义cell";
//注册cell
[self.tableView registerClass:[CustomTableViewCell class] forCellReuseIdentifier:@"CELL"];
}
- (void)didReceiveMemoryWarning {
[super didReceiveMemoryWarning];
// Dispose of any resources that can be recreated.
}
#pragma mark - Table view data source
- (NSInteger)numberOfSectionsInTableView:(UITableView *)tableView {
#warning Incomplete implementation, return the number of sections
return 1;
}
- (NSInteger)tableView:(UITableView *)tableView numberOfRowsInSection:(NSInteger)section {
#warning Incomplete implementation, return the number of rows
return 3;
}
#pragma mark -- 单元格填充
- (UITableViewCell *)tableView:(UITableView *)tableView cellForRowAtIndexPath:(NSIndexPath *)indexPath {
CustomTableViewCell *cell = [tableView dequeueReusableCellWithIdentifier:@"CELL" forIndexPath:indexPath];
cell.tag =1000;
//对cell填写内容
cell.newsImageView.image = [UIImage imageNamed:@"placeholder.jpg"];
cell.titleLabel.text = [NSString stringWithFormat:@"第%ld条",indexPath.row];
cell.abstractLabel.text = _contentArray[indexPath.row];
cell.commentNumLavel.text = @"1.6万跟帖";
return cell;
}
//返回单元格的高度
-(CGFloat)tableView:(UITableView *)tableView heightForRowAtIndexPath:(NSIndexPath *)indexPath
{
//数据数组
_contentArray = [[NSArray alloc]initWithObjects:@"不信这都不过。我是高二的文科生,政治学得不怎么样,
老爸就叫我抄了老师的号码说是跟老师探讨怎么督促我学习什么的…。结果两个月后,政治老师被我爸拿下了………。- -!我现在更不知道政治该怎么办……。 ",
@"听我们这的一位老师傅讲的。。。前面一辆宝马,开车的是个妹子,后面跟着一个皮卡,块红绿灯了,到路口,刚好黄灯,那妹子直接刹车,当然了,你们懂的,
皮卡没反应过来,再加上刹车不如人宝马快,果断撞上了,其实要是个爷们开那宝马,黄灯也就闯过去了,那皮卡就这么想的。然后那妹子走下车来,看车撞了,
蹲地上就哭。那皮卡里的少年出来愣了,扶着那妹子说,妹妹你别哭了,该哭的是我。。。 ",@"刚刚从台湾旅游回来,体会到了传说中的民风淳朴。。。。。
默默地分割。。。。。。话说住在嘉义那天去夜市,找了一家店吃宵夜,点了一个特色的火鸡饭和卤肉饭,小碗那种,总共才40台币,十块rmb都不到,
中途我出去买盐酥鸡,我朋友出去买饮料,吃完我们就抹抹嘴巴走了(我们都以为对方付过钱了)走到半路想起来落了围巾,回去拿,我跟店员打了招呼,
拿好围巾出店门,想想不对,问朋友付钱没?她也摇头,于是回到店里问那个腼腆的小伙子,怎么不问我们收钱,他说:看你们刚刚走得急。。。", nil];
//根据内容计算高度
CGRect rect = [_contentArray[indexPath.row] boundingRectWithSize:CGSizeMake(CGRectGetWidth(self.view.frame)-120, MAXFLOAT)
options:NSStringDrawingUsesLineFragmentOrigin | NSStringDrawingUsesFontLeading
attributes:@{NSFontAttributeName:[UIFont systemFontOfSize:17]} context:nil];
//再加上其他控件的高度得到cell的高度
return rect.size.height + 20 + 20;
}
@end自定义的cell
//
//  CustomTableViewCell.h

#import

@interface CustomTableViewCell : UITableViewCell

//创建三个label,一个imageView
@property (nonatomic,retain)UILabel* titleLabel;//标题
@property (nonatomic,retain)UILabel* abstractLabel;//摘要
@property (nonatomic,retain)UILabel* commentNumLavel;//跟帖数量
@property (nonatomic,retain)UIImageView* newsImageView;//新闻图片

@end
//
// CustomTableViewCell.m
#import "CustomTableViewCell.h"
@implementation CustomTableViewCell
#pragma mark -- 懒加载
//左侧图片
-(UIImageView *)newsImageView
{
if (!_newsImageView) {
_newsImageView = [[UIImageView alloc]initWithFrame:CGRectMake(5, 10, 80, 80)];
[self.contentView addSubview:_newsImageView];
_newsImageView.image = [UIImage imageNamed:@"placeholder.jpg"];
//设置圆角
_newsImageView.layer.cornerRadius = 5;
_newsImageView.layer.masksToBounds = YES;
}
return _newsImageView;
}
//标题
-(UILabel *)titleLabel
{
if (!_titleLabel) {
_titleLabel = [[UILabel alloc]initWithFrame:CGRectMake(100, 5, CGRectGetWidth(self.frame)-120, 20)];
[self.contentView addSubview:_titleLabel];
_titleLabel.backgroundColor = [UIColor colorWithRed:247/255.0 green:162/255.0 blue:120/255.0 alpha:1];
}
return _titleLabel;
}
//摘要
-(UILabel *)abstractLabel
{
if (!_abstractLabel) {
_abstractLabel = [[UILabel alloc]initWithFrame:CGRectMake(100, 25, CGRectGetWidth(self.frame)-120, 70)];
[self.contentView addSubview:_abstractLabel];
_abstractLabel.backgroundColor = [UIColor colorWithRed:200/255.0 green:233/255.0 blue:160/255.0 alpha:1];
//设置行数,这里很重要,0意味着行数自适应
_abstractLabel.numberOfLines = 0;
//设置字体
_abstractLabel.font = [UIFont fontWithName:@"28=蒙纳幼雅丽" size:15];
}
//根据cell重新调整label的高度
CGRect labelRect = _abstractLabel.frame;
labelRect.size.height = CGRectGetHeight(self.frame)-20-20;
_abstractLabel.frame = labelRect;
return _abstractLabel;
}
//跟帖数
-(UILabel *)commentNumLavel
{
if (!_commentNumLavel) {
_commentNumLavel = [[UILabel alloc]initWithFrame:CGRectMake(CGRectGetWidth(self.frame)-100,
CGRectGetHeight(self.frame)-20, 80, 15)];
[self.contentView addSubview:_commentNumLavel];
_commentNumLavel.backgroundColor = [UIColor colorWithRed:109/255.0 green:211/255.0 blue:206/255.0 alpha:1];
//设置字体
_commentNumLavel.font = [UIFont fontWithName:@"testfont" size:12];
}
return _commentNumLavel;
}
@end效果
三、在可视化下让cell自适应高度
在使用xib或者storyBoard时,同样可以在heightForCell的代理方法里调整cell的高度
但是cell上面的label要同时改变大小,就有所不同。
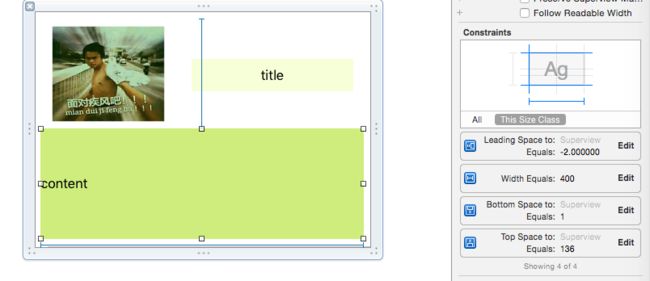
可以使用拉约束的方法,如图我这里是一个UITableViewCell的xib文件,给上面的contentLabel拉了四个约束,具体怎么拉看autolayout
分别规定了这个Label 到cell上边缘的距离,到cell下边缘的距离,到cell左边缘的距离,已经label的width给定值。
这样,cell的高度变化,label为随之变化

