Retrofit 2.0 学习第二弹——使用篇
前言
Retrofit是当下比较热门的一个网络框架,相信很多公司都在使用,即使你没使用过这个框架,也应该听过
MVP+Retrofit+Rxjava 或者 Retrofit+Rxjava+Okhttp+MVP 这样的组合。本篇只是一篇对Retrofit的入门介绍及简单使用,后面再逐步框架上过渡,慢慢来!
1 简介
Retrofit 官方地址
如果没有一些基础,像我一样,直接看官方文档,估计也会看的一头雾水,因为文档很简洁,上来就直接给出使用的方法。
需要的一些基础知识还得自己去补,上一篇关于 Retrofit 中涉及到的一些基础,主要是 Http 和 RESTful Api,需要补的童鞋可以看看
Retrofit2.0学习第一弹——准备篇
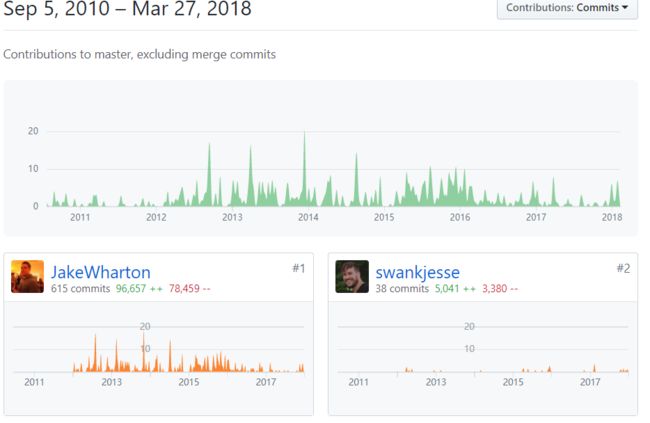
Retrofit 是 Android 之神 JakeWharton 写的网络框架,github 地址。
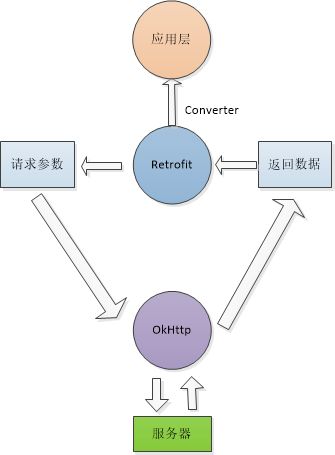
Retrofit 是基于 OkHttp 进行的封装,遵循 RESTful Api,通过注解来设计请求接口,Retrofit 实际上是对网络请求参数通过注解方式设置,包括 Header、URL等,
然后请求操作通过 okhttp 来完成,从服务器返回的请求结果,okhttp 又交给 Retrofit 根据需要进行解析(通过 Converter),
对于开发者来说,更加简洁和方便。OkHttp 也是 square 公司开发的网络框架,JakeWharton 也是主要开发者之一。
2 特点
对于 Retrofit 的描述,官方给出了这样一句话:
A type-safe HTTP client for Android and Java
意思是说 Retrofit 是方便 Android 和 Java 使用的一种 Http 安全客户端请求框架。
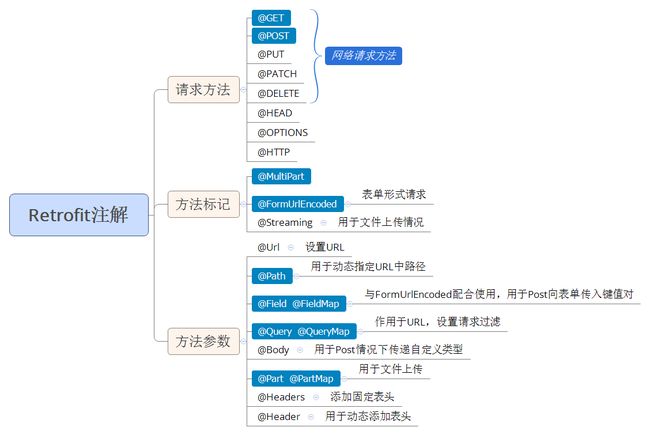
下面给出一张图,说明 Retrofit 的主要特点。
另外,既然 Retrofit 是依赖 Okhttp,那么到底他们之间的关系是怎样的呢?,再来一张图。
理清了关系,我们该干什么呢?首先肯定是先动手实践一下,看看 Retrofit 如何使用,是否真的很好用,然后要想深入研究的话,可以去看源码啦。
3 使用
步骤一:添加依赖库
1. 在 build.gradle 中添加依赖库,由于 Retrofit 依赖 OkHttp,所以还需要添加 okhttp 的依赖,版本号可以在官网上的 Github 中获取。
dependencies {
  //引入okhttp
  compile 'com.squareup.okhttp3:okhttp:3.5.0'
  //引入retrofit
  compile 'com.squareup.retrofit2:retrofit:2.1.0'
  //引入rxjava
  //compile 'io.reactivex.rxjava2:rxjava:2.0.4'
  //引入Log拦截器,方便DEBUG模式输出log信息
  //compile 'com.squareup.okhttp3:logging-interceptor:3.5.0'
  //引入json转换器,方便将返回的数据转换为json格式
  compile 'com.squareup.retrofit2:converter-gson:2.1.0'
}
步骤二:建立数据实体类
这里使用的是郭神《第一行代码》天气例子中的城市请求的 URL。
public class City {

    int id;
    String name;

    public String toString() {

        return "[id = " + id + ", name = " + name + "]";
    }
}
步骤三:设计请求接口
Retrofit 请求通过 java 接口创建,这句话描述的不太清楚,实际上我们使用时,只要将 请求方法放在接口中,通过注解方式对请求参数进行描述和配置,调用方法的实例是框架通过动态代理完成的,在源码中能够找到。
有以下两点需要注意:
-
设计的接口不能继承和嵌套,嵌套意思是在一个接口中不能再有一个接口,这一点也是实验过程中发现,想了下,如果熟悉注解的话,应该能够理解,注解也是不能继承和嵌套。
-
接口中的所有方法都需要进行注解,注解相应的网络请求操作。
public interface GetService {

    @GET("api/china")
    Call> getProvinces();
}
上面是最简单的一个网络请求接口,下面对注解的各种类型进行说明。
1 请求方法注解
方法注解常用的有这几个:@GET、@POST、@PUT、@PATCH 、@DELETE、@HEAD 、@OPTIONS、@HTTP
注解对应着 Http 中的方法,这在上一篇文章的讲解中已有了详细的说明,是对应着请求的具体的动作。其中,GET、POST最常用,HTTP也可能用到,反正我没用到,那就对这三个进行说明,其他的遇到了再补充。
@GET
上面例子中就是 @GET 的请求,注解 @GET 的方法,向服务器请求指定 URL 地址的资源,数据流方向:服务器—>客户端,使用时一般会配合 @Path,通过 @Path 注解方法参数,使得请求的 URL 能够动态改变,更加灵活,后面会对 @Path 详细讲解。
@POST
注解成 @POST 方法,表明向服务器发送数据,所以数据流方向很明确,客户端—>服务器
@POST 注解的方法向服务器发送数据,主要 Form 表单类型,一般配合 FormUrlEncoded 或者 MultiPart 注解。
@HTTP
@HTTP 是概括性的注解方法,具体的参数是在后面括号中进行说明,这里只给出请求方法的配置,还有其他参数可以设置,如 path,hasBody 等
/**
 * method:网络请求的方法,对应 HTTP 的请求方法
 */
@HTTP(method = "GET",path = "api/china")
Call getCall();

//等同于
@GET("api/china")
Call> getProvinces();
2 方法标记类注解
方法注解类参数主要是对方法进行一个标记,不同于方法请求,主要对数据类型进行说明。
@FormUrlEncoded
用于 POST 请求方法,注解后,表明发送 Form 表单数据,与 @Field 或 @FieldMap 配合使用。
public interface PostService {

    @POST("path")
    @FormUrlEncoded
    Call getTranslate(@Field("key") String value);

    //或者使用FieldMap,根据需要来选择

    @POST("path")
    @FormUrlEncoded
    Call getTranslate(@FieldMap Map maps);
}
@MultiPart
使用 @MultiPart 标记的方法中可以传递三种类型的数据:
(1)RequestBody,参数中需要使用 @Part 标记字段
(2)MultipartBody.Part 类型,@Part 标记,但不需要注明字段,一般用于文件
(3)其他类型,如 String 类型或者其他自定义类型
直接来上代码:
public interface UpLoadService {

  //1 upload a image
  @Multipart
  @POST("user")
  Call upload(@Part("file\";filename=\"image.jpg") RequestBody file);

  //2 upload some images,the number is certain
  @Multipart
  @POST("user")
  Call upload(@Part("file\";filename=\"image1.jpg") RequestBody file1,@Part("file\";filename=\"image2.jpg") RequestBody file2,@Part("file\";filename=\"image3.jpg") RequestBody file3);

  //3 upload one image and text
  @Multipart
  @POST("user")
  Call upload(@Part("description") String description,
                            @Part MultipartBody.Part file);

  //4 upload one image and text
  @Multipart
  @POST("user")
  Call upload(@Part("description") RequestBody description,@Part MultipartBody.Part file);

  /**********************************************************************/

  //5 upload images and text
  @Multipart
  @POST("user")
  Call upload(@Part("description") RequestBody description,
                           @PartMap() Map maps);
}
下面一个一个分析:
1 和 2 是用来上传图片的,只不过 2 是用来上传多张图片。可能一上来有些迷糊,这就是上一篇文章中提到的关于请求的消息结构部分组成,这里再拿出来说明一下。
POST http://www.example.com HTTP/1.1
Content-Type:multipart/form-data; boundary=----WebKitFormBoundaryrGKCBY7qhFd3TrwA

//第一部分,文本
------WebKitFormBoundaryrGKCBY7qhFd3TrwA
Content-Disposition: form-data; name="text"
title

//第二部分,图片
------WebKitFormBoundaryrGKCBY7qhFd3TrwA
Content-Disposition: form-data; name="file"; filename="image1.jpg" //注意这里的 name 和 filename
Content-Type: image/png
PNG ... content of chrome.png ...
------WebKitFormBoundaryrGKCBY7qhFd3TrwA--
需要上传 RequestBody,而 @Part 部分注明就是图片的 Content-Disposition:
看注释部分的 name 和 filename,就是 @Part(“file”;filename=“image1.jpg”) 给出的。这里没有实际验证,因为我没有自己搭建后台部分,所示这里只是说明。
3 和 4 方法是一样的,实现文字和图片同时上传,MultipartBody.Part 部分的 @Part 不需要给出相应的字段。另外,为啥给出 3 和 4 这两种方式,看起来 3 更加简单,但是有篇文章 Retrofit上传单图、多图、图文 说上传图文时遇到了坑,使用 String 类型的话,服务端接收到的参数会带双引号。这里仍需要实际验证,我没有做验证,为了保险起见,使用 RequestBody 类型肯定没有问题。
5 实现的是多张图片和文字的上传,使用 @PartMap() 进行标记,其中 Map< String,RequestBody > 也可换成 List< MultipartBody.Part>,同样能够实现多张图片上传。
使用过程
private void upload() {

        UpLoadService upLoadService = getService("http://webset", UpLoadService.class);

        File file1 = new File("d:/1/test1.jpg");
        File file2 = new File("d:/1/test2.jpg");
        File file3 = new File("d:/1/test3.jpg");

        //upload serveral images, the number is certain
        RequestBody requestFile1 = RequestBody.create(MediaType.parse("multipart/form-data"), file1);
        RequestBody requestFile2 = RequestBody.create(MediaType.parse("multipart/form-data"), file2);
        RequestBody requestFile3 = RequestBody.create(MediaType.parse("multipart/form-data"), file3);

        Map<String, RequestBody> maps = new HashMap<>();

        //the key is the field in the database
        maps.put("image1", requestFile1);
        maps.put("image2", requestFile2);
        maps.put("image3", requestFile3);

        String describString = "this are images and text";
        RequestBody description = RequestBody.create(MediaType.parse("multipart/form-data"), describString);

        Call<ResponseBody> uploadImagesAndTextCall = upLoadService.upload(description, maps);

        //execute the call
        uploadImagesAndTextCall.enqueue(new Callback<ResponseBody>() {
            @Override
            public void onResponse(Call<ResponseBody> call, Response<ResponseBody> response) {
                Log.e("tag", "upload the images and text success");
            }

            @Override
            public void onFailure(Call<ResponseBody> call, Throwable t) {
                Log.e("tag", "upload the image and text failed");
            }
        });
    }
Content-Type
Content-Type即内容类型,上面使用的都是 multipart/form-data,代表二进制数据类型,对于图片也可以使用 image/jpg 格式,对于 Json 类型可以使用 application/json 类型
City city = new City(1, "Beijing");
String jsonString = new Gson().toJson(city);

RequestBody body = RequestBody.create(MediaType.parse("application/json; charset=utf-8")
        , jsonString);
小结
@MultiPart 很不好理解,反正我是看了很久,才有了一些理解,另外还需要实际操作,加深理解,实际使用中可能不需要这么多方式,那就根据需求选择其中一种先用起来,然后再改进。
@Streaming
嗯,没用过,自己脑补去吧,哈哈!
3 方法参数注解
方法参数这部分也很多,为了方便理解和记忆,有些可以看成是相同的,像 @Field 和 @FieldMap,@Query 和 @QueryMap,@Part 和 @PartMap,@Headers 和 @Header(这两个和前面三对还有些区别)。
@Path
@GET("api/{Country}")
Call> getProvinces(@Path("Country") String country);
通过 Path 注解,可以将 GET 中{Country}部分进行动态替换,这个很好理解。
@Url
@Url 注解同样可设置 URL,达到上面 GET 后面设置的效果。
@GET
Call> getProvinces(@Url String url);
@Field 和 @FieldMap
在进行 POST 请求时提交请求的表单字段,可以理解为键值对,与 @FormUrlEncoded 配合使用,在 @FormUrlEncoded 说明是也提到了,表单格式的请求类型为 Content-Type:application/x-www-form-urlencoded,也是请求消息结构的默认类型。
@Query 和 @QueryMap
如,我要访问下面这个URL,在 ?之后是查询参数,这些参数就可以通过 @Query 来动态设定。
- http://fy.iciba.com/ajax.php?a=fy&f=auto&t=auto&w=hello world
查询参数分解为键值对:
key--------value
a-------------fy
f------------auto
t------------auto
w---------hello%20world
使用 @Query 对每一个键值对进行参数设置,当有多个键值对时,就可以通过 @QueryMap
public interface QueryService {

    //baseurl 为http://fy.iciba.com/
    @GET("ajax.php")
    Call getMessage(@Query("a") String param1,
    @Query("f") String param2, @Query("t") String param3,
    @Query("w") String param4);

    @GET("{message}")
    Call getMessage(@QueryMap Map params);
}
使用
//getService 创建接口实例的方法,重点看下面的代码
QueryService getService = (QueryService) getService("http://fy.iciba.com/", GetService.class);

/**
 * url
 * http://fy.iciba.com/ajax.php?a=fy&f=auto&t=auto&w=hello%20world
 */

//@Query
Call call = getService.getMessage("fy","auto","auto","hello%20world");

//@QueryMap
Map paramsMap = new HashMap<>();
paramsMap.put("a", "fy");
paramsMap.put("f", "auto");
paramsMap.put("t", "auto");
paramsMap.put("w", "hello%20world");
Call call = getService.getMessage(paramsMap);
@Body
@Body 用来封装自定义类型的数据, 一般是通过实体对象进行封装的数据类型,如String 或者自己定义的实体类型。
实体类
class User{

    private String name;
    private int age;

    public User(String name, int age) {
        this.name = name;
        this.age = age;
    }
}
请求接口
public interface UserService {
    @POST("api/users")
    Call uploadUser(@Body User user);
}
调用
Call call = userService.uploadUser(new User("name",24));
需要注意的是,在服务器端需要自己进行解析,不能直接获取相应字段数据。
@Part 和 @PartMap
这个不用多说了,在上面方法标记类型里列出了使用方法,这部分可能稍微有点不好理解,多看一些文章,多练习,着重看下消息结构组成,就可以完全搞明白。
@Header 和 @Headers
这两个注解都是作用于请求头,区别在于 @Header 用于不固定的请求头,@Headers 用于添加固定请求头,关于请求头的概念,需要去了解下消息结构的 header 部分。
@Headers 设置请求头的Content-type,即设置编码格式,固定请求头 意思是使用这个请求接口的编码格式都是一样的。
public interface HeadersService {

    @Headers("Content-type:application/x-www-form-urlencoded;charset=UTF-8")
    @POST("api/users")
    Call uploadUser(@Field("username") String username);
}
@Header 设定动态设置请求头编码格式,在调用方式,通过参数传递
public interface HeaderService {

    @POST("api/users")
    Call uploadUser(@Header("Content-Type") String contentType,@Field("username") String username);
}

// 调用
Call call = service.uploadNewUser("application/x-www-form-urlencoded;charset=UTF-8","Ralf");
当然,请求头部分还有其他可以设置的,根据实际需要进行设置。
至此,经历漫长的过程,各种注解类型已经讲完,是不是有点多,不过不要紧,实际中使用用到的应该不会太多吧,为啥不确定呢? 因为我没用过啊,也只是学习阶段,哈哈!在脑图中也已经标出来重点了。
步骤四:创建 Retrofit 实例
Retrofit retrofit = new Retrofit.Builder()
        .baseUrl(urlStr)
        .addConverterFactory(GsonConverterFactory.create()) // Gson 数据解析器
        //.addConverterFactory(MyConverterFactory.create()) // 自定义数据解析器
        .addCallAdapterFactory(RxJavaCallAdapterFactory.create()) // RxJava 适配器
        .build();
创建 Retrofit 实例可以设置解析器和适配器。
Adapter
Retrofit主要支持这几种网络请求适配器:guava、Java8 和 Rxjava
如果不设置适配器,则使用 Android 默认的 CallAdapter 。
| Adopter | gradle |
|---|---|
| guava | com.squareup.retrofit2:adapter-guava:2.0.2 |
| Java8 | com.squareup.retrofit2:adapter-java8:2.0.2 |
| RxJava | compile ‘io.reactivex.rxjava2:rxjava:2.0.4’ |
Converter
数据解析器,主要由以下几种类型,另外可以自己定义数据解析器
| Converter | gradle |
|---|---|
| Gson | com.squareup.retrofit2:converter-gson:2.1.0 |
| Jackson | com.squareup.retrofit2:converter-jackson:2.0.2 |
| Simple XML | com.squareup.retrofit2:converter-simplexml:2.0.2 |
| Protobuf | com.squareup.retrofit2:converter-protobuf:2.0.2 |
| Moshi | com.squareup.retrofit2:converter-moshi:2.0.2 |
| Wire | com.squareup.retrofit2:converter-wire:2.0.2 |
| Scalars | com.squareup.retrofit2:converter-scalars:2.0.2 |
自定义数据解析器
解析出实体类,如获取城市的 JsonArray,解析出实体类,返回一个 List
http://guolin.tech/api/china/12
[{
	"id": 57,
	"name": "石家庄"
}, {
	"id": 58,
	"name": "保定"
}, {
	"id": 59,
	"name": "张家口"
}, {
	"id": 60,
	"name": "唐山"
}, {
	"id": 61,
	"name": "廊坊"
}, {
	"id": 62,
	"name": "沧州"
}, {
	"id": 63,
	"name": "衡水"
}, {
	"id": 64,
	"name": "邢台"
}, {
	"id": 65,
	"name": "邯郸"
}, {
	"id": 66,
	"name": "秦皇岛"
}]
public class MyConverterFactory extends Converter.Factory {

    public static MyConverterFactory create() {

        return new MyConverterFactory();
    }

    @Override
    public Converter responseBodyConverter(Type type, Annotation[] annotations,
                                                            Retrofit retrofit) {
        return new MyConverter();
    }

    class MyConverter implements Converter> {

        @Override
        public List convert(ResponseBody value) throws IOException {

            List resultList = new ArrayList<>();
            String cityInfo = value.string();

            if (cityInfo == null || TextUtils.isEmpty(cityInfo)) {
                return resultList;
            }

            try {
                JSONArray jsonArray = new JSONArray(cityInfo);
                for (int i = 0; i < jsonArray.length(); i++) {

                    JSONObject object = jsonArray.getJSONObject(i);
                    String cityName = object.getString("name");
                    int cityId = object.getInt("id");
                    resultList.add(new City(cityId, cityName));
                }

            } catch (JSONException e) {

                e.printStackTrace();
            }

            return resultList;
        }
    }

}
以上作用完全可以使用 GsonConverterFactory,这里自己解析主要是熟悉一下自定义数据解析器的流程。
步骤五:创建 Retrofit 实例
步骤六:执行网络请求 和 返回数据处理
异步
call.enqueue(new Callback<Message>() {
            //请求成功回调该函数
            @Override
            public void onResponse(Call<Message> call, Response<Message> response) {

                Message message = response.body(); // 返回数据部分
                message.show();
            }

            //请求失败回调该函数
            @Override
            public void onFailure(Call<Message> call, Throwable t) {

            }
});
同步
try {
    Response response = call.execute();
} catch (IOException e) {
    e.printStackTrace();
}
小结
Retrofit 网络请求按照上面 7 个 步骤就可以正常运行了。需要注意以下几点:
-
定义的接口类型要与服务店返回的类型对应,否则会解析错误
-
在 AndroidManifest 中需要设置权限
<uses-permission android:name="android.permission.INTERNET"/>
- 异步请求中,不需要再单独再开启线程
- 每个请求接口放在一个文件中,不能继承
还有需要补充的地方, 大家可以一起来讨论一下,避免一些不必要的坑。
后续将学习梳理一下Rxjava的结合,以及拦截器和一些封装操作,敬请期待!
参考
代码练习地址
Say Hello to Retrofit
订阅
这是一份很详细的 Retrofit 2.0 使用教程


