(4.4)Docker的安装与使用1
文章目录
- 1.安装过程如下
- 2.Docker服务
- 3.镜像操作
- 3.容器操作
- 4.Docker常用命令图
1.安装过程如下
- 查看内核版本(3.10.0以上)
- 更新yum源
yum update
- 执行安装命令
curl – sSL https://get.docker.com/ | sh
- 查看安装版本
docker -v
- 允许开机启动Docker服务
systemctl enable docker
- 安装过程中可能出现的问题
我的OS是Ubuntu 16.04.6 LTS
(1)安装过程中出现:Could not get lock /var/lib/dpkg/lock问题,解决办法如下:
E: Could not get lock /var/lib/dpkg/lock - open (11: Resource temporarily unavailable)
E: Unable to lock the administration directory (/var/lib/dpkg/), is another process using it

执行命令,将相应的lock文件删除即可
rm -rf /var/cache/apt/archives/lock
rm -rf /var/lib/dpkg/lock

参考:https://www.jianshu.com/p/6e4f16cf6398

(2)配置阿里云镜像加速,因为从docker自己的仓库pull镜像太慢了
首先在:https://cr.console.aliyun.com/cn-hangzhou/mirrors,申请一个账号;
接着按照页面里面的镜像加速器进行配置即可;
参考:https://blog.csdn.net/weixin_37173488/article/details/99694586

配置完毕后,ubuntu结果如下:输入:docker info
Insecure Registries:
127.0.0.0/8
Registry Mirrors:
https://s2k2mqwz.mirror.aliyuncs.com/
Live Restore Enabled: false

注意:
(1)若启动docker的时候出现以下错误:docker.service: Failed with result 'start-limit-hit'.
则:
如果是配置了国内镜像,并且镜像文件为/etc/docker/daemon.json,则修改文件后缀为.conf即可正常启动docker 服务
参考:https://segmentfault.com/q/1010000002392472?_ea=176528

(2)docker search mysql若出现以下错误:
Error response from daemon: Get https://index.docker.io/v1/search?q=m&n=25: dial tcp: lookup index.docker.io on 127.0.1.1:53: read udp 127.0.0.1:41608->127.0.1.1:53: i/o timeout
或者
Error response from daemon: Get https://registry-1.docker.io/v2/: net/http: request canceled while waiting for connection (Client.Timeout exceeded while awaiting headers)

则需要修改服务器DNS网络配置
vi /etc/resolv.conf

把里面的内容清除,并改为:
nameserver 8.8.8.8
nameserver 8.8.8.4

重启网络服务
systemctl restart network

ubuntu16.04的网络重启方式:
service networking restart
or
/etc/init.d/networking restart
ps:上面的方式如果还不行的话,注意直接修改/etc/resolv.conf这个文件,因为重启网络后,这里面的内容会重新生成,
所以dns地址可以在/etc/network/interfaces文件中配置,然后再重启网络!!
配置DNS可以参考:https://blog.csdn.net/u011436427/article/details/104152964

参考:https://www.cnblogs.com/Dylanl/p/10972065.html
稍微耐心点,pull镜像比较慢,需要等待下
2.Docker服务
- (1)启动Docker服务
service docker start 或者systemctl start docker
- (2)查看Docker服务状态
service docker status 或者systemctl status docker
- (3)停止Docker服务
service docker stop 或者systemctl stop docker
3.镜像操作
- (1)搜索镜像
docker search 关键字 ;关键字不能为空

eg:docker search hello-world
- (2)拉取镜像
docker pull 镜像名

eg:
docker pull hello-world
docker pull ubuntu
等等
-(3)查看镜像
docker images
- (4)删除镜像
docker rmi 镜像名:tag/镜像ID

eg:docker rmi hello-world:latest
- Docker 删除 none 镜像
REPOSITORY                                             TAG                 IMAGE ID            CREATED             SIZE
<none>                                                 <none>              c29a411111103        2 weeks ago         1.639 MB

docker images|grep none|awk '{print $3 }'|xargs docker rmi
3.容器操作
- (1)创建容器
docker run [选项] 镜像名:tag/镜像ID 要执行的命令

-i:交互模式
-t:打开一个虚拟终端,-i一起使用
-d:后台运行,打开-d,就不要用-i和-t
--name:容器自定义名称
-v:映射文件

ctrl p+q:表示容器在后台运行
exit:表示真正的退出,不要轻易使用
进入后台运行的容器的方法:
docker attach 镜像ID
docker exec -it 容器NAMES bash

eg:docker attach 44fc0f0582d9
docker exec -it web1 bash

eg:docker run -i -t --name=wangji1 ubuntu /bin/bash
docker run -d -p 81:80 nginx
-p参数:将外部端口81映射到内部端口80

root@ubuntu:/home/jiwangreal# docker ps
CONTAINER ID        IMAGE               COMMAND                  CREATED             STATUS              PORTS                NAMES
0979c8d1b298        nginx               "nginx -g 'daemon of…"   3 seconds ago       Up 2 seconds        0.0.0.0:81->80/tcp   suspicious_lichterman

eg:将当前目录映射到容器内的/usr/share/目录下,nginx是镜像的名字
docker run -d -p 88:80 --name mynginx -v `pwd`:/usr/share nginx


docker 怎么 重新开启状态为exited的容器?
root@ubuntu:/tmp/demo# docker start 729f0d3454a8
2、查看容器
docker ps [选项]
![]()
3、 启动和停止容器
docker start/stop 容器名/容器ID
eg:stop ubuntu容器结果如下:

4、删除容器
docker rm [选项] 容器名/容器ID
-f:删除正在运行的容器
eg:删除ubuntu容器的结果如下:
![]()
5、将容器commit成镜像
commit跟着容器的id
root@ubuntu:/home/jiwangreal# docker commit 0979c8d1b298 m1
root@ubuntu:/home/jiwangreal# docker images
REPOSITORY          TAG                 IMAGE ID            CREATED             SIZE
m1                  latest              eb5539cbc676        7 seconds ago       127MB
nginx               latest              2073e0bcb60e        12 days ago         127MB
ubuntu              latest              ccc6e87d482b        4 weeks ago         64.2MB
6、将Dockfile build成镜像
首先新建Dockerfile文件
root@ubuntu:vim Dockerfile
root@ubuntu:/# cat Dockerfile
FROM nginx
ADD ./ /usr/share/nginx/html/

接着写一个.html文件
root@ubuntu:/# cat index.html
wangji wangji

root@ubuntu:/# docker build -t m2 .
root@ubuntu:/# docker run -d -p 100:80 m3
7、将镜像保存成tar文件和将tar文件转换为镜像文件
docker ps
。。。   IMAG 。。。。  。。。。 。。。。
。。。    m3  .。。。   。。。。  。。。。
docker save m3 >1.tar

docker load <1.tar
- save命令
docker save [options] images [images...]

示例
docker save -o nginx.tar nginx:latest
或
docker save > nginx.tar nginx:latest
其中-o和>表示输出到文件,nginx.tar为目标文件,nginx:latest是源镜像名(name:tag)
8、将容器保存成tar文件和将tar文件转换为镜像文件
- 镜像和容器 导出和导入的区别:
1.镜像导入 是复制的过程
2.容器导入 是将当前容器 变成一个新的镜像

save 和 export区别:
1)save 保存镜像所有的信息-包含历史
2)export 只导出当前的信息

所以使用export和import后,实际上是保存的成镜像了,还需要docker run镜像
用法docker run -it --name XXX --privileged -v /path1:/path2:rw 镜像id bash
--privileged -v :表示将外部目录映射到容器内的目录
- 用法:
导出容器
docker export $container_id > centos.tar

导入容器(其实导入的是镜像,而且只是容器的环境而已)
docker import centos.tar centos:latesd
使用docker images,可以查看导出的镜像

若出现以下情况:
[root@k8s-master tmp]# docker images
REPOSITORY                                        TAG                 IMAGE ID            CREATED             SIZE
<none>                                            <none>              47d9f45f739a        47 seconds ago      345MB
则可以使用:
docker tag 47d9f45f739a tomcat7:export
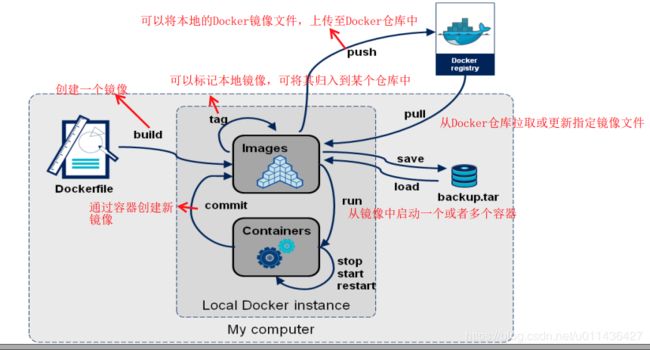
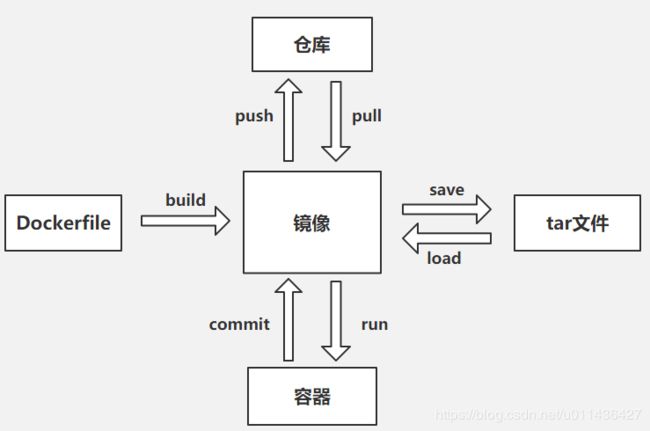
4.Docker常用命令图
build:创建一个镜像
push:可以将本地的Docker镜像文件,上传至Docker仓库中
pull:从Docker仓库拉取或更新指定镜像文件
run:从镜像中启动一个或者多个容器
tag:可以标记本地镜像,可将其归入到某个仓库中
commit:通过容器创建新镜像
- 参考:Docker 镜像和容器的导入导出