这周的初步计划是想提交前三个部分的内容,但是由于本周我们计算机视觉A组第一组需要讲课,牵扯到一定的精力与时间,所以这次作业只提交了前两个部分,第三部分会抽时间去看一下这三篇论文。
1、视频总结
机器学习(深度学习)中的数学基础
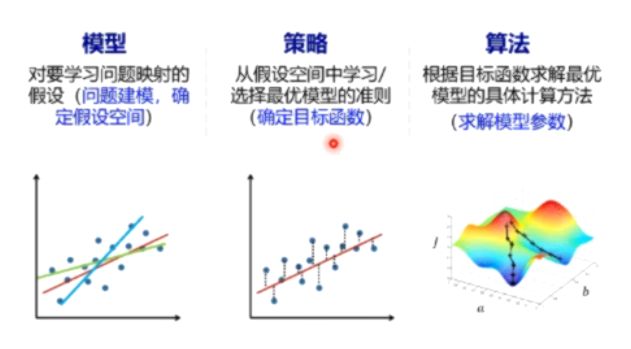
1、机器学习的三要素:模型、策略、算法
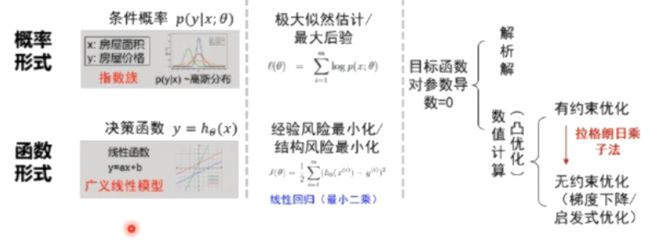
概率/函数形式的统一
最优的函数策略
损失函数
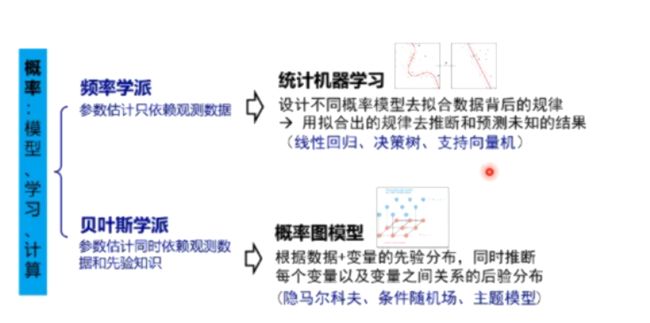
频率学派&贝叶斯学派
Beyond深度学习
因果推断
群体智能
概率论:模型假设,策略设计的基础
线性代数:对数据/样本通过向量或矩阵的方式去表示;如感知器的一些线性变换,一些操作是在矩阵的相乘上进行的。
最优化理论:求解目标函数的具体算法。
2、矩阵的线性变换
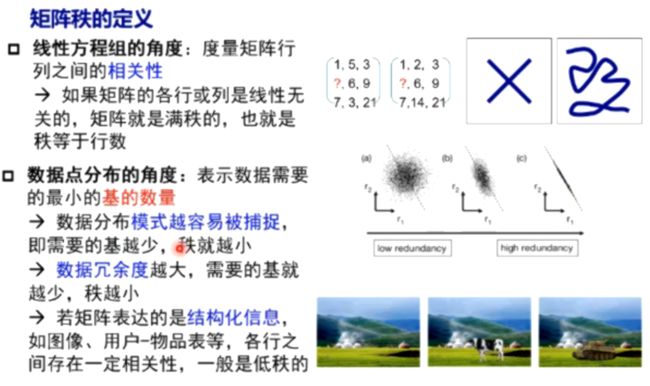
3、桑老师将矩阵的秩,理解为秩序,越有秩序,秩越小,需要的基越小,数据分布的模式就越容易被捕捉。
还可以从冗余度来理解,冗余度越大,需要的维度就越小,基数就越小。
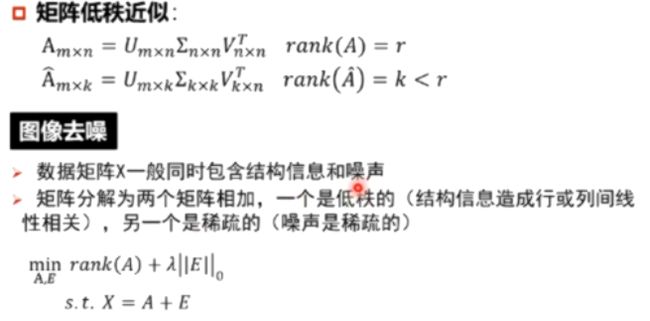
4、较大的奇异值包含了矩阵的主要信息
5、低秩近似的意义:
保留决定数据分布的最主要模式/方式(丢弃的可能是噪声或其他不关键信息)
6、概率是基础
支持限量机设计很多数学基础
梯度下降是神经网络共同的基础
7、机器学习的三要素:模型、策略、算法
8、逻辑回归也可以直接采用对数损失函数通过经验风险最小化求参:
经验风险最小化策略与极大似然策略优化得到的模型参数是一致的
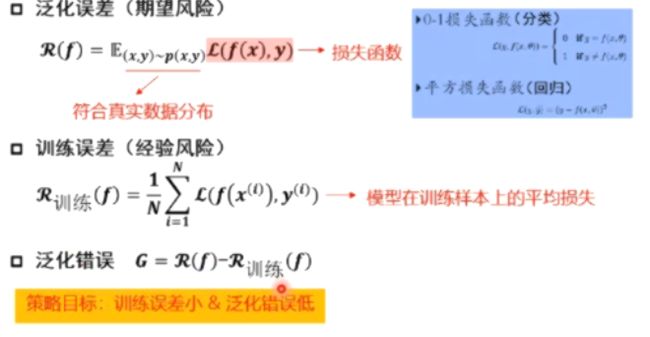
9、最合适的模型:机器学习从有限的观测数据中心学习出规律,并将总结的规律推广应用到未观测样本上,追求泛化性能
10、机器学习的目的是要获得小的泛化误差
训练误差要小
训练误差与泛化误差足够接近
训练误差与泛化误差的差异和两个方面有关系:第一个方面是,训练样本量,训练样本量越大,误差就越小;第二个方面是模型的复杂度,模型越复杂,差异就越大。
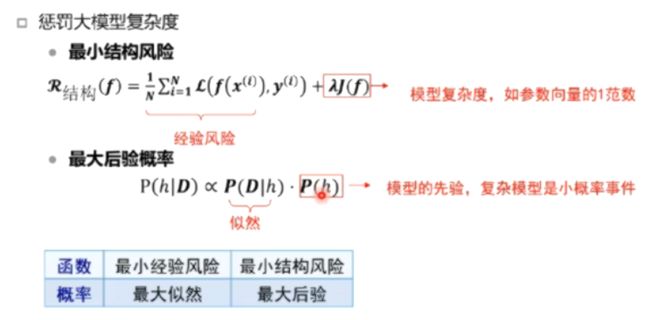
11、如果多种模型能够同等程度地符合一个问题的观测结果,应该选择其中使用假设最少的——最简单模型
12、欠拟合:训练集的一般性质尚未被学习器学好(训练误差大)
过拟合:学习器把训练集特点当做样本的一般特点(训练误差小,测试误差
13、BP神经网络和损失函数
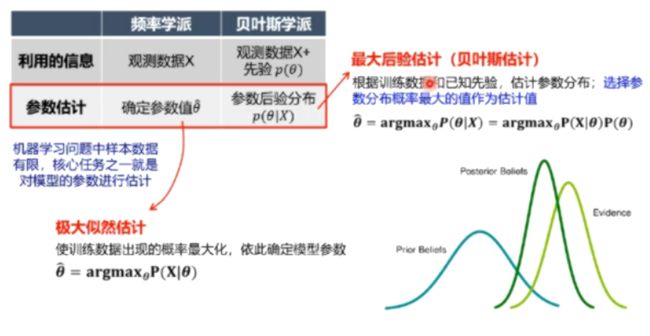
14、频率学派&贝叶斯学派
卷积神经网络
1、卷积神经网络的应用:分类,检索,检测,分割,人脸识别,图像生成,自动驾驶等
2、深度学习三部曲
3、损失函数
4、传统神经网络VS卷积神经网络
全连接网络处理图像的问题:
参数太多:权重矩阵的参数太多——过拟合
卷积神经网络的解决方式:
局部关联,参数共享
5、
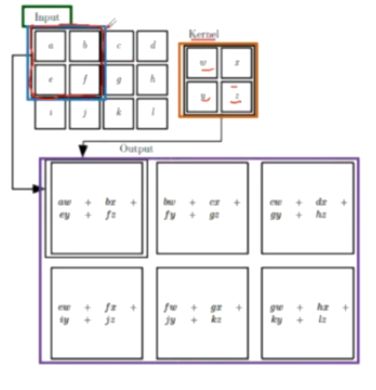
6、卷积是对两个实变函数的一种数学操作(求内积)
在图像处理中,图像是以二维矩阵的形式输入到神经网络的,因此我们需要二维卷积。
7、卷积涉及到的基本概念
(1)input:输入
(2)kernel/filter:卷积核/滤波器
(3)weights:权重(卷积核中的每一个值)
(4)receptive field:感受野(卷积核进行一次卷积后对应输入的一块区域)
(5)feature map:特征图(进行一次卷积后输出的)
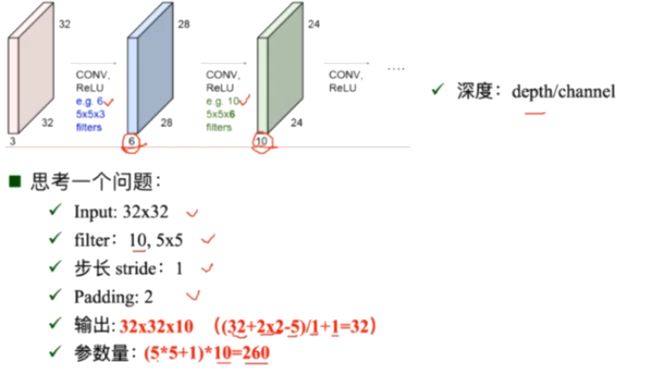
(6)channel/depth:深度(特征图的厚度)
(7)output:输出
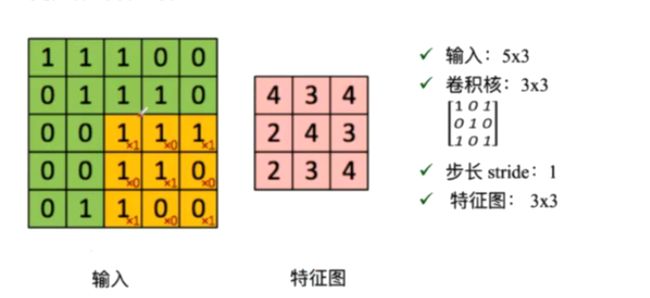
8、进行卷积的具体过程
9、零填充:走到最后发现不够一次卷积后进行补0 padding
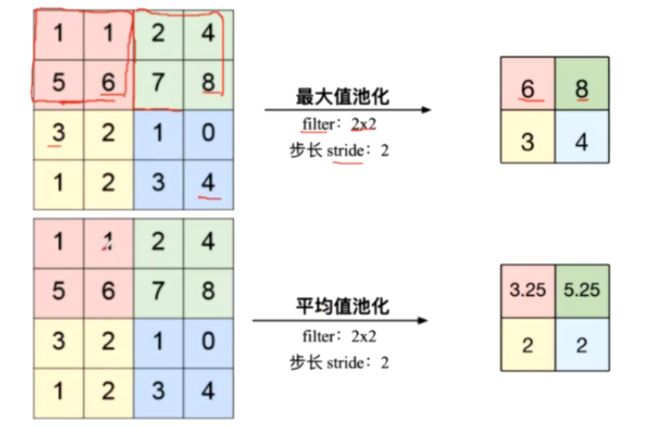
10、池化——Pooling Layer
(1)是一个缩放的过程
(2)最大值池化与平均值池化
11、全连接
12、
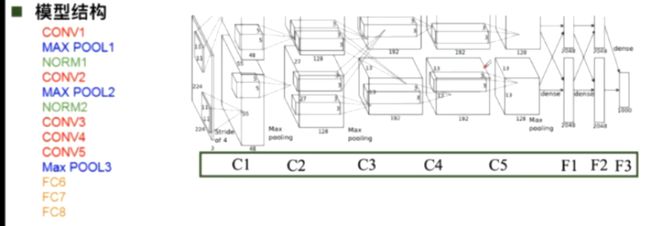
13、AlexNet卷积神经网络
(1)大数据训练:百万级ImageNet图像数据
(2)非线性激活函数:ReLU 在每个feature map上操作(解决了在正区间梯度消失的问题;计算速度特别快,只需要判断输入是否大于0;收敛速度远快于sigmoid)
(3)防止过拟合:Dropout随机失活(训练时随机关闭部分神经元,测试时整合所有神经元 ),Data augmentation数据增强
(4)其他:双GPU实现
14、ZFNet
(1)结构与AlexNet相同
(2)将卷积层1中的感受野大小由11×11 改为7×7,步长由4改为2
(3)卷积层3,4,5中的滤波器个数由384,384,256改为512,512,1024
15、VGG
是一个更深的网络。
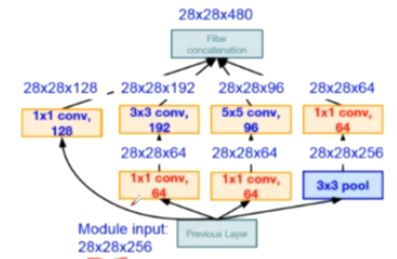
16、GoogleNet
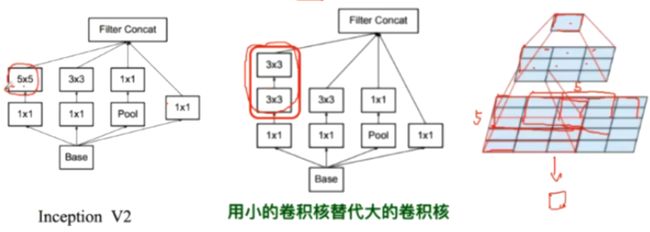
Inception V2解决了 Inception V1计算量复杂的问题,插入了1×1的卷积核进行降维
Inception V3进一步对V2的参数数量进行降维(一个5×5等同于两个3×3的感受野)
(1)降低了参数量
(2)增加非线性激活函数:增加非线性激活函数是网络产生更多独立特,表征能力更强,训练更快。
17、ResNet
2、代码练习
2.1 MNIST 数据集分类
全连接网络VS卷积神经网络
n_hidden = 8 # number of hidden units

model_fnn = FC2Layer(input_size, n_hidden, output_size)
model_fnn.to(device)
optimizer = optim.SGD(model_fnn.parameters(), lr=0.01, momentum=0.5)
print('Number of parameters: {}'.format(get_n_params(model_fnn)))

train(model_fnn)
test(model_fnn)
# Training settings
n_features = 6 # number of feature maps

model_cnn = CNN(input_size, n_features, output_size)
model_cnn.to(device)
optimizer = optim.SGD(model_cnn.parameters(), lr=0.01, momentum=0.5)
print('Number of parameters: {}'.format(get_n_params(model_cnn)))

train(model_cnn)
test(model_cnn)
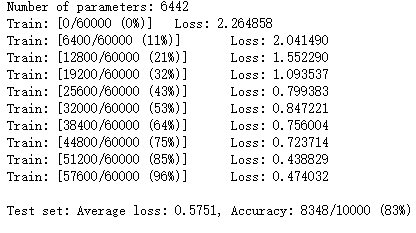
通过上面的测试结果,明显可以发现,含有相同参数的 CNN 效果要明显优于 简单的全连接网络,是因为 CNN 能够更好的挖掘图像中的信息。
打乱像素顺序再次在两个网络上训练与测试
考虑到CNN在卷积与池化上的优良特性,如果我们把图像中的像素打乱顺序,这样卷积和池化就难以发挥作用了。
重新定义训练与测试函数,我们写了两个函数 train_perm 和 test_perm,分别对应着加入像素打乱顺序的训练函数与测试函数。
与之前的训练与测试函数基本上完全相同,只是对 data 加入了打乱顺序操作。
# 对每个 batch 里的数据,打乱像素顺序的函数
def perm_pixel(data, perm):
    # 转化为二维矩阵
    data_new = data.view(-1, 28*28)
    # 打乱像素顺序
    data_new = data_new[:, perm]
    # 恢复为原来4维的 tensor
    data_new = data_new.view(-1, 1, 28, 28)
    return data_new

# 训练函数
def train_perm(model, perm):
    model.train()
    for batch_idx, (data, target) in enumerate(train_loader):
        data, target = data.to(device), target.to(device)
        # 像素打乱顺序
        data = perm_pixel(data, perm)

        optimizer.zero_grad()
        output = model(data)
        loss = F.nll_loss(output, target)
        loss.backward()
        optimizer.step()
        if batch_idx % 100 == 0:
            print('Train: [{}/{} ({:.0f}%)]\tLoss: {:.6f}'.format(
                batch_idx * len(data), len(train_loader.dataset),
                100. * batch_idx / len(train_loader), loss.item()))

# 测试函数
def test_perm(model, perm):
    model.eval()
    test_loss = 0
    correct = 0
    for data, target in test_loader:
        data, target = data.to(device), target.to(device)

        # 像素打乱顺序
        data = perm_pixel(data, perm)

        output = model(data)
        test_loss += F.nll_loss(output, target, reduction='sum').item()
        pred = output.data.max(1, keepdim=True)[1]
        correct += pred.eq(target.data.view_as(pred)).cpu().sum().item()

    test_loss /= len(test_loader.dataset)
    accuracy = 100. * correct / len(test_loader.dataset)
    print('\nTest set: Average loss: {:.4f}, Accuracy: {}/{} ({:.0f}%)\n'.format(
        test_loss, correct, len(test_loader.dataset),
        accuracy))
首先现在全连接网络下进行测试:
perm = torch.randperm(784)
n_hidden = 8 # number of hidden units

model_fnn = FC2Layer(input_size, n_hidden, output_size)
model_fnn.to(device)
optimizer = optim.SGD(model_fnn.parameters(), lr=0.01, momentum=0.5)
print('Number of parameters: {}'.format(get_n_params(model_fnn)))

train_perm(model_fnn, perm)
test_perm(model_fnn, perm)
然后在卷积神经网络下进行测试:
perm = torch.randperm(784)
n_features = 6 # number of feature maps

model_cnn = CNN(input_size, n_features, output_size)
model_cnn.to(device)
optimizer = optim.SGD(model_cnn.parameters(), lr=0.01, momentum=0.5)
print('Number of parameters: {}'.format(get_n_params(model_cnn)))

train_perm(model_cnn, perm)
test_perm(model_cnn, perm)
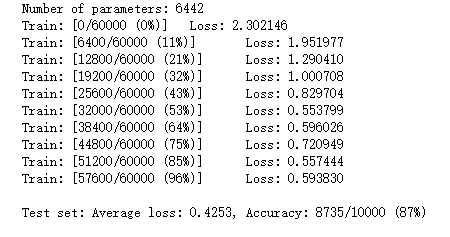
从打乱像素顺序的实验结果来看,全连接网络的性能基本上没有发生变化,但是 卷积神经网络的性能明显下降。
这是因为对于卷积神经网络,会利用像素的局部关系,但是打乱顺序以后,这些像素间的关系将无法得到利用。
2.2 CIFAR10 数据集分类
主要步骤:定义网络——训练模型——测试
def imshow(img):
    plt.figure(figsize=(8,8))
    img = img / 2 + 0.5     # 转换到 [0,1] 之间
    npimg = img.numpy()
    plt.imshow(np.transpose(npimg, (1, 2, 0)))
    plt.show()

# 得到一组图像
images, labels = iter(trainloader).next()
# 展示图像
imshow(torchvision.utils.make_grid(images))
# 展示第一行图像的标签
for j in range(8):
    print(classes[labels[j]])
定义网络,损失函数和优化器:
class Net(nn.Module):
    def __init__(self):
        super(Net, self).__init__()
        self.conv1 = nn.Conv2d(3, 6, 5)
        self.pool = nn.MaxPool2d(2, 2)
        self.conv2 = nn.Conv2d(6, 16, 5)
        self.fc1 = nn.Linear(16 * 5 * 5, 120)
        self.fc2 = nn.Linear(120, 84)
        self.fc3 = nn.Linear(84, 10)

    def forward(self, x):
        x = self.pool(F.relu(self.conv1(x)))
        x = self.pool(F.relu(self.conv2(x)))
        x = x.view(-1, 16 * 5 * 5)
        x = F.relu(self.fc1(x))
        x = F.relu(self.fc2(x))
        x = self.fc3(x)
        return x

# 网络放到GPU上
net = Net().to(device)
criterion = nn.CrossEntropyLoss()
optimizer = optim.Adam(net.parameters(), lr=0.001)
开始训练:
for epoch in range(10):  # 重复多轮训练
    for i, (inputs, labels) in enumerate(trainloader):
        inputs = inputs.to(device)
        labels = labels.to(device)
        # 优化器梯度归零
        optimizer.zero_grad()
        # 正向传播 + 反向传播 + 优化
        outputs = net(inputs)
        loss = criterion(outputs, labels)
        loss.backward()
        optimizer.step()
        # 输出统计信息
        if i % 100 == 0:
            print('Epoch: %d Minibatch: %5d loss: %.3f' %(epoch + 1, i + 1, loss.item()))

print('Finished Training')
correct = 0
total = 0

for data in testloader:
    images, labels = data
    images, labels = images.to(device), labels.to(device)
    outputs = net(images)
    _, predicted = torch.max(outputs.data, 1)
    total += labels.size(0)
    correct += (predicted == labels).sum().item()

print('Accuracy of the network on the 10000 test images: %d %%' % (
    100 * correct / total))
![]()
可以看到准确率为百分之64.
2.3 使用 VGG16 对 CIFAR10 分类
VGG16的网络结构如下图所示:
建立VGG16:
class VGG(nn.Module):
    def __init__(self):
        super(VGG, self).__init__()
        self.cfg = [64, 'M', 128, 'M', 256, 256, 'M', 512, 512, 'M', 512, 512, 'M']
        self.features = self._make_layers(cfg)
        self.classifier = nn.Linear(2048, 10)

    def forward(self, x):
        out = self.features(x)
        out = out.view(out.size(0), -1)
        out = self.classifier(out)
        return out

    def _make_layers(self, cfg):
        layers = []
        in_channels = 3
        for x in cfg:
            if x == 'M':
                layers += [nn.MaxPool2d(kernel_size=2, stride=2)]
            else:
                layers += [nn.Conv2d(in_channels, x, kernel_size=3, padding=1),
                           nn.BatchNorm2d(x),
                           nn.ReLU(inplace=True)]
                in_channels = x
        layers += [nn.AvgPool2d(kernel_size=1, stride=1)]
        return nn.Sequential(*layers)
初始化网络,根据实际需要,修改分类层。因为 tiny-imagenet 是对200类图像分类,这里把输出修改为200。
# 网络放到GPU上
net = VGG().to(device)
criterion = nn.CrossEntropyLoss()
optimizer = optim.Adam(net.parameters(), lr=0.001)
训练代码和之前是完全一样的。
correct = 0
total = 0

for data in testloader:
    images, labels = data
    images, labels = images.to(device), labels.to(device)
    outputs = net(images)
    _, predicted = torch.max(outputs.data, 1)
    total += labels.size(0)
    correct += (predicted == labels).sum().item()

print('Accuracy of the network on the 10000 test images: %.2f %%' % (
    100 * correct / total))
![]()
经过VGG16后,训练结果明显提高许多。(之前为百分之64)
2.4 使用VGG模型迁移学习进行猫狗大战
创建VGG model
model_vgg = models.vgg16(pretrained=True)

with open('./imagenet_class_index.json') as f:
    class_dict = json.load(f)
dic_imagenet = [class_dict[str(i)][1] for i in range(len(class_dict))]

inputs_try , labels_try = inputs_try.to(device), labels_try.to(device)
model_vgg = model_vgg.to(device)

outputs_try = model_vgg(inputs_try)

print(outputs_try)
print(outputs_try.shape)

'''
可以看到结果为5行,1000列的数据,每一列代表对每一种目标识别的结果。
但是我也可以观察到,结果非常奇葩,有负数,有正数,
为了将VGG网络输出的结果转化为对每一类的预测概率,我们把结果输入到 Softmax 函数
'''
m_softm = nn.Softmax(dim=1)
probs = m_softm(outputs_try)
vals_try,pred_try = torch.max(probs,dim=1)

print( 'prob sum: ', torch.sum(probs,1))
print( 'vals_try: ', vals_try)
print( 'pred_try: ', pred_try)

print([dic_imagenet[i] for i in pred_try.data])
imshow(torchvision.utils.make_grid(inputs_try.data.cpu()),
       title=[dset_classes[x] for x in labels_try.data.cpu()])
我们的目标是使用预训练好的模型,因此,需要把最后的 nn.Linear 层由1000类,替换为2类。为了在训练中冻结前面层的参数,需要设置 required_grad=False。这样,反向传播训练梯度时,前面层的权重就不会自动更新了。训练中,只会更新最后一层的参数。
print(model_vgg)

model_vgg_new = model_vgg;

for param in model_vgg_new.parameters():
    param.requires_grad = False
model_vgg_new.classifier._modules['6'] = nn.Linear(4096, 2)
model_vgg_new.classifier._modules['7'] = torch.nn.LogSoftmax(dim = 1)

model_vgg_new = model_vgg_new.to(device)

print(model_vgg_new.classifier)
训练并测试全连接层:
第一步:创建损失函数和优化器

损失函数 NLLLoss() 的 输入 是一个对数概率向量和一个目标标签.
它不会为我们计算对数概率,适合最后一层是log_softmax()的网络.
'''
criterion = nn.NLLLoss()

# 学习率
lr = 0.001

# 随机梯度下降
optimizer_vgg = torch.optim.SGD(model_vgg_new.classifier[6].parameters(),lr = lr)

'''
第二步:训练模型
'''

def train_model(model,dataloader,size,epochs=1,optimizer=None):
    model.train()

    for epoch in range(epochs):
        running_loss = 0.0
        running_corrects = 0
        count = 0
        for inputs,classes in dataloader:
            inputs = inputs.to(device)
            classes = classes.to(device)
            outputs = model(inputs)
            loss = criterion(outputs,classes)
            optimizer = optimizer
            optimizer.zero_grad()
            loss.backward()
            optimizer.step()
            _,preds = torch.max(outputs.data,1)
            # statistics
            running_loss += loss.data.item()
            running_corrects += torch.sum(preds == classes.data)
            count += len(inputs)
            print('Training: No. ', count, ' process ... total: ', size)
        epoch_loss = running_loss / size
        epoch_acc = running_corrects.data.item() / size
        print('Loss: {:.4f} Acc: {:.4f}'.format(
                     epoch_loss, epoch_acc))


# 模型训练
train_model(model_vgg_new,loader_train,size=dset_sizes['train'], epochs=1,
            optimizer=optimizer_vgg)
def test_model(model,dataloader,size):
    model.eval()
    predictions = np.zeros(size)
    all_classes = np.zeros(size)
    all_proba = np.zeros((size,2))
    i = 0
    running_loss = 0.0
    running_corrects = 0
    for inputs,classes in dataloader:
        inputs = inputs.to(device)
        classes = classes.to(device)
        outputs = model(inputs)
        loss = criterion(outputs,classes)
        _,preds = torch.max(outputs.data,1)
        # statistics
        running_loss += loss.data.item()
        running_corrects += torch.sum(preds == classes.data)
        predictions[i:i+len(classes)] = preds.to('cpu').numpy()
        all_classes[i:i+len(classes)] = classes.to('cpu').numpy()
        all_proba[i:i+len(classes),:] = outputs.data.to('cpu').numpy()
        i += len(classes)
        print('Testing: No. ', i, ' process ... total: ', size)
    epoch_loss = running_loss / size
    epoch_acc = running_corrects.data.item() / size
    print('Loss: {:.4f} Acc: {:.4f}'.format(
                     epoch_loss, epoch_acc))
    return predictions, all_proba, all_classes

predictions, all_proba, all_classes = test_model(model_vgg_new,loader_valid,size=dset_sizes['valid'])
6. 可视化模型预测结果(主观分析)
附加(周四会议)
Depthwise卷积与Pointwise卷积
Depthwise(DW)卷积与Pointwise(PW)卷积,合起来被称作Depthwise Separable Convolution(参见Google的Xception),该结构和常规卷积操作类似,可用来提取特征,但相比于常规卷积操作,其参数量和运算成本较低。所以在一些轻量级网络中会碰到这种结构如MobileNet。
常规卷积操作
对于一张5×5像素、三通道彩色输入图片(shape为5×5×3)。经过3×3卷积核的卷积层(假设输出通道数为4,则卷积核shape为3×3×3×4),最终输出4个Feature Map,如果有same padding则尺寸与输入层相同(5×5),如果没有则为尺寸变为3×3。
Depthwise Separable Convolution
Depthwise Separable Convolution是将一个完整的卷积运算分解为两步进行,即Depthwise Convolution与Pointwise Convolution。
Depthwise Convolution
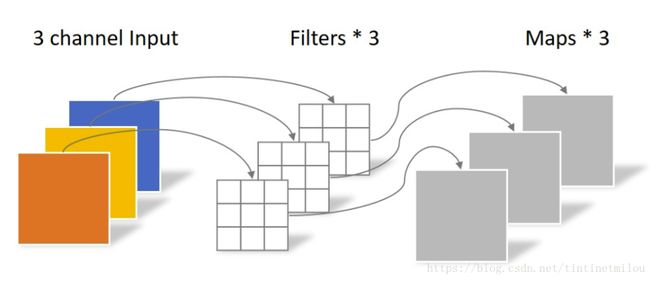
不同于常规卷积操作,Depthwise Convolution的一个卷积核负责一个通道,一个通道只被一个卷积核卷积。上面所提到的常规卷积每个卷积核是同时操作输入图片的每个通道。
同样是对于一张5×5像素、三通道彩色输入图片(shape为5×5×3),Depthwise Convolution首先经过第一次卷积运算,不同于上面的常规卷积,DW完全是在二维平面内进行。卷积核的数量与上一层的通道数相同(通道和卷积核一一对应)。所以一个三通道的图像经过运算后生成了3个Feature map(如果有same padding则尺寸与输入层相同为5×5),如下图所示。
Depthwise Convolution完成后的Feature map数量与输入层的通道数相同,无法扩展Feature map。而且这种运算对输入层的每个通道独立进行卷积运算,没有有效的利用不同通道在相同空间位置上的feature信息。因此需要Pointwise Convolution来将这些Feature map进行组合生成新的Feature map。
Pointwise Convolution
Pointwise Convolution的运算与常规卷积运算非常相似,它的卷积核的尺寸为 1×1×M,M为上一层的通道数。所以这里的卷积运算会将上一步的map在深度方向上进行加权组合,生成新的Feature map。有几个卷积核就有几个输出Feature map。如下图所示。
