SpringCloud认识四之配置中心及服务链路追踪
看到这里必须看过我前面的博客才能继续进行下去。之前,我们已经学习了 SpringCloud 的很多组件,每个组件都创建了一个工程,而每个工程都会有一个配置文件,并且有些配置是一样的。例如:在实际项目中,我们创建了用户和订单两个服务,这两个服务是同一个数据库,那么我们在这两个服务的配置文件都会配置相同的数据源,一旦我们的数据库地址发生改变(只是一种情况),用户和订单两个服务的配置文件都需要改,这还是只是两个服务,在一个大型系统(比如淘宝),将会有成千上万个服务,按照这种方式代价无疑是巨大的。
不过无需担心,正所谓上有政策,下有对策,既然有这个问题,就一定会有解决方案,那就是创建一个配置中心,专门用于管理系统的所有配置,也就是我们将所有配置文件放到统一的地方进行管理。
我们知道,SpringCloud 就是为了简化开发而生的,因此 SpringCloud 为我们集成了配置中心——Spring Cloud Config 组件。
Spring Cloud Config 简介
Spring Cloud Config 是一个高可用的分布式配置中心,它支持将配置存放到内存(本地),也支持将其放到 Git 仓库进行统一管理(本文主要探讨和 Git 的融合)。
创建配置中心
创建配置中心一般分为以下几个步骤:
1.创建 Git 仓库。
请自行百度谢谢。
2.创建配置中心。
在原有工程创建一个 moudle,命名为 config,在 pom.xml 加入配置中心的依赖:
            org.springframework.cloud
            spring-cloud-starter-eureka


            org.springframework.cloud
            spring-cloud-config-server
创建启动类 Application.java:
@SpringBootApplication
@EnableEurekaClient
@EnableConfigServer
public class Application {

    public static void main(String[] args) {
        SpringApplication.run(Application.class,args);
    }
}
注意,要加入
@EnableConfigServer注解,否则配置中心是无法开启的。
创建 application.yml 并增加如下内容:
server:
  port: 8888
spring:
  application:
    name: config
  profiles:
    active: dev
  cloud:
    config:
      server:
        git:
          uri: https://github.com/lynnlovemin/SpringCloudLesson.git #配置git仓库地址
          searchPaths: 第09课/config #配置仓库路径
          username: ****** #访问git仓库的用户名
          password: ****** #访问git仓库的用户密码
      label: master #配置仓库的分支
eureka:
  instance:
    hostname: ${spring.cloud.client.ipAddress}
    instanceId: ${spring.cloud.client.ipAddress}:${server.port}
  client:
    serviceUrl:
      defaultZone: http://localhost:8761/eureka/
注意这里出现了前面课程没有出现过的新配置: eureka.instance.hostname 和 eureka.instance.instanceId,我们可以通过一个测试来看这两个配置的作用。
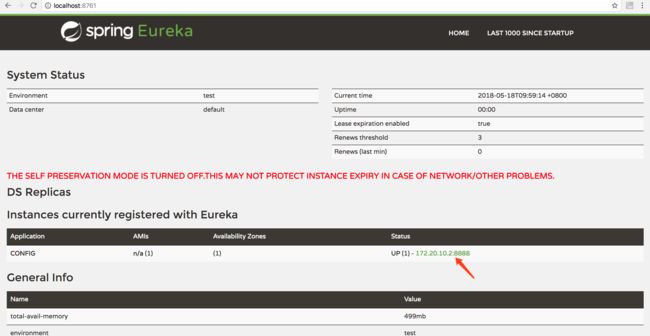
首先分别启动注册中心 eurekaserver 和配置中心 config,浏览器访问:http://localhost:8761,我们可以看到如下界面:
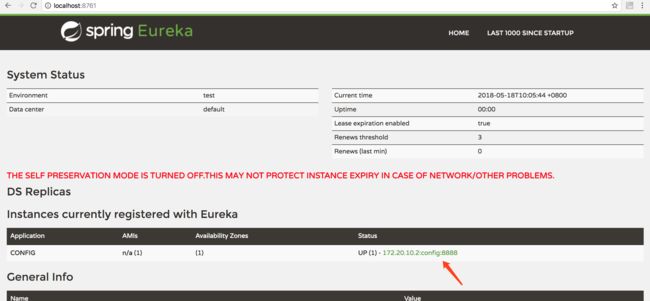
可以看到箭头所指向的位置是以 IP:端口形式呈现的,现在我们去掉这两个配置重新启动配置中心 config,再次访问:http://localhost:8761,可以看到:
由此可见,它默认是以 ip:application_name:端口呈现的。
在实际项目中,建议大家都写成上述配置,否则如果通过 K8S 或 Docker 部署系统,可能会出现问题,具体原因将在第16课提到。
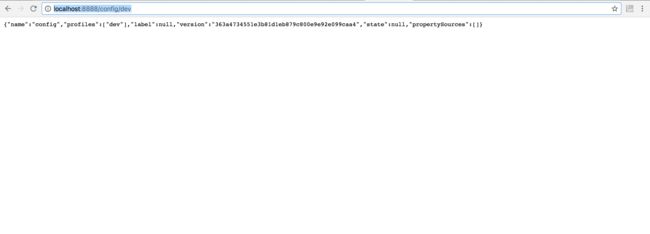
通过上述过程,配置服务中心已经创建完成,启动它并且访问地址:http://localhost:8888/config/dev,即可看到:
3.修改各个服务配置。
我们创建配置中心的目的就是为了方便其他服务进行统一的配置管理,因此,还需要修改各个服务。
以服务提供者 eurekaclient 为例,按照以下步骤进行操作。
在 pom.xml 加入配置中心依赖:
            org.springframework.cloud
            spring-cloud-starter-config
在 resources 下新建 bootstrap.yml 并删除 application.yml(注意:这里不是 application.yml,而是 bootstrap.yml):
spring:
  application:
    name: eurekaclient
  profiles:
    active: dev
  cloud:
    config:
      profile: dev #指定配置环境,配置文件如果是多环境则取名类似:config-dev.yml
      name: eurekaclient #指定配置文件名字(多个配置文件以英文逗号隔开)
      label: master #git仓库分支名
      discovery:
        enabled: true
        serviceId: config #连接的配置中心名字(applicaiton.name)
eureka:
  client:
    serviceUrl:
      defaultZone: http://localhost:8761/eureka/
在配置中心配置的 Git 仓库相应路径下创建配置文件 eurekaclient.yml(本实例为第09课/config):
eureka:
  client:
    serviceUrl:
      defaultZone: http://localhost:8761/eureka/
server:
  port: 8763
spring:
  application:
    name: eurekaclient
我们依次启动注册中心、配置中心和服务提供者 eurekaclient,可以看到 eurekaclient 的监听端口为8763,然后修改 eurekaclient.yml 的 server.port 为8764,重新启动 eurekaclient,可以看到其监听端口为8764,说明 eurekaclient 成功从 Git 上拉取了配置。
配置自动刷新
我们注意到,每次修改配置都需要重新启动服务,配置才会生效,这种做法也比较麻烦,因此我们需要一个机制,每次修改了配置文件,各个服务配置自动生效,Spring Cloud 给我们提供了解决方案。
手动刷新配置
我们先来看看如何通过手动方式刷新配置。
1.在 eurekaclient 工程的 pom.xml 添加依赖:
            org.springframework.boot
            spring-boot-starter-actuator
2.修改远程 Git 仓库的配置文件 eurekaclient.yml:
eureka:
  client:
    serviceUrl:
      defaultZone: http://localhost:8761/eureka/
server:
  port: 8764
spring:
  application:
    name: eurekaclient
management:
  security:
    #关闭安全验证,否则访问refresh端点时会提示权限不足
    enabled: false
3.在 HelloController 类加入 @RefeshScope 依赖:
@RestController
@RefreshScope
public class HelloController {

    @Value("${server.port}")
    private int port;

    @RequestMapping("index")
    public String index(){
        return "Hello World!,端口:"+port;
    }
}
以上步骤就集成了手动刷新配置。下面开始进行测试。
- 依次启动注册中心,配置中心,客户端;
- 访问地址:http://localhost:8763/index,即可看到:

- 修改 Git 仓库远程配置文件 eurekaclient.yml 的端口为8764;
- 重新访问2的地址,我们发现端口未发生改变;
- POST 方式请求地址:http://localhost:8763/refresh,如:
curl -X POST http://localhost:8763/refresh,可以的客户端控制台看到如下日志信息: 说明 refresh 端点已请求配置中心刷新配置。 6.再次访问2的地址,可以看到:
 我们发现端口已发生改变,说明刷新成功!
自动刷新配置
前面我们讲了通过 /refresh 端点手动刷新配置,如果每个微服务的配置都需要我们手动刷新,代价无疑是巨大的。不仅如此,随着系统的不断扩张,维护也越来越麻烦。因此,我们有必要实现自动刷新配置。
自动刷新配置原理
- 利用 Git 仓库的 WebHook,可以设置当有内容 Push 上去后,则通过 HTTP 的 POST 远程请求指定地址。
- 利用消息队列如 RabbitMQ、Kafka 等自动通知到每个微服务(本文以 RabbitMQ 为例讲解)。
实现步骤
下面我们就来实现自动刷新配置。
1.安装 RabbitMQ(安装步骤省略,请自行百度)。
2.在 eurekaclient 加入如下依赖:
            org.springframework.cloud
            spring-cloud-starter-bus-amqp
3.在 bootstrap.yml 添加以下内容:
spring:
    rabbitmq:
        host: localhost
        port: 5672
        username: guest
        password: guest
4.启动注册中心、配置中心和客户端;
5.POST 方式请求:http://localhost:8763/bus/refresh,可以看到配置已被刷新,实际项目中,我们会单独创建一个工程用以刷新配置,请求这个地址后,可以发现所有加入了 RefreshScope 和 actuator 依赖的工程都会被刷新配置。
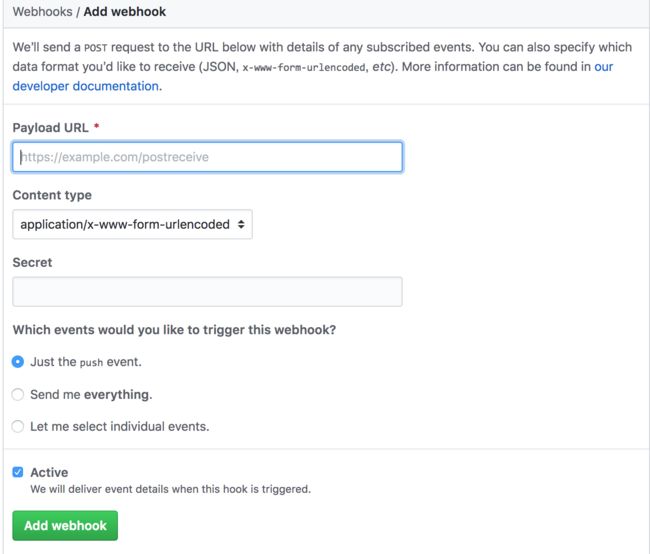
6.利用 Git 的 WebHook,实现自动刷新,如图:
设置好刷新 URL 后,点击提交。以后每次有新的内容被提交后,会自动请求该 URL 实现配置的自动刷新。
其实在上一课我们已经接触过了消息总线,那就是 Spring Cloud Bus,这一课我们将继续深入研究 Spring Cloud Bus 的一些特性。
局部刷新
Spring Cloud Bus 用于实现在集群中传播一些状态变化(例如:配置变化),它常常与 Spring Cloud Config 联合实现热部署。上面我们体验了配置的自动刷新,但每次都会刷新所有微服务,有些时候我们只想刷新部分微服务的配置,这时就需要通过 /bus/refresh 断点的 destination 参数来定位要刷新的应用程序。
它的基本用法如下:
/bus/refresh?destination=application:port
其中,application 为各微服务指定的名字,port 为端口,如果我们要刷新所有指定微服务名字下的配置,则 destination 可以设置为 application:例如:/bus/refresh/destination=eurekaclient:,代表刷新所有名字为 EurekaClient 的微服务配置。
改进架构
在前面的示例中,我们是通过某一个微服务的 /bus/refesh 断点来实现配置刷新,但是这种方式并不优雅,它有以下弊端:
- 破坏了微服务的单一职责原则,微服务客户端理论上应只关注自身业务,而不应该负责配置刷新。
- 破坏了微服务各节点的对等性。
- 有一定的局限性。在微服务迁移时,网络地址时常会发生改变,这时若想自动刷新配置,就不得不修改 Git 仓库的 WebHook 配置。
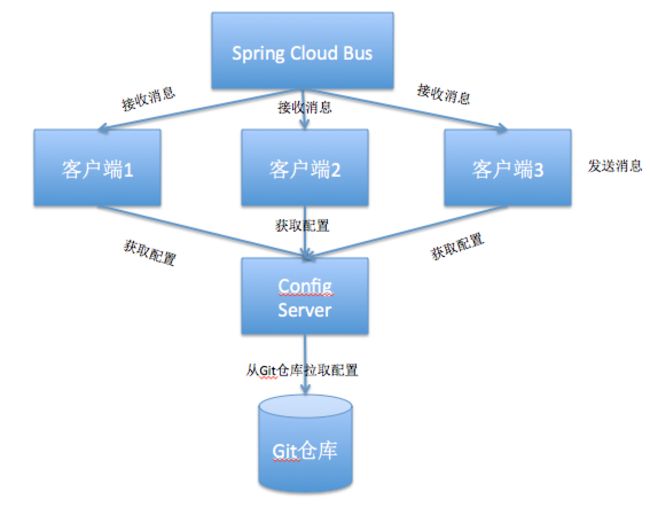
因此,我们应考虑改进架构,将 ConfigServer 也加入到消息总线来,将其 /bus/refresh 用于实现配置的自动刷新。这样,各个微服务节点就只需关注自身业务,无需再承担配置自动刷新的任务。
我们来看看此时的架构图:
注意: 所有需要刷新配置的服务都需要添加以下依赖。
            org.springframework.cloud
            spring-cloud-starter-bus-amqp
并且需要在配置文件设置 rabbitmq 信息:
 spring:
    rabbitmq:
        host: localhost
        port: 5672
        username: guest
        password: guest
消息总线事件
在某些场景下,我们需要知道 Spring Cloud Bus 的事件传播细节,这时就需要跟踪消息总线事件。
要实现跟踪消息总线事件是一件很容易的事情,只需要修改配置文件,如下所示:
server:
  port: 8888
spring:
  application:
    name: config
  profiles:
    active: dev
  cloud:
    bus:
      trace:
        enable: true
    config:
      server:
        git:
          uri: https://github.com/lynnlovemin/SpringCloudLesson.git #配置git仓库地址
          searchPaths: 第09课/config #配置仓库路径
          username: lynnlovemin #访问git仓库的用户名
          password: liyi880301 #访问git仓库的用户密码
      label: master #配置仓库的分支
  rabbitmq:
    host: localhost
    port: 5672
    username: guest
    password: guest
eureka:
  instance:
    hostname: ${spring.cloud.client.ipAddress}
    instanceId: ${spring.cloud.client.ipAddress}:${server.port}
  client:
    serviceUrl:
      defaultZone: http://localhost:8761/eureka/
management:
  security:
    enabled: false
我们将 spring.cloud.trace.enabled 设置为 true 即可,这样我们在 POST 请求 /bus/refresh 后,浏览器访问访问 /trace 端点即可看到如下数据:
[{
    "timestamp": 1527299528556,
    "info": {
        "method": "GET",
        "path": "/eurekaclient/dev/master",
        "headers": {
            "request": {
                "accept": "application/json, application/*+json",
                "user-agent": "Java/1.8.0_40",
                "host": "192.168.31.218:8888",
                "connection": "keep-alive"
            },
            "response": {
                "X-Application-Context": "config:dev:8888",
                "Content-Type": "application/json;charset=UTF-8",
                "Transfer-Encoding": "chunked",
                "Date": "Sat, 26 May 2018 01:52:08 GMT",
                "status": "200"
            }
        },
        "timeTaken": "4200"
    }
}, {
    "timestamp": 1527299524802,
    "info": {
        "method": "POST",
        "path": "/bus/refresh",
        "headers": {
            "request": {
                "host": "localhost:8888",
                "user-agent": "curl/7.54.0",
                "accept": "*/*"
            },
            "response": {
                "X-Application-Context": "config:dev:8888",
                "status": "200"
            }
        },
        "timeTaken": "1081"
    }
}, {
    "timestamp": 1527299497470,
    "info": {
        "method": "GET",
        "path": "/eurekaclient/dev/master",
        "headers": {
            "request": {
                "accept": "application/json, application/*+json",
                "user-agent": "Java/1.8.0_40",
                "host": "192.168.31.218:8888",
                "connection": "keep-alive"
            },
            "response": {
                "X-Application-Context": "config:dev:8888",
                "Content-Type": "application/json;charset=UTF-8",
                "Transfer-Encoding": "chunked",
                "Date": "Sat, 26 May 2018 01:51:37 GMT",
                "status": "200"
            }
        },
        "timeTaken": "2103"
    }
}, {
    "timestamp": 1527299490374,
    "info": {
        "method": "GET",
        "path": "/eurekaclient/dev/master",
        "headers": {
            "request": {
                "accept": "application/json, application/*+json",
                "user-agent": "Java/1.8.0_40",
                "host": "192.168.31.218:8888",
                "connection": "keep-alive"
            },
            "response": {
                "X-Application-Context": "config:dev:8888",
                "Content-Type": "application/json;charset=UTF-8",
                "Transfer-Encoding": "chunked",
                "Date": "Sat, 26 May 2018 01:51:30 GMT",
                "status": "200"
            }
        },
        "timeTaken": "6691"
    }
}]
这样就可以清晰的看到传播细节了。
之前的博客已经教大家使用 Actuator 监控微服务,使用 Hystrix 监控 Hystrix Command。现在,我们来研究微服务链路追踪。
我们知道,微服务之间通过网络进行通信。在我们提供服务的同时,我们不能保证网络一定是畅通的,相反,网络是很脆弱的,网络资源也有限。因此,我们有必要追踪每个网络请求,了解其经过了哪些微服务,延迟多少,每个请求所耗费的时间等。只有这样,我们才能更好的分析系统拼劲,解决系统问题。
下面,我们主要探讨服务追踪组件 Zipkin,SpringCloudSleuth 集成了 Zipkin。
Zipkin 简介
Zipkin 是 Twitter 开源的分布式跟踪系统,基于 Dapper 的论文设计而来。它的主要功能是收集系统的时序数据,从而追踪微服务架构的系统延时等问题。Zipkin 还提供了一个非常友好的界面,便于我们分析追踪数据。
SpringCloudSleuth 简介
通过 SpringCloud 来构建微服务架构,我们可以通过 SpringCloudSleuth 实现分布式追踪,它集成了 Zipkin。
Sleuth 术语
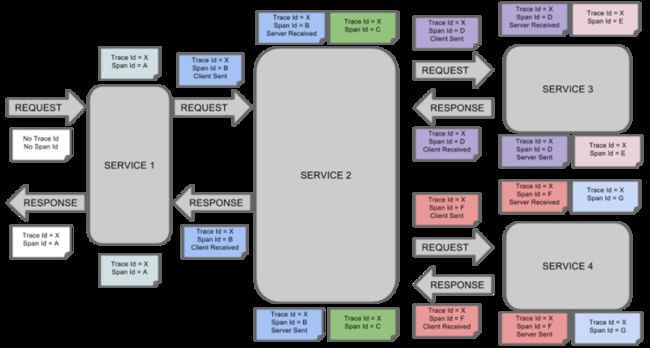
- span(跨度):基本工作单元。例如,在一个新建的 span 中发送一个 RPC 等同于发送一个回应请求给 RPC,span 通过一个64位 ID 唯一标识,trace 以另一个64位 ID 表示,span 还有其他数据信息,比如摘要、时间戳事件、关键值注释(tags)、span 的 ID,以及进度 ID(通常是 IP 地址)。span 在不断的启动和停止,同时记录了时间信息,当你创建了一个 span,你必须在未来的某个时刻停止它。
- trace(追踪):一组共享“root span”的 span 组成的树状结构成为 trace。trace 也用一个64位的 ID 唯一标识,trace中的所有 span 都共享该 trace 的 ID。
- annotation(标注):用来及时记录一个事件的存在,一些核心 annotations 用来定义一个请求的开始和结束。
- cs,即 Client Sent,客户端发起一个请求,这个 annotion 描述了这个 span 的开始。
- sr,即 Server Received,服务端获得请求并准备开始处理它,如果将其 sr 减去 cs 时间戳便可得到网络延迟。
- ss,即 Server Sent,注解表明请求处理的完成(当请求返回客户端),如果 ss 减去 sr 时间戳便可得到服务端需要的处理请求时间。
- cr,即 Client Received,表明 span 的结束,客户端成功接收到服务端的回复,如果 cr 减去 cs 时间戳便可得到客户端从服务端获取回复的所有所需时间。
下图演示了请求依次经过 SERVICE1 -> SERVICE2 -> SERVICE3 -> SERVICE4 时,span、trace、annotation 的变化:
简单的链路追踪实现
(1)在 parent 工程上创建一个子工程:zipkin,在 pom.xml 加入以下依赖:
            io.zipkin.java
            zipkin-autoconfigure-ui


            io.zipkin.java
            zipkin-server
(2)编写启动类 Application.java:
@SpringBootApplication
@EnableZipkinServer
public class Application {

    public static void main(String[] args) {
        SpringApplication.run(Application.class,args);
    }
}
(3)编写配置文件 application.yml:
server:
  port: 9411
(4)启动 Application.java,并访问地址:http://localhost:9411,即可看到如下界面:
单纯集成 zipkinServer 还达不到追踪的目的,我们还必须使我们的微服务客户端集成 Zipkin 才能跟踪微服务,下面是集成步骤。
(1)在 EurekaClient 工程的 pom 文件中添加以下依赖:
            org.springframework.cloud
            spring-cloud-sleuth-zipkin
(2)在 Git 仓库的配置文件 eurekaclient.yml 中添加以下内容:
spring:
    zipkin:
        base-url: http://localhost:9411
    sleuth:
        sampler:
            percentage: 1.0
其中,spring.zipkin.base-url 用来指定 zipkinServer 的地址。spring.sleutch.sampler.percentage 用来指定采样请求的百分比(默认为0.1,即10%)。
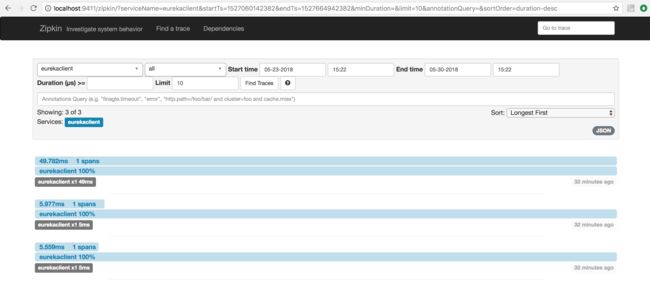
(3)依次启动注册中心、配置中心、Zipkin、eurekaclient,依次访问 http://localhost:8763/index,http://localhost:9411,进入 Zipkin 界面后,点击 Find a trace 按钮,可以看到 trace 列表:
通过消息中间件实现链路追踪
在之前的实例中,我们使用 HTTP 来收集数据,如果 zipkinServer 的网络地址发生了变化,每个微服务的 base-url 都需要改变,因此,我们还可以通过消息队列来收集追踪数据。
我以 RabbitMQ 作为消息中间件进行演示。
(1)改造 Zipkin 工程,将 pom.xml 依赖修改为:
            io.zipkin.java
            zipkin-autoconfigure-ui


            org.springframework.cloud
            spring-cloud-sleuth-zipkin-stream


            org.springframework.cloud
            spring-cloud-starter-sleuth


            org.springframework.cloud
            spring-cloud-stream-binder-rabbit
(2)配置文件加入 RabbitMQ 相关:
pring:
  rabbitmq:
    host: localhost
    port: 5672
    username: guest
    password: guest
(3)改造 EurekaClient,将 pom.xml 依赖改为如下内容:
            org.springframework.cloud
            spring-cloud-starter-eureka


            org.springframework.cloud
            spring-cloud-starter-config


            org.springframework.cloud
            spring-cloud-starter-bus-amqp


            org.springframework.cloud
            spring-cloud-sleuth-stream


            org.springframework.cloud
            spring-cloud-starter-sleuth


            org.springframework.cloud
            spring-cloud-stream-binder-rabbit
(4)Git 仓库的配置文件 EurekaClient 去掉 spring.zipkin.base-url 配置,并添加如下内容:
spring:
  rabbitmq:
    host: localhost
    port: 5672
    username: guest
(5)依次启动相应工程,我们发现依然可以正常跟踪微服务。
存储追踪数据
前面的示例中,ZipkinServer 是默认将数据存储在内存中,一旦 ZipkinServer 重启或发生故障,将会导致历史数据丢失,因此我们需要将跟踪数据保存到硬盘中。
ZipkinServer 支持多种后端数据存储,比如:MySQL、ElasticSearch、Cassandra 等。
我以 MySQL 为例来演示如何将历史数据存储在 MySQL 中。
(1)首先创建一个名为 Zipkin 的数据库,并执行以下脚本:
CREATE TABLE IF NOT EXISTS zipkin_spans (
  `trace_id_high` BIGINT NOT NULL DEFAULT 0 COMMENT 'If non zero, this means the trace uses 128 bit traceIds instead of 64 bit',
  `trace_id` BIGINT NOT NULL,
  `id` BIGINT NOT NULL,
  `name` VARCHAR(255) NOT NULL,
  `parent_id` BIGINT,
  `debug` BIT(1),
  `start_ts` BIGINT COMMENT 'Span.timestamp(): epoch micros used for endTs query and to implement TTL',
  `duration` BIGINT COMMENT 'Span.duration(): micros used for minDuration and maxDuration query'
) ENGINE=InnoDB ROW_FORMAT=COMPRESSED CHARACTER SET=utf8 COLLATE utf8_general_ci;

ALTER TABLE zipkin_spans ADD UNIQUE KEY(`trace_id_high`, `trace_id`, `id`) COMMENT 'ignore insert on duplicate';
ALTER TABLE zipkin_spans ADD INDEX(`trace_id_high`, `trace_id`, `id`) COMMENT 'for joining with zipkin_annotations';
ALTER TABLE zipkin_spans ADD INDEX(`trace_id_high`, `trace_id`) COMMENT 'for getTracesByIds';
ALTER TABLE zipkin_spans ADD INDEX(`name`) COMMENT 'for getTraces and getSpanNames';
ALTER TABLE zipkin_spans ADD INDEX(`start_ts`) COMMENT 'for getTraces ordering and range';

CREATE TABLE IF NOT EXISTS zipkin_annotations (
  `trace_id_high` BIGINT NOT NULL DEFAULT 0 COMMENT 'If non zero, this means the trace uses 128 bit traceIds instead of 64 bit',
  `trace_id` BIGINT NOT NULL COMMENT 'coincides with zipkin_spans.trace_id',
  `span_id` BIGINT NOT NULL COMMENT 'coincides with zipkin_spans.id',
  `a_key` VARCHAR(255) NOT NULL COMMENT 'BinaryAnnotation.key or Annotation.value if type == -1',
  `a_value` BLOB COMMENT 'BinaryAnnotation.value(), which must be smaller than 64KB',
  `a_type` INT NOT NULL COMMENT 'BinaryAnnotation.type() or -1 if Annotation',
  `a_timestamp` BIGINT COMMENT 'Used to implement TTL; Annotation.timestamp or zipkin_spans.timestamp',
  `endpoint_ipv4` INT COMMENT 'Null when Binary/Annotation.endpoint is null',
  `endpoint_ipv6` BINARY(16) COMMENT 'Null when Binary/Annotation.endpoint is null, or no IPv6 address',
  `endpoint_port` SMALLINT COMMENT 'Null when Binary/Annotation.endpoint is null',
  `endpoint_service_name` VARCHAR(255) COMMENT 'Null when Binary/Annotation.endpoint is null'
) ENGINE=InnoDB ROW_FORMAT=COMPRESSED CHARACTER SET=utf8 COLLATE utf8_general_ci;

ALTER TABLE zipkin_annotations ADD UNIQUE KEY(`trace_id_high`, `trace_id`, `span_id`, `a_key`, `a_timestamp`) COMMENT 'Ignore insert on duplicate';
ALTER TABLE zipkin_annotations ADD INDEX(`trace_id_high`, `trace_id`, `span_id`) COMMENT 'for joining with zipkin_spans';
ALTER TABLE zipkin_annotations ADD INDEX(`trace_id_high`, `trace_id`) COMMENT 'for getTraces/ByIds';
ALTER TABLE zipkin_annotations ADD INDEX(`endpoint_service_name`) COMMENT 'for getTraces and getServiceNames';
ALTER TABLE zipkin_annotations ADD INDEX(`a_type`) COMMENT 'for getTraces';
ALTER TABLE zipkin_annotations ADD INDEX(`a_key`) COMMENT 'for getTraces';

CREATE TABLE IF NOT EXISTS zipkin_dependencies (
  `day` DATE NOT NULL,
  `parent` VARCHAR(255) NOT NULL,
  `child` VARCHAR(255) NOT NULL,
  `call_count` BIGINT
) ENGINE=InnoDB ROW_FORMAT=COMPRESSED CHARACTER SET=utf8 COLLATE utf8_general_ci;

ALTER TABLE zipkin_dependencies ADD UNIQUE KEY(`day`, `parent`, `child`);
(2)改造 Zipkin 工程并添加以下依赖:
            io.zipkin.java
            zipkin-storage-mysql
            2.4.9


            org.springframework.boot
            spring-boot-starter-jdbc


            mysql
            mysql-connector-java
(3)在 application.yaml 增加如下配置:
zipkin:
  storage:
    type: mysql
spring:
  datasource:
    url: jdbc:mysql://localhost:3306/zipkin?autoReconnect=true
    username: root
    password: ******
    driverClassName: com.mysql.jdbc.Driver
(4)修改 Application.java:
@SpringBootApplication
@EnableZipkinStreamServer
public class Application {

    public static void main(String[] args) {
        SpringApplication.run(Application.class,args);
    }

    @Bean
    @Primary
    public MySQLStorage mySQLStorage(DataSource datasource) {
        return MySQLStorage.builder().datasource(datasource).executor(Runnable::run).build();
    }
}
(5)启动测试,查看 Zipkin 数据库,发现已经生成了数据,并重启 Zipkin 工程,继续查询,发现仍可查询历史数据。
