SpringCloud 使用Fegin实现客户端负载均衡
fegin基于Netflix Fegin实现,整合了ribbon+Hystrix,是做为客户端负载均衡的一个插件,它比ribbon更加简洁,不用拼写那么长的url和参数,它自身是一个声明式的伪http客户端,写起来更加思路清晰和方便,通过对接口的注解,使得调用接口就像调用方法一样简单。
1,创建配置fegin模块
使用fegin之前,需要先创建一个Eureka Server,再加两个client,做为fegin转发请求的客户端。
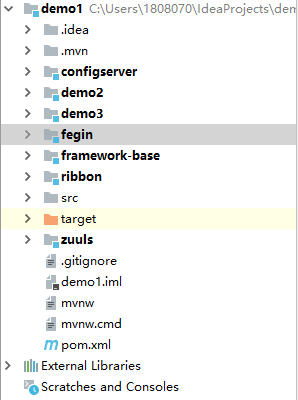
创建springboot项目,取名fegin,结构如下:

其中,demo1(Eureka Server),demo2(client),demo3(client),fegin是要用到的部分
pom.xml中引入相关依赖
            org.springframework.boot
            spring-boot-starter-web


            org.springframework.cloud
            spring-cloud-starter-netflix-eureka-client


            org.springframework.cloud
            spring-cloud-starter-openfeign


            org.springframework.boot
            spring-boot-starter-test
            test
打开fegin的application.properties进行配置
server.port=8702
#设置服务名
spring.application.name=fegin
#设置服务注册中心的URL,本服务要向该服务注册中心注册自己
eureka.client.serviceUrl.defaultZone= http://localhost:8080/eureka
启动类添加注解
@EnableFeignClients 启用fegin功能
@EnableEurekaClient 启用服务注册客户端功能
@EnableFeignClients
@EnableEurekaClient
@SpringBootApplication
public class FeginApplication {

    public static void main(String[] args) {
        SpringApplication.run(FeginApplication.class, args);
    }
}
创建service:FeginClients
添加注解:@FeignClient(value=“client-A”) 使用ribbon进行负载,应用服务名称是client-A,demo2,3服务名称都是client-A;
创建两个测试接口,带参数和不带参数的
@FeignClient(value="client-A")
public interface FeignClients {
    @RequestMapping(value = "/hello")
    public String hello();
    @RequestMapping(value = "/hello2")
    public String hello(@RequestParam("name") String name);
}
创建接口调用FeginController
@RestController
public class FeginController {

    @Resource
    FeignClients feignClients;
    @RequestMapping("/hello")
    public String hello() {
        return feignClients.hello();
    }
    @RequestMapping("/hello2")
    public String hello2(@RequestParam("name") String name) {
        return feignClients.hello(name);
    }
}
2,client创建测试接口
demo2添加代码:
   @RequestMapping("/hello")
    public String hello(HttpServletRequest request) {
       return "demo2";
    }
    @RequestMapping("/hello2")
    public String hello(HttpServletRequest request,@RequestParam String name) {
        return "demo2+"+name;
    }
demo3添加代码:
    @RequestMapping("/hello")
    public String hello(HttpServletRequest request) {
       return "demo3";
    }
    @RequestMapping("/hello2")
    public String hello(HttpServletRequest request,@RequestParam String name) {
        return "demo3+"+name;
    }
3,测试
依次启动demo1,fegin,demo2,demo3
输入http://localhost:8080,degin和两台client都已经注册上

分别输入http://localhost:8702/hello 和http://localhost:8702/hello2?name=123进行刷新测试


说明fegin客户端负载已经成功。