Java的GridBagLayout布局
1、写在干货前面的话
这里是我个人的一些感想,如果大家赶时间的可以跳过,直接阅读第二段。之所以一直写技术博客,是想把自己在学习中的感悟写出来,希望对大家有所帮助,毕竟不同的思维碰撞往往会产生意想不到的火花。我个人在学习的过程往往是先学习官方的资料,再去网上阅读别人写的博客,这样往往会加深自己对知识点的感悟,毕竟网上的大神很多,我能从大神的思想上得到启发。
就像GridBagLayout布局,我个人认为它是Java很重要很实用的布局,但是API文档的介绍让人头皮发麻,我强行看了两遍才梳明白,接下来我会尽量简单的把GridBagLayout布局的使用方法讲清楚,希望对大家有帮助。
2 、GridBagLayout类的介绍
GridBagLayout类是一个灵活的布局管理器,GridBagLayout类的对象维持一个动态的矩形单元网格,然后我们可以把组件放进一个或多个矩形单元网格,组件大就多放几个,组件小就少放几个。
而每个组件,要占几个网格单元,每个组件要占领的位置在哪等等,都是要用GridBagConstraints类的对象来设置。
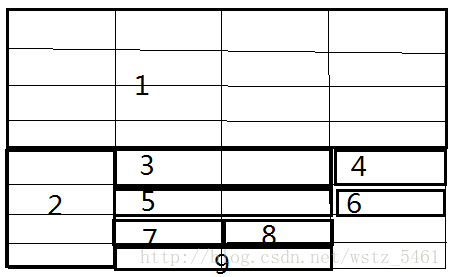
1,比如说我们要完成这么一个界面设计

2,我们可以把整个界面分成一个个小网格单元

3,根据界面中组件的大小和位置的不同,让组件去分别占用不同数量和不同位置的单元网格。

组件占用网格的数量和位置都是利用GridBagConstraints类的对象来设置。
比如说组件1的位置是(0,0),(位置是指组件的左上角),占用了4行4列的表格,组件5的位置是(5,1),占用了1行2列的表格。
下面给出针对于组件1和组件5的设置,完整的登录界面代码和注释我会放在最后面,完整代码有点长哈哈哈。
/*
         * 窗体的基本设置
         */
        JFrame jf=new JFrame();
        jf.setSize(450,300);
        jf.setLocationRelativeTo(null);
        jf.setDefaultCloseOperation(3);
        jf.setResizable(false);

ImageIcon imageQQ =new ImageIcon(this.getClass().getResource("QQ面板.png"));
        JLabel component1=new JLabel(imageQQ);
        //组件1 是界面上的QQ蓝色面板图像,图像我们把它放在JLabel类对象上
         JTextField component5=new JTextField();
        //组件5是用户的密码输入框
        GridBagLayout gridBagLayout=new GridBagLayout(); //实例化布局对象
        jf.setLayout(gridBagLayout);                     //jf窗体对象设置为GridBagLayout布局
        GridBagConstraints gridBagConstraints=new GridBagConstraints();//实例化这个对象用来对组件进行管理
        gridBagConstraints.fill=GridBagConstraints.BOTH;//该方法是为了设置如果组件所在的区域比组件本身要大时的显示情况
        //NONE:不调整组件大小。
        //HORIZONTAL:加宽组件,使它在水平方向上填满其显示区域,但是不改变高度。
        //VERTICAL:加高组件,使它在垂直方向上填满其显示区域,但是不改变宽度。
        //BOTH:使组件完全填满其显示区域。
        //组件1(gridx,gridy)组件的左上角坐标,gridwidth,gridheight:组件占用的网格行数和列数
        gridBagConstraints.gridx=0;
        gridBagConstraints.gridy=0;
        gridBagConstraints.gridwidth=4;
        gridBagConstraints.gridheight=4;
        gridBagLayout.setConstraints(component1, gridBagConstraints);
        //对组件5进行设置
        gridBagConstraints.gridx=1;
        gridBagConstraints.gridy=5;
        gridBagConstraints.gridwidth=2;
        gridBagConstraints.gridheight=1;
        gridBagLayout.setConstraints(component5, gridBagConstraints);
        //把设置好的组件放进窗体
        jf.add(component1);
        jf.add(component5);
        jf.setVisible(true);
我觉得这就是GridBagLayout布局的思想,根据界面上组件的大小和位置的不同,让组件分别去占用不同数量的不同位置的单元网格。
3、代码和注释
代码我已经测试过了,完全可以运行大家放心,哈哈哈。要是大家觉得看的还顺,就帮我点个赞哈。
import java.awt.GridBagConstraints;
import java.awt.GridBagLayout;
import javax.swing.ImageIcon;
import javax.swing.JButton;
import javax.swing.JCheckBox;
import javax.swing.JFrame;
import javax.swing.JLabel;
import javax.swing.JTextField;


public class UI {
    public static void main(String args[]){
        UI ui=new UI();
        ui.show();
    }
    public void show(){
        /*
         * 窗体的基本设置
         */
        JFrame jf=new JFrame();
        jf.setSize(450,300);
        jf.setLocationRelativeTo(null);
        jf.setDefaultCloseOperation(3);
        jf.setResizable(false);
        /*
         * 生成窗体中的各种组件
         */
        ImageIcon imageQQ =new ImageIcon(this.getClass().getResource("QQ面板.png"));
        JLabel component1=new JLabel(imageQQ);
        //组件1 是界面上的QQ蓝色面板图像,图像我们把它放在JLabel类对象上
        ImageIcon imageqq =new ImageIcon(this.getClass().getResource("QQ头像.png"));
        JLabel component2=new JLabel(imageqq);
        //组件2 是界面上的QQ企鹅图像,同理图像我们把它放在JLabel类对象上
        JTextField component3=new JTextField();
        //组件3是用户的账号输入框
        JLabel component4=new JLabel("用户账号");
        //组件4是用户的账号输入框右边的提示标签
        JTextField component5=new JTextField();
        //组件5是用户的密码输入框
        JLabel component6=new JLabel("用户密码");
        //组件6是用户的密码输入框右边的提示标签
        JCheckBox component7=new JCheckBox("记住密码");
        //组件7是用户的“记住密码”的勾选键
        JCheckBox component8=new JCheckBox("自动登录");
        //组件8是用户的“自动登录”的勾选键
        JButton component9=new JButton("安全登录");
        //组件8是用户的“安全登录”的按键
        /*
         * 对窗体进行布局
         */
        GridBagLayout gridBagLayout=new GridBagLayout(); //实例化布局对象
        jf.setLayout(gridBagLayout);                     //jf窗体对象设置为GridBagLayout布局
        GridBagConstraints gridBagConstraints=new GridBagConstraints();//实例化这个对象用来对组件进行管理
        gridBagConstraints.fill=GridBagConstraints.BOTH;//该方法是为了设置如果组件所在的区域比组件本身要大时的显示情况
        //NONE:不调整组件大小。
        //HORIZONTAL:加宽组件,使它在水平方向上填满其显示区域,但是不改变高度。
        //VERTICAL:加高组件,使它在垂直方向上填满其显示区域,但是不改变宽度。
        //BOTH:使组件完全填满其显示区域。
        /*
         * 分别对组件进行设置
         */
        //组件1(gridx,gridy)组件的左上角坐标,gridwidth,gridheight:组件占用的网格行数和列数
        gridBagConstraints.gridx=0;
        gridBagConstraints.gridy=0;
        gridBagConstraints.gridwidth=4;
        gridBagConstraints.gridheight=4;
        gridBagLayout.setConstraints(component1, gridBagConstraints);
        //组件2
        gridBagConstraints.gridx=0;
        gridBagConstraints.gridy=4;
        gridBagConstraints.gridwidth=1;
        gridBagConstraints.gridheight=4;
        gridBagLayout.setConstraints(component2, gridBagConstraints);

        gridBagConstraints.gridx=1;
        gridBagConstraints.gridy=4;
        gridBagConstraints.gridwidth=2;
        gridBagConstraints.gridheight=1;
        gridBagLayout.setConstraints(component3, gridBagConstraints);

        gridBagConstraints.gridx=3;
        gridBagConstraints.gridy=4;
        gridBagConstraints.gridwidth=1;
        gridBagConstraints.gridheight=1;
        gridBagLayout.setConstraints(component4, gridBagConstraints);

        gridBagConstraints.gridx=1;
        gridBagConstraints.gridy=5;
        gridBagConstraints.gridwidth=2;
        gridBagConstraints.gridheight=1;
        gridBagLayout.setConstraints(component5, gridBagConstraints);

        gridBagConstraints.gridx=3;
        gridBagConstraints.gridy=5;
        gridBagConstraints.gridwidth=2;
        gridBagConstraints.gridheight=1;
        gridBagLayout.setConstraints(component6, gridBagConstraints);

        gridBagConstraints.gridx=1;
        gridBagConstraints.gridy=6;
        gridBagConstraints.gridwidth=1;
        gridBagConstraints.gridheight=1;
        gridBagLayout.setConstraints(component7, gridBagConstraints);

        gridBagConstraints.gridx=2;
        gridBagConstraints.gridy=6;
        gridBagConstraints.gridwidth=1;
        gridBagConstraints.gridheight=1;
        gridBagLayout.setConstraints(component8, gridBagConstraints);

        gridBagConstraints.gridx=1;
        gridBagConstraints.gridy=7;
        gridBagConstraints.gridwidth=2;
        gridBagConstraints.gridheight=1;
        gridBagLayout.setConstraints(component9, gridBagConstraints);
        /*
         * 把所有组件加入jf窗体对象中去
         */
        jf.add(component1);
        jf.add(component2);
        jf.add(component3);
        jf.add(component4);
        jf.add(component5);
        jf.add(component6);
        jf.add(component7);
        jf.add(component8);
        jf.add(component9);

        jf.setVisible(true);
    }
}