UIGestureRecognizer(基础)
UIGestureRecognizer(基础)
UIGestureRecognizer(进阶)
UIGestureRecognizer(高级)
1 UIGestureRecognizer
手势识别器是识别用户在界面的触摸响应,它能帮助我们更好的响应用户的触摸行为,实现更好的交互效果。如一个按钮的点击,就是一个手势响应。手势的核心是UIGestureRecognizer,它是具体手势识别器的一个抽象基类。它的工作原理如图所示。
从图中我们可以看出:
- 当用户在myView界面触摸时,通知手势识别器myGestureRecognizer;
- 手势识别器接受到手势通知后,通过我们预先添加的响应链通知类myViewController的方法respondToGesture;
- myViewController的respondToGesture方法体接受到手势通知后执行我们相应执行的业务。
在UITapGestureRecognizer中有如下几个子类,也是我们常用的手势识别器。
| UIGestureRecognizer | 基类 |
|---|---|
| UITapGestureRecognizer | 点击响应 |
| UIPinchGestureRecognizer | 缩放响应 |
| UIRotationGestureRecognizer | 旋转响应 |
| UISwipeGestureRecognizer | 固定方向滑动响应 |
| UIPanGestureRecognizer | 边缘滑动响应 |
| UIScreenEdgePanGestureRecognizer | 滑动响应 |
| UILongPressGestureRecognizer | 长点击响应 |
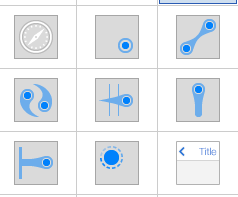
在StoryBoard控件处你可以看见这些控件。
打开UITapGestureRecognizer类,你会看到如下的通用方法和属性,这里我们只介绍其中比较重要的。
- (instancetype)initWithTarget:(nullable id)target action:(nullable SEL)action:初始化时,并添加响应的VC和方法体。如
UITapGestureRecognizer *tapGR = [[UITapGestureRecognizer alloc] initWithTarget:self action:@selector(tapAction:)];- (void)addTarget:(id)target action:(SEL)action;:初始化后添加,可以同时添加多个响应的target和action。- (void)removeTarget:(nullable id)target action:(nullable SEL)action;: 删除响应的target和action。
[gr addTarget:self action:@selector(tapAction:)];
[gr removeTarget:self action:@selector(tapAction:)];
@property(nonatomic,readonly) UIGestureRecognizerState state: 手势的枚举状态,可以在回调方法中判断当前手势的状态。
typedef NS_ENUM(NSInteger, UIGestureRecognizerState) {
    UIGestureRecognizerStatePossible,   // 准备手势响应
    UIGestureRecognizerStateBegan,      // 开始手势响应
    UIGestureRecognizerStateChanged,    // 手势响应持续中,如旋转手势的连续旋转
    UIGestureRecognizerStateEnded,      // 手势响应结束
    UIGestureRecognizerStateCancelled,  // 手势响应取消
    UIGestureRecognizerStateFailed,     // 手势响应丢弃,如旋转手势识别器接受到一个缩放手势,则会不响应则个手势,将其通过手势链向下抛。
    UIGestureRecognizerStateRecognized = UIGestureRecognizerStateEnded // 手势已响应
};
它们的运作方式如下图所示
这里运用到了COR设计模式,在IOS的界面,苹果公司运用了大量的COR模式。如果你不知道什么是COR,可以阅读我的另一篇博文《23设计模式之责任链模式 (COR)》
@property(nullable,nonatomic,weak) id:手势的代理,你可以通过它监听手势的每一个细微的变化。delegate @property(nonatomic, getter=isEnabled) BOOL enabled: 开启还是关闭手势响应,默认开启YES;@property(nullable, nonatomic,readonly) UIView *view:手势控制的View,给View添加和删除手势识别器的方法如下:
[self.view addGestureRecognizer:gr];    // 添加
[self.view removeGestureRecognizer:gr]; // 删除
- (void)requireGestureRecognizerToFail:(UIGestureRecognizer *)otherGestureRecognizer:当otherGestureRecognizer的手势响应跳过时才执行当前手势的响应。- (NSUInteger)numberOfTouches: 用户触摸的手指数。
2 项目准备
2.1 创建项目
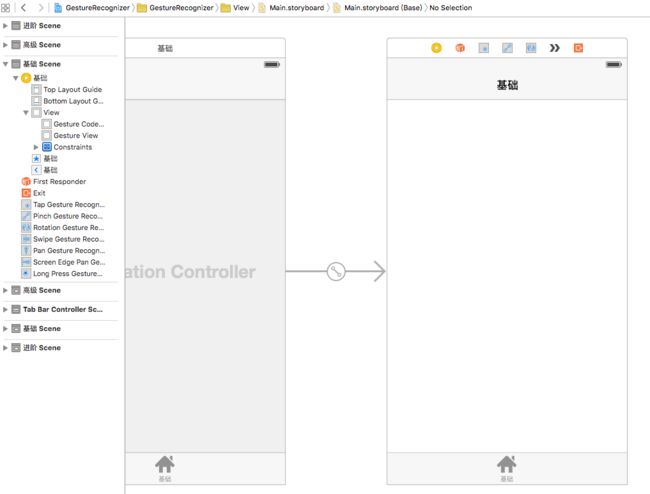
创建一个单一项目GestureRecognizer
这里我使用了两个View,一个是界面直接拉去手势识别器的gestureView,一个是通过代码添加手势识别器的gestureCodeView。当然你不一定要跟我一样,在这里我还使用了tab控件,是为了讲解进阶和高级做准备的。两个View和最底层的View最好使用不同的颜色做区分,有助于提示你,你正在那个界面做手势操作。
2.2 核心类
我们使用的核心类是BaseVC。下面是核心代码。
//
//  BaseVC.m
//  GestureRecognizer
//
//  Created by yangjun on 15/11/8.
//  Copyright © 2015年 六月. All rights reserved.
//

#import "BaseVC.h"

@interface BaseVC ()

@property (weak, nonatomic) IBOutlet UIView *gestureView;     ///< 手势界面(视图添加)
@property (weak, nonatomic) IBOutlet UIView *gestureCodeView; ///< 手势界面(代码添加)

@end

@implementation BaseVC

- (void)viewDidLoad {
    [super viewDidLoad];

    BOOL codeHidden = NO; // YES视图测试,NO代码测试
    self.gestureView.hidden = !codeHidden;
    self.gestureCodeView.hidden = codeHidden;
    self.gestureCodeView.userInteractionEnabled = YES; // 开启手势响应

}

@end
在BaseVC中,我们通过View的hidden控制当前是做视图添加的手势测试还是代码添加的手势测试。将BaseVC和视图连接起来后,运行项目。
3 UITapGestureRecognizer
UITapGestureRecognizer是单点击的手势识别器,你也可以理解为短点击手势识别器,如UIButton的点击响应。
在UITapGestureRecognizer中有如下属性。
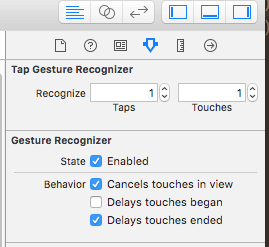
@property (nonatomic) NSUInteger numberOfTapsRequired: 用户点击的次数,默认为1;@property (nonatomic) NSUInteger numberOfTouchesRequired __TVOS_PROHIBITED:用户使用的手指数,默认1;
使用视图添加手势后,你可以通过设置栏设置相关属性。
在代码中添加方法体,然后连接运行即可看见效果。
#pragma mark UITapGestureRecognizer 点击
- (IBAction)tapAction:(UITapGestureRecognizer *)sender {
    NSLog(@"%@", NSStringFromSelector(_cmd));
    NSLog(@"点击数:%lu; 手指数:%lu", (unsigned long)sender.numberOfTapsRequired, (unsigned long)sender.numberOfTouchesRequired);
    CGPoint location = [sender locationInView:self.view];
    NSLog(@"点击的位置:%@", NSStringFromCGPoint(location));
}
当然你也可以直接在viewDidLoad方法中代码添加UITapGestureRecognizer。
//UITapGestureRecognizer 短点击
UITapGestureRecognizer *tapGR = [[UITapGestureRecognizer alloc] initWithTarget:self action:@selector(tapAction:)];// 初始化指定回调target和方法action
tapGR.numberOfTapsRequired = 1; // 手指连续点击的次数,默认1
tapGR.numberOfTouchesRequired = 1; // 有几个手指点击,默认1
[self.gestureCodeView addGestureRecognizer:tapGR];
你只需修改codeHidden的值即可切换storyboard测试还是代码测试。为节约篇幅,以后会直接显示相应的方法体和代码添加手势的相关代码。
4 UILongPressGestureRecognizer
与短点击相对应的还有长点击手势UILongPressGestureRecognizer。
在UILongPressGestureRecognizer中有如下属性。
@property (nonatomic) NSUInteger numberOfTapsRequired: 长点击响应前点击次数,默认0;@property (nonatomic) NSUInteger numberOfTouchesRequired __TVOS_PROHIBITED: 用户触摸的手指数,默认1;@property (nonatomic) CFTimeInterval minimumPressDuration: 长按最低时间,默认0.5秒;@property (nonatomic) CGFloat allowableMovement: 手指长按期间可移动的区域,默认10像素。
使用视图添加手势后,你可以通过设置栏设置相关属性。
相关代码如下。
// UILongPressGestureRecognizer长点击
UILongPressGestureRecognizer *longPressGR = [[UILongPressGestureRecognizer alloc] initWithTarget:self action:@selector(longPressAction:)];
longPressGR.numberOfTapsRequired = 1; // 长点击点击次数,默认0
longPressGR.numberOfTouchesRequired = 1; // 手指数,默认1
longPressGR.minimumPressDuration = 0.5; // 长按最低时间,默认0.5秒
longPressGR.allowableMovement = 10; // 手指长按时可移动的区域,默认10像素
[self.gestureCodeView addGestureRecognizer:longPressGR];

#pragma mark UILongPressGestureRecognizer长点击
- (IBAction)longPressAction:(UILongPressGestureRecognizer *)sender {
    NSLog(@"%@", NSStringFromSelector(_cmd));
}
5 UIPinchGestureRecognizer
UIPinchGestureRecognizer主要用于捏合操作,在app中主要用它缩放视图,如缩放照片。
在UIPinchGestureRecognizer中有如下属性。
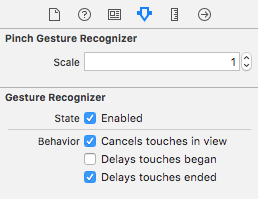
@property (nonatomic) CGFloat scale:缩放的比例,默认为1;@property (nonatomic,readonly) CGFloat velocity:缩放的速度,放大为+,缩小为-。
设置栏:
相关代码:
// UIPinchGestureRecognizer缩放
UIPinchGestureRecognizer *pinchGR = [[UIPinchGestureRecognizer alloc] initWithTarget:self action:@selector(pinchAction:)];
[self.gestureCodeView addGestureRecognizer:pinchGR];

#pragma mark UIPinchGestureRecognizer 缩放
- (IBAction)pinchAction:(UIPinchGestureRecognizer *)sender {
    NSLog(@"%@", NSStringFromSelector(_cmd));
    // 放大+;缩小-
    NSLog(@"缩放比例:%f; 缩放速度:%f", sender.scale, sender.velocity);
}
6 UIRotationGestureRecognizer
UIRotationGestureRecognizer主要用于旋转视图。
在UIRotationGestureRecognizer中有如下属性。
@property (nonatomic) CGFloat rotation:旋转的角度,顺时针为+,逆时针为-,180度为#define M_PI 3.14159265358979323846264338327950288;@property (nonatomic,readonly) CGFloat velocity:旋转的角速度,顺时针为+,逆时针为-;
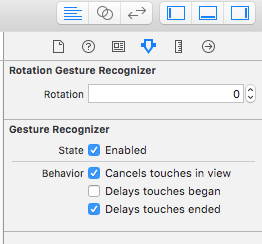
设置栏
相关代码
// UIRotationGestureRecognizer旋转
UIRotationGestureRecognizer *rotationGR = [[UIRotationGestureRecognizer alloc] initWithTarget:self action:@selector(rotationAction:)];
[self.gestureCodeView addGestureRecognizer:rotationGR];

#pragma mark UIRotationGestureRecognizer 旋转
- (IBAction)rotationAction:(UIRotationGestureRecognizer *)sender {
    NSLog(@"%@", NSStringFromSelector(_cmd));
    // 顺时针+;逆时针-
    NSLog(@"旋转角度:%f; 旋转速度:%f", sender.rotation, sender.velocity);
}
7 UISwipeGestureRecognizer
UISwipeGestureRecognizer是滑动手势,它可以监听上下左右的滑动。在实际应用中,它更多的是帮助用户滑动切换视图。
在UISwipeGestureRecognizer中有如下属性。
@property(nonatomic) NSUInteger numberOfTouchesRequired:用户触摸的手指数。@property(nonatomic) UISwipeGestureRecognizerDirection direction: 滑动的方向,是一个枚举。枚举中有四个方向。
typedef NS_OPTIONS(NSUInteger, UISwipeGestureRecognizerDirection) {
    UISwipeGestureRecognizerDirectionRight = 1 << 0, // 向右滑
    UISwipeGestureRecognizerDirectionLeft  = 1 << 1, // 向左滑
    UISwipeGestureRecognizerDirectionUp    = 1 << 2, // 向上滑
    UISwipeGestureRecognizerDirectionDown  = 1 << 3  // 向下滑
};
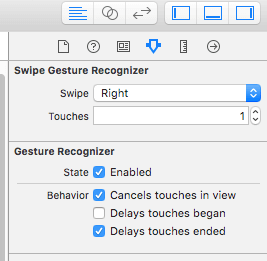
使用视图添加手势后,你也可以通过设置栏设置相关属性。
相关代码。
// UISwipeGestureRecognizer 固定方向滑动
UISwipeGestureRecognizer *swipeGR = [[UISwipeGestureRecognizer alloc] initWithTarget:self action:@selector(swipeAction:)];
swipeGR.numberOfTouchesRequired = 1; // 手指数,默认1
swipeGR.direction = UISwipeGestureRecognizerDirectionLeft | UISwipeGestureRecognizerDirectionRight; // 手势响应
[self.gestureCodeView addGestureRecognizer:swipeGR];

#pragma mark UISwipeGestureRecognizer 固定方向滑动
- (IBAction)swipeAction:(UISwipeGestureRecognizer *)sender {
    NSLog(@"%@", NSStringFromSelector(_cmd));
    NSLog(@"手指数:%ld", (unsigned long)sender.numberOfTouchesRequired);
    switch (sender.direction) {
        case UISwipeGestureRecognizerDirectionRight:
            NSLog(@"向右滑");
            break;
        case UISwipeGestureRecognizerDirectionLeft:
            NSLog(@"向左滑");
            break;
        case UISwipeGestureRecognizerDirectionUp:
            NSLog(@"向上滑");
            break;
        case UISwipeGestureRecognizerDirectionDown:
            NSLog(@"向下滑");
            break;
    }
}
你可以使用一个手势监听多个方向,如同时监听向左和向右使用
swipeGR.direction = UISwipeGestureRecognizerDirectionLeft | UISwipeGestureRecognizerDirectionRight;
8 UIScreenEdgePanGestureRecognizer
UIScreenEdgePanGestureRecognizer边缘滑动,就是在屏幕边缘滑动的手势响应。屏幕顶端向下划出的通知栏。
在UIScreenEdgePanGestureRecognizer中的属性。
@property (readwrite, nonatomic, assign) UIRectEdge edges:
typedef NS_OPTIONS(NSUInteger, UIRectEdge) {
    UIRectEdgeNone   = 0,
    UIRectEdgeTop    = 1 << 0,
    UIRectEdgeLeft   = 1 << 1,
    UIRectEdgeBottom = 1 << 2,
    UIRectEdgeRight  = 1 << 3,
    UIRectEdgeAll    = UIRectEdgeTop | UIRectEdgeLeft | UIRectEdgeBottom | UIRectEdgeRight
}
你可以使用UIRectEdgeAll监听全部,你还可以自动组装监听如
UIRectEdgeTop | UIRectEdgeLeft
设置栏
相关代码
// UIScreenEdgePanGestureRecognizer 边缘滑动
UIScreenEdgePanGestureRecognizer *screenEdgePanGR = [[UIScreenEdgePanGestureRecognizer alloc] initWithTarget:self action:@selector(screenEdgePanAction:)];
screenEdgePanGR.edges = UIRectEdgeAll; // 所有方向
[self.gestureCodeView addGestureRecognizer:screenEdgePanGR];

#pragma mark UIScreenEdgePanGestureRecognizer 边缘滑动
- (IBAction)screenEdgePanAction:(UIScreenEdgePanGestureRecognizer *)sender {
    NSLog(@"%@", NSStringFromSelector(_cmd));
    switch (sender.edges) {
        case UIRectEdgeNone:
            NSLog(@"无边缘");
            break;
        case UIRectEdgeTop:
            NSLog(@"上边缘");
            break;
        case UIRectEdgeLeft:
            NSLog(@"左边缘");
            break;
        case UIRectEdgeBottom:
            NSLog(@"下边缘");
            break;
        case UIRectEdgeRight:
            NSLog(@"右边缘");
            break;
        case UIRectEdgeAll:
            NSLog(@"UIRectEdgeTop | UIRectEdgeLeft | UIRectEdgeBottom | UIRectEdgeRight");
            break;
    }
}
9 UIPanGestureRecognizer
UIPanGestureRecognizer为平滑手势,只要是你的手指在屏幕上滑动都可以通过它监听。
在UIPanGestureRecognizer中的属性和方法:
@property (nonatomic) NSUInteger minimumNumberOfTouches __TVOS_PROHIBITED;:滑动触摸的最少手指数,默认1;@property (nonatomic) NSUInteger maximumNumberOfTouches __TVOS_PROHIBITED;:滑动触摸的最多手指数,默认UINT_MAX;- (CGPoint)translationInView:(nullable UIView *)view;: 获取手指移动的相对位移;- (void)setTranslation:(CGPoint)translation inView:(nullable UIView *)view;:设置手指触摸的点在view中的位置,可改变view的位置;- (CGPoint)velocityInView:(nullable UIView *)view;:获取手指移动的速度。
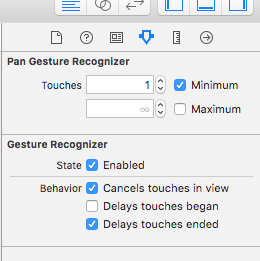
设置栏
相关代码
// UIPanGestureRecognizer 滑动手势,会影响其他手势的响应
UIPanGestureRecognizer *panGR = [[UIPanGestureRecognizer alloc] initWithTarget:self action:@selector(panAction:)];
panGR.minimumNumberOfTouches = 1; // 最少手指数,默认1.
panGR.maximumNumberOfTouches = 1; // 最多响应的手指,默认UINT_MAX
[self.gestureCodeView addGestureRecognizer:panGR];
[panGR requireGestureRecognizerToFail:swipeGR]; //UISwipeGestureRecognizer失效时才判断UIPanGestureRecognizer

#pragma mark UIPanGestureRecognizer 平滑
- (IBAction)panAction:(UIPanGestureRecognizer *)sender {
    NSLog(@"%@", NSStringFromSelector(_cmd));
    CGPoint velocityPoint = [sender translationInView:sender.view]; // 移动的速度
    NSLog(@"移动速度:%@", NSStringFromCGPoint(velocityPoint));
    CGPoint translatedPoint = [sender translationInView:sender.view]; // 移动的位移
    NSLog(@"移动位移:%@", NSStringFromCGPoint(translatedPoint));
}
由于UIPanGestureRecognizer能够监听的手势很多,它可能拦截你想监听的手势,如左滑动。你需要使用
requireGestureRecognizerToFail:设置优先级。
其他
参考资料
Event Handling Guide for iOS
UIGestureRecognizer Class Reference
文档修改记录
| 时间 | 描述 |
|---|---|
| 2015-11-08 | 苹果手势识别基础总结 |
| 2015-11-09 | 添加相应链接 |
| 2015-12-11 | 目录添加索引 |
| 2015-12-12 | 文章标题更新 |
版权所有
CSDN:http://blog.csdn.net/y550918116j
GitHub:https://github.com/937447974/Blog

