Android批量打包-如何一秒内打完几百个apk渠道包
在国内Android常用渠道可能多达几十个,如:
谷歌市场、腾讯应用宝、百度手机助手、91手机商城、360应用平台、豌豆荚、安卓市场、小米、魅族商店、oppo手机、联想乐商、中兴汇天地、华为、安智、应用汇、木蚂蚁、3G安卓市场(久邦开发者发布系统)
uc应用商店、苏宁应用、淘宝手机助手、蘑菇市场、搜狗市场、搜狗助手、机锋、易用汇(金立手机)、中国联通沃商、中国移动MM、中国电信天翼、亿优市场、历趣世界、冒泡堂、网讯安卓开发者平台、桌乐、网易、泡椒网、十字猫、酷传、安粉、安卓园、安卓之家
所以在工作中,当项目开发、测试完毕后就需要针对不同的渠道打出对应的apk安装包。为了统计每个渠道效果,我们可以使用Umeng sdk或者百度的sdk。这些sdk的使用我就不再这里赘述了,请看相应的开发文档即可。本文以友盟统计为例。
#批量打包方式一:Gradle方式
我相信现在应该很多开发环境都是AndroidStudio了,对Gradle相对还是熟悉的。如果您使用的是Eclipse也没有关系,用AndroidStudio导入Eclipse工程,或者把gradle配置放在Eclipse工程下(因为AndroidStudio和Eclipse的工程目录有些差别,把对应的目录配置对即可)
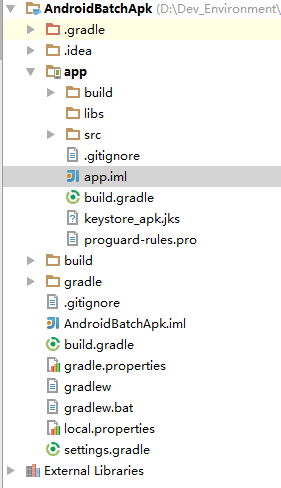
首先我们使用AndroidStudio新建一个工程,名叫AndroidBatchApk,工程结构如下:
打开AndroidManifest.xml文件 添加友盟的渠道配置如下:
在MainActivity 显示渠道名代码:
public class MainActivity extends AppCompatActivity {

    @Override
    protected void onCreate(Bundle savedInstanceState) {
        super.onCreate(savedInstanceState);
        setContentView(R.layout.activity_main);
        String channel = ManifestUtil.getMetaDataFromAppication(this, "UMENG_CHANNEL");
        //String channel = ManifestUtil.getUmengChannel(this);
        ((TextView) findViewById(R.id.tv_channel)).setText(channel);
    }
}
打开app目录下的build.gradle文件,修改成如下形式:
apply plugin: 'com.android.application'
	android {
		compileSdkVersion 22
		buildToolsVersion "22.0.1"
		packagingOptions {
			exclude 'META-INF/NOTICE.txt'
			exclude 'META-INF/LICENSE.txt'
		}
		//签名
		signingConfigs {
			release {
				//storeFile file("../yourapp.keystore")
				storeFile file("keystore_apk.jks")
				storePassword "123456"
				keyAlias "apk"
				keyPassword "123456"
			}
		}
		buildTypes {
			release {
				// 不显示Log
				//buildConfigField "boolean", "LOG_DEBUG", "false"

				//minifyEnabled true //混淆
				zipAlignEnabled true //内存对齐
				shrinkResources true //移除无用的resource文件
				proguardFiles getDefaultProguardFile('proguard-android.txt'), 'proguard-rules.pro'
				signingConfig signingConfigs.release

				android.applicationVariants.all { variant ->
					def stringsFile = new File(variant.outputs[0].processResources.assetsDir, "abc.txt")
					stringsFile.mkdir()
				}

				applicationVariants.all { variant ->
					variant.outputs.each { output ->
						def outputFile = output.outputFile
						if (outputFile != null && outputFile.name.endsWith('.apk')) {
							def fileName = "APK_${releaseTime()}_${variant.productFlavors[0].name}.apk"
							output.outputFile = new File(outputFile.parent, fileName)
						}
					}
				}
			}
		}

		lintOptions {
			checkReleaseBuilds false
			abortOnError false
			ignoreWarnings true
		}

		// 渠道列表
		productFlavors {
			_360 {}
			_91 {}
			QQ {}
			appChina {}
			baidu {}
			google {}
			//.....
		}

		productFlavors.all { flavor ->
			flavor.manifestPlaceholders = [UMENG_CHANNEL_VALUE: name]
		}
	}

	def releaseTime() {
		return new Date().format("yyyy-MM-dd HH-mm-ss", TimeZone.getTimeZone("GMT+8"))
	}

	dependencies {
		compile fileTree(dir: 'libs', include: ['*.jar'])
		compile 'com.android.support:appcompat-v7:22.2.1'
	}
上面的配置,我们测试打6个包,分别是google 、_360、 _91、 appChina、 QQ、 baidu
打开cmd命令行 进入工程所在的目录,输入命令:gradle build 不出意外将看到如下成功界面:

并且在output目录下生成了我们要的apk包(AndroidBatchApk\app\build\outputs\apk)

现在用的安装我们的生成apk文件,安装google渠道的apk。

到这里我们就通过gradle方式成功的批量打包了,
时间我们只花费了25秒,但是这是最简单的工程,如果是实际的开发中,我们的项目会很大,打包的时间也会花费很长时间,我现在公司的项目,通过这种方式打包,需要30、40分钟左右,这也是挺长的。时间上并不占优势。但是比我们用工具一个个的打apk强太多了。下面为大家界面一种更高效的打包方式。
#批量打包方式二:Python批量打包
首先配置好Python,我用的是Python2.7版本。使用该方式,不把渠道名称放在AndroidManifest.xml 里,而是新建一个空文件,文件名就是渠道名称。该文件放在apk目录的META-INF里。META-INF目录下默认文件列表如下:

现在我们要解决两个问题:
##如果在META-INF目录下新建文件?
我们解决第一个问题。首先我们通过AndroidStudio或者Eclipse打一个正式环境的apk安装包,不需要有渠道。
然后按照渠道列表 复制出各个渠道的,然后往apk文件里写入文件为渠道名的空文件。我们使用Python代码来实现该功能,代码如下:
import sys,os,shutil,zipfile,time
apkVersion="1.0"
srcFileName="source.apk"
destDir=os.path.abspath('.')
file=open("channel.txt")

def writeChannelToApk(filename,channel):
		z=zipfile.ZipFile(filename,'a',zipfile.ZIP_DEFLATED)
		empty_channel_file="META-INF/channel_{channe}".format(channe=channel)
		target_file="channel.apk"
		z.write(target_file,empty_channel_file)
		z.close()
		print "writeChannelToApkchannel"+channel+","+filename+"\n"

def cpFile(srcPath,fileName):
	destPath = destDir + os.path.sep + fileName
	if os.path.exists(srcPath) and not os.path.exists(destPath):
		shutil.copy(srcPath,destPath)


if not os.path.exists(srcFileName):
	print "sourcefile"+srcFileName+"notexists"
	sys.exit(1)


start = time.clock()

for line in file:
	channel=line.strip('\n').strip()
	targetFileName="apk_"+channel+"-"+apkVersion+".apk"
	print "copyfile:"+targetFileName
	cpFile(srcFileName,targetFileName)
	writeChannelToApk(targetFileName,channel)
end = time.clock()

print("The function run time is : %.03f seconds" %(end-start))
上面是我编写的Python代码,根据代码我们需要三个文件,一个我们打出的apk文件(source.apk 当然名字可以改)、一个空apk文件(channel.apk)和渠道列表文件(channel.txt) 目录如下:

渠道文件内容如下:
360
appChina
wandoujia
91
baidu
QQ
3G
eoe
anzhi
163
hiapk
jifeng
xiaomi
meizu
oppo
lenovo
在命令行输入:python batch_apk.py 回车
解压文件oppo渠道的apk,看看是不是META-INF下是不是有渠道文件:

##如果读取META-INF下的渠道文件?
public class ManifestUtil {

	public static String channel;

	public static String getUmengChannel(Context context) {
		//return getMetaDataFromAppication(context, "UMENG_CHANNEL");
		return getChannel(context);
	}

	/**
	 * 获取META-INFO下面的渠道
	 * @param context
	 * @return
	 */
	public static String getChannel(Context context) {
		if (!TextUtils.isEmpty(channel)) {
			return channel;
		}
		ApplicationInfo appinfo = context.getApplicationInfo();
		String sourceDir = appinfo.sourceDir;
		ZipFile zipfile = null;
		final String start_flag = "META-INF/channel_";
		try {
			zipfile = new ZipFile(sourceDir);
			Enumeration entries = zipfile.entries();
			while (entries.hasMoreElements()) {
				ZipEntry entry = ((ZipEntry) entries.nextElement());
				String entryName = entry.getName();
				if (entryName.contains(start_flag)) {
					channel = entryName.replaceAll(start_flag, "");
					return channel;
				}
			}
		} catch (IOException e) {
			e.printStackTrace();
		} finally {
			if (zipfile != null) {
				try {
					zipfile.close();
				} catch (IOException e) {
					e.printStackTrace();
				}
			}
		}
		return "";

	}
}
通过上面的对比,使用Pyhon往META-INF写入渠道的方式,比gradle方式极大的提高了效率。
资源下载
脚本地址Github
Have Fun !
2017-07-06 更新
由于 Android7.0 的版本上不能安装app,提示 INSTALL_PARSE_FAILED_NO_CERTIFICATES 可以使用美团开源的工具:
打包工具
如果你觉得本文帮助到你,给我个关注和赞呗!
另外,我为 Android 程序员编写了一份:超详细的 Android 程序员所需要的技术栈思维导图。
如果有需要可以移步我的 GitHub -> AndroidAll,里面包含了最全的目录和对应知识点链接,帮你扫除 Android 知识点盲区。 由于篇幅原因只展示了 Android 思维导图:
![]()


