SpringBoot怎么将项目正确打包为war包步骤(实测成功)
最近在做一个springboot+springcloud+consul的测试demo时,把springboot项目打包成war包放tomcat6、7、8版本都运行不起来。然后就在网上找一堆的资料,大部分的人写的打war方法都不全,特别是遇到一些标题党,看他们写的blog就是浪费时间。接下来,我说下具体步骤。
1、创建spingboot的项目
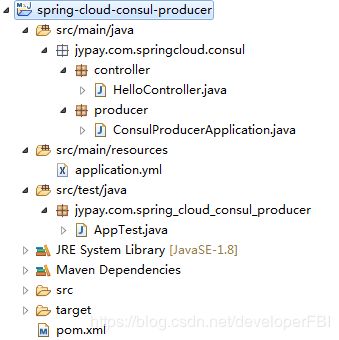
spring-cloud-consul-producer,目录结构如下:
pom.xml
  4.0.0

  jypay.com
  spring-cloud-consul-producer
  0.0.1-SNAPSHOT
  war

  spring-cloud-consul-producer
  http://maven.apache.org


      org.springframework.boot
      spring-boot-starter-parent
      2.0.3.RELEASE


	  1.8
	  UTF-8
	  UTF-8
	  Finchley.RELEASE


        org.springframework.boot
        spring-boot-starter-actuator


        org.springframework.cloud
        spring-cloud-starter-consul-discovery


        org.springframework.boot
        spring-boot-starter-web


	    org.springframework.boot
	    spring-boot-starter-tomcat

	    provided


	    org.apache.tomcat.embed
	    tomcat-embed-jasper


       org.springframework.boot
       spring-boot-starter-test
       test


     	junit
		junit
		test


		javax.servlet
		javax.servlet-api

		provided


		javax.servlet.jsp
		jsp-api
		2.2
		provided


              org.springframework.cloud
              spring-cloud-dependencies
              ${spring-cloud.version}
              pom
              import


	  springCloudConsulProducer
添加配置,在配置文件添加内容如下。application.yml
server.context-path: /
server:
  port: 8511
spring:
  application:
    name: spring-cloud-consul-producer
  cloud:
    consul:
      host: localhost
      port: 8500
      discovery:
        serviceName: service-producer    # 注册到consul的服务名称
修改启动类如下:
@EnableDiscoveryClient
@EnableAutoConfiguration
@ComponentScan(basePackages = "jypay.com.springcloud.consul.controller")/*注意要把controller扫描进项目的路径,不然不能加载你的controller*/
@SpringBootApplication
public class ConsulProducerApplication extends SpringBootServletInitializer{

	@Override
	protected SpringApplicationBuilder configure(SpringApplicationBuilder builder) {
		return builder.sources(ConsulProducerApplication.class);
	}


	public static void main(String[] args) {
		SpringApplication.run(ConsulProducerApplication.class, args);
	}

}
添加服务,新建 HelloController,提供 hello 接口, 返回 hello consul 字符串。
package jypay.com.springcloud.consul.controller;

import org.springframework.web.bind.annotation.RequestMapping;
import org.springframework.web.bind.annotation.RestController;

@RestController
public class HelloController {

	 @RequestMapping("/hello")
	 public String hello() {
	    return "hello consul.";
	 }

}
2、打war包部署
方式一:
项目右键--->run as--->maven install 完成打包如下图:
方式二:
项目右键--->run as--->maven build 弹出如下图:
按标红1、2、3操作可完成打包。
其他打包方式
比如使用mvn的命令可自行搜下就知道了。
3、部署
把第2步打成war文件放到tomcat8.5版本(以上)的webapps目录下,如果在windows下面启动startup.bat。如在linux则时行tomcat的bin目录输入./startup.sh。注意:如果tomcat版本为6.x或7.x是运行不起来的。我已实测了,如果大家想看具体的报错请自测了解下。
4、访问
在浏览器访问:http://localhost:8080/war包名/@RequestMapping.value
在我的为例子:http://localhost:8180/springCloudConsulProducer/hello
下载项目的链接:https://download.csdn.net/download/developerFBI/12016147。
如大家按上面的操作有报错或其他问题请留言。谢谢!


