一、软、硬件准备
- VS2017
- opencv3.4.6
- 相机:Basler acA2500-14gm
- 驱动:pylon
二、软硬件配置
- 下载安装pylon,到basler官方网站下载适合自己相机的pylon版本(我的是pylon 5.0),安装的时候注意选择安装开发者模式(开发者模式才含有SDK)。搜索相机IP并改成固定IP,使系统和相机利用路由器连接在同一个局域网内。
打开Pylon View,在左边找到basler,右键选择pylon IP configurator,出现下面的窗口,查看IP地址和子网掩码,
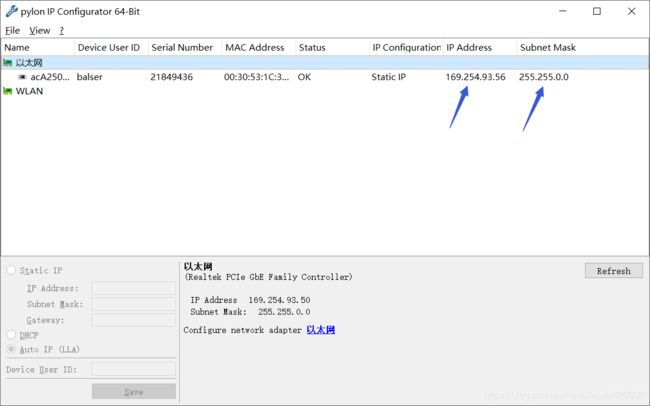
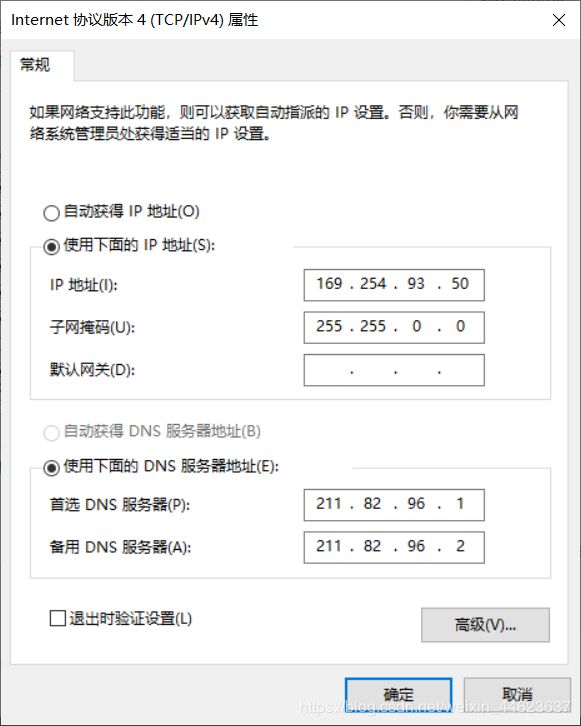
然后配置电脑的IP地址和子网掩码。
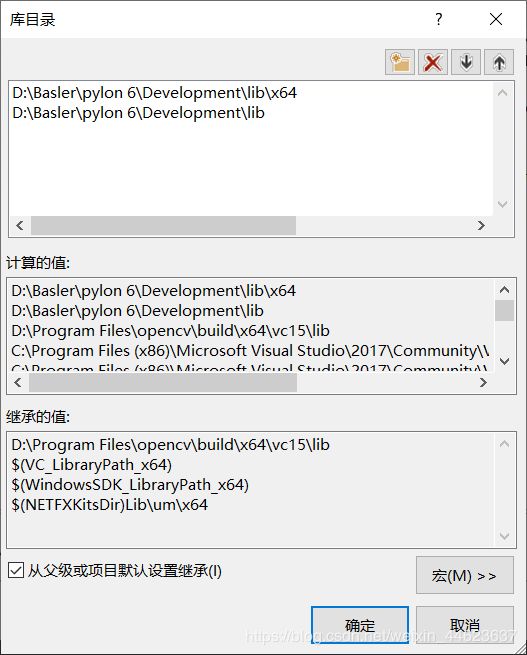
- 打开VS2017,配置包含目录和库目录。
1)包含目录
D:\Basler\pylon 6\Development\include(一定要根据自己安装目录来配置,不要复制)

2) 库目录
三、Basler实时采集图像
- 相机界面
基于MFC的对话框,创建自己的界面,并修改每个控件的ID

- 头文件以及命名空间
#include "pch.h"
#include "framework.h"
#include "basler_basedemo.h"
#include "basler_basedemoDlg.h"
#include "afxdialogex.h"
#include "opencv2/opencv.hpp"
using namespace cv;
using namespace std;
#include "pylon/PylonIncludes.h"
#include "pylon/gige/BaslerGigEInstantCamera.h"
typedef Pylon::CBaslerGigEInstantCamera Camera_t;
using namespace Pylon;
using namespace Basler_GigECameraParams;
using namespace GenApi;
- 设置静态全局变量
Mat background;
bool Open_device = false;
bool acquire = false;
bool grab_image = false;
static Mat g_srcImage;
static int ImgNum = 0;
static Mat frame;
CPylonImage pylonImage;
CImageFormatConverter formatConverter;
static CRect rect;
static CInstantCamera camera;
static CGrabResultPtr ptrGrabResult;
- 将Opencv窗口与MFC的picture control窗口连接
background = imread("仪器科学与光电工程学院.png");
namedWindow("Basler", WINDOW_AUTOSIZE);
HWND hWnd = (HWND)cvGetWindowHandle("Basler");
HWND hParent = ::GetParent(hWnd);
::SetParent(hWnd, GetDlgItem(IDC_STATIC_DEVICE)->m_hWnd);
::ShowWindow(hParent, SW_HIDE);
imshow("Basler", background);
namedWindow("SHOW", WINDOW_AUTOSIZE);
hWnd = (HWND)cvGetWindowHandle("SHOW");
hParent = ::GetParent(hWnd);
::SetParent(hWnd, GetDlgItem(IDC_STATIC_GRAB)->m_hWnd);
::ShowWindow(hParent, SW_HIDE);
imshow("SHOW", background);
- “开启设备”对应相应函数
加载设备,并将其初始化与连接到对应的camera变量控制
Open_device = TRUE;
formatConverter.OutputPixelFormat = PixelType_BGR8packed;
PylonInitialize();
camera.Attach(CTlFactory::GetInstance().CreateFirstDevice());
camera.Open();
camera.MaxNumBuffer = 5;
- “开始采集“对应相应函数
开始之后,先采集第一帧,并利用定时器一直采集并显示。
if (Open_device == false) {
MessageBox(_T("未打开设备!!!"));
return;
}
acquire = TRUE;
static const uint32_t c_countOfImagesToGrab = 100;
camera.StartGrabbing(c_countOfImagesToGrab);
if (camera.IsGrabbing())
{
camera.RetrieveResult(5000, ptrGrabResult, TimeoutHandling_ThrowException);
if (ptrGrabResult->GrabSucceeded())
{
formatConverter.Convert(pylonImage, ptrGrabResult);
frame = cv::Mat(ptrGrabResult->GetHeight(), ptrGrabResult->GetWidth(), CV_8UC3, (uint8_t *)pylonImage.GetBuffer());
imshow("Basler", frame);
}
}
SetTimer(1, 1002, NULL);
- 时间触发器函数
这里使用SetTimer函数,需要添加计时器以实现循环。应用定时器实现动态显示相机采集到的图片
添加计时器:类向导-消息-WM-TIMER,双击添加OnTimer函数,如下
if (camera.IsGrabbing())
{
camera.RetrieveResult(5000, ptrGrabResult, TimeoutHandling_ThrowException);
if (ptrGrabResult->GrabSucceeded())
{
formatConverter.Convert(pylonImage, ptrGrabResult);
frame = cv::Mat(ptrGrabResult->GetHeight(), ptrGrabResult->GetWidth(), CV_8UC3, (uint8_t *)pylonImage.GetBuffer());
imshow("Basler", frame);
}
}
CDialogEx::OnTimer(WM_TIMER);
return;
- ”停止采集“响应函数
只需要停止采集和断开连接,如果不断开连接,下次就无法再加载设备了。
if (Open_device == false) {
MessageBox(_T("未打开设备!!!"));
return;
}
acquire = false;
Open_device = false;
camera.StopGrabbing();
PylonTerminate();
imshow("Basler", background);
- ”捕获图像“消息响应函数
g_srcImage = frame;
ImgNum++;
if (acquire == false)
{
MessageBox(_T("摄像头已关闭,无法捕捉图像!!!"));
return;
}
imshow("SHOW", g_srcImage);
string strSaveName;
char buffer[256];
sprintf_s(buffer, "D%04d", ImgNum);
strSaveName = buffer;
string outPutPath = "D:\\Picture\\";
string strImgSavePath = outPutPath + "\\" + strSaveName;
strImgSavePath += ".jpeg";
strImgSavePath += ".png";
imwrite(strImgSavePath.c_str(), g_srcImage);
- 调整曝光时间和增益对应的消息对应函数
这里面利用成员变量来camera_gain和exposure_time来控制相机增益和曝光时间。由于博主的电脑不支持千兆网卡,所以曝光时间增长,降低帧率。
static int64_t Adjust(int64_t val, int64_t minimum, int64_t maximum, int64_t inc)
{
if (inc <= 0)
{
throw LOGICAL_ERROR_EXCEPTION("Unexpected increment %d", inc);
}
if (minimum > maximum)
{
throw LOGICAL_ERROR_EXCEPTION("minimum bigger than maximum.");
}
if (val < minimum)
{
return minimum;
}
if (val > maximum)
{
return maximum;
}
if (inc == 1)
{
return val;
}
else
{
return minimum + (((val - minimum) / inc) * inc);
}
}
void CbaslerbasedemoDlg::OnEnChangeEdit2Exposure()
{
UpdateData(true);
KillTimer(1);
SetTimer(1, exposure_time / 1000, NULL);
INodeMap& nodemap = camera.GetNodeMap();
CIntegerPtr ptrExposureTimeRaw(nodemap.GetNode("ExposureTimeRaw"));
if (IsWritable(ptrExposureTimeRaw))
{
int64_t newExposureTimeRaw = Adjust(exposure_time, ptrExposureTimeRaw->GetMin(), ptrExposureTimeRaw->GetMax(), ptrExposureTimeRaw->GetInc());
exposure_time = newExposureTimeRaw;
UpdateData(FALSE);
ptrExposureTimeRaw->SetValue(newExposureTimeRaw);
}
}
void CbaslerbasedemoDlg::OnEnChangeEdit1Gain()
{
UpdateData(true);
INodeMap& nodemap = camera.GetNodeMap();
CEnumerationPtr PtrgainAuto(nodemap.GetNode("GainAuto"));
if (IsWritable(PtrgainAuto))
{
PtrgainAuto->FromString("Off");
}
CIntegerPtr PtrgainRaw(nodemap.GetNode("GainRaw"));
if (PtrgainRaw.IsValid())
{
int64_t newGainRaw = Adjust(camera_gain, PtrgainRaw->GetMin(), PtrgainRaw->GetMax(), PtrgainRaw->GetInc());
camera_gain = newGainRaw;
UpdateData(FALSE);
PtrgainRaw->SetValue(newGainRaw);
}
}