ubuntu18.04+cuda10.0+cudnn7.6.0+tensorflow1.13.1源码编译TensorFlow C++动态链接库
一、前言
经过差不多一周的折腾,各种坑,终于成功基于TensorFlow源码编译成c++调用的动态链接库,相当不易,在此总结下整个编译的主要过程。
二、环境
相关安装包的版本对应非常重要,因为我电脑系统(双系统)本身是ubuntu18.04,之前已经安装了TensorFlow1.13.1的python版本,之前是为了调起GPU已经安装了cuda10.0和cudnn7.6.0,所以我是基于这个环境再从TensorFlow源码编译的TensorFlow C++动态链接库。
- ubuntu18.04
- cuda10.0
- cudnn7.6.0
- tensorflow1.13.1
- nccl2.5.6
- bazel0.19.2
- protobuf3.6.1
- openjdk-8-jdk
- python3.6.9
- eigen3.3.4
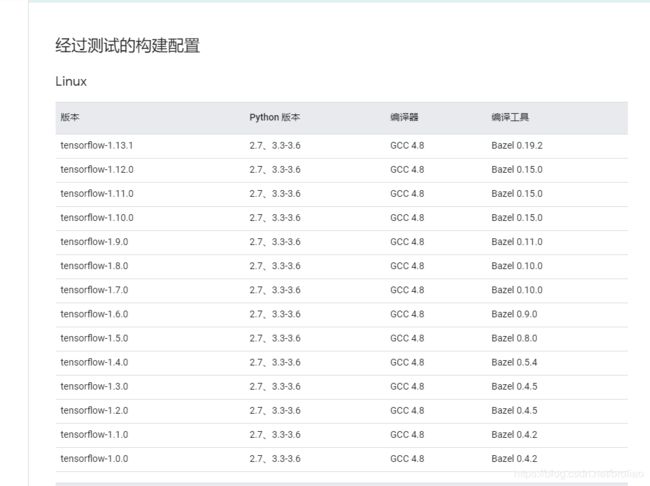
其中cuda、cudnn、nccl、bazel、tensorflow这几个版本要对应起来,否则会出各种错(当然就算都对应起来也可能会出其它错,只能根据自己的情况来搜索解决了),protobuf可能也要对应(没试过其它版本)。如果是要安装其它版本的TensorFlow,对应的需要安装的bazel版本可以参考这里
三、安装
cuda和cudnn是之前安装的,这里就不介绍了。
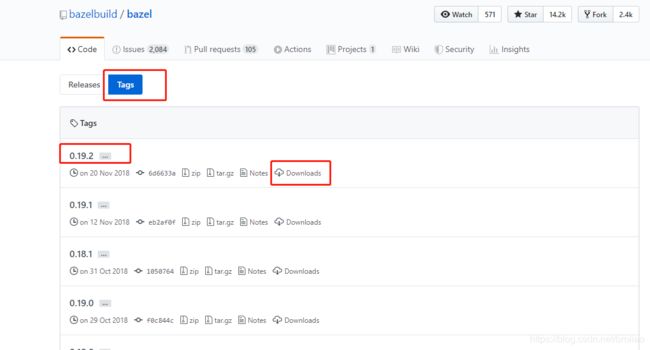
1.bazel编译安装
先进到这里,选择Tags,找到对应版本的bazel,下载bazel-0.19.2-installer-linux-x86_64.sh

将bazel-0.19.2-installer-linux-x86_64.sh移到没有中文的目录下,执行以下命令安装:
sudo apt-get install openjdk-8-jdk
chmod +x bazel-0.19.2-installer-linux-x86_64.sh
./bazel-0.19.2-installer-linux-x86_64.sh --user
export PATH="$PATH:$HOME/bin"
注意第三条命令后面要有 --user ,漏了这个我就安装失败了。
相关安装方法,主要是参考了官网的方法。
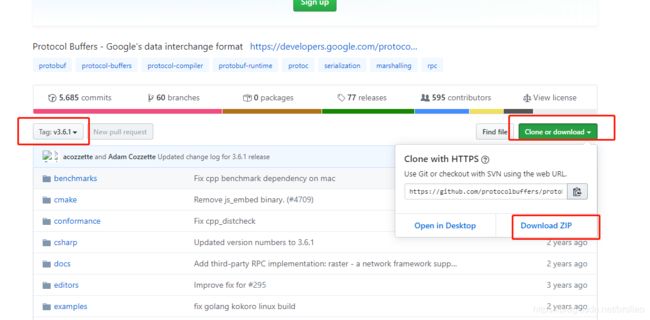
2.protobuf编译安装
下载对应版本压缩包程序:链接

在下载的压缩包的目录下打开终端运行如下命令安装:
unzip protobuf-3.6.1.zip
cd protobuf-3.6.1
./configure
make
make install
检验是否安装成功:
protoc --version
安装成功就会出现对应版本信息
3.nccl安装编译
不安装nccl,我在使用bazel编译TensorFlow c++动态链接库的时候老师失败,然后根据报错,我在尝试安装装nccl,并在后面TensorFlow安装配置时指定对应版本之后,才最终成功。
进到nccl下载位置,需要登录,找到与ubuntu18.04、cuda10.0相对应的nccl版本下载,下载之后会得到该文件:nccl-repo-ubuntu1804-2.5.6-ga-cuda10.0_1-1_amd64.deb
然后运行下面命令安装:
sudo dpkg -i nccl-repo-ubuntu1804-2.5.6-ga-cuda10.0_1-1_amd64.deb
sudo apt update
4.eigen编译安装
正常来讲,后面安装编译TensorFlow的时候,在下载相关依赖包的时候,会自动下载这个包,但是我那里老是编译不到最后,所以最后我就自己下载安装包安装了,但是我不确定对后面使用bazel编译的时候需不需要这个包,反正这个包我是安装了。
有两种安装方法:
参考这里
1)源码安装
sudo apt-get install libeigen3-dev
这个安装失败就用下面方式安装
2)本地安装
进到这里下载安装包,我下载的是eigen-3.3.4.zip。

然后输入命令:
cd eigen-3.3.4
mkdir build
cd build
cmake ..
sudo make install

#安装后,头文件安装在/usr/local/include/eigen3/
5.TensorFlow编译安装
下载对应的TensorFlow版本,我这里下载的是1.13.1,下载链接

得到tensorflow-1.13.1.zip,最好将其移动到非中文目录下编译,接下来:
unzip tensorflow-1.13.1.zip
cd tensorflow-1.13.1
在源码中安装相关依赖项:
./tensorflow/contrib/makefile/download_dependencies.sh
cd tensorflow/contrib/makefile/downloads/
cd eigen
mkdir build
cd build
cmake ../
make
sudo make install
注:这一步可能会失败(我运行的时候就失败了),后面我就没管它了,直接自己手动安装eigen方法如上面第4点所介绍。
加下来就是给TensorFlow配置安装了,首先要回到tensorflow-1.13.1目录下,假设现在已经在tensorflow-1.13.1目录下,运行:
./configure
之后的配置就很关键了,大部分选择默认,为了要支持GPU,我是如下配置的:
broliao@ljx:~/tensorflow-1.13.1$ ./configure
WARNING: --batch mode is deprecated. Please instead explicitly shut down your Bazel server using the command "bazel shutdown".
You have bazel 0.19.2 installed.
Please specify the location of python. [Default is /usr/bin/python]:


Found possible Python library paths:
  /usr/local/lib/python2.7/dist-packages
  /usr/lib/python2.7/dist-packages
Please input the desired Python library path to use.  Default is [/usr/local/lib/python2.7/dist-packages]

Do you wish to build TensorFlow with XLA JIT support? [Y/n]:
XLA JIT support will be enabled for TensorFlow.

Do you wish to build TensorFlow with OpenCL SYCL support? [y/N]:
No OpenCL SYCL support will be enabled for TensorFlow.

Do you wish to build TensorFlow with ROCm support? [y/N]:
No ROCm support will be enabled for TensorFlow.

Do you wish to build TensorFlow with CUDA support? [y/N]: y
CUDA support will be enabled for TensorFlow.

Please specify the CUDA SDK version you want to use. [Leave empty to default to CUDA 10.0]:


Please specify the location where CUDA 10.0 toolkit is installed. Refer to README.md for more details. [Default is /usr/local/cuda]: /usr/local/cuda-10.0


Please specify the cuDNN version you want to use. [Leave empty to default to cuDNN 7]:


Please specify the location where cuDNN 7 library is installed. Refer to README.md for more details. [Default is /usr/local/cuda-10.0]:


Do you wish to build TensorFlow with TensorRT support? [y/N]:
No TensorRT support will be enabled for TensorFlow.

Please specify the locally installed NCCL version you want to use. [Default is to use https://github.com/nvidia/nccl]: 2.5.6


NCCL libraries found in /usr/lib/x86_64-linux-gnu/libnccl.so
This looks like a system path.
Assuming NCCL header path is /usr/include
Please specify a list of comma-separated Cuda compute capabilities you want to build with.
You can find the compute capability of your device at: https://developer.nvidia.com/cuda-gpus.
Please note that each additional compute capability significantly increases your build time and binary size. [Default is: 6.1]:


Do you want to use clang as CUDA compiler? [y/N]:
nvcc will be used as CUDA compiler.

Please specify which gcc should be used by nvcc as the host compiler. [Default is /usr/bin/gcc]:


Do you wish to build TensorFlow with MPI support? [y/N]:
No MPI support will be enabled for TensorFlow.

Please specify optimization flags to use during compilation when bazel option "--config=opt" is specified [Default is -march=native -Wno-sign-compare]:


Would you like to interactively configure ./WORKSPACE for Android builds? [y/N]:
Not configuring the WORKSPACE for Android builds.

Preconfigured Bazel build configs. You can use any of the below by adding "--config=<>" to your build command. See .bazelrc for more details.
	--config=mkl         	# Build with MKL support.
	--config=monolithic  	# Config for mostly static monolithic build.
	--config=gdr         	# Build with GDR support.
	--config=verbs       	# Build with libverbs support.
	--config=ngraph      	# Build with Intel nGraph support.
	--config=dynamic_kernels	# (Experimental) Build kernels into separate shared objects.
Preconfigured Bazel build configs to DISABLE default on features:
	--config=noaws       	# Disable AWS S3 filesystem support.
	--config=nogcp       	# Disable GCP support.
	--config=nohdfs      	# Disable HDFS support.
	--config=noignite    	# Disable Apacha Ignite support.
	--config=nokafka     	# Disable Apache Kafka support.
	--config=nonccl      	# Disable NVIDIA NCCL support.
Configuration finished
其中需要特别注意着几个地方:
Do you wish to build TensorFlow with CUDA support? [y/N]: y                    //选择支持cuda
Please specify the location where CUDA 10.0 toolkit is installed. Refer to README.md for more details. [Default is /usr/local/cuda]: /usr/local/cuda-10.0                    //注意修改到你cuda安装的位置
Please specify the locally installed NCCL version you want to use. [Default is to use https://github.com/nvidia/nccl]: 2.5.6                                                 //之前安装的nccl版本
配置好之后就可以使用bazel编译安装了,命令如下:
CPU版本:
bazel build --config=opt //tensorflow:libtensorflow_cc.so
GPU版本:
bazel build --config=opt --config=cuda //tensorflow:libtensorflow_cc.so
根据这里,你还可以增加一些bazel的编译选项:
Bazel 编译选项
从源代码编译 TensorFlow 可能会消耗大量内存。如果系统内存有限,请使用以下命令限制 Bazel 的内存消耗量:–local_ram_resources=2048。
官方 TensorFlow 软件包是使用 GCC 4 编译的,并使用旧版 ABI。对于 GCC 5 及更高版本,为了使您的编译系统与旧版 ABI 兼容,请使用 --cxxopt="-D_GLIBCXX_USE_CXX11_ABI=0"。兼容 ABI 可确保针对官方 TensorFlow pip 软件包编译的自定义操作继续支持使用 GCC 5 编译的软件包。
说明:我只编译了GPU版本的,而且在我编译的时候,加了–cxxopt="-D_GLIBCXX_USE_CXX11_ABI=0"这个选项了,因为我更新GCC为GCC4了,所以加不加这个选项应该不会影响。
五、结果
如果使用bazel编译TensorFlow没有出错,那应该就成功了,但是这个过程会话一些时间,而且在编译过程因为占用资源比较多,电脑会比较卡。成功之后,我的tensorflow-1.13.1文件夹下多了这几个文件夹:
bazel-bin
bazel-genfiles
bazel-out
bazel-tensorflow-1.13.1
bazel-testlogs
third_party
六、测试
编写mytest.cpp:
#include 把代码放在src文件夹下,编写cmakelist.txt,具体文件结构如下:
├── src
| └── mytest.cpp
|
├── CMakeLists.txt
|
├── build
CMakeLists的文件的为,需要根据自己放置编译后的tensorflow文件的位置修改,即修改path_to_tensorflow :
cmake_minimum_required (VERSION 2.8.8)                       # 最低版本号
project (tf_test)                                            # 工程名

set(CMAKE_CXX_FLAGS "${CMAKE_CXX_FLAGS} -g -std=c++11 -W")  # 指定编译器
aux_source_directory(./src DIR_SRCS)                        # 将源码目录保存去变量中
link_directories(/home/broliao/tensorflow-1.13.1/bazel-bin/tensorflow)  # 动态链接库目录
include_directories(                                        # 头文件的搜索目录
   /home/broliao/tensorflow-1.13.1/
   /home/broliao/tensorflow-1.13.1/bazel-genfiles
   /home/broliao/tensorflow-1.13.1/tensorflow/contrib/makefile/downloads/absl
   /usr/local/include/eigen3
   )
add_executable(tf_test  ${DIR_SRCS})                                # 从源文件编译出目标文件
target_link_libraries(tf_test tensorflow_cc tensorflow_framework )  # 链接动态链接库
接下来执行命令:
经过测试发现,使用最新版本的g++编译有问题,需要降低版本,最后我将g++版本降低到4.9,更新过程参考:https://blog.csdn.net/broliao/article/details/104613443
cd build
cmake ..
make
最后在build中会生成tf_test可执行文件,运行:
./tf_test
最后得到如下结果
2020-02-27 17:41:08.991662: I tensorflow/stream_executor/cuda/cuda_gpu_executor.cc:998] successful NUMA node read from SysFS had negative value (-1), but there must be at least one NUMA node, so returning NUMA node zero
2020-02-27 17:41:08.993655: I tensorflow/compiler/xla/service/service.cc:150] XLA service 0x9fe270 executing computations on platform CUDA. Devices:
2020-02-27 17:41:08.993773: I tensorflow/compiler/xla/service/service.cc:158]   StreamExecutor device (0): GeForce GTX 1060 6GB, Compute Capability 6.1
2020-02-27 17:41:09.018217: I tensorflow/core/platform/profile_utils/cpu_utils.cc:94] CPU Frequency: 3192000000 Hz
2020-02-27 17:41:09.020145: I tensorflow/compiler/xla/service/service.cc:150] XLA service 0x987fd0 executing computations on platform Host. Devices:
2020-02-27 17:41:09.020211: I tensorflow/compiler/xla/service/service.cc:158]   StreamExecutor device (0): <undefined>, <undefined>
2020-02-27 17:41:09.020779: I tensorflow/core/common_runtime/gpu/gpu_device.cc:1433] Found device 0 with properties:
name: GeForce GTX 1060 6GB major: 6 minor: 1 memoryClockRate(GHz): 1.7335
pciBusID: 0000:01:00.0
totalMemory: 5.93GiB freeMemory: 5.46GiB
2020-02-27 17:41:09.020818: I tensorflow/core/common_runtime/gpu/gpu_device.cc:1512] Adding visible gpu devices: 0
2020-02-27 17:41:09.257120: I tensorflow/core/common_runtime/gpu/gpu_device.cc:984] Device interconnect StreamExecutor with strength 1 edge matrix:
2020-02-27 17:41:09.257171: I tensorflow/core/common_runtime/gpu/gpu_device.cc:990]      0
2020-02-27 17:41:09.257180: I tensorflow/core/common_runtime/gpu/gpu_device.cc:1003] 0:   N
2020-02-27 17:41:09.257348: I tensorflow/core/common_runtime/gpu/gpu_device.cc:1115] Created TensorFlow device (/job:localhost/replica:0/task:0/device:GPU:0 with 5221 MB memory) -> physical GPU (device: 0, name: GeForce GTX 1060 6GB, pci bus id: 0000:01:00.0, compute capability: 6.1)
Session successfully created.
至此,TensorFlow C++版本的动态链接库应该就生成成功了。
可以将其安装到/usr/local/下:
1)建立TensorFlow库文件夹:
sudo mkdir /usr/local/tensorflow
2)复制include文件:
sudo mkdir /usr/local/tensorflow/include
sudo cp -r bazel-genfiles/ /usr/local/tensorflow/include/
sudo cp -r tensorflow /usr/local/tensorflow/include/
sudo cp -r third_party /usr/local/tensorflow/include/
3)复制lib文件:
sudo mkdir /usr/local/tensorflow/lib
sudo cp -r bazel-bin/tensorflow/libtensorflow_cc.so /usr/local/tensorflow/lib/
七、总结
整个编译过程花了差不多一个星期的时间,期间遇到各种各样的问题,各种搜索解决,其中主要问题总结为三点:
1.因为墙的关系,很多安装包下载和安装过程超级慢,而且还经常中断,这种情况只能不断的继续尝试下载,或者想其它科学的方法;
2.下载下来的安装包,尽量放到没有中文的目录下执行安装;
3.以上一些安装包或者步骤可能是多余的,因为其它的我没有去验证,但是我确实是都执行过这些操作了,最终才编译成功的。
最后,把一些安装包的百度网盘链接附上,以备后用:
链接:https://pan.baidu.com/s/1EqcJtjurt4qDMErckNhvOw
提取码:c1nq
八、参考
相关参考链接:
https://www.tensorflow.org/install/source?hl=zh-cn
https://github.com/hemajun815/tutorial/blob/master/tensorflow/compilling-tensorflow-source-code-into-C%2B%2B-library-file.md#%E6%96%B9%E5%BC%8F%E4%BA%8C
https://www.jianshu.com/p/5d31cf657841
https://blog.csdn.net/MOU_IT/article/details/87976152
https://docs.bazel.build/versions/master/install-ubuntu.html