C# Winform 环境搭建串口通信应用
-
目录
前言
可能遇到的问题
具体操作
总结
前言
在与下位机通讯过程中,有一个良好的人机交互界面可以大大提高工程师的工作效率。将抽象晦涩的数字以界面曲线的形式展现出来,具有更加直观,容易理解的优势。本文采用C#语言编写windows平台下的串口通信应用,以实现上位机与下位机之间的通讯。提前说明的一点是,建议阅读本文的读者具有一定的C#编程经验。本示例源代码连接。
-
可能遇到的问题
在编写如何实现上位机应用之前,在此处先将编写应用过程中可能会遇到的问题做一个简单的概述。这些问题也是笔者在实际编写中遇到比较典型的问题。
- 跨线程操作控件
- 串口通讯在大量数据通讯期间应用无法正常关闭
-
具体操作
- 新建C# Winform界面
- 创建串口、文本框、按钮、下拉框等控件
- 使用Property属性对应用进行初始化设置
- 进行收发通讯
C# WinForm 界面的建立十分方便,直接使用微软自带的模板即可。在WinForm中使用控件最简单的方法是将工具箱中的控件直接拉到主界面中即可。但是本文采用的是全部使用代码的方式进行实现。
针对通用的串口通讯工具,需要具备串口工具,串口号、波特率、数据位、停止位、校验位的选择功能,文本框显示,以及开关、保存配置按钮。具体形式如下:
        Tuple[] _portSetting = new Tuple[5];
        Button _btnSwitch = new Button();
        Button _btnSaveSetting = new Button();
        TextBox _txtTrans = new TextBox();
        SerialPort _serialPort = new SerialPort();
在窗体加载之前对各控件进行布局:
        private void Form1_Load(object sender, EventArgs e)
        {
            #region 布局串口配置窗口
            for (int i = 0; i < _portSetting.Length; i++)
            {
                _portSetting[i] = new Tuple ( new Label(), new ComboBox() );
                _portSetting[i].Item1.Anchor = AnchorStyles.Left | AnchorStyles.Bottom;
                _portSetting[i].Item2.Anchor = AnchorStyles.Left | AnchorStyles.Bottom;
                _portSetting[i].Item1.Tag = i;
                _portSetting[i].Item2.Tag = i;
                _portSetting[i].Item1.TextAlign = ContentAlignment.MiddleLeft;

                _portSetting[i].Item1.Size = new Size(50, 35);
                int x = 5 + (50 + 70 + 5) * i;
                _portSetting[i].Item1.Location = new Point(x, this.Height - 70);
                _portSetting[i].Item2.Size = new Size(70, 35);
                int x2 = _portSetting[i].Item1.Location.X + 5 + _portSetting[i].Item1.Size.Width;
                _portSetting[i].Item2.Location = new Point(x2, this.Height - 70);

                _portSetting[i].Item2.DropDownStyle = ComboBoxStyle.DropDownList;
                this.Controls.Add(_portSetting[i].Item1);
                this.Controls.Add(_portSetting[i].Item2);
            }
            _portSetting[0].Item1.Text = "串口号";
            _portSetting[1].Item1.Text = "波特率";
            _portSetting[2].Item1.Text = "数据位";
            _portSetting[3].Item1.Text = "停止位";
            _portSetting[4].Item1.Text = "校验位";

            string[] com = SerialPort.GetPortNames();
            if (com.Length != 0)
            {
                Array.Sort(com);
                _portSetting[0].Item2.Items.AddRange(com);
                _portSetting[0].Item2.SelectedIndex = 0;
                _portSetting[0].Item2.MouseClick += portName_MouseClick;
            }
            _portSetting[1].Item2.Items.AddRange(new string[] { "1200", "2400", "4800", "9600", "115200" });
            _portSetting[2].Item2.Items.AddRange(new string[] { "5", "6", "7", "8" });
            _portSetting[3].Item2.Items.AddRange(new string[] { StopBits.One.ToString(), StopBits.OnePointFive.ToString(), StopBits.Two.ToString() });
            _portSetting[4].Item2.Items.AddRange(new string[] { Parity.None.ToString(), Parity.Even.ToString(), Parity.Odd.ToString() });
            _portSetting[1].Item2.SelectedIndex = Properties.Settings.Default.portBaud;
            _portSetting[2].Item2.SelectedIndex = Properties.Settings.Default.portDataBits;
            _portSetting[3].Item2.SelectedIndex = Properties.Settings.Default.portStopBits;
            _portSetting[4].Item2.SelectedIndex = Properties.Settings.Default.portParity;
            _portSetting[1].Item2.SelectedIndexChanged += portSetting_SelectedIndexChanged;
            _portSetting[2].Item2.SelectedIndexChanged += portSetting_SelectedIndexChanged;
            _portSetting[3].Item2.SelectedIndexChanged += portSetting_SelectedIndexChanged;
            _portSetting[4].Item2.SelectedIndexChanged += portSetting_SelectedIndexChanged;
            #endregion

            #region 布局按钮窗口
            _btnSwitch.Text = "打开串口";
            _btnSwitch.AutoSize = false;
            _btnSwitch.Size = new Size(90, _portSetting[4].Item2.Height);
            _btnSwitch.Location = new Point(_portSetting[4].Item2.Location.Y +
                _portSetting[4].Item2.Width + 5, this.Height - 70);
            _btnSwitch.Anchor = AnchorStyles.Left | AnchorStyles.Bottom;
            _btnSwitch.MouseClick += _btnSwitch_MouseClick;
            this.Controls.Add(_btnSwitch);

            _btnSaveSetting.Text = "保存配置";
            _btnSaveSetting.AutoSize = false;
            _btnSaveSetting.Size = new Size(90, _portSetting[4].Item2.Height);
            _btnSaveSetting.Location = new Point(_btnSwitch.Location.X +
                _btnSwitch.Width, this.Height - 70);
            _btnSaveSetting.Anchor = AnchorStyles.Left | AnchorStyles.Bottom;
            _btnSaveSetting.MouseClick += _btnSaveSetting_MouseClick; ;
            this.Controls.Add(_btnSaveSetting);
            #endregion

            #region 布局收发对话框
            _txtTrans.Multiline = true;
            _txtTrans.Size = new Size(this.Width - 25, _btnSwitch.Location.Y - 10);
            _txtTrans.Anchor = AnchorStyles.Left | AnchorStyles.Bottom |
                 AnchorStyles.Top | AnchorStyles.Right;
            _txtTrans.Location = new Point(5, 5);
            _txtTrans.KeyPress += _txtTrans_KeyPress;
            this.Controls.Add(_txtTrans);
            #endregion

            _serialPort.DataReceived += _serialPort_DataReceived;

        }
串口号按钮回调函数响应:
        private void portName_MouseClick(object sender, MouseEventArgs e)
        {
            string[] com = SerialPort.GetPortNames();
            if (com.Length != 0)
            {
                _portSetting[0].Item2.Items.Clear();
                Array.Sort(com);
                _portSetting[0].Item2.Items.AddRange(com);
                _portSetting[0].Item2.SelectedIndex = 0;
                _portSetting[0].Item2.MouseClick += portName_MouseClick;
            }
        }
串口配置下拉框回调函数响应:
        private void portSetting_SelectedIndexChanged(object sender, EventArgs e)
        {
            ComboBox combo = sender as ComboBox;
            int idx = (int)combo.Tag;
            if (idx == 1) { Properties.Settings.Default.portBaud = combo.SelectedIndex; }
            else if (idx == 2) { Properties.Settings.Default.portDataBits = combo.SelectedIndex; }
            else if (idx == 3) { Properties.Settings.Default.portStopBits = combo.SelectedIndex; }
            else if (idx == 4) { Properties.Settings.Default.portParity = combo.SelectedIndex; }
        }
串口开关按钮回调函数:
        private void _btnSwitch_MouseClick(object sender, MouseEventArgs e)
        {
            if(_btnSwitch.Text== "打开串口")
            {
                if(String.IsNullOrEmpty(_portSetting[0].Item2.Text))
                {
                    MessageBox.Show("未发现可用串口");
                    return;
                }
                try
                {
                    _serialPort.PortName = _portSetting[0].Item2.Text;
                    _serialPort.BaudRate = Convert.ToInt32(_portSetting[1].Item2.Text);
                    _serialPort.DataBits = Convert.ToInt32(_portSetting[2].Item2.Text);
                    _serialPort.StopBits = (StopBits)Enum.Parse(typeof(StopBits), _portSetting[3].Item2.Text);
                    _serialPort.Parity = (Parity)Enum.Parse(typeof(Parity), _portSetting[4].Item2.Text);
                    _serialPort.Open();
                    for(int i = 0; i < _portSetting.Length; i++)
                    {
                        _portSetting[i].Item2.Enabled = false;
                    }
                }
                catch
                {
                    MessageBox.Show("串口打开失败");
                    return;
                }
                _btnSwitch.Text = "关闭串口";
            }
            else
            {
                _serialPort.Close();
                for (int i = 0; i < _portSetting.Length; i++)
                {
                    _portSetting[i].Item2.Enabled = true;
                }
                _btnSwitch.Text = "打开串口";
            }
        }
保存配置按钮回调:
        private void _btnSaveSetting_MouseClick(object sender, MouseEventArgs e)
        {
            Properties.Settings.Default.Save();
            MessageBox.Show("配置保存成功");
        }
串口接收数据回调:
        private void _serialPort_DataReceived(object sender, SerialDataReceivedEventArgs e)
        {
            string recv = _serialPort.ReadExisting();
            _txtTrans.Invoke(new Action(() => _txtTrans.Text += recv));
        }
发送数据有两种思路,一种思路是新建一个发送文本框和发送按钮,这样可以将要发送的内容在屏幕上进行显示。另一种思路是可以直接在接受文本框中键入想要发送的文本。本文采用第二种思路进行实现。通过文本框发送数据:
        private void _txtTrans_KeyPress(object sender, KeyPressEventArgs e)
        {
            string send = e.KeyChar.ToString();
            e.Handled = true;
            if (_serialPort.IsOpen)
            {
                _serialPort.Write(send);
            }
        }
由于文本的显示是在串口接收数据事件中响应的,而串口控件和文本框控件属于两个线程,所以在串口接收事件中去修改文本框的内容属于跨线程调用,在某些情况下是不安全的。经过搜集资料和查阅相关解决方法,最终选用Invoke的方法解决跨线程调用不安全的问题。具体代码在串口接收数据回调中。关于相关的知识内容,建议读者可以自行查阅。
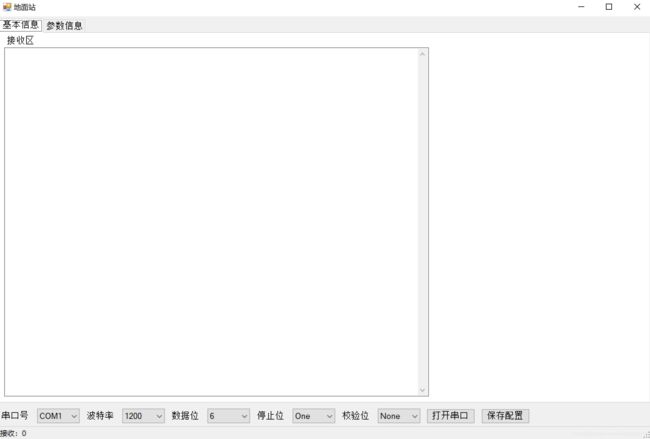
应用软件的大体框架搭建完毕,点击调试运行即可显示出运行界面:
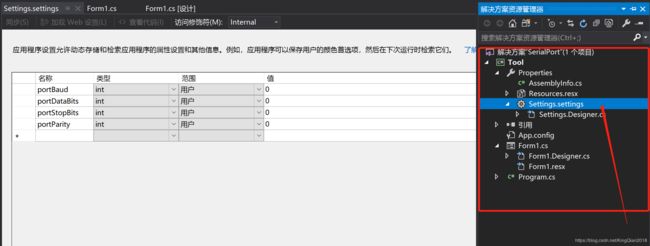
此外,软件在开始运行前期,需要对软件进行一些相关配置工作。使用Property可以为应用初始化提供必要的用户信息,例如串口的波特率,数据位,停止位等。之前采用过 .ini 文件对初始化配置进行过管理,但是对于.ini文件还需要进行解析操作,所以在使用过程中并没有Property方便。双击Setting.settings文件,即可打开相关配置界面。在这里可以根据自身需要提供给用户的属性接口进行编辑即可。建立好的初始配置如下:
其中名称即为需要使用到的配置变量名称,可以自己定义。类型即对应变量的类型。范围有用户和应用程序两个选项,其中用户选项是可读可写,而应用程序是只读。最后的值即为初始化的默认值。通过编辑好Setting文件,我们可以通过API接口函数实现对变量的访问和修改。相关属性的读取,修改和存储通过如下方式即可实现:
// 获取属性值
_portSetting[1].Item2.SelectedIndex = Properties.Settings.Default.portBaud;
// 配置属性值
if (idx == 1) { Properties.Settings.Default.portBaud = combo.SelectedIndex; }
// 保存属性值
Properties.Settings.Default.Save();
当用户保存属性后,下次重启软件时,将会使用上次配置的相关属性运行。
在使用串口通讯进行大量数据交互的过程中发现,在短时间内数据量特别大的时候会发生串口控件无法关闭的情况,究其原因在于串口控件在短时间内频繁的进入串口事件(从单片机的角度理解是频繁的进入中断事件,当然单片机的中断事件属于硬中断,还与此处有差别),而导致关闭串口动作无法响应,因此为串口通讯设置两个Flag进行加锁解锁工作。具体实现方法如下:
        bool _isListening = false;
        bool _isClosing = false;

        // 修改串口接收回调

        private void _serialPort_DataReceived(object sender, SerialDataReceivedEventArgs e)
        {
            if (_isClosing) return;
            try
            {
                _isListening = true;
                string recv = _serialPort.ReadExisting();
                _txtTrans.Invoke(new Action(() => _txtTrans.Text += recv));
            }
            finally
            {
                _isListening = false;
            }
        }

        // 修改关闭按钮回调

        private void _btnSwitch_MouseClick(object sender, MouseEventArgs e)
        {
            ...
            else
            {
                _isClosing = true;
                while (_isListening) Application.DoEvents();
                _serialPort.Close();
                for (int i = 0; i < _portSetting.Length; i++)
                {
                    _portSetting[i].Item2.Enabled = true;
                }
                _btnSwitch.Text = "打开串口";
                _isClosing = false;
            }
        }

        // 新增关闭窗口回调

        private void Form1_FormClosed(object sender, FormClosedEventArgs e)
        {
            _isClosing = true;
            while (_isListening) Application.DoEvents();
            _serialPort.Close();
        }
-
总结
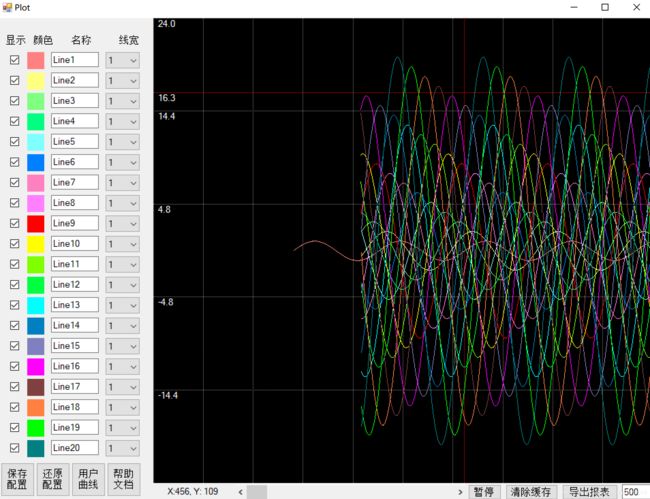
由于之前采用STM32从事下位机开发的工作比较多,在工作中发现需要一款特定的工具实现下位机数据的实时上传与显示,因此开始学习上位机应用相关开发。由于串口通讯以其简单易学的特点,经过一段时间的学习现已基本掌握上位机开发串口工具的套路,并实现了基于C#实现的上下位机数据通信、数据保存以及数据可视化处理。 效果图如下:
这些功能的实现都是基于串口通讯的,所以在这里将个人的学习经历和经验写成一篇文章,希望可以帮助到有需要的人。


