安卓开发之Animation学习(帧、补间、属性动画)
参考菜鸟教程,郭神博客
Android中的动画分为三大类,逐帧动画(Frame)以及补间动画(View动画),以及Android 3.0以后引入的属性动画 (Property)。
帧动画
帧动画就是简单的由N张静态图片收集起来,然后通过依次显示这些图片,形成动画的。实现帧动画一般有两种方式:
- 使用AnimationDrawable 先编写好Drawable,再调用的start()以及stop()开始或停止播放动画
- 在Java代码中创建逐帧动画,创建AnimationDrawable对象,然后调用 addFrame(Drawable frame,int duration)向动画中添加帧,接着调用start()和stop()
通过Demo来学习:
Demo1
首先在res/drawable文件夹下新建meizi.xml文件,作为我们依次显示的图片资源:android:oneshot是设置动画是否只是播放一次,true只播放一次,false循环播放。
<?xml version="1.0" encoding="utf-8"?>
<animation-list xmlns:android="http://schemas.android.com/apk/res/android" android:oneshot="false">
    <item android:drawable="@drawable/s_1" android:duration="80"/>
    <item android:drawable="@drawable/s_2" android:duration="80"/>
    <item android:drawable="@drawable/s_3" android:duration="80"/>
    <item android:drawable="@drawable/s_4" android:duration="80"/>
    <item android:drawable="@drawable/s_5" android:duration="80"/>
    <item android:drawable="@drawable/s_6" android:duration="80"/>
    <item android:drawable="@drawable/s_7" android:duration="80"/>
    <item android:drawable="@drawable/s_8" android:duration="80"/>
</animation-list>
布局文件如下,在ImageView的android:background中绑定上面的meizi.xml,:
<?xml version="1.0" encoding="utf-8"?>
<LinearLayout xmlns:android="http://schemas.android.com/apk/res/android"
    xmlns:app="http://schemas.android.com/apk/res-auto"
    xmlns:tools="http://schemas.android.com/tools"
    android:layout_width="match_parent"
    android:layout_height="match_parent"
    android:orientation="vertical"
    tools:context=".MainActivity">

    <Button
        android:id="@+id/start"
        android:text="start"
        android:layout_width="wrap_content"
        android:layout_height="wrap_content"/>

    <Button
        android:id="@+id/end"
        android:text="end"
        android:layout_width="wrap_content"
        android:layout_height="wrap_content"/>

    <ImageView
        android:id="@+id/image"
        android:layout_width="wrap_content"
        android:layout_height="wrap_content"
        android:layout_gravity="center"
        android:background="@drawable/meizi"/>

</LinearLayout>
MainActivity,主要逻辑就是start()以及stop()开始或停止播放动画:
public class MainActivity extends AppCompatActivity implements View.OnClickListener{
    private Button btn_start;
    private Button btn_stop;
    private ImageView img_show;
    private AnimationDrawable anim;

    @Override
    protected void onCreate(Bundle savedInstanceState) {
        super.onCreate(savedInstanceState);
        setContentView(R.layout.activity_main);
        bindviews();
        anim = (AnimationDrawable) img_show.getBackground();
        btn_start.setOnClickListener(this);
        btn_stop.setOnClickListener(this);
    }

    private void bindviews() {
        btn_start = findViewById(R.id.start);
        btn_stop = findViewById(R.id.end);
        img_show = findViewById(R.id.image);
    }

    @Override
    public void onClick(View v) {
        switch (v.getId()){
            case R.id.start:
                anim.start();
                break;
            case R.id.end:
                anim.stop();
                break;
        }
    }
}
Demo 2:
在指定地方播放帧动画。
meizi.xml文件不变,修改布局文件:
<?xml version="1.0" encoding="utf-8"?>
<FrameLayout xmlns:android="http://schemas.android.com/apk/res/android"
    xmlns:app="http://schemas.android.com/apk/res-auto"
    xmlns:tools="http://schemas.android.com/tools"
    android:id="@+id/myframe"
    android:layout_width="match_parent"
    android:layout_height="match_parent"
    tools:context=".MainActivity">

</FrameLayout>
只有个帧布局,我们通过addView方法往其中加入view。首先自定义FramView.java继承自AppCompatImageView,这样我们在onDraw方法中就可以控制跑完一轮后是否设置为不可见:
public class FrameView extends AppCompatImageView {

    private AnimationDrawable anim;

    public void setAnim(AnimationDrawable anim) {
        this.anim = anim;
    }

    public FrameView(Context context) {
        super(context);
    }

    public FrameView(Context context, @Nullable AttributeSet attrs) {
        super(context, attrs);
    }

    public FrameView(Context context, @Nullable AttributeSet attrs, int defStyleAttr) {
        super(context, attrs, defStyleAttr);
    }

//    @Override
//    protected void onDraw(Canvas canvas) {
          //如果想要跑完一轮也就是8个图片后设置为不可见,就重写onDraw方法
//        try{
//            //反射得到AnimationDrawable类里的成员变量mCurFrame值
//            //如果是对象的话就要实例.getclass() 这里是类,所以就直接类.class即可
//            Field field = AnimationDrawable.class.getDeclaredField("mCurFrame");
//            field.setAccessible(true);//因为mCurFrame是private的
//            int curFrame = field.getInt(anim);// 获取anim动画的当前帧
//            if (curFrame == anim.getNumberOfFrames() - 1)// 如果已经到了最后一帧也就是第八个图片
//            {
//                //隐藏view
//                setVisibility(View.INVISIBLE);
//            }
//
//        }catch (Exception e){
//            e.printStackTrace();
//        }
//        super.onDraw(canvas);
//    }

    public void setLocation(int top, int left)
    {
        this.setFrame(left, top, left + 200, top + 200);
    }

}
修改MainActivity,在frameLayout的setOnTouchListener中判断有没有点击事件:
public class MainActivity extends AppCompatActivity {

    private FrameLayout frameLayout = null;
    private AnimationDrawable anim;
    private FrameView frameView;

   @Override
    protected void onCreate(Bundle savedInstanceState) {
        super.onCreate(savedInstanceState);
        setContentView(R.layout.activity_main);
        frameLayout = findViewById(R.id.myframe);
        frameView = new FrameView(this);
        frameView.setBackgroundResource(R.drawable.meizi);
        frameView.setVisibility(View.INVISIBLE);//刚开始没点击事件所以设置为INVISIBLE
        anim = (AnimationDrawable) frameView.getBackground();
        frameView.setAnim(anim);
        frameLayout.addView(frameView);
        frameLayout.setOnTouchListener(new View.OnTouchListener() {
            @Override
            public boolean onTouch(View v, MotionEvent event) {
                if(event.getAction() == MotionEvent.ACTION_DOWN) {//如果是按下动作
                    anim.stop();
                    float x = event.getX();
                    float y = event.getY();
                    frameView.setLocation((int) y - 40, (int) x - 20);
                    frameView.setVisibility(View.VISIBLE);
                    anim.start();
                }
                return false;
            }
        });
    }

}
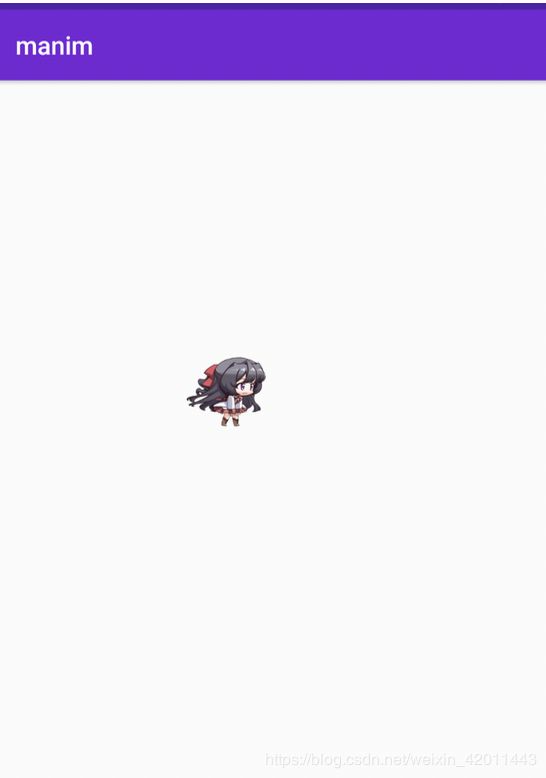
效果如下:
第一次点击:
第二次:

如果想要跑完一轮就自动消失就重写FrameView的onDraw方法。
补间动画(View动画)
补间动画与帧动画不同,帧动画是通过连续播放图片来模拟动画效果,而补间动画只需指定动画开始以及动画结束"关键帧"即可, 动画变化的"中间帧"由系统计算并补齐。Andoird所支持的补间动画效果有以下几种:
- AlphaAnimation:透明度渐变效果,创建时许指定开始以及结束透明度,还有动画的持续时间,透明度的变化范围(0,1),0是完全透明,1是完全不透明;对应标签。
- ScaleAnimation:缩放渐变效果,创建时需指定开始以及结束的缩放比,以及缩放参考点,还有动画的持续时间;对应标签。
- TranslateAnimation:位移渐变效果,创建时指定起始以及结束位置,并指定动画的持续 时间即可;对应标签。
- RotateAnimation:旋转渐变效果,创建时指定动画起始以及结束的旋转角度,以及动画持续时间和旋转的轴心;对应标签。
- AnimationSet:组合渐变,就是前面多种渐变的组合;对应标签。
举例来说:
- AlphaAnimation对应标签
   <alpha xmlns:android="http://schemas.android.com/apk/res/android"
    android:interpolator="@android:anim/accelerate_decelerate_interpolator"
    android:fromAlpha="1.0"
    android:toAlpha="0.1"
    android:duration="2000"/>
对应的特有属性:
fromAlpha :起始透明度
toAlpha:结束透明度
透明度的范围为:0-1,完全透明-完全不透明
- ScaleAnimation对应标签
 <scale xmlns:android="http://schemas.android.com/apk/res/android"
    android:interpolator="@android:anim/accelerate_interpolator"
    android:fromXScale="0.2"
    android:toXScale="1.5"
    android:fromYScale="0.2"
    android:toYScale="1.5"
    android:pivotX="50%"
    android:pivotY="50%"
    android:duration="2000"/>
对应的特有属性:
fromXScale/fromYScale:沿着X轴/Y轴缩放的起始比例
toXScale/toYScale:沿着X轴/Y轴缩放的结束比例
pivotX/pivotY:缩放的中轴点X/Y坐标,即距离自身左边缘的位置,比如50%就是以图像的 中心为中轴点
- TranslateAnimation对应标签
 <translate xmlns:android="http://schemas.android.com/apk/res/android"
    android:interpolator="@android:anim/accelerate_decelerate_interpolator"
    android:fromXDelta="0"
    android:toXDelta="320"
    android:fromYDelta="0"
    android:toYDelta="0"
    android:duration="2000"/>
对应的特有属性:
fromXDelta/fromYDelta:动画起始位置的X/Y坐标
toXDelta/toYDelta:动画结束位置的X/Y坐标
- RotateAnimation对应标签
<rotate xmlns:android="http://schemas.android.com/apk/res/android"
    android:interpolator="@android:anim/accelerate_decelerate_interpolator"
    android:fromDegrees="0"
    android:toDegrees="360"
    android:duration="1000"
    android:repeatCount="1"
    android:repeatMode="reverse"/>
对应的属性解释:
fromDegrees/toDegrees:旋转的起始/结束角度
repeatCount:旋转的次数,默认值为0,代表一次,假如是其他值,比如3,则旋转4次 另外,值为-1或者infinite时,表示动画永不停止
repeatMode:设置重复模式,默认restart,但只有当repeatCount大于0或者infinite或-1时 才有效。还可以设置成reverse,表示偶数次显示动画时会做方向相反的运动。
- AnimationSet前面多种渐变的组合,对应标签
<set xmlns:android="http://schemas.android.com/apk/res/android"
    android:interpolator="@android:anim/decelerate_interpolator"
    android:shareInterpolator="true" >

    <scale
        android:duration="2000"
        android:fromXScale="0.2"
        android:fromYScale="0.2"
        android:pivotX="50%"
        android:pivotY="50%"
        android:toXScale="1.5"
        android:toYScale="1.5" />

    <rotate
        android:duration="1000"
        android:fromDegrees="0"
        android:repeatCount="1"
        android:repeatMode="reverse"
        android:toDegrees="360" />

    <translate
        android:duration="2000"
        android:fromXDelta="0"
        android:fromYDelta="0"
        android:toXDelta="320"
        android:toYDelta="0" />

    <alpha
        android:duration="2000"
        android:fromAlpha="1.0"
        android:toAlpha="0.1" />

</set>
一些共有的属性,图片来源:

里面有个Interpolator比较常用,可以理解为动画渲染器,常用的一些值及其含义有:
- LinearInterpolator:动画以均匀的速度改变,用法@android:anim/linear_interpolator,后面同理
- AccelerateInterpolator:在动画开始的地方改变速度较慢,然后开始加速,用法@android:anim/accelerate_interpolator
- AccelerateDecelerateInterpolator:在动画开始、结束的地方改变速度较慢,中间时加速
- CycleInterpolator:动画循环播放特定次数,变化速度按正弦曲线改变:Math.sin(2 * mCycles * Math.PI * input)
- DecelerateInterpolator:在动画开始的地方改变速度较快,然后开始减速
- AnticipateInterpolator:反向,先向相反方向改变一段再加速播放
- AnticipateOvershootInterpolator:开始的时候向后然后向前甩一定值后返回最后的值
- BounceInterpolator: 跳跃,快到目的值时值会跳跃,如目的值100,后面的值可能依次为85,77,70,80,90,100
- OvershottInterpolator:回弹,最后超出目的值然后缓慢改变到目的值
Demo
对照上面介绍每个标签时的xml文件,布局文件如下:
<?xml version="1.0" encoding="utf-8"?>
<LinearLayout xmlns:android="http://schemas.android.com/apk/res/android"
    xmlns:app="http://schemas.android.com/apk/res-auto"
    xmlns:tools="http://schemas.android.com/tools"
    android:layout_width="match_parent"
    android:layout_height="match_parent"
    android:orientation="vertical"
    tools:context=".MainActivity">

    <Button
        android:id="@+id/btn_alpha"
        android:layout_width="wrap_content"
        android:layout_height="wrap_content"
        android:text="透明度渐变效果" />

    <Button
        android:id="@+id/btn_scale"
        android:layout_width="wrap_content"
        android:layout_height="wrap_content"
        android:text="缩放渐变效果" />

    <Button
        android:id="@+id/btn_tran"
        android:layout_width="wrap_content"
        android:layout_height="wrap_content"
        android:text="位移渐变效果" />

    <Button
        android:id="@+id/btn_rotate"
        android:layout_width="wrap_content"
        android:layout_height="wrap_content"
        android:text="旋转渐变效果" />

    <Button
        android:id="@+id/btn_set"
        android:layout_width="wrap_content"
        android:layout_height="wrap_content"
        android:text="组合渐变效果" />

    <ImageView
        android:id="@+id/img_show"
        android:layout_width="wrap_content"
        android:layout_height="wrap_content"
        android:layout_gravity="center"
        android:layout_marginTop="50dp"
        android:src="@drawable/s_1" />

</LinearLayout>
MainActivity中,调用AnimationUtils.loadAnimation() 方法加载动画,然后View控件调用startAnimation方法开启动画。
public class MainActivity extends AppCompatActivity implements View.OnClickListener {

    private Button btn_alpha;
    private Button btn_scale;
    private Button btn_tran;
    private Button btn_rotate;
    private Button btn_set;
    private ImageView img_show;
    private Animation animation = null;

    @Override
    protected void onCreate(Bundle savedInstanceState) {
        super.onCreate(savedInstanceState);
        setContentView(R.layout.activity_main);
        bindviews();
        btn_alpha.setOnClickListener(this);
        btn_scale.setOnClickListener(this);
        btn_tran.setOnClickListener(this);
        btn_rotate.setOnClickListener(this);
        btn_set.setOnClickListener(this);
    }

    private void bindviews() {
        btn_alpha = (Button) findViewById(R.id.btn_alpha);
        btn_scale = (Button) findViewById(R.id.btn_scale);
        btn_tran = (Button) findViewById(R.id.btn_tran);
        btn_rotate = (Button) findViewById(R.id.btn_rotate);
        btn_set = (Button) findViewById(R.id.btn_set);
        img_show = (ImageView) findViewById(R.id.img_show);
    }

    @Override
    public void onClick(View v) {
        switch (v.getId()) {
            case R.id.btn_alpha:
                animation = AnimationUtils.loadAnimation(this, R.anim.anim_alpha);
                img_show.startAnimation(animation);
                break;
            case R.id.btn_scale:
                animation = AnimationUtils.loadAnimation(this, R.anim.anim_scale);
                img_show.startAnimation(animation);
                break;
            case R.id.btn_tran:
                animation = AnimationUtils.loadAnimation(this, R.anim.anim_translate);
                img_show.startAnimation(animation);
                break;
            case R.id.btn_rotate:
                animation = AnimationUtils.loadAnimation(this, R.anim.anim_rotate);
                img_show.startAnimation(animation);
                break;
            case R.id.btn_set:
                animation = AnimationUtils.loadAnimation(this, R.anim.anim_set);
                img_show.startAnimation(animation);
                break;
        }
    }
}
属性动画
自Android 3.0版本开始,Android系统提供了一种全新的动画模式,属性动画(property animation),弥补了之前补间动画的一些缺陷,几乎可以完全替代掉补间动画。
引入属性动画的理由:
- 1.补间动画只能实现透明度,旋转,倾斜和位移这几种操作,局限性比较大
- 2.补间动画针对的对象只是View控件,不能针对非View对象进行动画操作
- 3.补间动画只是改变View的显示效果,不会去改变View的属性。比如说按钮从左平移到右,按钮其实还停留在左边,只不过补间动画将这个按钮绘制到了屏幕的右边,假如点右边的按钮是不会触发按钮的点击事件的。
属性动画就针对上面几种情况进行了改进:
- 不再限定于移动、缩放、旋转和淡入淡出这几种动画操作,可以定义任意属性的变化
- 不再是针对于View对象设计,可以针对任意对象的任意属性进行动画操作
- 不再仅仅是视觉上的效果,属性动画实际上是对任意目标对象进行赋值并修改其任意属性来实现,即不断对值进行操作的机制,并将值赋值到任意指定对象的任意指定属性上,这样上面说的按钮点击问题就不存在了
相关api
ValueAnimator:
ValueAnimator属性动画机制中最核心的一个类,前面说到属性动画实际上是对任意目标对象进行赋值并修改其任意属性来实现,而初始值和结束值之间的动画过渡就是由ValueAnimator这个类来负责计算的。它的内部使用一种时间循环的机制来计算值与值之间的动画过渡,我们只需要将初始值和结束值提供给ValueAnimator,并且告诉它动画所需运行的时长,那么ValueAnimator就会自动帮我们完成从初始值平滑地过渡到结束值这样的效果。除此之外,ValueAnimator还负责管理动画的播放次数、播放模式、以及对动画设置监听器等。
使用流程:
- 1.调用ValueAnimator的ofInt(),ofFloat()或ofObject()静态方法创建ValueAnimator实例,方法中可带多个参数值
ValueAnimator anim = ValueAnimator.ofFloat(0f, 1f); //将一个值从0平滑过渡到1
- 2.调用实例的setxxx方法设置动画持续时间,插值方式,重复次数等
anim.setDuration(300); //动画持续时间300ms
- 3.调用实例的addUpdateListener添加AnimatorUpdateListener监听器,在该监听器中可以获得ValueAnimator计算出来的值,可以将值应用到指定对象上
 anim.addUpdateListener(new ValueAnimator.AnimatorUpdateListener() {
    @Override
    public void onAnimationUpdate(ValueAnimator animation) {
        float currentValue = (float) animation.getAnimatedValue();//获得ValueAnimator计算出来的当前值
        Log.d("TAG", "cuurent value is " + currentValue);
    }
});
- 4.调用实例的start()方法开启动画
anim.start();
ValueAnimator Demo
布局文件:
<?xml version="1.0" encoding="utf-8"?>
<LinearLayout xmlns:android="http://schemas.android.com/apk/res/android"
    xmlns:app="http://schemas.android.com/apk/res-auto"
    xmlns:tools="http://schemas.android.com/tools"
    android:layout_width="match_parent"
    android:layout_height="match_parent"
    android:orientation="vertical"
    android:id="@+id/layout"
    tools:context=".MainActivity">
    <Button
        android:id="@+id/btn1"
        android:layout_width="wrap_content"
        android:layout_height="wrap_content"
        android:text="移动" />
    <Button
        android:id="@+id/btn2"
        android:layout_width="wrap_content"
        android:layout_height="wrap_content"
        android:text="缩放" />
    <Button
        android:id="@+id/btn3"
        android:layout_width="wrap_content"
        android:layout_height="wrap_content"
        android:text="旋转 同时透明度变化" />
    <ImageView
        android:id="@+id/imageview"
        android:layout_width="wrap_content"
        android:layout_height="wrap_content"
        android:layout_gravity="center"
        android:background="@drawable/s_jump" />
</LinearLayout>
MainActivity,按照上面的流程:
public class MainActivity extends AppCompatActivity implements View.OnClickListener {

    private Button btn1;
    private Button btn2;
    private Button btn3;
    private LinearLayout linearLayout;
    private ImageView imageView;
    private int width;
    private int height;

    @Override
    protected void onCreate(Bundle savedInstanceState) {
        super.onCreate(savedInstanceState);
        setContentView(R.layout.activity_main);
        bindviews();
    }

    private void bindviews() {
        btn1 = findViewById(R.id.btn1);
        btn2 = findViewById(R.id.btn2);
        btn3 = findViewById(R.id.btn3);
        imageView = findViewById(R.id.imageview);
        linearLayout = findViewById(R.id.layout);
        btn1.setOnClickListener(this);
        btn2.setOnClickListener(this);
        btn3.setOnClickListener(this);
    }

    @Override
    public void onClick(View v) {
        switch(v.getId()){
            case R.id.btn1:
                ValueAnimator anim1 = ValueAnimator.ofInt(linearLayout.getHeight(),0,linearLayout.getHeight());
                anim1.setDuration(3000);
                anim1.addUpdateListener(new ValueAnimator.AnimatorUpdateListener() {
                    @Override
                    public void onAnimationUpdate(ValueAnimator animation) {
                        int y = (int) animation.getAnimatedValue();
                        int x = linearLayout.getWidth()/2;
                        moveView(imageView,x,y);
                    }
                });
                anim1.setInterpolator(new LinearInterpolator());
                anim1.start();
                break;
            case R.id.btn2:
                ValueAnimator anim2 = ValueAnimator.ofFloat(1.0f, 0.5f,0.1f,0.5f,1.0f);
                anim2.setDuration(3000);
                anim2.addUpdateListener(new ValueAnimator.AnimatorUpdateListener() {
                    @Override
                    public void onAnimationUpdate(ValueAnimator animation) {
                        float  currentvalue = (Float) animation.getAnimatedValue();
                        imageView.setScaleX(currentvalue);
                        imageView.setScaleY(currentvalue);
                    }
                });
                anim2.setInterpolator(new LinearInterpolator());
                anim2.start();
                break;
            case R.id.btn3:
                ValueAnimator anim3 = ValueAnimator.ofInt(0,360,0);
                anim3.setDuration(3000);
                anim3.addUpdateListener(new ValueAnimator.AnimatorUpdateListener() {
                    @Override
                    public void onAnimationUpdate(ValueAnimator animation) {
                        int  currentvalue = (int) animation.getAnimatedValue();//当前值
                        imageView.setRotation(currentvalue);
                        float percentvaule = animation.getAnimatedFraction();//当前百分比
                        imageView.setAlpha(percentvaule);
                    }
                });
                anim3.setInterpolator(new DecelerateInterpolator());
                anim3.start();
                break;
        }

    }
    private void moveView(ImageView imageView, int x, int y) {
        int left = x - imageView.getWidth() / 2;
        int top = y - imageView.getHeight();
        int width = left + imageView.getWidth();
        int height = top + imageView.getHeight();
        imageView.layout(left, top, width, height);
    }
}
ValueAnimator高级用法
在介绍ValueAnimator的使用流程的时候,第一步说到可以通过ValueAnimator的类方法ofInt(),ofFloat()或ofObject()创建创建ValueAnimator实例,前面已经使用过ofInt(),ofFloat(),这里再学习下ofObject()。其实前面已经提到过ofObject()方法的作用,就是属性动画区别于补间动画的最重要的一点:属性动画可以针对任意对象进行操作。ofInt()/ofFloat()是初始值到结束值的过度,ofObject()就可以理解为初始对象到结束对象的过度。在写Demo之前,还需要了解Evaluator(计算器)的基本知识:
Evaluator计算器的作用就是规定了从初始值过度到结束值的方式,系统主要提供了下面几种Evaluator :
- IntEvaluator :用于计算int类型属性值的计算器
- FloatEvaluator :用于计算float类型属性值的计算器
- ArgbEvaluator :用于计算十六进制形式表示的颜色值的计算器
- TypeEvaluator :计算器的接口,可以通过实现该接口来完成自定义Evaluator
要了解TypeEvaluator可以先学习下IntEvaluator的源码实现:
  public class IntEvaluator implements TypeEvaluator< Integer > {
      public Integer evaluate(float fraction, Integer startValue, Integer endValue) {
               int startInt = startValue ;
               return (int) (startInt+fraction * (endValue - startInt)) ;
       }
 }
发现IntEvaluator实际上是实现了TypeEvaluator接口,然后重写了evaluate()方法,三个参数的主要含义如下:
- fraction:动画的完成度,可以理解为百分比
- startValue:动画的起始值
- endValue:动画的结束值
计算int类型属性值最后返回的结果是初始值 + 完成度 * (结束值 - 初始值),这就是动画的当前值。
Demo
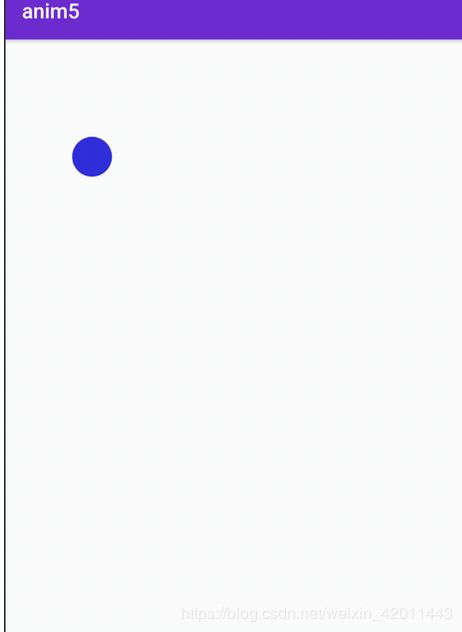
我们定义一个自定义的View,在这个View当中有一个Point对象用于管理坐标,在View的onDraw()方法中根据变化的Point对象的坐标值绘制圆形图形。补间动画由于只针对View对象,因此肯定不能完成类似的动画效果,利用属性动画和计算器就可以对Point对象(非View对象)进行动画操作。
首先定义Point类,包含x点与y点坐标:
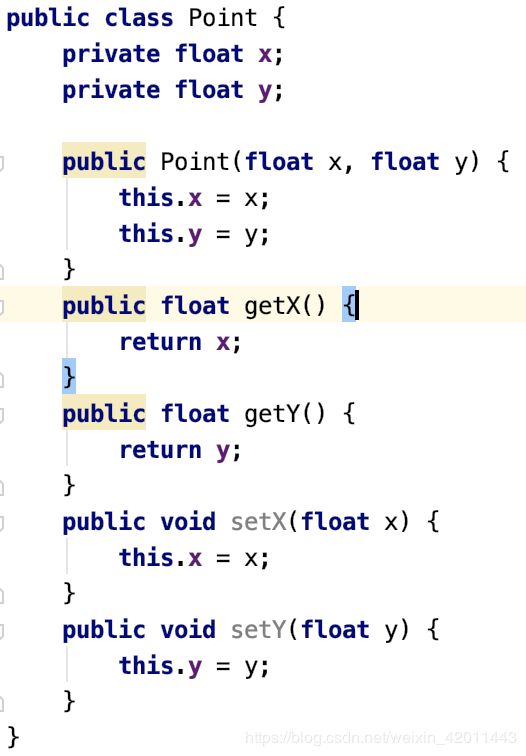
然后向IntEvalutor那样自定义Evalutor:PointEvalutor实现TypeEvaluator接口,然后重写evaluate方法,返回Point对象:
public class PointEvalutor implements TypeEvaluator<Point> {
    @Override
    public Point evaluate(float fraction, Point startValue, Point endValue) {
        //初始值+进度*(结束值-初始值)
        float x = startValue.getX() + fraction * (endValue.getX() - startValue.getX());
        float y = startValue.getY() + fraction * (endValue.getY() - startValue.getY());
        Point point = new Point(x, y);
        return point;
    }
}
接下来就是自定义View,在View的onDraw()方法中根据变化的Point对象的坐标值绘制圆形图形:
public class AnimView extends View {
    private static final float RADIUS = 50.0f;
    private Paint mpaint;
    private Point currentPoint;

    public AnimView(Context context, @Nullable AttributeSet attrs) {
        super(context, attrs);
        mpaint = new Paint(Paint.ANTI_ALIAS_FLAG);
        //初始化画笔
        mpaint.setColor(Color.BLUE);
    }
    @Override
    protected void onDraw(Canvas canvas) {
        if(currentPoint == null){
             currentPoint = new Point(RADIUS,RADIUS);
             canvas.drawCircle(currentPoint.getX(),currentPoint.getY(),RADIUS,mpaint);
             StartAnim();
        }else {
             canvas.drawCircle(currentPoint.getX(),currentPoint.getY(),RADIUS,mpaint);
        }
    }

    private void StartAnim() {
        //这里类似前面给一个初始值和结束值一样,要给个初始对象和结束对象
        Point startPoint = new Point(RADIUS,RADIUS);
        Point endPoint   = new Point(getWidth()-RADIUS,getHeight()-RADIUS);
        //接下来就和前面的流程一样了,使用ofObject方法,意为初始对象到结束对象的过度
        final ValueAnimator anim = ValueAnimator.ofObject(new PointEvalutor(),startPoint,endPoint);
        anim.setDuration(3000);
        anim.addUpdateListener(new ValueAnimator.AnimatorUpdateListener() {
            @Override
            public void onAnimationUpdate(ValueAnimator animation) {
                 currentPoint = (Point) animation.getAnimatedValue();
                 invalidate();
            }
        });
        anim.setInterpolator(new LinearInterpolator());
        anim.start();
    }
}
最后修改activity_main.xml文件:
<?xml version="1.0" encoding="utf-8"?>
<LinearLayout xmlns:android="http://schemas.android.com/apk/res/android"
    xmlns:app="http://schemas.android.com/apk/res-auto"
    xmlns:tools="http://schemas.android.com/tools"
    android:layout_width="match_parent"
    android:layout_height="match_parent"
    tools:context=".MainActivity">

    <com.demo.anim5.AnimView
        android:layout_width="match_parent"
        android:layout_height="match_parent"/>

</LinearLayout>
ObjectAnimator与AnimatorSet
相比于ValueAnimator只是对值进行了一个平滑的动画过渡来说,ObjectAnimator才是我们最常用到的类,因为它可以直接对任意对象(这里的任意对象不再像补间动画那样仅仅针对View对象了)的任意属性进行动画操作,本质上ObjectAnimator是通过寻找特定对象的属性的get和set方法,然后通过方法不断地对值进行改变,从而实现动画效果的。
ObjectAnimator虽然功能更加强大,但是底层的动画实现机制实际上还是基于ValueAnimator来完成的,因此用法上有相同之处。AnimatorSet是将多个动画组合到一起更简洁些,也可以分开写,但会比较繁琐。AnimatorSet类提供了一个play()方法,如果向这个方法中传入一个Animator对象(ValueAnimator或ObjectAnimator)将会返回一个AnimatorSet.Builder的实例,AnimatorSet.Builder实例又包括以下四个方法,利用这四个方法就可以完成组合动画的操作。
- after(Animator anim) 将现有动画插入到传入的动画之后执行
- after(long delay) 将现有动画延迟指定毫秒后执行
- before(Animator anim) 将现有动画插入到传入的动画之前执行
- with(Animator anim) 将现有动画和传入的动画同时执行
Demo
布局文件和ValueAnimator差不多,这里就只看MainActivity,在改变透明度的动画操作中添加了监听事件:
public class MainActivity extends AppCompatActivity implements View.OnClickListener {
    private Button btn1;
    private Button btn2;
    private Button btn3;
    private Button btn4;
    private Button btn5;
    private TextView textView;
    private AnimatorSet animSet;
    private ObjectAnimator anim1;
    private ObjectAnimator anim2;
    private ObjectAnimator anim3;
    private ObjectAnimator anim4;

    @Override
    protected void onCreate(Bundle savedInstanceState) {
        super.onCreate(savedInstanceState);
        setContentView(R.layout.activity_main);
        bindviews();
        initanim();
    }

    private void initanim() {
        anim1 = ObjectAnimator.ofFloat(textView, "alpha", 1f, 0f, 1f);
        anim2 = ObjectAnimator.ofFloat(textView, "rotation", 0f, 360f);
        anim3 = ObjectAnimator.ofFloat(textView, "scaleY", 1f, 3f, 1f);
        anim4 = ObjectAnimator.ofFloat(textView, "translationX", -500f,0f);
    }

    private void bindviews() {
        btn1 =  findViewById(R.id.btn1);
        btn2 =  findViewById(R.id.btn2);
        btn3 =  findViewById(R.id.btn3);
        btn4 =  findViewById(R.id.btn4);
        btn5 =  findViewById(R.id.btn5);
        textView = findViewById(R.id.textview);
        btn1.setOnClickListener(this);
        btn2.setOnClickListener(this);
        btn3.setOnClickListener(this);
        btn4.setOnClickListener(this);
        btn5.setOnClickListener(this);
    }

    @Override
    public void onClick(View v) {
        switch (v.getId()){
            case R.id.btn1:
                anim1.setDuration(1000);
                anim1.start();
                anim1.addListener(new AnimatorListenerAdapter() {
                    @Override
                    public void onAnimationEnd(Animator animation) {
                        Toast.makeText(getApplicationContext(),"透明度动画结束了",Toast.LENGTH_SHORT).show();
                    }
                });
                break;
            case R.id.btn2:
                anim2.setDuration(1000);
                anim2.start();
                break;
            case R.id.btn3:
                anim3.setDuration(1000);
                anim3.start();
                break;
            case R.id.btn4:
                anim4.setDuration(1000);
                anim4.start();
                break;
            case R.id.btn5:
                animSet = new AnimatorSet();
                animSet.play(anim2).with(anim1).after(anim4);//在after之后再play并with
                animSet.setDuration(1000);
                animSet.start();
                break;
        }
    }
}
XMl文件编写
如果不想使用Java编码创建动画操作的话也可以使用XML来编写动画,画的时间可能比Java代码长一点,但是方便重用。 对应的XML标签分别为:animator、objectAnimator、set:
- animator 对应代码中的ValueAnimator
- objectAnimator 对应代码中的ObjectAnimator
- set对应代码中的AnimatorSet
相比编码来说比较简单,具体的操作可以参考郭神博客
ObjectAnimator高级用法
前面在学习ValueAnimator高级用法高级用法的时候,我们使用ofObject()方法完成了初始对象到结束对象之间的过渡,这里利用ObjectAnimator实现View颜色的动态改变。
新建ColorEvalutor计算器计算颜色值,最后返回颜色值:
public class ColorEvalutor implements TypeEvaluator<Integer> {

    @Override
    public Integer evaluate(float fraction, Integer startValue, Integer endValue) {
        int alpha = (int) (Color.alpha(startValue) + fraction * (Color.alpha(endValue) - Color.alpha(startValue)));
        int red = (int) (Color.red(startValue) + fraction * (Color.red(endValue) - Color.red(startValue)));
        int green = (int) (Color.green(startValue) + fraction * (Color.green(endValue) - Color.green(startValue)));
        int blue = (int) (Color.blue(startValue) + fraction * (Color.blue(endValue) - Color.blue(startValue)));
        return Color.argb(alpha, red, green, blue);
    }
}
这里解释一下Color.argb(alpha, red, green, blue) :
Color是采用ARGB的方式,以int型数字(四个字节32比特位)来表示,RGB就代表的是红绿蓝三原色,A代表的透明度,它们分表各占一个字节(8比特位),四个参数(字节)可以代表一个颜色:
- A:Alpha 透明度,范围: 0—255(完全透明-完全不透明),位于int的高八位;
- R:RED 红色,范围: 0—255,位于int的8-16位;
- G:Green 绿色,范围: 0—255,位于int的16-24位;
- B:Blue 透明度,范围: 0—255,位于int的低8位。
在上面Point过渡的代码上修改StartAnim()方法,利用AnimatorSet实现组合动画,即移动与颜色改变:
public class AnimView extends View {
    private static final float RADIUS = 50.0f;
    private Paint mpaint;
    private Point currentPoint;
    private int color;
    public AnimView(Context context, @Nullable AttributeSet attrs) {
        super(context, attrs);
        mpaint = new Paint(Paint.ANTI_ALIAS_FLAG);
        //初始化画笔
        mpaint.setColor(Color.BLUE);
    }

    @Override
    protected void onDraw(Canvas canvas) {
        if(currentPoint == null){
             currentPoint = new Point(RADIUS,RADIUS);
             canvas.drawCircle(currentPoint.getX(),currentPoint.getY(),RADIUS,mpaint);
             StartAnim();
        }else {
             canvas.drawCircle(currentPoint.getX(),currentPoint.getY(),RADIUS,mpaint);
        }

    }

    private void StartAnim() {
        //这里类似前面给一个初始值和结束值一样,要给个初始对象和结束对象
        Point startPoint = new Point(RADIUS,RADIUS);
        Point endPoint   = new Point(getWidth()-RADIUS,getHeight()-RADIUS);
        //接下来就和前面的流程一样了,使用ofObject方法,意为初始对象到结束对象的过度
        final ValueAnimator anim1 = ValueAnimator.ofObject(new PointEvalutor(),startPoint,endPoint);
        anim1.addUpdateListener(new ValueAnimator.AnimatorUpdateListener() {
            @Override
            public void onAnimationUpdate(ValueAnimator animation) {
                 currentPoint = (Point) animation.getAnimatedValue();
                 invalidate();
            }
        });

        ObjectAnimator anim2 = ObjectAnimator.ofObject(currentPoint,"color",new ColorEvalutor(),Color.BLUE,Color.RED);
        anim2.addUpdateListener(new ValueAnimator.AnimatorUpdateListener() {
            @Override
            public void onAnimationUpdate(ValueAnimator animation) {
                  color = (int) animation.getAnimatedValue();
                  mpaint.setColor(color);
                  invalidate();
            }
        });
        AnimatorSet animset = new AnimatorSet();
        animset.play(anim1).with(anim2);
        animset.setDuration(3000);
        animset.start();
    }
}
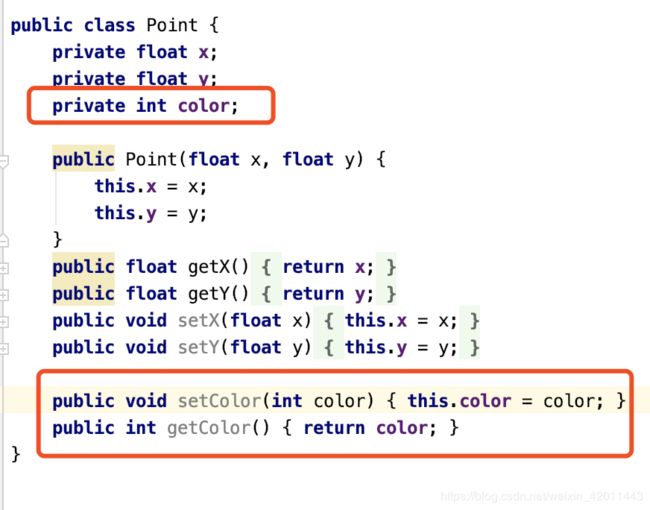
可以看到这里对Point对象的color属性进行了动画操作:

Interpolator高级用法
前面说到补间动画中一个重要的属性补间器,我们说的是类似于动画渲染器,它可以在补间动画和属性动画中使用,这里学习下它的高级用法。

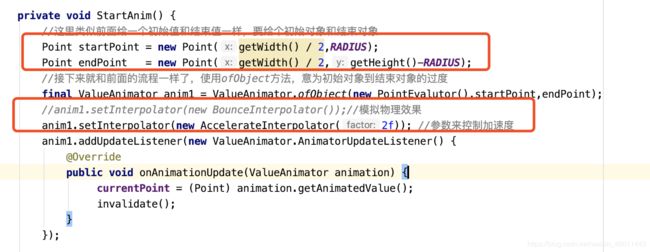
属性动画中新增了一个TimeInterpolator接口,用于兼容之前动画的Interpolator,Android系统已经内置一些TimeInterpolator接口的实现类,这里先举两个类:AccelerateInterpolator加速运动的Interpolator,BounceInterpolator模拟物理规律,实现反复弹起效果的Interpolator。代码如下图所示,首先改变了起始点与结束点:
模拟物理效果如下图所示:
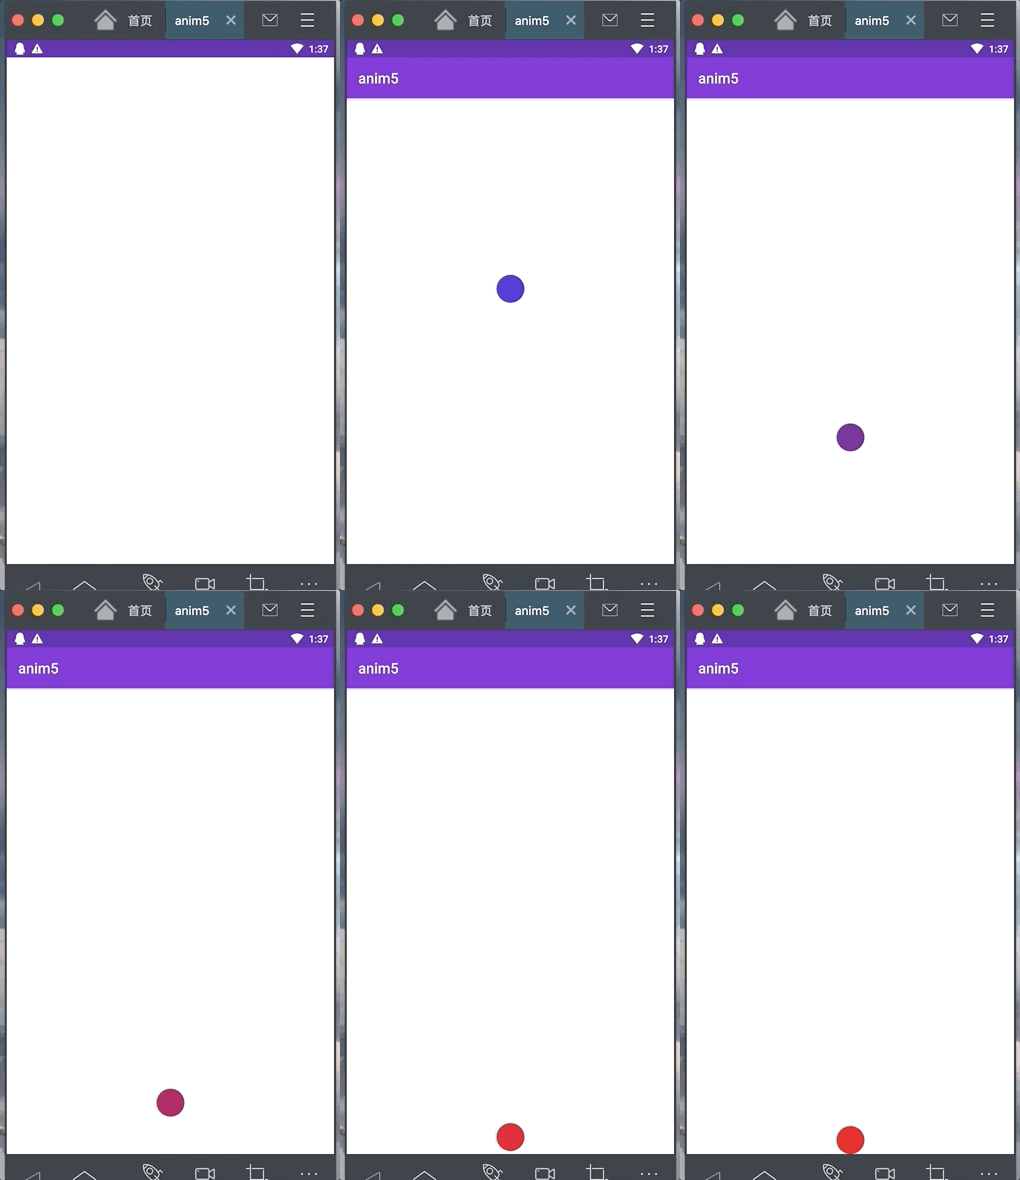
可以看到,效果还是非常棒的,这里继续学习下TimeInterpolator接口的内部实现机制,并尝试写一个自定义的Interpolator。
首先看下TimeInterpolator的接口定义,里面只有一个getInterpolation()方法,其他实现该接口的类都得重写getInterpolation方法。
public interface TimeInterpolator {
    float getInterpolation(float input);
}
该方法传入一个float参数input,这个参数的值会随着动画的运行而不断变化, 不过它的变化是非常有规律的,就是根据设定的动画时长匀速增加,变化范围是0到1。 也就是说当动画一开始的时候input的值是0,到动画结束的时候input的值是1,而中间的值则是随着动画运行的时长在0到1之间变化的。input值也决定了TypeEvaluator接口里的fraction的值,其他类重写getInterpolation方法后,就可以对这个input值采用不同算法进行计算,并将最后的计算结果返回,这个返回的计算结果就是fraction了。
举个例子,比如说我们前面提到的
-
LinearInterpolator:动画以均匀的速度改变,
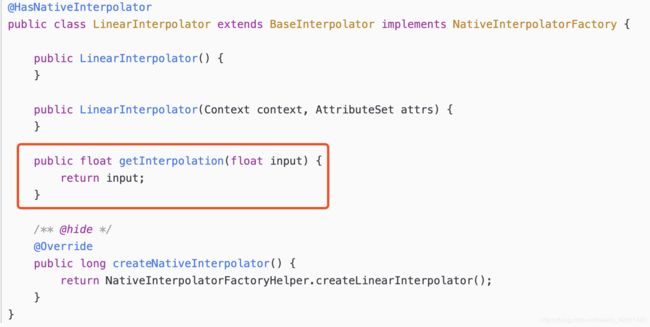
由于是匀速的原因,因此对input值没有进行运算就直接返回了。 -
AccelerateDecelerateInterpolator:在动画开始、结束的地方改变速度较慢,中间时加速

计算函数的图形如下图所示,斜率逐渐增大,到x=0.5时达到最大,后斜率逐渐变小,斜率就代表着速度:
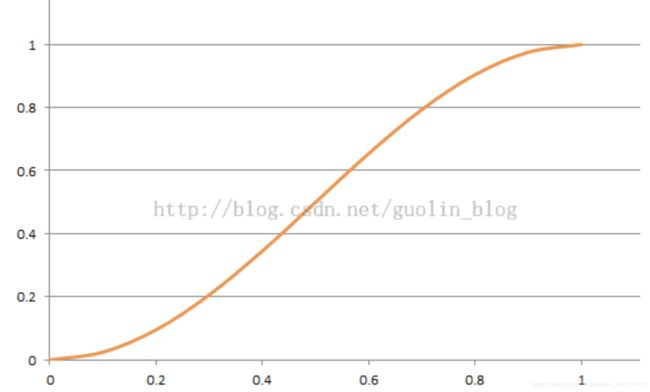
知道了Interpolator的核心就是getInterpolation方法,更准确的说是里面的计算函数后,我们可以自定义Interpolator:
在上面项目的基础上新建MyInterpolator:
public class MyInterpolator implements TimeInterpolator {
    @Override
    public float getInterpolation(float input) {
        float result;
        if (input <= 0.5) {
            result = (float) (Math.sin(Math.PI * input)) / 2;
        } else {
            result = (float) (2 - Math.sin(Math.PI * input)) / 2;
        }
        return result;
    }
}
对应的函数图形为:
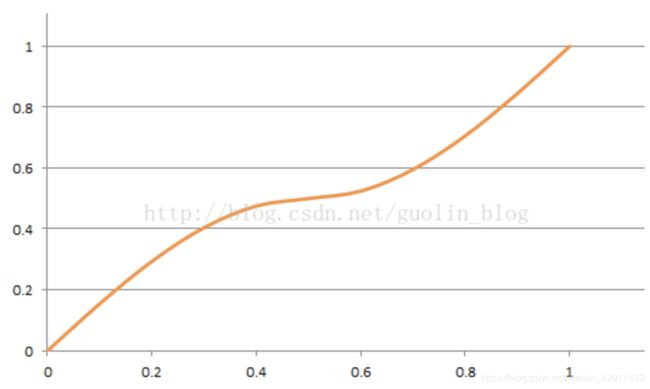
修改自定义View中的setInterpolator为自定义的MyInterpolator:
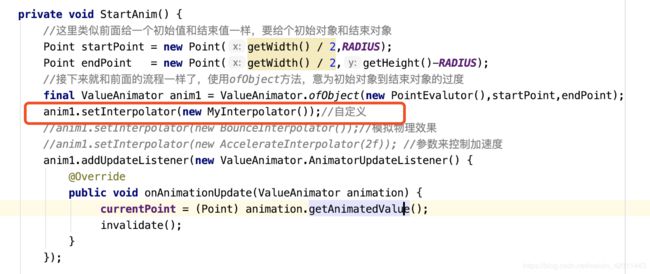
效果如下图所示:

ViewPropertyAnimator
此外还有一个比较重要的知识ViewPropertyAnimator,它支持连缀用法,之前我们想要让一个TextView从常规状态变成透明状态需要这样写:
ObjectAnimator animator = ObjectAnimator.ofFloat(textview, "alpha", 0f);
animator.start();
如果使用ViewPropertyAnimator的话,可以简化成:
textview.animate().alpha(0f);
animate()方法的返回值是一个ViewPropertyAnimator对象,得到这个对象之后就可以调用它的各种方法来实现动画效果了。比如想让textview在3000ms内移动到(500,500)这个坐标点上,并且插值器设置为BounceInterpolator,就可以这样写:
这里为了简便使用的Kotlin:
class MainActivity : AppCompatActivity() {

    override fun onCreate(savedInstanceState: Bundle?) {
        super.onCreate(savedInstanceState)
        setContentView(R.layout.activity_main)
        textview.animate().x(500.0f).y(500.0f).setDuration(3000).setInterpolator(BounceInterpolator())
    }
}
这里我们也可以看到使用ViewPropertyAnimator将动画定义完成之后,动画就会自动启动,并且这个机制对于组合动画也同样有效,只要我们不断地连缀新的方法, 那么动画就不会立刻执行,等到所有在ViewPropertyAnimator上设置的方法都执行完毕后, 动画就会自动启动。如果不想使用这一默认机制的话,就必须显式地调用 start()方法来手动启动动画。

