Linux网络服务——PXE高效能批量网络装机
【centos6.5】
PXE批量装机服务构建
1、保证网络的连通性
[root@localhost ~]# service iptables stop
[root@localhost ~]# chkconfig iptables off
[root@localhost ~]# setenforce 0
setenforce: SELinux is disabled
[root@localhost ~]# sed -i '7 s/enforcing/disabled/' /etc/selinux/config
2、构建网络yum仓库
2.1 安装FTP服务器
[root@localhost ~]# mkdir /media/cdrom
mkdir: 无法创建目录"/media/cdrom": 文件已存在
[root@localhost ~]# umount /dev/sr0
[root@localhost ~]# mount /dev/sr0 /media/cdrom
mount: block device /dev/sr0 is write-protected, mounting read-only
[root@localhost ~]# rpm -ivh /media/cdrom/Packages/vsftpd-2.2.2-11.el6_4.1.x86_64.rpm
Preparing... ########################################### [100%]
package vsftpd-2.2.2-11.el6_4.1.x86_64 is already installed
[root@localhost ~]# /etc/init.d/vsftpd restart
关闭 vsftpd: [确定]
为 vsftpd 启动 vsftpd: [确定]
2.2: 准备软件仓库目录
2.1 将centos6.5光盘中的内容copy到FTP服务器的匿名访问目录下,比如/var/ftp/c6/
[root@localhost ~]# mkdir /var/ftp/c6
[root@localhost ~]# cp -rf /media/cdrom/* /var/ftp/c6/ &
[1] 2205
[root@localhost ~]# du -sh /var/ftp/c6/
4.2G /var/ftp/c6/
[1]+ Done cp -i -rf /media/cdrom/* /var/ftp/c6/
[root@localhost ~]# jobs
2.3: 在客户端上配置内网yum源配置文件
[root@localhost ~]# cd /etc/yum.repos.d/
[root@localhost yum.repos.d]# mkdir a/
mkdir: 无法创建目录"a/": 文件已存在
[root@localhost yum.repos.d]# mv C* a/
mv:是否覆盖"a/CentOS-Media.repo"? y
[root@localhost yum.repos.d]# vi kgc.repo
[kgc]
name=kgc
baseurl=ftp://192.168.157.4/c6
gpgcheck=0
enabled=1
保存退出
[root@localhost yum.repos.d]# yum -y clean all
Loaded plugins: fastestmirror, refresh-packagekit, security
Cleaning repos: kgc
Cleaning up Everything
Cleaning up list of fastest mirrors
[root@localhost yum.repos.d]# yum makecache
Loaded plugins: fastestmirror, refresh-packagekit, security
Determining fastest mirrors
kgc | 4.0 kB 00:00
kgc/group_gz | 220 kB 00:00
kgc/filelists_db | 5.8 MB 00:00
kgc/primary_db | 4.4 MB 00:00
kgc/other_db | 2.7 MB 00:00
Metadata Cache Created
3、安装tftp-server 服务器,以客户端提供引导文件比如pxelinux.0 vmlinuz 等
[root@localhost yum.repos.d]# yum -y install tftp-server
Installed:
tftp-server.x86_64 0:0.49-7.el6
Dependency Installed:
xinetd.x86_64 2:2.3.14-39.el6_4
Complete!
[root@localhost yum.repos.d]# rpm -q tftp-server
tftp-server-0.49-7.el6.x86_64
[root@localhost yum.repos.d]# chkconfig tftp on 【开启tftp服务】
[root@localhost yum.repos.d]# /etc/init.d/xinetd restart
停止 xinetd: [失败]
正在启动 xinetd: [确定]
3.1 //tftp-server的共享目录是: /var/lib/tftpboot,我们需要将所有客户端所需要的文件,比如pxelinux.0 vmlinuz 等放到这个目录中
[root@localhost yum.repos.d]# cd
[root@localhost ~]# cd /var/ftp/c6/isolinux/
[root@localhost isolinux]# ls
boot.cat grub.conf isolinux.bin memtest TRANS.TBL vmlinuz
boot.msg initrd.img isolinux.cfg splash.jpg vesamenu.c32
[root@localhost isolinux]# cp vmlinuz initrd.img /var/lib/tftpboot/
[root@localhost isolinux]# ls /var/lib/tftpboot/
initrd.img vmlinuz
[root@localhost isolinux]# rpm -q syslinux
package syslinux is not installed
[root@localhost isolinux]# yum -y install syslinux
Installed:
syslinux.x86_64 0:4.02-8.el6
Complete!
[root@localhost isolinux]# rpm -q syslinux
syslinux-4.02-8.el6.x86_64
[root@localhost isolinux]# rpm -ql syslinux |grep "pxelinux.0"
/usr/share/syslinux/gpxelinux.0
/usr/share/syslinux/pxelinux.0
[root@localhost isolinux]# cp /usr/share/syslinux//pxelinux.0 /var/lib/tftpboot/
[root@localhost isolinux]# ls /var/lib/tftpboot/
initrd.img pxelinux.0 vmlinuz
3.2 下面开始准备启动引导菜单
[root@localhost isolinux]# cp /var/ftp/c6/isolinux/isolinux.cfg /var/lib/tftpboot/
[root@localhost isolinux]# cd /var/lib/tftpboot/
[root@localhost tftpboot]# chmod 644 isolinux.cfg
[root@localhost tftpboot]# vim isolinux.cfg
1 default linux 【linux 默认标签名称】
2 prompt 0 去掉#号【不进行交互】
3 #timeout 600 【禁用倒计时60秒等待人机交互】
4
21 kernel vmlinuz
22 append initrd=initrd.img ks=ftp://192.168.157.4/ks.cfg 【指定免交互配置参数文件下载路径】
23 label vesa
保存退出
[root@localhost tftpboot]# mkdir pxelinux.cfg
[root@localhost tftpboot]# cp isolinux.cfg pxelinux.cfg/default
[root@localhost tftpboot]# ls pxelinux.cfg/
Default
4: 安装并配置DHCP服务器
[root@localhost tftpboot]# rpm -q dfcp
package dfcp is not installed
[root@localhost tftpboot]# yum -y install dhcp
Running Transaction
Installing : 12:dhcp-4.1.1-38.P1.el6.centos.x86_64 1/1
Verifying : 12:dhcp-4.1.1-38.P1.el6.centos.x86_64 1/1
Installed:
dhcp.x86_64 12:4.1.1-38.P1.el6.centos
Complete!
[root@localhost tftpboot]# cd
[root@localhost ~]# rpm -q dhcp
dhcp-4.1.1-38.P1.el6.centos.x86_64
[root@localhost ~]# cat /usr/share/doc/dhcp-4.1.1/dhcpd.conf.sample > /etc/dhcp/dhcpd.conf
[root@localhost ~]# vi /etc/dhcp/dhcpd.conf
1 default-lease-time 3600;
2 max-lease-time 7200;
3 log-facility local7;
4
5 subnet 192.168.157.0 netmask 255.255.255.0 {
6 range 192.168.157.3 192.168.157.222;
7 option routers 192.168.157.1; 【指定客户机要找的tftp-server的IP地址】
8 next-server 192.168.157.4; 【指定客户机要从tftp-server上获取的pxelinx.0】
9 filename "pxelinux.0";
10 }
其他的全部删除
保存退出
[root@localhost ~]# /etc/init.d/dhcpd start
正在启动 dhcpd: [确定]
[root@localhost ~]# chkconfig dhcpd on
5: 创建/var/ftp/ks.cfg 这个免交互参数配置文件
ks.cfg可以通过system-config-kickstart这命令来生成,所以不需要创建
但是很多系统默认没有这个命令,所以要先安装这个命令
[root@localhost ~]# yum -y install system-config-kickstart
Dependency Installed:
anaconda.x86_64 0:13.21.215-1.el6.centos
anaconda-yum-plugins.noarch 1:1.0-5.1.el6
createrepo.noarch 0:0.9.9-18.el6
deltarpm.x86_64 0:3.5-0.5.20090913git.el6
device-mapper-multipath.x86_64 0:0.4.9-72.el6
device-mapper-multipath-libs.x86_64 0:0.4.9-72.el6
fcoe-utils.x86_64 0:1.0.28-3.el6
iscsi-initiator-utils.x86_64 0:6.2.0.873-10.el6
squashfs-tools.x86_64 0:4.0-5.el6
system-config-language.noarch 0:1.3.4-6.el6
tigervnc-server.x86_64 0:1.1.0-5.el6_4.1
Complete!
[root@localhost ~]# rpm -q system-config-kickstart
system-config-kickstart-2.8.6.5-1.el6.noarch
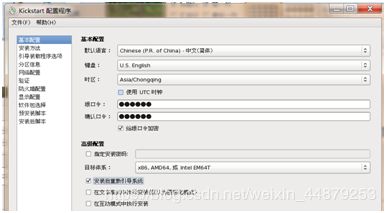
[root@localhost ~]# system-config-kickstart 【通过这个命令可以打开一个生成ks.cfg文档的交互界面】
Xlib: extension "RANDR" missing on display "localhost:10.0".
/usr/share/system-config-kickstart/kickstartGui.py:103: GtkWarning: GtkSpinButton: setting an adjustment with non-zero page size is deprecated
Loading mirror speeds from cached hostfile
Loading mirror speeds from cached hostfile
自己本机的ip 目录为挂载时的目录
下面可选择有用的系统
选完之后进行保存
选择文件系统的/var/ftp(此处的保存地址必须与这个/var/lib/tftpboot/pxelinux.cfg/default文件里编辑append initrd=initrd.img ks=ftp://192.168.157.7/ks.cfg的地址是同一处)为保存地
保存成功,出现其他提示时多保存几次,务必保存到ftp下,不可保存到ftp的其他目录下
这时保存好后复制xsell通道号,把保存好的ks.cfg文件权限提到777,防止安装失败
[root@localhost ~]# ls -l /var/ftp/ks.cfg
-rw-r--r-- 1 root root 1146 4月 6 07:38 /var/ftp/ks.cfg
[root@localhost ~]# chmod 777 /var/ftp/ks.cfg
[root@localhost ~]# ls -l /var/ftp/ks.cfg
-rwxrwxrwx 1 root root 1146 4月 6 07:38 /var/ftp/ks.cfg
打开本地计算机选择要安装的地方,并创建文件夹取名为“pxf试验地”
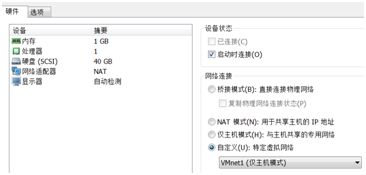
打开虚拟机创建新虚拟机位置选“pxf试验地”
硬件里除了这几个其他全部删除,网络配置改为与创建的服务器同一网段VM1
之后打开虚拟机实验自动安装
实验补充:
1、在执行system-config-kickstart这个命令失败时,打开xsell的属性→隧道→x11(第一个M)打对勾→确定,重新开一个隧道
2、在最后的文件保存时必须跟上面的路径一样,如果最后文件保存的位置在/root/var/ftp/下,那么在编辑/var/lib/tftpboot/pxelinux.cfg/default文件时,这个中的路径append initrd=initrd.img ks=ftp://192.168.157.7/ks.cfg 也必须是ftp下,如果保存的位置在/root/var/ftp/pub/,那么编辑文件时就得写成ks=ftp://192.168.157.7./bup/ks.cfg
3、先启动dhcp,再启动xineted,否则会启动失败
4、查看tftp运行的2种命令
方法一
ls /var/lib/tftpboot
这个文件里有文件vesamenu.c32
tftp 127.0.0.1
get vesamenu.c32
quit
ls
当前目录有vesamenu.c32证明tftp运行
方法二
netstat -anptu | grep ":69"
当前有0.0.0.0.0:69
证明tftp在运行


