选字验证码
本示例为选择一个字,点击图片上的字到后台进行验证:
import javax.imageio.ImageIO;
import javax.servlet.http.HttpServletRequest;
import javax.servlet.http.HttpServletResponse;
import javax.servlet.http.HttpSession;
import java.awt.*;
import java.awt.geom.AffineTransform;
import java.awt.image.BufferedImage;
import java.io.File;
import java.io.IOException;
import java.io.UnsupportedEncodingException;
import java.util.Random;

/**
 * Created by Saindy on 2017/7/3.
 */
public class ImgCheckController extends BaseController {

    public void gotoDemo() {
        render("imgCheckDemo.jsp");
    }

    private static Random random = new Random();

    public void getImg() {
//        HttpServletRequest request = getRequest();
        HttpServletResponse response = getResponse();
        HttpSession session = getSession();

        int fontSize = 30;

        int height = 490;  //图片高
        int width = 650;  //图片宽
        BufferedImage image = new BufferedImage(width, height, BufferedImage.TYPE_INT_RGB);
        Graphics2D g = (Graphics2D) image.getGraphics();
        // 读取本地图片,做背景图片
        String picPath = "d:/opt/img/" + (random.nextInt(4) + 1) + ".png";
        System.out.println(picPath);


        try {
            g.drawImage(ImageIO.read(new File(picPath)), 0, fontSize, width, height, null); //将背景图片从高度30开始
        } catch (IOException e) {
            e.printStackTrace();
        }


        g.setColor(Color.WHITE);  //设置颜色
        g.drawRect(0, 0, width - 1, height - 1); //画边框

        g.setFont(new Font("宋体", Font.BOLD, fontSize)); //设置字体
        Integer x = null, y = null;  //用于记录坐标
        String target = null; // 用于记录文字
        for (int i = 0; i < 4; i++) {  //随机产生4个文字,坐标,颜色都不同
            g.setColor(getRandColor(100, 160));
            String str = getRandomChineseChar();
            int a = random.nextInt(width - 100) + 50;
            int b = random.nextInt(height - 100) + 55;

            if (x == null) {
                x = a; //记录第一个x坐标
            }
            if (y == null) {
                y = b;//记录第一个y坐标
            }
            if (target == null) {
                target = str; //记录第一个文字
            }

            AffineTransform affine = new AffineTransform();
            System.out.println("第:" + i + "个");
            g.drawString(str, a, b);

            System.out.println("生成的文字[" + str + "], 坐标:x=" + a + ", y=" + b);
        }

        g.setColor(Color.white);
        g.drawString("请点击" + target, 0, fontSize);//写入验证码第一行文字  “请点击..”
        session.setAttribute("gap", x + ":" + y);//将坐标放入session
        //5.释放资源
        g.dispose();
        //6.利用ImageIO进行输出
        try {
            response.setHeader("Pragma", "No-cache");
            response.setHeader("Cache-Control", "no-cache");
            response.setDateHeader("Expires", 0);
            response.setContentType("image/jpeg");
            ImageIO.write(image, "PNG", response.getOutputStream()); //将图片输出
        } catch (IOException e) {
            e.printStackTrace();
        }
    }

    /**
     * 随机产生颜色
     */
    private static Color getRandColor(int fc, int bc) {
        if (fc > 255)
            fc = 255;
        if (bc > 255)
            bc = 255;
        int r = fc + random.nextInt(bc - fc);
        int g = fc + random.nextInt(bc - fc);
        int b = fc + random.nextInt(bc - fc);
        return new Color(r, g, b);
    }

    /**
     * 随机产生汉字
     */
    public String getRandomChineseChar() {
        String str = null;
        int heightPos, lowPos; // 定义高低位
        Random random = new Random();
        heightPos = (176 + Math.abs(random.nextInt(39))); //获取高位值
        lowPos = (161 + Math.abs(random.nextInt(93))); //获取低位值
        byte[] b = new byte[2];
        b[0] = (new Integer(heightPos).byteValue());
        b[1] = (new Integer(lowPos).byteValue());
        try {
            str = new String(b, "GBk"); //转成中文
        } catch (UnsupportedEncodingException ex) {
            ex.printStackTrace();
        }
        return str;
    }

    public void checkImg() {
        HttpSession session = getSession();
        String mX = getPara("x");
        String mY = getPara("y");

        String str = (String) session.getAttribute("gap");//获取session中的gap

        String[] split2 = str.split(":");
        int x = Integer.parseInt(mX);
        int y = Integer.parseInt(mY);
        int x1 = Integer.parseInt(split2[0]);
        int y1 = Integer.parseInt(split2[1]);
        if (x1 - 22 < x && x < x1 + 22 && y1 - 22 < y && y < y1 + 22) {  //若前端上传的坐标在session中记录的坐标的一定范围内则验证成功
            renderJson(HttpResultEntry.ok("验证成功"));
        } else {
            renderJson(HttpResultEntry.error(100, "验证失败"));
        }
    }

    public void checkSliding() {
        String mX = getPara("x");
        int x = Integer.parseInt(mX);
        if (x == 261) {
            renderJson(HttpResultEntry.ok("验证成功"));
        } else {
            renderJson(HttpResultEntry.error(100, "验证失败"));
        }
    }

}
示例代码中的 getSessoin() 和 getRequest() 为自己封闭的,其实就是普通的 session 和 request ,自行替换就行了。
另外,这个示例代码中的,是用JFianl, 也可以直接换成直接返回状态和消息
然后,有JSP 里,弄一个IMG 元素,去调用后台的生成图片的方法:

最后,用JQuery ,点击图片的事件,当点击图片后,获取点击的位置,用这个位置去后台验证,简单的示例代码:
$("#imageCheck").click(function(event){
    var x=event.offsetX;//获取点击时鼠标相对图片坐标
    var y=event.offsetY;
    console.log("X==>"+x+", Y==>"+y);
    $.ajax({
        url: "checkImg",
        type: "POST",
        dataType: "json",
        data:{'x':x,"y":y},
        success:function(rsp){
            console.log(rsp.code);
            console.log(rsp.msg);
        }
    })
});
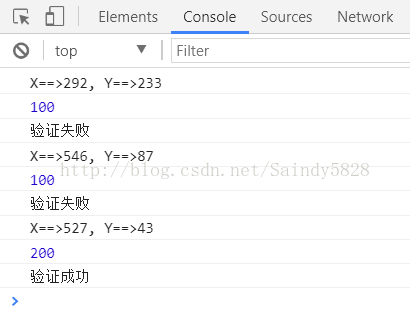
这样,点击之后就验证:

