用Shader绘制自由多边形

前言
讲述一下如何在场景中使用Unity Shader绘制自由多边形。
本文所述的程序,支持在地图中用鼠标点击,确定多边形顶点,并且绘制多边形的边,在内部填充半透明的颜色。
 

1 开发工具介绍
Windows 10(64位)
Unity 5.4.1(64位)

2 建立工程
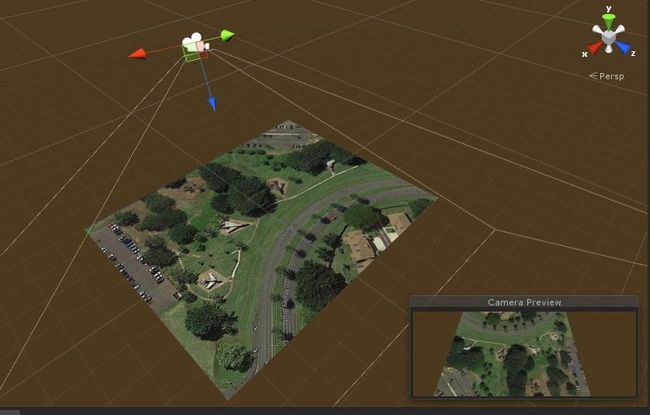
首先建立一个新工程,命名为Polygon,并创建一个Scene。在场景中新建一个Plane,该Plane是默认带有碰撞体的,这个碰撞体必须有,因为我们在后边使用鼠标选取位置的时候,涉及到碰撞检测。给该Plane加上贴图。
用Shader绘制自由多边形_第1张图片

3 核心代码实现
3.1  Polygon.cs脚本中实现的是鼠标点击和向shader传递信息的功能
(1)为了实现鼠标点选场景中的3D位置,需要使用射线
[C#]  纯文本查看  复制代码
?
 
1
2
3
4
5
Ray ray = Camera.main.ScreenPointToRay(Input.mousePosition);   
RaycastHit hit;   
if (Physics.Raycast(ray, out hit, 100))   
{   
     Debug.DrawLine(ray.origin, hit.point);                        
}

(2)向shader传递顶点的位置和数量
[C#]  纯文本查看  复制代码
?
 
1
mat.SetVectorArray( "Value" ,screenPos); //传递顶点屏幕位置信息给shader 
mat.SetInt ( "PointNum" ,pointNum2Shader); //传递顶点数量给shader

(3)将鼠标点击的位置转化为屏幕坐标
[C#]  纯文本查看  复制代码
?
 
1
2
worldPos[currentpointNum-1] = hit.point; 
Vector3 v3 = Camera.main.WorldToScreenPoint (worldPos [currentpointNum-1]); 
screenPos[currentpointNum-1] = new Vector4(v3.x,Screen.height-v3.y,v3.z,0);


3.2 Polygon.shader中实现多边形的绘制功能
(1)计算两点之间的距离函数   
[C#]  纯文本查看  复制代码
?
 
1
2
3
float Dis(float4 v1,float4 v2) 
     return sqrt(pow((v1.x-v2.x),2)+pow((v1.y-v2.y),2)); 
}

(2)绘制线段的函数
[C#]  纯文本查看  复制代码
?
 
01
02
03
04
05
06
07
08
09
10
11
12
bool DrawLineSegment(float4 p1, float4 p2, float lineWidth,v2f i) 
     float4 center = float4((p1.x+p2.x)/2,(p1.y+p2.y)/2,0,0); 
     //计算点到直线的距离   
      float d = abs((p2.y-p1.y)*i.vertex.x + (p1.x - p2.x)*i.vertex.y +p2.x*p1.y -p2.y*p1.x )/sqrt(pow(p2.y-p1.y,2) + pow(p1.x-p2.x,2));   
     //小于或者等于线宽的一半时,属于直线范围   
     float lineLength = sqrt(pow(p1.x-p2.x,2)+pow(p1.y-p2.y,2)); 
     if (d<=lineWidth/2 && Dis(i.vertex,center)
     {   
         return true ;   
     }   
     return false
}

(3)绘制多边形的函数
参考:https://www.ecse.rpi.edu/Homepages/wrf/Research/Short_Notes/pnpoly.html
[C#]  纯文本查看  复制代码
?
 
01
02
03
04
05
06
07
08
09
10
11
12
13
14
15
16
17
18
bool pnpoly( int nvert, float4 vert[6], float testx, float testy) 
       
     int i, j; 
     bool c= false
     float vertx[6]; 
     float verty[6]; 
   
     for ( int n=0;n
    
         vertx[n] = vert[n].x; 
         verty[n] = vert[n].y; 
    
     for (i = 0, j = nvert-1; i < nvert; j = i++) { 
     if ( ((verty[i]>testy) != (verty[j]>testy)) && (testx < (vertx[j]-vertx[i]) * (testy-verty[i]) / (verty[j]-verty[i]) + vertx[i]) ) 
        c = !c; 
    
     return c; 
}


4 完整的C#脚本和Shader代码
Ploygon.cs
[C#]  纯文本查看  复制代码
?
 
01
02
03
04
05
06
07
08
09
10
11
12
13
14
15
16
17
18
19
20
21
22
23
24
25
26
27
28
29
30
31
32
33
34
35
36
37
38
39
40
41
42
43
44
45
46
47
48
49
50
51
52
53
54
55
56
57
58
59
60
61
62
63
64
65
66
67
68
69
70
71
72
using UnityEngine; 
using System.Collections; 
[ExecuteInEditMode]  
public class Polygon : MonoBehaviour { 
   
     public Material mat; //绑定材质 
     Vector3[] worldPos; //存储获取的3D坐标 
     Vector4[] screenPos; //存储待绘制的多边形顶点屏幕坐标 
     int maxPointNum=6;  //多边形顶点总数 
     int currentpointNum =0; //当前已经获得的顶点数 
     int pointNum2Shader =0; //传递顶点数量给shader 
     bool InSelection= true ; //是否处于顶点获取过程 
   
     void Start () { 
         worldPos = new Vector3[maxPointNum]; 
         screenPos = new Vector4[maxPointNum]; 


     void Update () { 
         mat.SetVectorArray( "Value" ,screenPos); //传递顶点屏幕位置信息给shader 
         mat.SetInt ( "PointNum" ,pointNum2Shader); //传递顶点数量给shader 
   
         //使用摄像机发射一条射线,以获取要选择的3D位置 
         Ray ray = Camera.main.ScreenPointToRay(Input.mousePosition);   
         RaycastHit hit;   
         if (Physics.Raycast(ray, out hit, 100))   
         {   
             Debug.DrawLine(ray.origin, hit.point);                        
         }   
   
         //利用鼠标点击来获取位置信息 
         if (Input.GetMouseButtonDown (0)&& InSelection)  
        
             if (currentpointNum < maxPointNum)  
            
                 currentpointNum++; 
                 pointNum2Shader++; 
                 worldPos[currentpointNum-1] = hit.point; 
                 Vector3 v3 = Camera.main.WorldToScreenPoint (worldPos [currentpointNum-1]); 
                 screenPos[currentpointNum-1] = new Vector4(v3.x,Screen.height-v3.y,v3.z,0); 
             }  
             else  
            
                 InSelection = false


         //实时更新已选择的3D点的屏幕位置 
         for ( int i = 0; i < maxPointNum; i++)  
        
             Vector3 v3 = Camera.main.WorldToScreenPoint (worldPos[i]); 
             screenPos[i] = new Vector4(v3.x,Screen.height-v3.y,v3.z,0); 


         //检测是否有3D点移动到了摄像机后面,如果有,则停止绘制 
         for ( int i = 0; i < currentpointNum; i++)  
        
             if (Vector3.Dot(worldPos[i]- Camera.main.transform.position,Camera.main.transform.forward)<=0)  
            
                 pointNum2Shader=0; 
                 break
            
             pointNum2Shader= currentpointNum; 


     //抓取当前的渲染图像进行处理 
     void OnRenderImage(RenderTexture src, RenderTexture dest) {   
         Graphics.Blit(src, dest, mat);   
     }        
}


Polygon.shader
[C#]  纯文本查看  复制代码
?
 
001
002
003
004
005
006
007
008
009
010
011
012
013
014
015
016
017
018
019
020
021
022
023
024
025
026
027
028
029
030
031
032
033
034
035
036
037
038
039
040
041
042
043
044
045
046
047
048
049
050
051
052
053
054
055
056
057
058
059
060
061
062
063
064
065
066
067
068
069
070
071
072
073
074
075
076
077
078
079
080
081
082
083
084
085
086
087
088
089
090
091
092
093
094
095
096
097
098
099
100
101
102
103
104
105
106
107
108
109
110
111
112
113
114
115
116
117
118
119
120
121
122
123
124
125
126
127
128
129
130
131
132
133
134
135
136
137
138
139
140
Shader "Unlit/polygon" 
     Properties   
     {   
         //定义基本属性,可以从编辑器里面进行设置的变量   
         // _MainTex ("Texture", 2D) = "white" {}   
     }   
   
     CGINCLUDE 
             //从应用程序传入顶点函数的数据结构定义  
             struct appdata   
             {   
                 float4 vertex : POSITION;   
                 float2 uv : TEXCOORD0;   
             };   
             //从顶点函数传入片段函数的数据结构定义   
             struct v2f   
             {   
                 float2 uv : TEXCOORD0;   
                 float4 vertex : SV_POSITION;   
             };   
             //定义贴图变量   
             sampler2D _MainTex;   
             // float4 _MainTex_ST;   
   
             //定义与脚本进行通信的变量 
             vector Value[6];  
             int PointNum =0; 
   
             //计算两点间的距离的函数 
             float Dis(float4 v1,float4 v2) 
            
                 return sqrt(pow((v1.x-v2.x),2)+pow((v1.y-v2.y),2)); 
             }    
   
             //绘制线段 
             bool DrawLineSegment(float4 p1, float4 p2, float lineWidth,v2f i) 
            
                 float4 center = float4((p1.x+p2.x)/2,(p1.y+p2.y)/2,0,0); 
                 //计算点到直线的距离   
                 float d = abs((p2.y-p1.y)*i.vertex.x + (p1.x - p2.x)*i.vertex.y +p2.x*p1.y -p2.y*p1.x )/sqrt(pow(p2.y-p1.y,2) + pow(p1.x-p2.x,2));   
                 //小于或者等于线宽的一半时,属于直线范围   
                 float lineLength = sqrt(pow(p1.x-p2.x,2)+pow(p1.y-p2.y,2)); 
                 if (d<=lineWidth/2 && Dis(i.vertex,center)
                 {   
                     return true ;   
                 }   
                 return false
            
   
             //绘制多边形,这里限制了顶点数不超过6。可以自己根据需要更改。 
             bool pnpoly( int nvert, float4 vert[6], float testx, float testy) 
            
                   
                 int i, j; 
                 bool c= false
                 float vertx[6]; 
                 float verty[6]; 
   
                 for ( int n=0;n
                
                     vertx[n] = vert[n].x; 
                     verty[n] = vert[n].y; 
                
                 for (i = 0, j = nvert-1; i < nvert; j = i++) { 
                 if ( ((verty[i]>testy) != (verty[j]>testy)) && (testx < (vertx[j]-vertx[i]) * (testy-verty[i]) / (verty[j]-verty[i]) + vertx[i]) ) 
                    c = !c; 
                
                 return c; 
            
                               
             v2f vert (appdata v)   
             {   
                 v2f o;   
                 //将物体顶点从模型空间换到摄像机剪裁空间,也可采用简写方式——o.vertex = UnityObjectToClipPos(v.vertex);   
                 o.vertex = mul(UNITY_MATRIX_MVP,v.vertex);   
                 //2D UV坐标变换,也可以采用简写方式——o.uv = TRANSFORM_TEX(v.uv, _MainTex);   
                 //o.uv = v.uv.xy * _MainTex_ST.xy + _MainTex_ST.zw;   
                 return o;   
             }              
             fixed4 frag (v2f i) : SV_Target   
             {   
                   
                 //绘制多边形顶点 
                 for ( int j=0;j
                
                     if (Dis(i.vertex, Value[j])<3) 
                    
                         return fixed4(1,0,0,0.5); 
                    
                
                 //绘制多边形的边 
                 for ( int k=0;k
                
                     if (k==PointNum-1) 
                    
                         if (DrawLineSegment(Value[k],Value[0],2,i)) 
                        
                             return fixed4(1,1,0,0.5); 
                        
                    
                     else 
                    
                         if (DrawLineSegment(Value[k],Value[k+1],2,i)) 
                        
                             return fixed4(1,1,0,0.5); 


                 //填充多边形内部 
                 if (pnpoly(PointNum, Value,i.vertex.x ,i.vertex.y)) 
                
                     return fixed4(0,1,0,0.3); 
                
                 return fixed4(0,0,0,0); 
                 //fixed4 col = tex2D(_MainTex, i.uv);  
                 //return col;   
             }   
     ENDCG 
   
     SubShader   
     {   
         Tags { "RenderType" = "Opaque" }   
         LOD 100   
         Pass   
         {   
             //选取Alpha混合方式   
             Blend  SrcAlpha OneMinusSrcAlpha   
             //在CGPROGRAM代码块中写自己的处理过程   
             CGPROGRAM   
             //定义顶点函数和片段函数的入口分别为vert和frag   
             #pragma vertex vert   
             #pragma fragment frag   
             //包含基本的文件,里面有一些宏定义和基本函数   
             #include "UnityCG.cginc"                
              
             ENDCG   
         }   
     }   
}


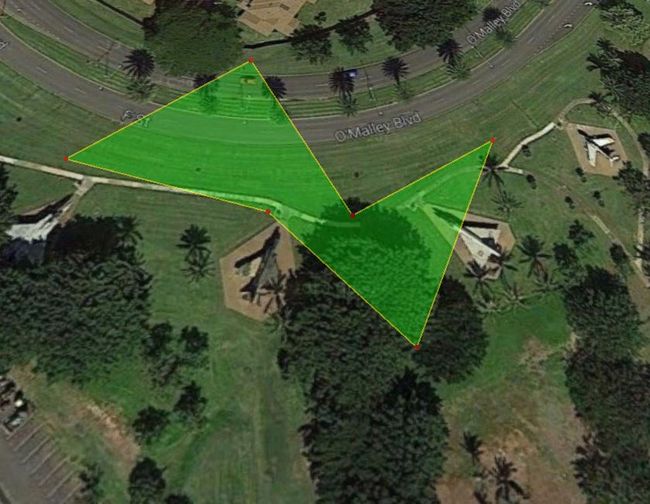
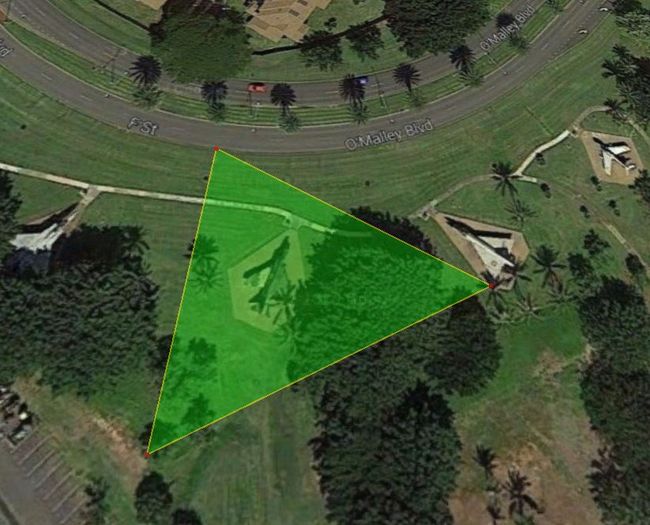
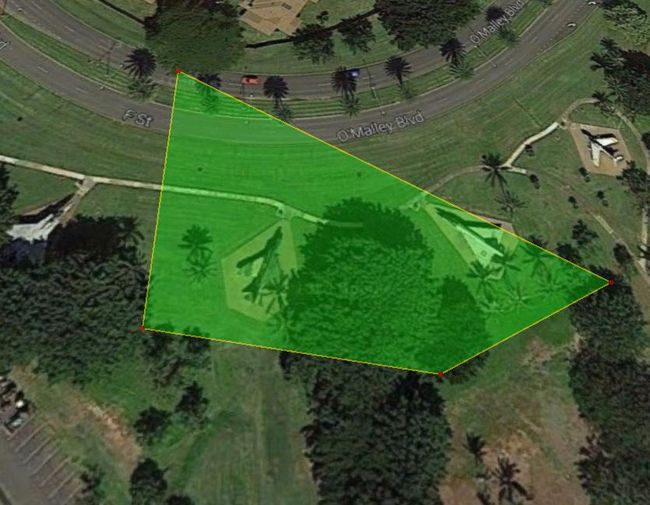
5 运行效果
用Shader绘制自由多边形_第2张图片

用Shader绘制自由多边形_第3张图片

用Shader绘制自由多边形_第4张图片

用Shader绘制自由多边形_第5张图片

小结
本文介绍的是关于Unity Shader的一种基本应用。使用了简单的绘制技术,完成了在场景中进行自由多边形区域的选择功能。目前,还只是一种简单的实现,仅仅展示了绘制一个多边形。读者可以根据自己的需要,扩展其相关功能。

你可能感兴趣的:(Unity,unity,地图,鼠标)