Android 自定义View(三)仿网易云鲸云音效
目录表
- android自定义view必备api
- android圆环带刻度进度条
- android仿滴滴大头针跳动波纹效果
- 仿网易云鲸云音效
孤独星球
这是最终的实现效果(左上),主要包括波纹扩散效果、圆球旋转缩小效果及颜色渐变效果。
此效果是由一个整体的自定义view绘制而成。其中波纹扩散效果,是通过定时改变波纹半径实现的,此波纹是由先后两个空心圆组成,在实现过程中要注意时间和各自的尺寸变化。这是参考代码:
    public void startAnima() {
        if(drawTimingThread != null) {

            drawTimingThread.sendEmptyMessage(MSG_DRAW0);//开始1波纹

            float time = (mRMaxRadius - mRMinRadius) / distance * 0.5f;//先取整,再取中
            drawTimingThread.sendEmptyMessageDelayed(MSG_DRAW1, (int)(animaBotIntervalTime * time));//定时开启2波纹
        }
    }
这是波纹1的半径变化,参考代码如下:
        if(mCurRadius0 <= mRMaxRadius){
            mCurRadius0 += distance;
        }else{
            mCurRadius0 = mRMinRadius + distance;
        }

        circlePointF0 = drawCircleOnRipple(MSG_DRAW0, curIndex0);

        mRPaint0.setAlpha(getAlphaOfRipple(curIndex0));//透明度
        mCirclePaint0.setAlpha(getAlphaOfRipple(curIndex0));
        curRadius0 = getRadiusOnRipple(curIndex0);

        curIndex0 ++;
        if(curIndex0 > (mRMaxRadius - mRMinRadius) / distance)
            curIndex0 = 0;

        cancleHandle(MSG_DRAW0);
圆球效果同样是定时绘制的结果,平滑运动只是错觉。在这里是每隔200ms(波纹的定时值)在相应的位置进行绘制的,由于波纹扩散周期较短,所以我将圆球的隔旋转周期定为了45度,可根据业务自行修改。这里的难点是在于怎么找到圆球的圆心坐标, 即根据圆心坐标,半径,扇形角度来求扇形终射线与圆弧交叉点的xy坐标的问题。这个方法我已经在android自定义view系列之圆环刻度条介绍过了,有兴趣的可以看下,或者直接在github上查看项目代码。圆球参考代码如下:
    private PointF drawCircleOnRipple(int msg, int index) {

        //周期开始,随机初始角度
        if(index == 0)
            if(msg == MSG_DRAW0)
                cirAngel0 = (float) (Math.random() * - 360 + 180);
            else
                cirAngel1 = (float) (Math.random() * - 360 + 180);

        PointF progressPoint = CommentUtils
                .calcArcEndPointXY(mRMaxRadius + getPaddingLeft() + mStrokeWidth
                        , mRMaxRadius + getPaddingTop() + mStrokeWidth
                        , msg == MSG_DRAW0 ? mCurRadius0 : mCurRadius1
                        //每个周期旋转45度
                        , (msg == MSG_DRAW0 ? curIndex0 : curIndex1) * 1.0f / ((mRMaxRadius - mRMinRadius) / distance) * 45f
                        , msg == MSG_DRAW0 ? cirAngel0 : cirAngel1);

        return progressPoint;
    }
圆球的不断缩小效果,也是定时改变半径进行绘制的结果,很常规,在这里就不细说了。波纹和圆球的颜色渐变效果,由于不是渐变到全透明,所以我的alpha取值范围105-255,参考代码如下:
    private int getAlphaOfRipple(int curIndex) {
        int alpha = curIndex * 150 * distance / (mRMaxRadius - mRMinRadius);//只取150的二进制
        return 255 - alpha;
    }
其余具体实现方法我就不细说了,源码我放在了gitHub上,有需要的可以下载或在线看下。
动感环绕
这是最终的实现效果(左下),主要是不断波动的圆环效果。但跟实际效果相比…嗯有点一言难尽…
这个效果是由四段贝塞尔曲线来拟合实现的。但这种方式出来的效果跟真正的鲸云音效(动感环绕)差别很大,所以鲸云音效不太可能是由这种方式实现的。如果有更贴近的实现方法,希望不吝赐教。
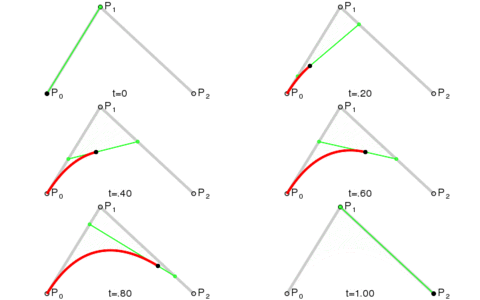
这是三阶贝塞尔曲线的动态图及公式,它通过控制曲线上的四个点(起始点、终止点以及两个相互分离的控制点)来创造、编辑图形。其中参数 t 的值等于线段上某一个点距离起点的长度除以该线段长度。


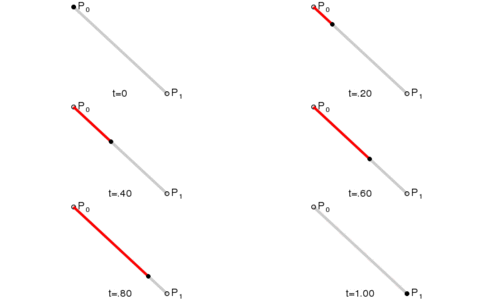
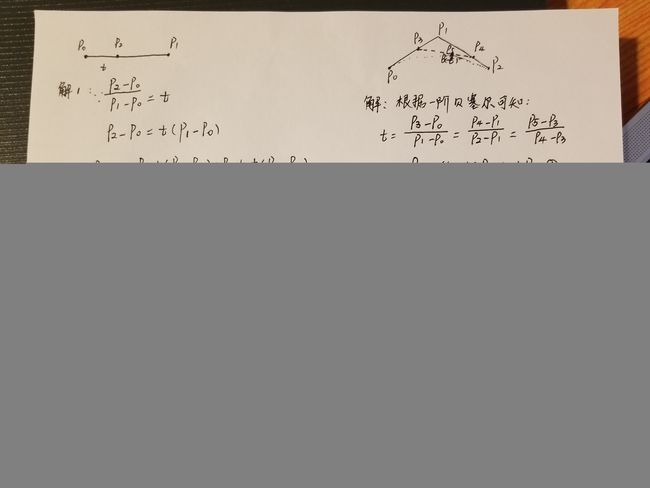
这是一阶/二阶贝塞尔曲线简单的推导过程,即参数 t 所对应p2坐标。三阶贝塞尔曲线稍微麻烦点,但思路一样,也是不断带入替换的过程。

由n段三阶贝塞尔曲线拟合圆形时,曲线端点到该端点最近的控制点的最佳距离是(4/3)tan(π/(2n))。且t=0.5时的点一定落在圆弧上。

所以当我们想用4条贝塞尔曲线拟合圆,可以进行简单推导 h 的值:

下面我们就拿四段贝塞尔曲线(h = 0.552284749831)组合成一条完整的圆,作为我们的初始态。求此 h 这个临界值的另一个作用是,我们需要运动的b曲线都是向外凸的。起始点和控制点的参考代码如下:
    private void calculateCp() {

        b = 0.552284749831;

        if(startP == null || endP == null) {
            startP = new PointF(0, - mRadius);
            endP = new PointF(mRadius, 0);
        }

        /**
         * 平移后的画布坐标,坐标(0,0)为圆心
         */

        cp1 = new PointF((float) (mRadius * b), - mRadius);
        cp2 = new PointF(mRadius, - (float) (mRadius * b));
    }
运动中的圆环,是不断的随机更改控制点的坐标,并为起始点添加偏移量的结果,这是一个不断调试的过程…,需要不断调整控制点来控制凸起的幅度,很难找到一个完美的效果,难受,上图效果的坐标如下。
    private void calculateDynamicCp() {

        b = Math.random() * 0.44 + 0.55;

        /**
         * 平移后的画布坐标,坐标(0,0)为圆心
         * 8个控制点和4个起始点,顺时针(12点->3点->6点->9点)
         */
        if(points != null && points.size() != 0)
            points.clear();

        points.add(new PointF((float) (Math.random() * - 20 + 10) , - mRadius - (float) (Math.random() * 20)));
        points.add(new PointF((float) (mRadius * b), - mRadius - (float) (Math.random() * 20)));
        points.add(new PointF(mRadius + (float) (Math.random() * 20), - mRadius - (float) (Math.random() * 10 + 10)));

        points.add(new PointF(mRadius + (float) (Math.random() * 10 + 10), (float) (Math.random() * - 20 + 10)));
        points.add(new PointF(mRadius + (float) (Math.random() * 20), (float) (Math.random() * 0.5 * mRadius * b + 0.5 *mRadius * b)));
        points.add(new PointF((float) (mRadius * b + 10), mRadius + (float) (Math.random() * 20)));

        points.add(new PointF((float) (Math.random() * - 20 + 10), mRadius + (float) (Math.random() * 20)));
        points.add(new PointF((float) (- mRadius * b), mRadius + (float) (Math.random() * 20)));
        points.add(new PointF(- mRadius - (float) (Math.random() * 20), (float) (mRadius * b)));

        points.add(new PointF(- mRadius - (float) (Math.random() * 10 + 10), (float) (Math.random() * - 20 + 10)));
        points.add(new PointF(- mRadius - (float) (Math.random() * 20), (float) (- mRadius * b)));
        points.add(new PointF((float) (- mRadius * b), - mRadius - (float) (Math.random() * 20)));
    }
这是绘制方法。初始圆环因为端点坐标是对称的,所以只需不断旋转画布绘制即可,很简单。而动态的圆环因为端点都有了偏移量,所以只能依次绘制四条贝塞尔曲线,每条曲线以lineTo相接。参考代码如下:
    @Override
    protected void onDraw(Canvas canvas) {
        super.onDraw(canvas);

        canvas.save();
        canvas.translate(mRadius + mStrokeWidth + getPaddingLeft()// 平移画布
                , mRadius + mStrokeWidth + getPaddingTop());

        if(isFirst) {
            /**
             * 旋转画布
             */
            for(int index = 0; index < 4; index ++) {
                canvas.rotate(90f);

                bPath.moveTo(startP.x, startP.y);
                bPath.cubicTo(cp1.x, cp1.y, cp2.x, cp2.y, endP.x, endP.y);

                canvas.drawPath(bPath, bPaint);
                bPath.reset();
            }
        } else {

            /**
             * 8个控制点和4个起始点,不旋转
             */
            for (int index = 0; index < 4; index ++) {
                if(index == 0)
                    bPath.moveTo(points.get(0).x, points.get(0).y);
                else
                    bPath.lineTo(points.get(index * 3).x, points.get(index * 3).y);

                bPath.cubicTo(points.get(index * 3 + 1).x, points.get(index * 3 + 1).y
                        , points.get(index * 3 + 2).x, points.get(index * 3 + 2).y
                        , index != 3 ? points.get(index * 3 + 3).x : points.get(0).x
                        , index != 3 ? points.get(index * 3 + 3).y : points.get(0).y);
            }

            canvas.drawPath(bPath, bPaint);
            bPath.reset();
        }

        canvas.restore();
    }
其余实现部分我就不细说了,具体的代码我都放在了gitHub上,有需要的可以下载或在线看下。