Swagger项目搭建
一、文章说明
本文由我亲自搭建,搭建过程中出现过各种错误,百度了一大堆教程都没能解决,最后,只能去官网翻资料,加上公司项目的使用结合,终于搭建出来,如果在搭建有新的问题,欢迎与我讨论。
在你看本文章时,有些情况你必须了解清楚,本文章所写的Swager项目的搭建仅在本文所示例的环境,包括不限于JDK版本、依赖库版本等等。还有个前提,需要说明,在配置Swagger项目时,前提是你的Web项目已经可以正常启动且可以访问,如果不能,请先搭建一个可以正常访问的Web应用。另外,本文搭建Swagger不需要下载Swagger的UI资源(依赖jar中已经包含),可省去很多复杂步骤,话不多说,一起来搭建一个自己的Swagger吧!
二、Swagger搭建步骤
环境说明:
一个可以正常访问的Web应用,并且必须是Spring + Spring MVC整合的项目;
必须是Maven构建的项目;
本文使用JDK 1.8;
搭建步骤
- 在pom.xm中引入Swagger需要的相关依赖
<dependency>
    <groupId>io.springfoxgroupId>
    <artifactId>springfox-swagger2artifactId>
    <version>2.7.0version>
dependency>
<dependency>
    <groupId>io.springfoxgroupId>
    <artifactId>springfox-swagger-uiartifactId>
    <version>2.7.0version>
dependency>


<dependency>
    <groupId>com.fasterxml.jackson.coregroupId>
    <artifactId>jackson-coreartifactId>
    <version>${jackson.version}version>
dependency>
<dependency>
    <groupId>com.fasterxml.jackson.coregroupId>
    <artifactId>jackson-annotationsartifactId>
    <version>${jackson.version}version>
dependency>
<dependency>
    <groupId>com.fasterxml.jackson.coregroupId>
    <artifactId>jackson-databindartifactId>
    <version>${jackson.version}version>
dependency>
<dependency>
    <groupId>com.fasterxml.jackson.modulegroupId>
    <artifactId>jackson-module-jaxb-annotationsartifactId>
    <version>${jackson.version}version>
dependency>- 创建Swagger配置类,放到源码同级目录下,配置类具体信息如下,参数的含义不在解释,看看代码应该都能懂
package yao.config;

import com.google.common.base.Predicate;
import org.springframework.context.annotation.Bean;
import org.springframework.context.annotation.Configuration;
import springfox.documentation.builders.ApiInfoBuilder;
import springfox.documentation.builders.PathSelectors;
import springfox.documentation.builders.RequestHandlerSelectors;
import springfox.documentation.service.ApiInfo;
import springfox.documentation.spi.DocumentationType;
import springfox.documentation.spring.web.plugins.Docket;
import springfox.documentation.swagger2.annotations.EnableSwagger2;

/**
 * @Author: Yaohong
 * @Date: 2018/6/7
 * @Time: 15:48
 * Copyright © Yao All Rights Reserved.
 */
@Configuration
@EnableSwagger2
public class SwaggerConfig {

    @Bean
    public Docket customImplementation() {
        return new Docket(DocumentationType.SWAGGER_2)
                .enable(true)
                .apiInfo(this.apiInfo())
                .select()
                .apis(RequestHandlerSelectors.any())
                .paths(this.paths())
                .build();
    }

    protected Predicate paths() {
        return PathSelectors.regex("/((api)|(backend/admin)|(backend/auth)).*");
    }

    protected ApiInfo apiInfo() {
        return new ApiInfoBuilder()
                .title("Test Swagger API")
                .description("Swagger API")
                .version("1.0")
                .build();
    }

}
- 在mvc-dispatcher-servlet.xml(DispatcherServlet的配置文件)中加入有关Swagger有关的配置,同时加入jackson的配置,如下:
<mvc:annotation-driven>
   <mvc:message-converters>
       <bean class="org.springframework.http.converter.json.MappingJackson2HttpMessageConverter">
           <property name="objectMapper" ref="objectMapper"/>
       bean>
       <bean class="org.springframework.http.converter.ByteArrayHttpMessageConverter"/>
       <bean class="org.springframework.http.converter.FormHttpMessageConverter"/>
       <bean class="org.springframework.http.converter.StringHttpMessageConverter">
           <constructor-arg value="UTF-8"/>
       bean>
   mvc:message-converters>
mvc:annotation-driven>
<bean id="objectMapper" class="org.springframework.http.converter.json.Jackson2ObjectMapperFactoryBean">
    <property name="failOnEmptyBeans" value="false"/>
bean>


<bean class="yao.config.SwaggerConfig" id="swagger2Config"/>- 使用Swagger的注解标注到接口上,这样就可以生成Swagger文档,代码实现如下(Swagger的注解使用不做解释,具体可查看官方文档),其中,@Api、@ApiOperation、@ApiParam 便是Swagger的注解的使用方法,Story类中也有用到Swagger相关的注解
package yao.swagger.web;

import io.swagger.annotations.Api;
import io.swagger.annotations.ApiOperation;
import io.swagger.annotations.ApiParam;
import org.springframework.web.bind.annotation.*;
import yao.swagger.story.dto.Story;
import yao.swagger.story.service.StoryManagerService;

import javax.annotation.Resource;

/**
 * @Author: Yaohong
 * @Date: 2018/6/8
 * @Time: 11:08
 * Copyright © Yao All Rights Reserved.
 */
@Api(tags = {"故事接口"}, description = "故事管理")
@RestController
@RequestMapping("/api/auth/stories")
public class StoryManagerController {

    @Resource
    private StoryManagerService storyManagerService;

    @ApiOperation(value = "根据id获取故事", httpMethod = "GET", response = Story.class)
    @GetMapping(value = "/{id}")
    public Story getStoryMessageById(@ApiParam("故事id") @PathVariable Long id) {
        return storyManagerService.getStoryById(id);
    }

    @ApiOperation(value = "添加故事", httpMethod = "POST", response = Boolean.class)
    @PostMapping(value = "")
    public Boolean addStory(@ApiParam("故事信息") @RequestBody Story story) {
        return storyManagerService.addStory(story);
    }

}
Story类中@ApiModel、@ApiModelProperty是Swagger的注解,@ApiModel用于展现数据模型,@ApiModelProperty则用户展现字段描述,也就是告诉使用者这个字段的作用或含义。最好自己对照Swagger UI一一对应这去了解,才能够真正的理解他们的作用。
package yao.swagger.story.dto;

import com.fasterxml.jackson.databind.PropertyNamingStrategy;
import com.fasterxml.jackson.databind.annotation.JsonNaming;
import io.swagger.annotations.ApiModel;
import io.swagger.annotations.ApiModelProperty;

/**
 * @Author: Yaohong
 * @Date: 2018/6/8
 * @Time: 11:11
 * Copyright © Yao All Rights Reserved.
 */
@ApiModel
@JsonNaming(PropertyNamingStrategy.LowerCaseWithUnderscoresStrategy.class)
public class Story {

    @ApiModelProperty("故事id")
    private Long id;

    @ApiModelProperty("故事名称")
    private String name;

    //省略getter、setter、toString方法
}- 上述步骤都做好之后,启动项目,此时控制台会输出项目的访问地址,如下图:

用这个地址拼接Swaggeer的特定地址,就可以看到Swagger的界面了,最终访问地址如下
http://localhost:8080/test-swagger/swagger-ui.html三、完整配置代码
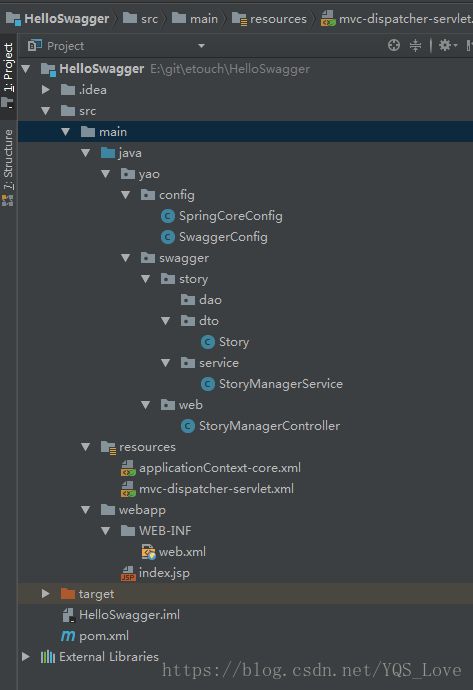
我的项目结构
DispatcherServlet 配置文件
<beans xmlns="http://www.springframework.org/schema/beans"
       xmlns:xsi="http://www.w3.org/2001/XMLSchema-instance"
       xmlns:context="http://www.springframework.org/schema/context"
       xmlns:mvc="http://www.springframework.org/schema/mvc"
       xsi:schemaLocation="http://www.springframework.org/schema/beans
        http://www.springframework.org/schema/beans/spring-beans.xsd
        http://www.springframework.org/schema/context
        http://www.springframework.org/schema/context/spring-context.xsd
        http://www.springframework.org/schema/mvc
        http://www.springframework.org/schema/mvc/spring-mvc.xsd">

    <mvc:default-servlet-handler/>

    <context:annotation-config/>

    <mvc:annotation-driven>
        <mvc:message-converters>
            <bean class="org.springframework.http.converter.json.MappingJackson2HttpMessageConverter">
                <property name="objectMapper" ref="objectMapper"/>
            bean>
            <bean class="org.springframework.http.converter.ByteArrayHttpMessageConverter"/>
            <bean class="org.springframework.http.converter.FormHttpMessageConverter"/>
            <bean class="org.springframework.http.converter.StringHttpMessageConverter">
                <constructor-arg value="UTF-8"/>
            bean>
        mvc:message-converters>
    mvc:annotation-driven>

    <context:component-scan base-package="yao.swagger">
        <context:include-filter type="annotation" expression="org.springframework.stereotype.Controller"/>
    context:component-scan>

    <bean id="objectMapper" class="org.springframework.http.converter.json.Jackson2ObjectMapperFactoryBean">
        <property name="failOnEmptyBeans" value="false"/>
    bean>

    <bean class="yao.config.SwaggerConfig" id="swagger2Config"/>

beans>- SwaggerConfig的代码同步骤二中列出的相同
如果你使用我的方法构建失败,欢迎与我讨论或联系我要项目源码,大家一起进步。
由于小编能力有限,如果文中错误或是纰漏之处,还忘指正,谢谢合作。