Spring源码阅读——记录一次非典型异常排查
最近在做微服务技术方案调研,因为eureka的闭源,注册中心准备启用consul,同时consul还可以把配置中心的活干了。搭了一个简单的springboot2.0+consul2.1的demo,模拟了一下配置中心的任务,没啥问题,准备跟现有项目合并,结果合并后springboot无法正常启动,报了一个很诡异的错误:
[WARN] [main] 2019-01-03 12:10:14,408 org.springframework.boot.web.servlet.context.AnnotationConfigServletWebServerApplicationContext : log 87 - Exception encountered during context initialization - cancelling refresh attempt: org.springframework.beans.factory.BeanInitializationException: Failed to process @EventListener annotation on bean with name 'consulAutoServiceRegistration'; nested exception is java.lang.IllegalStateException: Need to invoke method 'bind' declared on target class 'AbstractAutoServiceRegistration', but not found in any interface(s) of the exposed proxy type. Either pull the method up to an interface or switch to CGLIB proxies by enforcing proxy-target-class mode in your configuration.
这个错误看起来没什么大不了的,甚至于spring只是将其列为了一个warning,还很贴心的给了一大堆错误提示,简单理解一下就是说consulserviceautoconfig这个类在初始化过程中报错了,因为没有找到类的接口定义,但是又使用了jdk的动态代理,导致无法进一步执行bind方法注入,还给出了推荐强制使用cglib代理的解决方案。但其实这个问题没那么简单。首先项目中我们已经配置了aop的代理模式为cglib,其次如果一个类没有实现接口,spring难道不应该在初始化bean的时候就自动去采用cglib代理么?
问题排查的话,先去看一眼报错的类ConsulAutoServiceRegistrationAutoConfiguration:
    @Bean
	@ConditionalOnMissingBean
	public ConsulAutoServiceRegistration consulAutoServiceRegistration(
			ConsulServiceRegistry registry,
			AutoServiceRegistrationProperties autoServiceRegistrationProperties,
			ConsulDiscoveryProperties properties,
			ConsulAutoRegistration consulRegistration) {
		return new ConsulAutoServiceRegistration(registry,
				autoServiceRegistrationProperties, properties, consulRegistration);
	}
方法注入的bean名称默认为方法名,这点方便后面找ConsulAutoServiceRegistration的实例bean,继续看一眼ConsulAutoServiceRegistration类本身没有bind方法,实现在其父类AbstractAutoServiceRegistration:
    @EventListener(WebServerInitializedEvent.class)
	public void bind(WebServerInitializedEvent event) {
		ApplicationContext context = event.getApplicationContext();
		if (context instanceof ConfigurableWebServerApplicationContext) {
			if ("management".equals(
					((ConfigurableWebServerApplicationContext) context).getServerNamespace())) {
				return;
			}
		}
		this.port.compareAndSet(0, event.getWebServer().getPort());
		this.start();
	}
初步判定,在进行EventListener注解绑定的时候出现了问题。下一步该干嘛呢?当然不是百度。简单的配置问题百度一下固然可以,但是这个问题明显有点非典型,先不说能不能百度到,即便是百度到答案,不明白为啥会出这样的问题,以后再遇到也一样懵逼。所以解决spring的问题,最好的办法就是,翻源码。
排查之前我们首先要整理一下现有的线索,我们目前已知的线索如下:
- 项目确认已经配置了aop:proxy-target-class属性为true,强制使用cglib代理,观察启动日志也可以见到cglib相关代理类的初始化信息,可以验证cglib模块工作正常。
- ConsulAutoServiceRegistration的初始化发生了问题,而且问题并不是发生在初始化阶段,而是在实例初始化完成后,进行下一步的实例内部注解的解析封装时出现了问题。
线索2的得出是基于之前对bean初始化过程的一定了解。spring的bean初始化大体上分成加载bean定义,初始化bean实例,执行BeanProcessor处理器。这里涉及一个概念就是BeanProcessor,为了方便称之为bean处理器。bean处理器用来对bean做额外操作,例如修改bean的相关属性。Spring提供了一个BeanPostProcessor接口,用来给开发人员使用。很多人理解BeanProcessor一定会在Bean初始化完成后执行,其实不然。这里主要看如何定义Bean初始化完成这个动作。DefaultListableBeanFactory是一个常用的工厂类,我们看一下其中创建bean的逻辑:
@Override
public void preInstantiateSingletons() throws BeansException {
if (logger.isDebugEnabled()) {
logger.debug("Pre-instantiating singletons in " + this);
}
// Iterate over a copy to allow for init methods which in turn register new bean definitions.
// While this may not be part of the regular factory bootstrap, it does otherwise work fine.
List beanNames = new ArrayList<>(this.beanDefinitionNames);
// Trigger initialization of all non-lazy singleton beans...
for (String beanName : beanNames) {
RootBeanDefinition bd = getMergedLocalBeanDefinition(beanName);
if (!bd.isAbstract() && bd.isSingleton() && !bd.isLazyInit()) {
if (isFactoryBean(beanName)) {
Object bean = getBean(FACTORY_BEAN_PREFIX + beanName);
if (bean instanceof FactoryBean) {
final FactoryBean factory = (FactoryBean) bean;
boolean isEagerInit;
if (System.getSecurityManager() != null && factory instanceof SmartFactoryBean) {
isEagerInit = AccessController.doPrivileged((PrivilegedAction)
((SmartFactoryBean) factory)::isEagerInit,
getAccessControlContext());
}
else {
isEagerInit = (factory instanceof SmartFactoryBean &&
((SmartFactoryBean) factory).isEagerInit());
}
if (isEagerInit) {
getBean(beanName);
}
}
}
else {
getBean(beanName);
}
}
}
// Trigger post-initialization callback for all applicable beans...
for (String beanName : beanNames) {
Object singletonInstance = getSingleton(beanName);
if (singletonInstance instanceof SmartInitializingSingleton) {
final SmartInitializingSingleton smartSingleton = (SmartInitializingSingleton) singletonInstance;
if (System.getSecurityManager() != null) {
AccessController.doPrivileged((PrivilegedAction 方法整体上由两个大循环构成,其中第一个循环负责初始化bean,第二个循环用来进行bean初始化后的回调工作。以本次出问题的ConsulAutoServiceRegistration类为例,第一个循环中会创建ConsulAutoServiceRegistration的bean实例,并且同时调用该bean所属的Context中包含的所有BeanProcessor,对bean进行必要性的处理,其中如果涉及aop的相关逻辑,在此时生成的bean对象,本身就已经是一个代理对象:
	@Override
	public Object applyBeanPostProcessorsAfterInitialization(Object existingBean, String beanName)
			throws BeansException {

		Object result = existingBean;
        //getBeanPostProcessor会返回该context下所包含的所有类型为BeanProcessor的bean,包括用户
        //自定义的BeanPostProcessor接口
		for (BeanPostProcessor processor : getBeanPostProcessors()) {
			Object current = processor.postProcessAfterInitialization(result, beanName);
			if (current == null) {
				return result;
			}
            //result代表返回的bean实例,current是由各个processor生成的结果,这些结果根据各个
            //processor的内部逻辑,有可能是普通对象也有可能是代理对象
			result = current;
		}
		return result;
	}
所以BeanPostProcessor接口的执行时机,并不是我们普通意义上的Bean实例化完成后,而是在bean实例被创建以后,尚未完全实例化的过程中执行。那么什么叫Bean的完全实例化?还是以DefaultListableBeanFactory为例,在该工厂中默认注册了一个DefaultSingletonBeanRegistry这样一个策略类,负责对单例bean的获取销毁等工作。当中有这样一个方法:
	protected void addSingleton(String beanName, Object singletonObject) {
		synchronized (this.singletonObjects) {
			this.singletonObjects.put(beanName, singletonObject);
			this.singletonFactories.remove(beanName);
			this.earlySingletonObjects.remove(beanName);
			this.registeredSingletons.add(beanName);
		}
	}
任何一个bean都会在初始化到一定阶段后调用该方法,一般而言,只要进入了this.singletonObjects这个map中的bean,都可以视为完全初始化。但这只是完成了我们DefaultListableBeanFactory的第一个循环,也就是说这个阶段的bean对程序员而言并不是完全可用的,很多bean内部方法属性的初始化还在进行中,例如这次bind方法的EvenHandler注解。
了解这些以后,大概可以猜想到问题所在一定是初始化过程中,spring错误的将ConsulAutoServiceRegistration类注册成了一个jdk的代理类,然后想要继续初始化EventHandler注解时出错。所以排查的方向上,我们并不用去关心EventHandler注解的实现方式,也不要去关心ConsulAutoServiceRegistration这个类为啥不去使用cglib代理,因为bean本身并不会生成一个代理类,spring默认生成bean只会调用bean的工厂方法或者构造方法二者选其一,既然是代理类出了问题,我们最终问题排查的方向一定是加工该代理类的BeanProcessor。下面将会带着大家一步一步的重现问题的排查过程,同时也是对spring整体bean初始化的一个源码阅读,只不过我们的方向跟传统的阅读方向不同,一般阅读bean初始化都是从ioc容器初始化开始,我们这次算是逆过程,一步一步的从一个创建好的bean倒退回去,看一下spring在bean的创建过程中到底做了什么。当然过程中我们要重点关注processor的处理逻辑
在我们开始排查之前,我们务必要精通IDE的debug调试工具,无论你用的是eclipse还是idea,debug时条件的判断,数组的展开,栈帧的查看都是必要手段,这里先不展开讲,笔者用的idea。我们首先去到车祸现场,也就是ConsulAutoServiceRegistrationAutoConfiguration这个报错类,在bean实例化时打入断点:
这里简单讲一下我们如何找到这里,毕竟这是问题排查的第一步。其实思想很简单,既然是bean的初始化出了问题,我们首先要去找的一定是这个bean在哪里被定义的,也就是初始化的源头。找到ConsulAutoServiceRegistration类之后我们首先发现这个类并没有被标示为一个bean:
然后我们在整个项目目录下寻找有调用ConsulAutoServiceRegistration这个类的地方,然后点进去就能得到答案了:
回到我们刚才打断点的地方,代码执行到这里的时候,我们看一下栈帧:
以此为基础,我们一步一步点过去,一直看到AbstractAutowiredCapableBeanFactory的createBeanInstance方法,我们断点打在了new语句,也就是bean刚刚准备实例化的起点,所以此时我们看到的第一个方法就是创建bean实例的方法:
	protected BeanWrapper createBeanInstance(String beanName, RootBeanDefinition mbd, @Nullable Object[] args) {
		// Make sure bean class is actually resolved at this point.
		Class beanClass = resolveBeanClass(mbd, beanName);

		if (beanClass != null && !Modifier.isPublic(beanClass.getModifiers()) && !mbd.isNonPublicAccessAllowed()) {
			throw new BeanCreationException(mbd.getResourceDescription(), beanName,
					"Bean class isn't public, and non-public access not allowed: " + beanClass.getName());
		}

		Supplier instanceSupplier = mbd.getInstanceSupplier();
		if (instanceSupplier != null) {
			return obtainFromSupplier(instanceSupplier, beanName);
		}

		if (mbd.getFactoryMethodName() != null)  {
			return instantiateUsingFactoryMethod(beanName, mbd, args);
		}

		// Shortcut when re-creating the same bean...
		boolean resolved = false;
		boolean autowireNecessary = false;
		if (args == null) {
			synchronized (mbd.constructorArgumentLock) {
				if (mbd.resolvedConstructorOrFactoryMethod != null) {
					resolved = true;
					autowireNecessary = mbd.constructorArgumentsResolved;
				}
			}
		}
		if (resolved) {
			if (autowireNecessary) {
				return autowireConstructor(beanName, mbd, null, null);
			}
			else {
				return instantiateBean(beanName, mbd);
			}
		}

		// Need to determine the constructor...
		Constructor[] ctors = determineConstructorsFromBeanPostProcessors(beanClass, beanName);
		if (ctors != null ||
				mbd.getResolvedAutowireMode() == RootBeanDefinition.AUTOWIRE_CONSTRUCTOR ||
				mbd.hasConstructorArgumentValues() || !ObjectUtils.isEmpty(args))  {
			return autowireConstructor(beanName, mbd, ctors, args);
		}

		// No special handling: simply use no-arg constructor.
		return instantiateBean(beanName, mbd);
	}
代码内容很简单这里不详细讲,主要是判断初始化bean的时候采用哪种方式,工厂方式,有参构造函数,或者最后一种默认的无参构造函数构建,也就是上面所说的bean在初始化时并不会直接生成代理对象的依据,继续往上走,还是这个类,我们进入到doCreateBean方法:
	protected Object doCreateBean(final String beanName, final RootBeanDefinition mbd, final @Nullable Object[] args)
			throws BeanCreationException {

		// Instantiate the bean.
		BeanWrapper instanceWrapper = null;
		if (mbd.isSingleton()) {
			instanceWrapper = this.factoryBeanInstanceCache.remove(beanName);
		}
		if (instanceWrapper == null) {
			instanceWrapper = createBeanInstance(beanName, mbd, args);
		}
		...

		// Allow post-processors to modify the merged bean definition.
		synchronized (mbd.postProcessingLock) {
			if (!mbd.postProcessed) {
				try {
					applyMergedBeanDefinitionPostProcessors(mbd, beanType, beanName);
				}
				catch (Throwable ex) {
					throw new BeanCreationException(mbd.getResourceDescription(), beanName,
							"Post-processing of merged bean definition failed", ex);
				}
				mbd.postProcessed = true;
			}
		}

		...

		// Initialize the bean instance.
		Object exposedObject = bean;
		try {
			populateBean(beanName, mbd, instanceWrapper);
			exposedObject = initializeBean(beanName, exposedObject, mbd);
		}
		catch (Throwable ex) {
			if (ex instanceof BeanCreationException && beanName.equals(((BeanCreationException) ex).getBeanName())) {
				throw (BeanCreationException) ex;
			}
			else {
				throw new BeanCreationException(
						mbd.getResourceDescription(), beanName, "Initialization of bean failed", ex);
			}
		}

		if (earlySingletonExposure) {
			...
		}

		// Register bean as disposable.
		...

		return exposedObject;
	}
代码略长做了部分删减,这里我们着重注意两个方法,一个是在当前栈中能看到的createBeanInstance方法,负责实例化bean,另外就是实例化之后的初始化工作,也就是最终返回值exposedObject的加工者initializeBean方法,当然代码执行到这里还没进入初始化部分,我们先略过,继续往上跟,一直到AbstractApplicationContext中的finishBeanFactoryInitialization方法,
	protected void finishBeanFactoryInitialization(ConfigurableListableBeanFactory beanFactory) {
		...

		// Instantiate all remaining (non-lazy-init) singletons.
		beanFactory.preInstantiateSingletons();
	}
然后向上看调用者refresh方法:
	public void refresh() throws BeansException, IllegalStateException {
		synchronized (this.startupShutdownMonitor) {
			// Prepare this context for refreshing.
			prepareRefresh();

			// Tell the subclass to refresh the internal bean factory.
			ConfigurableListableBeanFactory beanFactory = obtainFreshBeanFactory();

			// Prepare the bean factory for use in this context.
			prepareBeanFactory(beanFactory);

			try {
				// Allows post-processing of the bean factory in context subclasses.
				postProcessBeanFactory(beanFactory);

				// Invoke factory processors registered as beans in the context.
				invokeBeanFactoryPostProcessors(beanFactory);

				// Register bean processors that intercept bean creation.
				registerBeanPostProcessors(beanFactory);

				// Initialize message source for this context.
				initMessageSource();

				// Initialize event multicaster for this context.
				initApplicationEventMulticaster();

				// Initialize other special beans in specific context subclasses.
				onRefresh();

				// Check for listener beans and register them.
				registerListeners();

				// Instantiate all remaining (non-lazy-init) singletons.
				finishBeanFactoryInitialization(beanFactory);

				// Last step: publish corresponding event.
				finishRefresh();
			}

			...//省略了catch,finally
		}
	}
对spring稍微有了解的人都知道,refresh方法时spring各个context中的核心方法,spring整个ioc容器的启动也就是调用各个context的refresh方法的过程。至于这个方法是在哪被调用的,感兴趣的同学可以继续顺着栈帧向上走,你会发现最终的入口就是springboot的main方法中调用的run方法,该方法在初始化准备好context环境后就进入了ioc容器的初始化部分,也就是refresh方法。
refresh方法的倒数第二步,finishBeanFactoryInitialization方法,根据名字来看这是负责完成Bean工厂的初始化,但其实Bean的创建初始化逻辑也在这个方法之中,同时我们也要注意靠上的invokeBeanFactoryPostProcessors方法,该方法负责在容器初始化时注入context所有的processor。
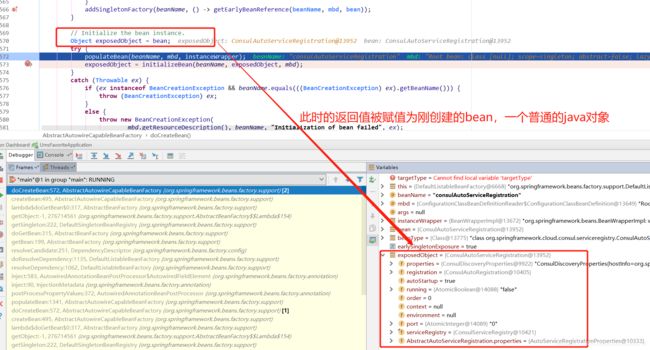
至此我们了解了整个bean创建之前的逻辑,接下来我们逐步的去跟踪代码,会发现创建bean的主要过程都集中在AbstractAutowiredCapableBeanFactory的doCreateBean方法中,毕竟该方法是直接返回创建的bean,那么在跟踪这个方法时,我们要重点关注返回值exposeObject的变化,
到此,我们可以初步判定,问题发生在initializeBean方法内。虽然我们此时还不清楚这个方法内部做了什么,但从结果上可以清晰的看到,这个方法改变了createBean方法的返回值,从而导致了后面异常的发生。那么下面的重点就是弄清楚initializeBean方法内部逻辑。
我们先看一眼代码:
protected Object initializeBean(final String beanName, final Object bean, @Nullable RootBeanDefinition mbd) {
if (System.getSecurityManager() != null) {
AccessController.doPrivileged((PrivilegedAction可以清楚的看到我们熟悉的BeanPostProcessor接口中,两个方法的执行时机。这里的invokeInitMethods可以暂时忽略,该方法并不是创建bean,而是对一个创建好的bean进行属性注入,我们继续采用之前的策略,跟踪返回值wrappedBean,我们可以看到wrappedBean一开始的值与创建好的bean一致,后面只有两个更改值的过程,也就是BeanPostProcessor的两个方法,根据代码执行中wrapperBean值的变化,我们观察到在ConsulAutoServiceRegistration这个bean的初始化中,applyBeanPostProcessorsAfterInitialization方法改变了返回值:
	public Object applyBeanPostProcessorsAfterInitialization(Object existingBean, String beanName)
			throws BeansException {

		Object result = existingBean;
		for (BeanPostProcessor processor : getBeanPostProcessors()) {
			Object current = processor.postProcessAfterInitialization(result, beanName);
			if (current == null) {
				return result;
			}
			result = current;
		}
		return result;
	}
该方法的作用非常清晰,遍历所有的BeanPostProcessor,然后执行Processor的逻辑。
代码调试到这里,我们算是完成了第二阶段,定义到了直接改变bean的地方。但是问题并没有解决,接下来我们还需要知道两件事:
- 到底是哪个BeanProcessor使用了错误的代理方式?
- 这个BeanProcessor为何会选择jdk代理模式?
解决第一个问题,我们需要idea的帮助:
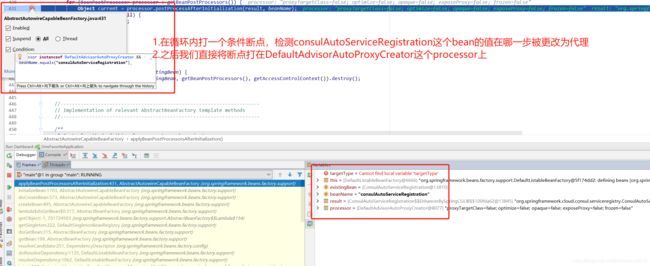
我们首先打一个条件断点,根据name,不断的去监控方法中current与result的值变化,看看究竟是哪一个processor改变了result的值,当我们执行到DefaultAdvisorAutoProxyCreator的时候,我们能明显发现变化的发生地:
至此,我们解决了目前需要解决的第一个问题,是谁修改了 ConsulAutoServiceRegistration这个bean的返回值,答案很明显。那么接下来我们就要去解决第二个问题,DefaultAdvisorAutoProxyCreator这个processor抽什么风,为啥要去用jdk的动态代理方案?
关于jdk代理和cglib代理的区别,大家可以自行百度,源码也可以稍微翻一下。这里我们继续去解决DefaultAdvisorAutoProxyCreator使用jdk代理的问题,我们继续跟进postProcessAfterInitialization这个方法,DefaultAdvisorAutoProxyCreator本身并没有实现这个方法,该方法的实现在其父类AbstractAutoProxyCreator中:
	public Object postProcessAfterInitialization(@Nullable Object bean, String beanName) throws BeansException {
		if (bean != null) {
			Object cacheKey = getCacheKey(bean.getClass(), beanName);
			if (!this.earlyProxyReferences.contains(cacheKey)) {
				return wrapIfNecessary(bean, beanName, cacheKey);
			}
		}
		return bean;
	}
看代码或者debug都能知道,问题一定在wrapIfNecessary方法中:
	protected Object wrapIfNecessary(Object bean, String beanName, Object cacheKey) {
		if (StringUtils.hasLength(beanName) && this.targetSourcedBeans.contains(beanName)) {
			return bean;
		}
		if (Boolean.FALSE.equals(this.advisedBeans.get(cacheKey))) {
			return bean;
		}
		if (isInfrastructureClass(bean.getClass()) || shouldSkip(bean.getClass(), beanName)) {
			this.advisedBeans.put(cacheKey, Boolean.FALSE);
			return bean;
		}

		// Create proxy if we have advice.
		Object[] specificInterceptors = getAdvicesAndAdvisorsForBean(bean.getClass(), beanName, null);
		if (specificInterceptors != DO_NOT_PROXY) {
			this.advisedBeans.put(cacheKey, Boolean.TRUE);
			Object proxy = createProxy(
					bean.getClass(), beanName, specificInterceptors, new SingletonTargetSource(bean));
			this.proxyTypes.put(cacheKey, proxy.getClass());
			return proxy;
		}

		this.advisedBeans.put(cacheKey, Boolean.FALSE);
		return bean;
	}
我们很容易看到代码createProxy,继续往下走:
	protected Object createProxy(Class beanClass, @Nullable String beanName,
			@Nullable Object[] specificInterceptors, TargetSource targetSource) {

		if (this.beanFactory instanceof ConfigurableListableBeanFactory) {
			AutoProxyUtils.exposeTargetClass((ConfigurableListableBeanFactory) this.beanFactory, beanName, beanClass);
		}

		ProxyFactory proxyFactory = new ProxyFactory();
		proxyFactory.copyFrom(this);

		if (!proxyFactory.isProxyTargetClass()) {
			if (shouldProxyTargetClass(beanClass, beanName)) {
				proxyFactory.setProxyTargetClass(true);
			}
			else {
				evaluateProxyInterfaces(beanClass, proxyFactory);
			}
		}

		Advisor[] advisors = buildAdvisors(beanName, specificInterceptors);
		proxyFactory.addAdvisors(advisors);
		proxyFactory.setTargetSource(targetSource);
		customizeProxyFactory(proxyFactory);

		proxyFactory.setFrozen(this.freezeProxy);
		if (advisorsPreFiltered()) {
			proxyFactory.setPreFiltered(true);
		}

		return proxyFactory.getProxy(getProxyClassLoader());
	}
在这段创建代理对象的前置准备代码中,我们注意proxyFactory.copyFrom方法。我们进入到返回值调用的getProxy方法:
可以看到getProxy方法已经开始多态,那么决定实现方式的一定是createAopProxy方法,继续跟进,我们最终会进入到DefaultAopProxyFactory的createAopProxy方法:
	public AopProxy createAopProxy(AdvisedSupport config) throws AopConfigException {
		if (config.isOptimize() || config.isProxyTargetClass() || hasNoUserSuppliedProxyInterfaces(config)) {
			Class targetClass = config.getTargetClass();
			if (targetClass == null) {
				throw new AopConfigException("TargetSource cannot determine target class: " +
						"Either an interface or a target is required for proxy creation.");
			}
			if (targetClass.isInterface() || Proxy.isProxyClass(targetClass)) {
				return new JdkDynamicAopProxy(config);
			}
			return new ObjenesisCglibAopProxy(config);
		}
		else {
			return new JdkDynamicAopProxy(config);
		}
	}
这里很明显是用来区分代理种类,而且很显然默认采用了jdk代理,这过程中我们注意到config.isProxyTargetClass,根据debug工具的反馈,DefaultAdvisorAutoProxyCreator也有这个属性,但问题是,这个属性为false!
关于配置文件中的aop:proxy-target-class属性如何被读取的,限于篇幅我们不展开讲,感兴趣的同学可以去加载BeanDefine的代码中找一下,不复杂,就是映射到ProxyConfig这个类中,覆盖类的原有属性。其实在之前对AbstractAutowiredCapableBeanFactory类的applyBeanPostProcessorsAfterInitialization方法的跟踪中我们也可以看到,大部分的processor的属性都为true,唯独DefaultAdvisorAutoProxyCreator例外。那么为何DefaultAdvisorAutoProxyCreator的属性值为false呢?
到这里我们需要整理一下思路,既然DefaultAdvisorAutoProxyCreator属性出了问题,那么我们就需要去查一下DefaultAdvisorAutoProxyCreator这个processor的初始化过程。回到AbstractAutowiredCapableBeanFactory中的applyBeanPostProcessorsAfterInitialization方法:
我们关注一下processor是从哪里获取的,进入到getBeanPostProcessors 方法内部:
	public List getBeanPostProcessors() {
		return this.beanPostProcessors;
	}
既然获取的是实例变量,我们利用IDEA查看一下BeanPostProcessors这个变量被调用的地方:
如果要增加一个processor,必然要调用List.add方法, 借此我们找到了add方法:
	public void addBeanPostProcessor(BeanPostProcessor beanPostProcessor) {
		Assert.notNull(beanPostProcessor, "BeanPostProcessor must not be null");
		this.beanPostProcessors.remove(beanPostProcessor);
		this.beanPostProcessors.add(beanPostProcessor);
		if (beanPostProcessor instanceof InstantiationAwareBeanPostProcessor) {
			this.hasInstantiationAwareBeanPostProcessors = true;
		}
		if (beanPostProcessor instanceof DestructionAwareBeanPostProcessor) {
			this.hasDestructionAwareBeanPostProcessors = true;
		}
	}
在试图寻找addBeanPostProcessor的调用者时,我们发现调用这个方法的地方很多,所以这里我们换种策略,在add方法打一个条件断点:
通过栈帧信息,我们一步一步往上推,找到PostProcessorRegistrationDelegate类中的registerBeanPostProcessor方法:
	public static void registerBeanPostProcessors(
			ConfigurableListableBeanFactory beanFactory, AbstractApplicationContext applicationContext) {

		String[] postProcessorNames = beanFactory.getBeanNamesForType(BeanPostProcessor.class, true, false);

		// Register BeanPostProcessorChecker that logs an info message when
		// a bean is created during BeanPostProcessor instantiation, i.e. when
		// a bean is not eligible for getting processed by all BeanPostProcessors.
		int beanProcessorTargetCount = beanFactory.getBeanPostProcessorCount() + 1 + postProcessorNames.length;
		beanFactory.addBeanPostProcessor(new BeanPostProcessorChecker(beanFactory, beanProcessorTargetCount));

		// Separate between BeanPostProcessors that implement PriorityOrdered,
		// Ordered, and the rest.
		List priorityOrderedPostProcessors = new ArrayList<>();
		List internalPostProcessors = new ArrayList<>();
		List orderedPostProcessorNames = new ArrayList<>();
		List nonOrderedPostProcessorNames = new ArrayList<>();
		for (String ppName : postProcessorNames) {
			if (beanFactory.isTypeMatch(ppName, PriorityOrdered.class)) {
				BeanPostProcessor pp = beanFactory.getBean(ppName, BeanPostProcessor.class);
				priorityOrderedPostProcessors.add(pp);
				if (pp instanceof MergedBeanDefinitionPostProcessor) {
					internalPostProcessors.add(pp);
				}
			}
			else if (beanFactory.isTypeMatch(ppName, Ordered.class)) {
				orderedPostProcessorNames.add(ppName);
			}
			else {
				nonOrderedPostProcessorNames.add(ppName);
			}
		}

		// First, register the BeanPostProcessors that implement PriorityOrdered.
		sortPostProcessors(priorityOrderedPostProcessors, beanFactory);
		registerBeanPostProcessors(beanFactory, priorityOrderedPostProcessors);

		// Next, register the BeanPostProcessors that implement Ordered.
		List orderedPostProcessors = new ArrayList<>();
		for (String ppName : orderedPostProcessorNames) {
			BeanPostProcessor pp = beanFactory.getBean(ppName, BeanPostProcessor.class);
			orderedPostProcessors.add(pp);
			if (pp instanceof MergedBeanDefinitionPostProcessor) {
				internalPostProcessors.add(pp);
			}
		}
		sortPostProcessors(orderedPostProcessors, beanFactory);
		registerBeanPostProcessors(beanFactory, orderedPostProcessors);
方法开始定义了一个局部变量,postProcessorNames,该方法获取某一个类型下的所有bean的名称,我们跟踪这个方法,回到DefaultListableBeanFactory中的doGetBeanNamesForType方法:
	private String[] doGetBeanNamesForType(ResolvableType type, boolean includeNonSingletons, boolean allowEagerInit) {
		List result = new ArrayList<>();

		// Check all bean definitions.
		for (String beanName : this.beanDefinitionNames) {
			// Only consider bean as eligible if the bean name
			// is not defined as alias for some other bean.
			if (!isAlias(beanName)) {
            ...
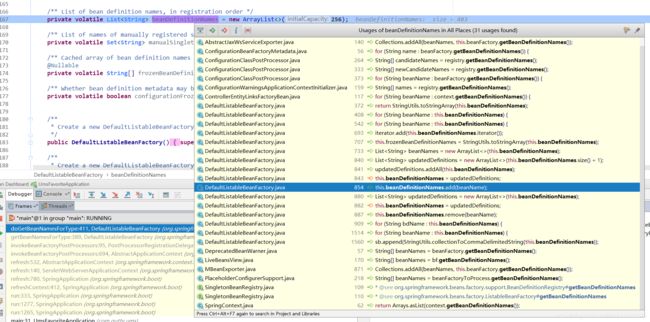
代码很长,我们不需要看全,这里明显发现beanName是从beanDefinitionNames数组中获取,我们利用查DefaultAdvisorAutoProxyCreator的方法,查找这个实例变量add方法的调用处:
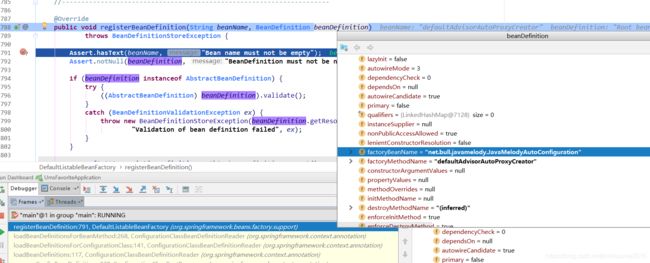
进入该方法,debug调试后找到该bean的定义:
至此,问题开始清晰,我们进入到JavaMelodyAutoConfiguration,搜索一下DefaultAdvisorAutoProxyCreator:
其实对spring的bean生命周期熟悉的话,在之前我们发现DefaultAdvisorAutoProxyCreator的属性值不对的时候,就可以着手去找这个bean的定义地点,先检查是不是覆盖掉了配置文件中的设置。这里的DefaultAdvisorAutoProxyCreator只是单纯的新建对象,并没有做任何属性处理。
文中其实还少了一个部分,那就是文章开头的异常到底是哪一行代码报的错?我们回到DefaultListableBeanFactory的preInstantiateSingletons方法:
这段代码进行bean初始化后的其他操作,debug调试可以看到EventHandler的执行对象为 org.springframework.context.event.internalEventListenerProcessor,我们进入到这个类对该方法的实现:
@Override
	public void afterSingletonsInstantiated() {
		List factories = getEventListenerFactories();
		ConfigurableApplicationContext context = getApplicationContext();
		String[] beanNames = context.getBeanNamesForType(Object.class);
		for (String beanName : beanNames) {
			if (!ScopedProxyUtils.isScopedTarget(beanName)) {
				Class type = null;
				try {
					type = AutoProxyUtils.determineTargetClass(context.getBeanFactory(), beanName);
				}
				catch (Throwable ex) {
					// An unresolvable bean type, probably from a lazy bean - let's ignore it.
					if (logger.isDebugEnabled()) {
						logger.debug("Could not resolve target class for bean with name '" + beanName + "'", ex);
					}
				}
				if (type != null) {
					if (ScopedObject.class.isAssignableFrom(type)) {
						try {
							Class targetClass = AutoProxyUtils.determineTargetClass(
									context.getBeanFactory(), ScopedProxyUtils.getTargetBeanName(beanName));
							if (targetClass != null) {
								type = targetClass;
							}
						}
						catch (Throwable ex) {
							// An invalid scoped proxy arrangement - let's ignore it.
							if (logger.isDebugEnabled()) {
								logger.debug("Could not resolve target bean for scoped proxy '" + beanName + "'", ex);
							}
						}
					}
					try {
						processBean(factories, beanName, type);
					}
					catch (Throwable ex) {
						throw new BeanInitializationException("Failed to process @EventListener " +
								"annotation on bean with name '" + beanName + "'", ex);
					}
				}
			}
		}
	}
核心逻辑在processBean中:
	protected void processBean(
			final List factories, final String beanName, final Class targetType) {

		if (!this.nonAnnotatedClasses.contains(targetType)) {
			Map annotatedMethods = null;
			try {
				annotatedMethods = MethodIntrospector.selectMethods(targetType,
						(MethodIntrospector.MetadataLookup) method ->
								AnnotatedElementUtils.findMergedAnnotation(method, EventListener.class));
			}
			catch (Throwable ex) {
				// An unresolvable type in a method signature, probably from a lazy bean - let's ignore it.
				if (logger.isDebugEnabled()) {
					logger.debug("Could not resolve methods for bean with name '" + beanName + "'", ex);
				}
			}
			if (CollectionUtils.isEmpty(annotatedMethods)) {
				this.nonAnnotatedClasses.add(targetType);
				if (logger.isTraceEnabled()) {
					logger.trace("No @EventListener annotations found on bean class: " + targetType.getName());
				}
			}
			else {
				// Non-empty set of methods
				ConfigurableApplicationContext context = getApplicationContext();
				for (Method method : annotatedMethods.keySet()) {
					for (EventListenerFactory factory : factories) {
						if (factory.supportsMethod(method)) {
							Method methodToUse = AopUtils.selectInvocableMethod(method, context.getType(beanName));
							ApplicationListener applicationListener =
									factory.createApplicationListener(beanName, targetType, methodToUse);
							if (applicationListener instanceof ApplicationListenerMethodAdapter) {
								((ApplicationListenerMethodAdapter) applicationListener).init(context, this.evaluator);
							}
							context.addApplicationListener(applicationListener);
							break;
						}
					}
				}
				if (logger.isDebugEnabled()) {
					logger.debug(annotatedMethods.size() + " @EventListener methods processed on bean '" +
							beanName + "': " + annotatedMethods);
				}
			}
		}
	}
在最终注入方法的时候,调用了AopUtils.selectInvocableMethod方法,该方法最终调用了MethodIntrospector的selectInvokeMethod方法:
	public static Method selectInvocableMethod(Method method, Class targetType) {
		if (method.getDeclaringClass().isAssignableFrom(targetType)) {
			return method;
		}
		try {
			String methodName = method.getName();
			Class[] parameterTypes = method.getParameterTypes();
			for (Class ifc : targetType.getInterfaces()) {
				try {
					return ifc.getMethod(methodName, parameterTypes);
				}
				catch (NoSuchMethodException ex) {
					// Alright, not on this interface then...
				}
			}
			// A final desperate attempt on the proxy class itself...
			return targetType.getMethod(methodName, parameterTypes);
		}
		catch (NoSuchMethodException ex) {
			throw new IllegalStateException(String.format(
					"Need to invoke method '%s' declared on target class '%s', " +
					"but not found in any interface(s) of the exposed proxy type. " +
					"Either pull the method up to an interface or switch to CGLIB " +
					"proxies by enforcing proxy-target-class mode in your configuration.",
					method.getName(), method.getDeclaringClass().getSimpleName()));
		}
	}
bind方法是在ConsulAutoServiceRegistration父类AbstractAutoServiceRegistration类中,并不是通过接口实现的。而jdk代理是根据对象的接口来生成代理对象,所以代码执行到这一步,在进行EventHandler注解的解析时,方法会找不到。
后续:
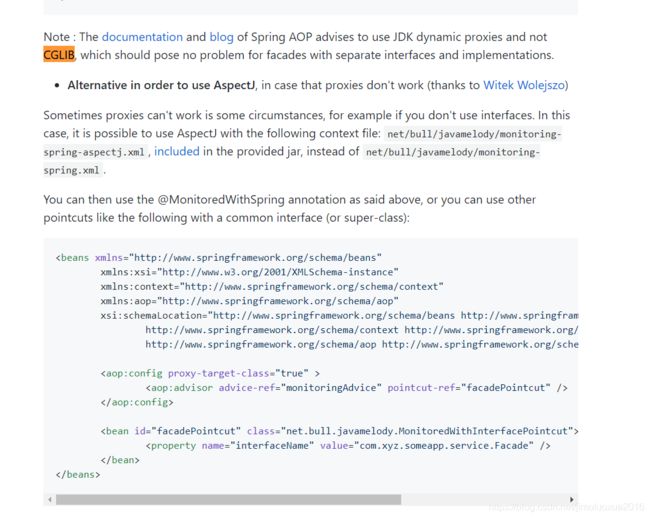
javamelody官方其实已经有过类似的解决方案:


