关于AutoLayout和代码修改约束
作者:Love@YR
链接:http://blog.csdn.net/jingqiu880905/article/details/52047030
请尊重原创,谢谢!
demo下载
先普及下AutoLayout的基础知识:
在storyboard中,一个view controller的右边栏的File inspector中默认是勾选了Use Auto Layout和Use Size Classes。如果你不想在storyboard里设置约束,可以勾掉,一旦勾掉Use Auto Layout,Use Size Classes也会被去掉,不再能选择Any,Compact,Regular视图大小,无法预览每个设备下controller的UI
不勾掉的话,点击右上边导航的show assistant editor, 会出现关联controller文件,选择Preview出现预览视图,然后左下角有个加号,可以选择你想看的设备大小的预览。
一般情况下我们选择以下视图来绘制UI
iPhone4S,iPhone5/5s,iPhone6
竖屏:(w:Compact h:Regular)
横屏:(w:Compact h:Compact)
iPhone6 Plus
竖屏:(w:Compact h:Regular)
横屏:(w:Regular h:Compact)
或者说
iphone竖屏:宽:紧凑 高:正常
iphone横屏:宽:任意 高:紧凑
iPad竖屏:(w:Regular h:Regular)
ipad横屏:(w:Regular h:Regular)
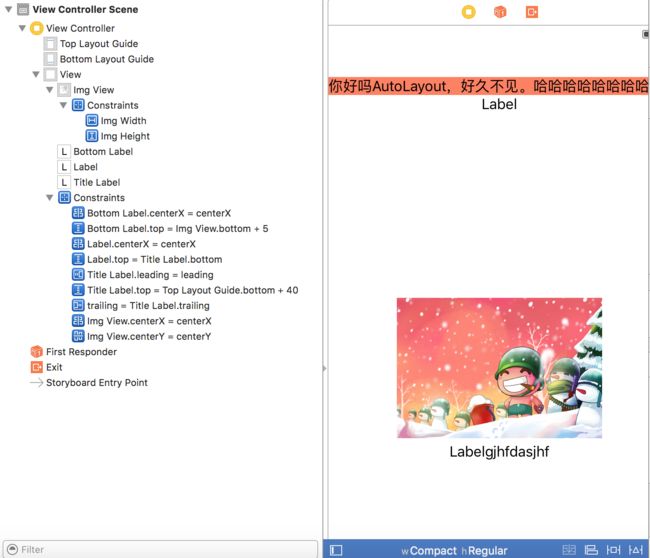
self.view上有4个控件
第一个titleLabel:trailing:0 leading:0 top:40
第二个label:centerX=其superView.centerX,离上方的titleLabel相距0
imageView:centerX=其superView.centerX, centerY=其superView.centerY,宽240 高164
第三个bottomLabel:离上方的imageView相距5,centerX=其superView.centerX
如果用代码写约束的话,就把此viewController的Use Auto Layout勾掉
#pragma mark - 代码添加约束
-(void)addConstraintForAll{
    //如果不加上下面4句的话,就会呈现storyboard上显现的位置,加上之后约束才生效
 self.titleLabel.translatesAutoresizingMaskIntoConstraints = NO;   self.label.translatesAutoresizingMaskIntoConstraints = NO;   self.imgView.translatesAutoresizingMaskIntoConstraints = NO;  self.bottomLabel.translatesAutoresizingMaskIntoConstraints = NO;

    NSLayoutConstraint *titleTop = [NSLayoutConstraint constraintWithItem:self.titleLabel attribute:NSLayoutAttributeTop relatedBy:NSLayoutRelationEqual toItem:self.view attribute:NSLayoutAttributeTop multiplier:1 constant:40];
    NSLayoutConstraint *titleLeft = [NSLayoutConstraint constraintWithItem:self.titleLabel attribute:NSLayoutAttributeLeft relatedBy:NSLayoutRelationEqual toItem:self.view attribute:NSLayoutAttributeLeft multiplier:1 constant:0];
    NSLayoutConstraint *titleRight = [NSLayoutConstraint constraintWithItem:self.titleLabel attribute:NSLayoutAttributeRight relatedBy:NSLayoutRelationEqual toItem:self.view attribute:NSLayoutAttributeRight multiplier:1 constant:0];

    NSLayoutConstraint *labelCenterX = [NSLayoutConstraint constraintWithItem:self.label attribute:NSLayoutAttributeCenterX relatedBy:NSLayoutRelationEqual toItem:self.view attribute:NSLayoutAttributeCenterX multiplier:1 constant:0];
    NSLayoutConstraint *labelTop = [NSLayoutConstraint constraintWithItem:self.label attribute:NSLayoutAttributeTop relatedBy:NSLayoutRelationEqual toItem:self.titleLabel attribute:NSLayoutAttributeBottom multiplier:1 constant:0];

     NSLayoutConstraint *imageCenterX = [NSLayoutConstraint constraintWithItem:self.imgView attribute:NSLayoutAttributeCenterX relatedBy:NSLayoutRelationEqual toItem:self.view attribute:NSLayoutAttributeCenterX multiplier:1 constant:0];
     NSLayoutConstraint *imageCenterY = [NSLayoutConstraint constraintWithItem:self.imgView attribute:NSLayoutAttributeCenterY relatedBy:NSLayoutRelationEqual toItem:self.view attribute:NSLayoutAttributeCenterY multiplier:1 constant:0];
    NSLayoutConstraint *imgWidth = [NSLayoutConstraint constraintWithItem:self.imgView attribute:NSLayoutAttributeWidth relatedBy:NSLayoutRelationEqual toItem:nil attribute:NSLayoutAttributeNotAnAttribute multiplier:1 constant:240];
      NSLayoutConstraint *imgHeight = [NSLayoutConstraint constraintWithItem:self.imgView attribute:NSLayoutAttributeHeight relatedBy:NSLayoutRelationEqual toItem:nil attribute:NSLayoutAttributeNotAnAttribute multiplier:1 constant:164];

    NSLayoutConstraint *bottomlabelTop = [NSLayoutConstraint constraintWithItem:self.bottomLabel attribute:NSLayoutAttributeTop relatedBy:NSLayoutRelationEqual toItem:self.imgView attribute:NSLayoutAttributeBottom multiplier:1 constant:5];
    NSLayoutConstraint *bottomlabelCenterX = [NSLayoutConstraint constraintWithItem:self.bottomLabel attribute:NSLayoutAttributeCenterX relatedBy:NSLayoutRelationEqual toItem:self.view attribute:NSLayoutAttributeCenterX multiplier:1 constant:0];
    [self.imgView addConstraints:@[imgWidth,imgHeight]];
    [self.view addConstraints:@[titleTop,titleLeft,titleRight,labelCenterX,labelTop,imageCenterX,imageCenterY,bottomlabelTop,bottomlabelCenterX]];


}
代码看着很长,其实很简单。就是你要设置的item的某个attribute 参照的toItem的某个attribute的值为constant的某个Relation
比如self.bottomLabel的NSLayoutAttributeTop 与self.imgView的NSLayoutAttributeBottom相距NSLayoutRelationEqual 5
如果要设置某个控件的高宽度为一个死值,则参照为nil,参照的attribute为NSLayoutAttributeNotAnAttribute
multiplier为缩放的比例。比如你可以设置宽度为superview宽的一半,这边multiplier就可以设置为0.5
为什么有的约束不是被加在自身里了?
看上面的代码我们知道,除了图片的宽,高,其他的约束全都被加到self.view里了。从上面的图里我们也可以看出来。那就有疑问了,比如图片和bottomLabel相距为5,按理说这个约束应该为图片或者bottomLabel里,为什么跑到self.view里了呢?
参考:http://www.jianshu.com/p/93016a1ceabf
中添加约束的规则。
比如cview有两个子view a和b,a和b分别有一个子view1和2。
a和b之间的关系约束会被添加到其共同父view c上
1和2之间的关系约束会被添加到最近共同父view c上
b和c之间的关系约束会被添加到层次较高的父view c上下面我们来看下怎么在代码中动态修改约束:
直接创建约束对象的对象关联,修改约束常量值
也就是说从storyboard里把约束像控件一样拉到.h里创建一个IBOutlet NSLayoutConstraint *someConstraint
这样的话可以直接 self.someConstraint.constant=40;去赋值,而其他都是只读的,不能修改
NSLayoutConstraint.h
@property (readonly, assign) id firstItem;
@property (readonly) NSLayoutAttribute firstAttribute;
@property (readonly) NSLayoutRelation relation;
@property (nullable, readonly, assign) id secondItem;
@property (readonly) NSLayoutAttribute secondAttribute;
@property (readonly) CGFloat multiplier;

@property CGFloat constant;- 代码中拿到某个约束,删除再添加新约束
比如这里我把bottomLabel与图片相距5,但是我想在某个时刻改成bottomLabel与titleLabel相距0
-(void)modifyConstraint{
    NSArray* constrains = self.view.constraints;
    for (NSLayoutConstraint* constraint in constrains) {
                    if (constraint.firstAttribute == NSLayoutAttributeTop&&constraint.firstItem == self.bottomLabel) {
                        //修改的约束会立即生效,加上下面这句变化的过程就显得比较自然
                        [UIView animateWithDuration:3 animations:^
                         {                             //constraint.constant = 80;
                              [self.view removeConstraint:constraint];
                               [self.view addConstraint:[NSLayoutConstraint constraintWithItem:self.bottomLabel attribute:NSLayoutAttributeTop relatedBy:NSLayoutRelationEqual toItem:self.titleLabel  attribute:NSLayoutAttributeBottom multiplier:1 constant:0]];
 [self.view layoutIfNeeded];
         }];
      }
    }
}
上面代码是在self.view的约束里去找而不是图片或者bottomLabel里,原因上面已经分析了,不知道的话这里是个大坑。
在viewDidLoad里
[self performSelector:@selector(modifyConstraint) withObject:nil afterDelay:0.1];这里为什么一定要延迟执行呢。因为虽然在viewDidLoad中修改的约束的代码块运行了,但是运行完之后又被storyboard自己的配置给覆盖了,所以 你看到的还是你之前设置的约束!
这也是个坑,没有延时我一直在constrains这个数组里没找到imageview和bottomlabel那个关系,延时了之后constrains这个数组才有。
最后我们来看下怎么再把ipad的约束加进去:
首先,target-general- deployment info那边device为universal才能保证ipad运行的不是大号版的iphone
然后storyboard改成regular regular之后发现有些控件变灰了,控件的attributes inspector那里installed勾上就会由灰色变成正常的,这时控件就可以被挪动和设置约束了
这时会有一些约束也是灰的,代表无效约束,不要管它,不要改它,也不要删它!(它在之前设置的iphone版是正确的,删了之后iphone版的就不能正确显示了)
如果你在之前iphone版设置某个控件的宽高,pad版想改,直接改。
如果你在之前iphone版设置某个控件的centerX, pad版想改,直接改。
然后你也可以添加约束,比如这里我把label和bottomLabel设置成横排,分别靠屏幕左右各30,离titleLabel 100。
设置完了选择pad运行,ok~
总之,你可以更改约束值,可以添加新的约束,但不要删除对应其他设备大小版本的约束!
关于如何给scrollview设置约束:
按照正常设置约束的步骤给scrollview设置了其相对于父view的trailing leading top bottom之后,会出现错误警告,说没有设置scrollview的宽和高。
这是因为上述设置只是定住了scrollview的frame,而没有给其contentView设置个size。
如何给contentView设置size呢?
contentView肯定是左上角的point在frame的(0,0)处,其中加了一个子view之后,子view设置相对于scrollview的trailing leading top bottom,代表了此子view在scrollview中距离content边缘的位置,一旦确定了其大小,则可以确定这个contentView的大小。
如图:

这里我们在self.view上加一个scrollview
scrollview设置上下左右分别距离self.view为0 即占满view
然后添加蓝色子view 让蓝色子view距离scrollview的contentView左右上下分别为20 300 20 300
然后蓝色子view的高度和宽度设置为scrollview的父view的宽高分别减去40
这样即确定了contentView的大小(20+self.view宽-40+300,20+self.view高-40+300)
当设置蓝色子view的高度宽度不用高度宽度约束而用距离self.view上下左右去做的时候,发现这个子view是无法随着scrollview一起滚动的(因self.view固定,其相对于self.view又是固定的),只有设置其与scrollview(contentView)的上下左右间距,其才会滚动。
总结下来如何给scrollview添加约束:
首先找个子view设置其与scrollview内容视图的间距
然后设置这个子view的大小为一个定值
