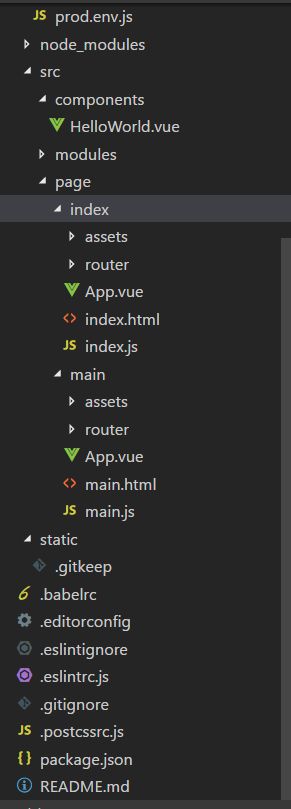
vue 多页面入口项目搭建
安装 nodejs 环境
下载地址:https://nodejs.org/en/download/
完成安装
安装 vue-cli VUE的脚手架工具
在终端中输入命令:npm install -g vue-cli
用 vue-cli 构建一个项目
-cd ~/Sites/MyWork/ 找到需要放项目的文件夹
-vue init webpack 项目名称
首先进入build文件夹下,在utils文件中添加以下代码块
{
// glob是webpack安装时依赖的一个第三方模块,还模块允许你使用 *等符号, 例如lib/*.js就是获取lib文件夹下的所有js后缀名的文件
var glob = require('glob')
// 页面模板
var HtmlWebpackPlugin = require('html-webpack-plugin')
// 取得相应的页面路径,因为之前的配置,所以是src文件夹下的page文件夹
var PAGE_PATH = path.resolve(__dirname, '../src/page')
    // 用于做相应的merge处理
var merge = require('webpack-merge')

//多入口配置
// 通过glob模块读取page文件夹下的所有对应文件夹下的js后缀文件,如果该文件存在
// 那么就作为入口处理
exports.entries = function() {
    var entryFiles = glob.sync(PAGE_PATH + '/*/*.js')
    var map = {}
    entryFiles.forEach((filePath) => {
        var filename = filePath.substring(filePath.lastIndexOf('\/') + 1, filePath.lastIndexOf('.'))
        map[filename] = filePath
    })
    return map
}
//多页面输出配置
// 与上面的多页面入口配置相同,读取page文件夹下的对应的html后缀文件,然后放入数组中
exports.htmlPlugin = function() {
    let entryHtml = glob.sync(PAGE_PATH + '/*/*.html')
    let arr = []
    entryHtml.forEach((filePath) => {
        let filename = filePath.substring(filePath.lastIndexOf('\/') + 1, filePath.lastIndexOf('.'))
        let conf = {
            // 模板来源
            template: filePath,
            // 文件名称
            filename: filename + '.html',
            // 页面模板需要加对应的js脚本,如果不加这行则每个页面都会引入所有的js脚本
            chunks: ['manifest', 'vendor', filename],
            inject: true
        }
        if (process.env.NODE_ENV === 'production') {
            conf = merge(conf, {
                minify: {
                    removeComments: true,
                    collapseWhitespace: true,
                    removeAttributeQuotes: true
                },
                chunksSortMode: 'dependency'
            })
        }
        arr.push(new HtmlWebpackPlugin(conf))
    })
    return arr
    }
}
然后修改build/webpack.base.conf.js的入口配置
// entry: {
//     app: "./src/main.js"
// },
entry:utils.entries(),
继续修改开发环境build/webpack.dev.conf.js
    // new HtmlWebpackPlugin({
    //      filename: 'index.html',
    //      template: 'index.html',
    //       inject: true,
    //       chunks:['app']
    //     }),
    // copy custom static assets
plugins:[
	// ...省略
].concat(utils.htmlPlugin())
同理修改build/webpack.prod.conf.js
    // new HtmlWebpackPlugin({
    //       filename: config.build.index,
    //       template: "index.html",
    //       inject: true,
    //       minify: {
    //         removeComments: true,
    //         collapseWhitespace: true,
    //         removeAttributeQuotes: true
    //         // more options:
    //         // https://github.com/kangax/html-minifier#options-quick-reference
    //       },
    //       // necessary to consistently work with multiple chunks via CommonsChunkPlugin
    //       chunksSortMode: "dependency"
    //     }),
plugins:[
	// ...省略
].concat(utils.htmlPlugin())
最后补充一个跨域的问题,修改config/index.js文件如下
dev: {
    // Paths
    assetsSubDirectory: "static",
    assetsPublicPath: "/",
    proxyTable: { // 需要 proxyTable 代理的接口(可跨域)
       "/api": { //使用"/api"来代替"
		target: 'http://localhost:8808/', //需要访问的地址
        changeOrigin: true, //是否跨域 //改变源
        pathRewrite: {
        	 "^/api": "" //需要rewrite的,//路径重写
			}
		}
    }
},
