PathMeasure 基础
PathMeasure是一个用来测量Path的类
1. 构造方法
(1)无参构造函数
 PathMeasure()
 用这个构造函数可创建一个空的 PathMeasure,但是使用之前需要先调用 setPath 方法来与 Path 进行关联。
 被关联的 Path 必须是已经创建好的,如果关联之后 Path 内容进行了更改,则需要使用 setPath 方法重新关联。
我们创建一个PathMeasure对象
 //创建PathMeasure
 PathMeasure pathMeasure=new PathMeasure();
再创建一个Path对象,并为它添加几条路径
  //创建Path对象,添加几条路劲
   Path path = new Path();
   path.lineTo(0, 200);
   path.lineTo(200, 200);
   path.lineTo(200, 0);
调用PathMeasure 的setPath方法
pathMeasure.setPath(path,true);
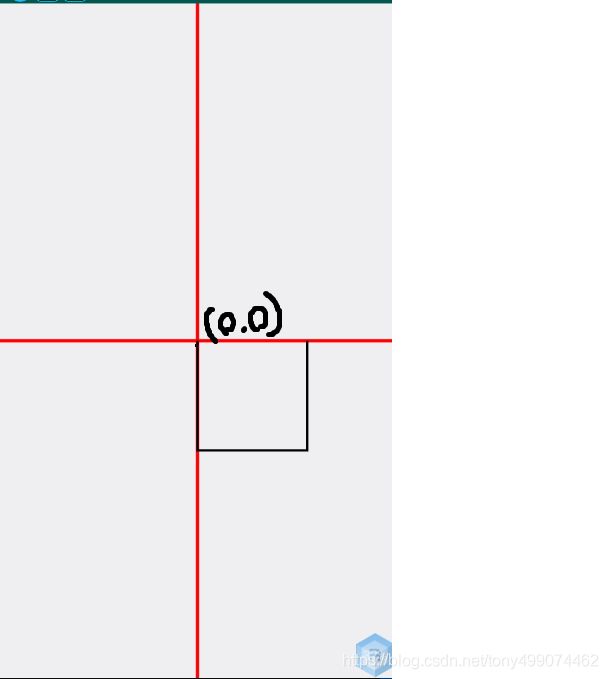
然后在onDraw方法中把这个Path绘制出来,看看绘制出来的界面
public class PathMeasureView extends View
{
    private Paint mPaint = new Paint();
    private Paint mLinePaint = new Paint(); //坐标系
    private Bitmap mBitmap;
    private int width, height;

    public PathMeasureView(Context context)
    {
        super(context);

        mPaint.setStyle(Paint.Style.STROKE);
        mPaint.setColor(Color.BLACK);
        mPaint.setStrokeWidth(4);

        mLinePaint.setStyle(Paint.Style.STROKE);
        mLinePaint.setColor(Color.RED);
        mLinePaint.setStrokeWidth(6);
    }

    @Override
    protected void onMeasure(int widthMeasureSpec, int heightMeasureSpec)
    {
        super.onMeasure(widthMeasureSpec, heightMeasureSpec);
        width = MeasureSpec.getSize(widthMeasureSpec);
        height = MeasureSpec.getSize(heightMeasureSpec);
    }

    @Override
    protected void onDraw(Canvas canvas)
    {
        super.onDraw(canvas);

        canvas.drawLine(0, height / 2, width, height / 2, mLinePaint);
        canvas.drawLine(width / 2, 0, width / 2, height, mLinePaint);
        //把画布移动到屏幕中心点  此时屏幕中心点坐标(0,0)
        canvas.translate(width / 2, height / 2);
        //创建Path对象,添加几条路劲
        Path path = new Path();
        path.lineTo(0, 200);
        path.lineTo(200, 200);
        path.lineTo(200, 0);

        //创建PathMeasure
        PathMeasure pathMeasure=new PathMeasure();
        pathMeasure.setPath(path,true);

        canvas.drawPath(path,mPaint);

    }
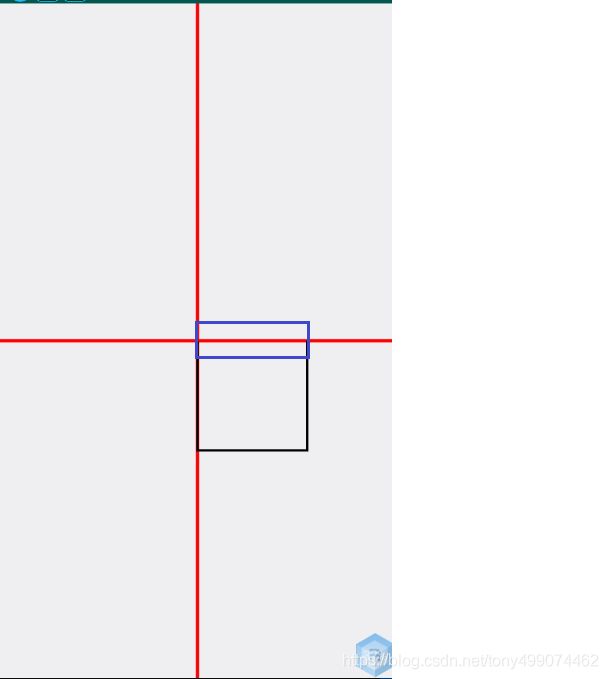
可以看到我们绘制了三条直线,图中黑色的线
调用setPath(Path path, boolean forceClosed)方法, 注意 此方法第二个参数是一个 boolean值 我们先传入true,看看PathMeasure 测量到的路径长度是多少?
 pathMeasure.setPath(path,true);
 Log.d("TAG_P","=============="+pathMeasure.getLength());
![]()
可以看到,pathMeasure测量出的Path长度是 800 ,但是我们明明只绘制了三条路劲,那是因为当 forceClosed=true时,path的开始和结尾 也会默认构成一条直线,这条直线刚好是200的长度,就是图中蓝色框里这条线
那么,我们把forceClosed 传入 false,再看看它的长度?
![]()
此时的path 长度就为 600了,只计算了三条边的长度,这就是 forceClosed 的区别
(2)有参构造函数
PathMeasure (Path path, boolean forceClosed)
第一个参数 传入 Path对象 第二个参数传入 forceClosed 这种方式其实就相当于 使用无参构造函数后 在调用 setPath(path,false)方法
 PathMeasure pathMeasure=new PathMeasure();
 pathMeasure.setPath(path,false);
这两种方式的效果是一样的
2 getSegment方法
boolean getSegment(float startD, float stopD, Path dst, boolean startWithMoveTo)
- 返回值boolean:判断截取是否成功(true 表示截取成功,结果存入dst中,false 截取失败,不会改变dst中内容);
- float startD:开始截取位置距离 Path 起点的长度(取值范围: 0 <= startD < stopD <=
Path总长度); - float stopD:结束截取位置距离 Path 起点的长度(取值范围: 0 <= startD < stopD <=
Path总长度); - Path dst:截取的 Path 将会添加到 dst 中(注意: 是添加,而不是替换);
- boolean startWithMoveTo:起始点是否使用 moveTo,用于保证截取的 Path
第一个点位置不变(true表示保证截取得到的 Path 片段不会发生形变,false表示保证存储截取片段的 Path(dst)
的连续性);
我们接下来来具体使用一下它
首先创建一个矩形
 canvas.drawLine(0, getHeight() / 2, getWidth(), getHeight() / 2, mLinePaint);
 canvas.drawLine(getWidth() / 2, 0, getWidth() / 2, getHeight(), mLinePaint);

 canvas.translate(getWidth() / 2, getHeight() / 2);

 Path path = new Path();
 //添加一个矩形路径,Path.Direction.CW 表示顺时针绘制
 path.addRect(-200, -200, 200, 200, Path.Direction.CW);
 //创建一个PathMeasure对象
 PathMeasure pathMeasure=new PathMeasure();
 pathMeasure.setPath(path,false);
 canvas.drawPath(path, mPaint);
注意,我们添加矩形是从(-200,-200)这个位置开始的,所以也就从这个点开始顺时针绘制的
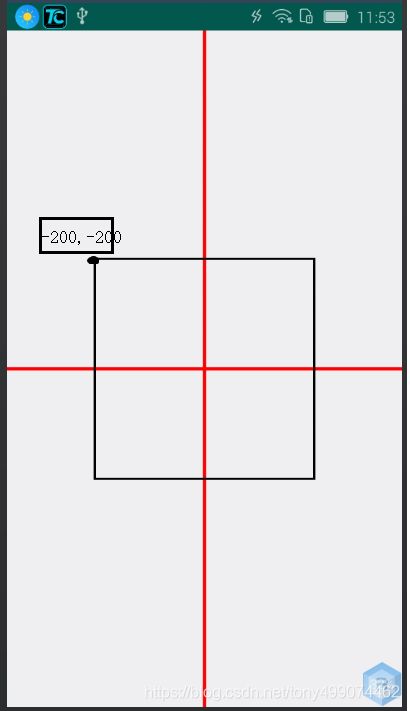
再创建一个 Path dst = new Path(); 对象,用于存放
pathMeasure.getSegment(200, 1000, dst, true);截取到的路径
 Path dst = new Path();
 pathMeasure.getSegment(200,1000,dst,true);
 canvas.drawPath(dst, mLinePaint);
第一个参数两百 是距离Path起点200的地方开始截取,第二个参数1000,表示距离Path起点1000,所有真正截取到的长度是1000-200=800,截取到的路径存放在 dst 中,我们将截取到的路径在绘制出来看看
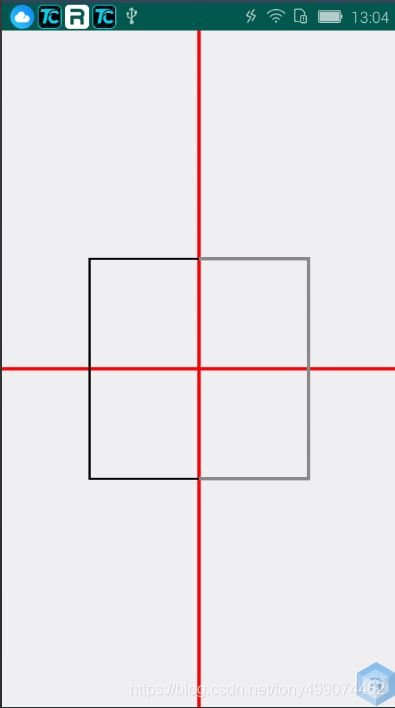
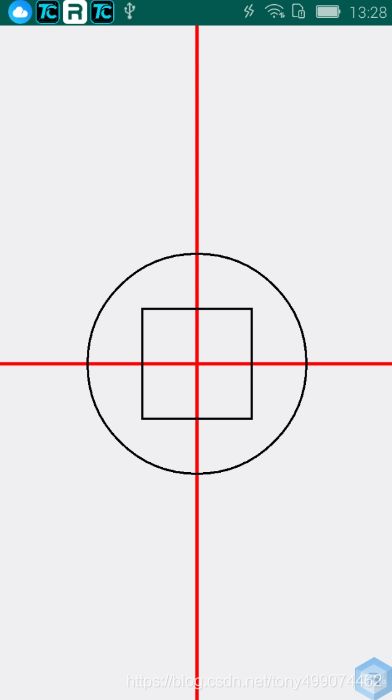
灰色的线就是我们截取到的路径并且绘制了出来,刚好是800个长度
当我们 把 pathMeasure.getSegment(200,1000,dst,false); 里面最后一个参数改成false时,我们再看看效果,这就是 true和false的区别
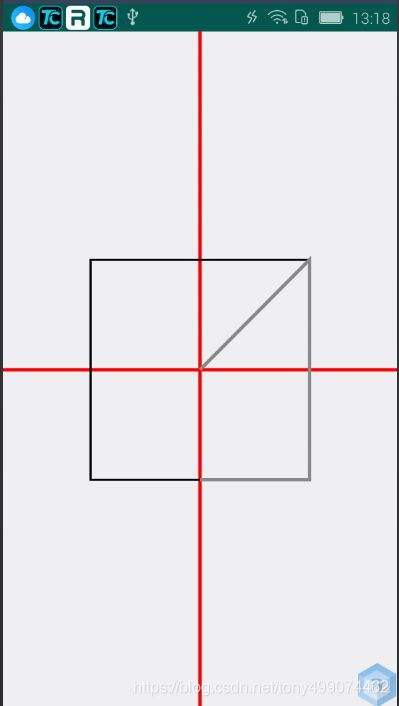
3 nextContour方法
boolean nextContour()
作用: Path 可以由多条曲线构成,但不论是 getLength 方法, 还是getgetSegment 或者其它方法,都只会在其中第一条线段上运行。此 nextContour方法 就是用于跳转到下一条曲线到方法。如果跳转成功,则返回 true, 如果跳转失败,则返回 false。
下面我们来使用这个方法,添加一个矩形和椭圆,并打印出 pathMeasure.getLength()) 的长度
   Path path = new Path();
   path.addRect(-100, -100, 100, 100, Path.Direction.CW);//添加一个矩形
   path.addOval(-200, -200, 200, 200, Path.Direction.CW);//添加一个椭圆
   canvas.drawPath(path, mPaint);
   PathMeasure pathMeasure = new PathMeasure(path, false);
   Log.e("TAG", "onDraw:forceClosed=false " + pathMeasure.getLength());
![]()
很明显 这个path的长度并不是整个路径的长度,它只是矩形的长度,那么我们相要圆的长度怎么办了?
调用pathMeasure.nextContour() 方法,跳转到下一条path路径就行了
pathMeasure.nextContour()
4 getPosTan方法
boolean getPosTan(float distance, float[] pos, float[] tan)

返回值(boolean):判断获取是否成功(true表示成功,数据会存入 pos 和 tan 中,false 表示失败,pos 和 tan 不会改变);
float distance:距离 Path 起点的长度 取值范围: 0 <= distance <= getLength;
float[] pos:该点的坐标值,坐标值: (x==[0], y==[1]);
float[] tan:该点的正切值,正切值: (x==[0], y==[1]);
作用:用于获取路径上某点的坐标以及该位置的正切值
//用于获取路径上某点的切线与x轴的正半轴的夹角
(math.atan2(tan[1], tan[0])*180.0 / math.PI)


上面代码是常用的一个公式,用于获取路径上某点的切线角度。通过 tan 得值计算出图片旋转的角度,
tan 是 tangent 的缩写,即中学中常见的正切, 其中tan0是邻边边长,tan1是对边边长,
而Math中 atan2 方法是根据正切是数值计算出该角度的大小,得到的单位是弧度,所以上面又将弧度转为了角度。
下面我们绘制一个圆来看看 圆上的任意一点 的 pos tan 它们的值是多少?、
 canvas.drawLine(0, getHeight() / 2, getWidth(), getHeight() / 2, mLinePaint);
 canvas.drawLine(getWidth() / 2, 0, getWidth() / 2, getHeight(), mLinePaint);
 canvas.translate(getWidth() / 2, getHeight() / 2);
 Path path = new Path();
 path.addCircle(0,0,200, Path.Direction.CW);//顺时针绘制圆
 canvas.drawPath(path,mPaint);

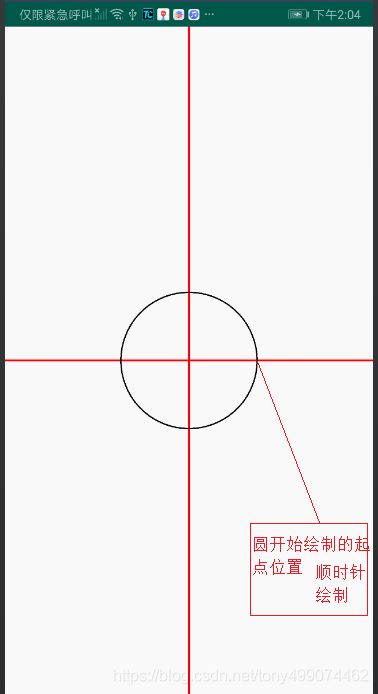
 还是将画布的原点坐标从左上角移动到画布的中心,看看我们绘制出来的圆
 PathMeasure pathMeasure=new PathMeasure(path,false);
 pathMeasure.getPosTan(0,pos,tan);//第一个参数传0 表示测量起点的 pos值和 tan值

 Log.d("TAG_P", "pos[0]" + pos[0]+"===pos[0]==="+pos[1]);
 Log.d("TAG_P", "tan[0]" + tan[0]+"===tan[0]==="+tan[1]);

pos[0]=200 表示这个点的x坐标为两百
pos[1]=0 表示这个点的纵坐标为0
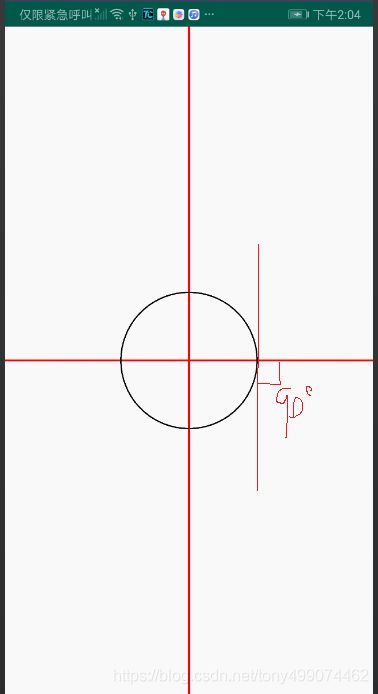
tan表示这个点的切线与x正轴的夹角的正切值,正切值是对边比上邻边 在tan中 tan[0]表示邻边长 tan[1]表示对边长
而根据上图,起点的切线与x轴是垂直的,夹角是90度,这个度数是我们画图推导出来的,那么我们使用上面的公式能不能得出90度了?
 double de= Math.atan2(tan[1], tan[0])*180.0 / Math.PI;
 tan值上面已经求得,代入这个公式
![]()
可以看出 我们求出了夹角90度,那么现在我们想要求出圆上任意一点的切线与x轴的夹角都可以求出了
比如我们想要知道圆的7/8那个点与x轴的夹角我们可以这么做
 PathMeasure pathMeasure=new PathMeasure(path,false);
 pathMeasure.getPosTan(pathMeasure.getLength()*7/8,pos,tan);
 double d= Math.atan2(tan[1], tan[0])*180.0 / Math.PI;
getMatrix方法
boolean getMatrix(float distance, Matrix matrix, int flags)
返回值(boolean):判断获取是否成功(true表示成功,数据会存入matrix中,false 失败,matrix内容不会改变);
float distance:距离 Path 起点的长度(取值范围: 0 <= distance <= getLength);
Matrix matrix:根据 falgs 封装好的matrix,会根据 flags 的设置而存入不同的内容;
int flags:规定哪些内容会存入到matrix中(可选择POSITION_MATRIX_FLAG位置 、ANGENT_MATRIX_FLAG正切 );
这个方法其实就是将 得到的pos tan 设置到 matrix中,然后直接使用 例如
canvas.drawBitmap(mBitmap,mMatrix, mPaint);
