SpringBoot解耦的扩展机制 Spring Factories介绍及使用
Spring Boot中有一种非常解耦的扩展机制:Spring Factories。这种扩展机制实际上是仿照Java中的SPI扩展机制来实现的。
什么是 SPI机制
SPI的全名为Service Provider Interface.大多数开发人员可能不熟悉,因为这个是针对厂商或者插件的。在java.util.ServiceLoader的文档里有比较详细的介绍。
简单的总结下java SPI机制的思想。我们系统里抽象的各个模块,往往有很多不同的实现方案,比如日志模块的方案,xml解析模块、jdbc模块的方案等。面向的对象的设计里,我们一般推荐模块之间基于接口编程,模块之间不对实现类进行硬编码。一旦代码里涉及具体的实现类,就违反了可拔插的原则,如果需要替换一种实现,就需要修改代码。为了实现在模块装配的时候能不在程序里动态指明,这就需要一种服务发现机制。
java SPI就是提供这样的一个机制:为某个接口寻找服务实现的机制。有点类似IOC的思想,就是将装配的控制权移到程序之外,在模块化设计中这个机制尤其重要。
Spring Boot中的SPI机制
在Spring中也有一种类似与Java SPI的加载机制。它在META-INF/spring.factories文件中配置接口的实现类名称,然后在程序中读取这些配置文件并实例化。
这种自定义的SPI机制是Spring Boot Starter实现的基础。
![]()
spring.factories
Spring Factories实现原理
spring-core包里定义了SpringFactoriesLoader类,这个类实现了检索META-INF/spring.factories文件,并获取指定接口的配置的功能。在这个类中定义了两个对外的方法:
loadFactories 根据接口类获取其实现类的实例,这个方法返回的是对象列表。
loadFactoryNames 根据接口获取其接口类的名称,这个方法返回的是类名的列表。
上面的两个方法的关键都是从指定的ClassLoader中获取spring.factories文件,并解析得到类名列表,具体代码如下
    private static Map> loadSpringFactories(@Nullable ClassLoader classLoader) {
        MultiValueMap result = cache.get(classLoader);
        if (result != null) {
            return result;
        }

        try {
            Enumeration urls = (classLoader != null ?
                    classLoader.getResources(FACTORIES_RESOURCE_LOCATION) :
                    ClassLoader.getSystemResources(FACTORIES_RESOURCE_LOCATION));
            result = new LinkedMultiValueMap<>();
            while (urls.hasMoreElements()) {
                URL url = urls.nextElement();
                UrlResource resource = new UrlResource(url);
                Properties properties = PropertiesLoaderUtils.loadProperties(resource);
                for (Map.Entry entry : properties.entrySet()) {
                    String factoryClassName = ((String) entry.getKey()).trim();
                    for (String factoryName : StringUtils.commaDelimitedListToStringArray((String) entry.getValue())) {
                        result.add(factoryClassName, factoryName.trim());
                    }
                }
            }
            cache.put(classLoader, result);
            return result;
        }
        catch (IOException ex) {
            throw new IllegalArgumentException("Unable to load factories from location [" +
                    FACTORIES_RESOURCE_LOCATION + "]", ex);
        }
    }
从代码中我们可以知道,在这个方法中会遍历整个ClassLoader中所有jar包下的spring.factories文件。也就是说我们可以在自己的jar中配置spring.factories文件,不会影响到其它地方的配置,也不会被别人的配置覆盖。
spring.factories的是通过Properties解析得到的,所以我们在写文件中的内容都是安装下面这种方式配置的:
com.xxx.interface=com.xxx.classname
如果一个接口希望配置多个实现类,可以使用’,’进行分割。
spring-boot包中的spring.factories文件
在Spring Boot的很多包中都能够找到spring.factories文件,下面就是spring-boot包中的spring.factories文件
# PropertySource Loaders
org.springframework.boot.env.PropertySourceLoader=\
org.springframework.boot.env.PropertiesPropertySourceLoader,\
org.springframework.boot.env.YamlPropertySourceLoader

# Run Listeners
org.springframework.boot.SpringApplicationRunListener=\
org.springframework.boot.context.event.EventPublishingRunListener

# Error Reporters
org.springframework.boot.SpringBootExceptionReporter=\
org.springframework.boot.diagnostics.FailureAnalyzers

# Application Context Initializers
org.springframework.context.ApplicationContextInitializer=\
org.springframework.boot.context.ConfigurationWarningsApplicationContextInitializer,\
org.springframework.boot.context.ContextIdApplicationContextInitializer,\
org.springframework.boot.context.config.DelegatingApplicationContextInitializer,\
org.springframework.boot.web.context.ServerPortInfoApplicationContextInitializer

# Application Listeners
org.springframework.context.ApplicationListener=\
org.springframework.boot.ClearCachesApplicationListener,\
org.springframework.boot.builder.ParentContextCloserApplicationListener,\
org.springframework.boot.context.FileEncodingApplicationListener,\
org.springframework.boot.context.config.AnsiOutputApplicationListener,\
org.springframework.boot.context.config.ConfigFileApplicationListener,\
org.springframework.boot.context.config.DelegatingApplicationListener,\
org.springframework.boot.context.logging.ClasspathLoggingApplicationListener,\
org.springframework.boot.context.logging.LoggingApplicationListener,\
org.springframework.boot.liquibase.LiquibaseServiceLocatorApplicationListener

# Environment Post Processors
org.springframework.boot.env.EnvironmentPostProcessor=\
org.springframework.boot.cloud.CloudFoundryVcapEnvironmentPostProcessor,\
org.springframework.boot.env.SpringApplicationJsonEnvironmentPostProcessor,\
org.springframework.boot.env.SystemEnvironmentPropertySourceEnvironmentPostProcessor

# Failure Analyzers
org.springframework.boot.diagnostics.FailureAnalyzer=\
org.springframework.boot.diagnostics.analyzer.BeanCurrentlyInCreationFailureAnalyzer,\
org.springframework.boot.diagnostics.analyzer.BeanNotOfRequiredTypeFailureAnalyzer,\
org.springframework.boot.diagnostics.analyzer.BindFailureAnalyzer,\
org.springframework.boot.diagnostics.analyzer.BindValidationFailureAnalyzer,\
org.springframework.boot.diagnostics.analyzer.UnboundConfigurationPropertyFailureAnalyzer,\
org.springframework.boot.diagnostics.analyzer.ConnectorStartFailureAnalyzer,\
org.springframework.boot.diagnostics.analyzer.NoUniqueBeanDefinitionFailureAnalyzer,\
org.springframework.boot.diagnostics.analyzer.PortInUseFailureAnalyzer,\
org.springframework.boot.diagnostics.analyzer.ValidationExceptionFailureAnalyzer,\
org.springframework.boot.diagnostics.analyzer.InvalidConfigurationPropertyNameFailureAnalyzer,\
org.springframework.boot.diagnostics.analyzer.InvalidConfigurationPropertyValueFailureAnalyzer

# FailureAnalysisReporters
org.springframework.boot.diagnostics.FailureAnalysisReporter=\
org.springframework.boot.diagnostics.LoggingFailureAnalysisReporter
在日常工作中,我们可能需要实现一些SDK或者Spring Boot Starter给被人使用时,
我们就可以使用Factories机制。Factories机制可以让SDK或者Starter的使用只需要很少或者不需要进行配置,只需要在服务中引入我们的jar包即可。
二.Spring Boot 之spring.factories加载第三方的Bean
1.首先抛出一个问题:如果想要被Spring容器管理的Bean的路径不再Spring Boot 的包扫描路径下,怎么办呢?也就是如何去加载第三方的Bean 呢?有两种方式可以解决:
这里我们使用Swagger的配置来做实验。
1:首先一个Swagger的配置类:SwaggerConfig
SwaggerConfig 代码:
@Configuration
@EnableSwagger2
public class SwaggerConfig implements EnvironmentAware {
    private static final Logger log = LoggerFactory.getLogger(SwaggerConfig.class);
    @Autowired
    private Environment env;
    @Value("${swagger.scan.package}")
    private String swaggerScanPackage;

    public SwaggerConfig() {
    }

    @Bean
    public Docket createRestApi() {
        Predicate path = PathSelectors.any();
        if (Arrays.asList(this.env.getActiveProfiles()).contains("prod")) {
            path = PathSelectors.none();
        }

        log.info("####初始化createRestApi####swaggerScanPackage:" + this.swaggerScanPackage);
        log.info(path.toString());
        return (new Docket(DocumentationType.SWAGGER_2)).apiInfo(this.apiInfo()).select().apis(RequestHandlerSelectors.basePackage(this.swaggerScanPackage)).paths(PathSelectors.any()).build();
    }

    private ApiInfo apiInfo() {
        log.info("##################################初始化API信息################################################");
        return (new ApiInfoBuilder()).title("APIs").description("…………").termsOfServiceUrl("https://js.dazhi.loan.com").version("1.0").build();
    }

    @Override
    public void setEnvironment(Environment environment) {

    }
}
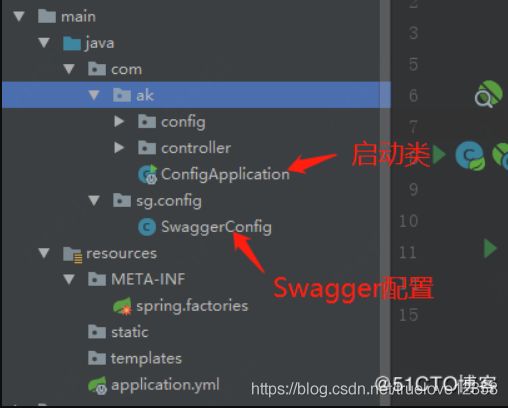
2:再看我的工程结构吧:
发现我的SwaggerConfig 类和 SpringBoot 的启动类ConfigApplication.java 不在同一级目录下,所以当Spring Boot 自动扫描包的时候,是扫描不到我的SwaggerConfig 的配置的,也就在控制台没有Swagger的打印的信息:
所以这时候我如果想要把SwaggerConfig 加载到Spring容器中的话 要怎么办呢?下面介绍两种方式
①:在Spring Boot Application 主类上 使用@Import 注解
启动就可以看到Swagger的基础信息:
②:现在我们将其改造一下,采用spring.factories 的方式去加载SwaggerConfig类,在resources目录下新建一个META-INF 的目录,然后在
新建一个spring.factories 的文件,里面的内容为:
org.springframework.boot.autoconfigure.EnableAutoConfiguration=\
com.sg.config.SwaggerConfig
然后在把Spring Boot 启动类上的@Import注释掉,启动发现也可以把SwaggerConfig加载到Spring 容器中
到这就完成了加载一个Spring 不能扫描到的一个类,他可以是第三方的,也可以是自己写的,只要是Spring Boot 默认扫描路径不能够扫描到,都可以使用这种方式去加载。
com.sg.config.SwaggerConfig 可以当作是一个自定义配置文件,里面也可以添加
@Configuration
@ComponentScan("xxx")
等配置,扫描指定目录下Service或Bean.


