【安装】Windows 下 TensorFlow 的安装(tensorflow-gpu、CUDA 10.0、cuDNN v7.6.3)——2019-09-03
____tz_zs
上次关于 TensorFlow 安装的文章 《【安装】Windows下 TensorFlow 的安装(包含:CUP版、GPU版、CUDA、cuDNN)》、Google 机器学习(一) 安装 Anaconda 以及 Scikit-learn 等必备库,已经是两年前所写的了。时过境迁,有些方法和注意点可能已经不再适用,后来一直在 Ubuntu 上开发,windows 上的环境一直没更新也已经太过老旧。所以干脆重新从零开始在 windows 上配置一套环境。
值得庆幸的是,TensorFlow 官方文档 已经拥有中文版了,不过仍需翻过(和谐,几个月了我才发现审查一直没通过。。)城墙使用。查看 tensorflow 安装 了解关于 Linux、macOS、Windows 系统上的安装。
一、安装 Anaconda
(一)下载
去往 Anaconda 官网,下载对应版本的包。打开主页如下,可以看到在右上角有一个 download 按钮,点击去往下载页面。
![]()
在下载页面,提供 Windows、Mac、linux 等不同系统的对应版本,选择下载适合自己电脑的版本。比如我的系统是 Windows 64 位的。

(二)安装
点击下载好的 exe 文件,比较简单一路下一步。下面这里不用动,第一个选项是把 Anaconda 加入 path 路径,不用勾选。第二个是将Anaconda 作为系统默认的 python 版本(如果你的电脑中已经装了一个 python,这里默认是没有勾选的)。

要注意的是,安装过程比较久,在途中杀毒软件可能会阻止在 Anaconda 安装过程中的某些修改,记得点击允许,或者提前把杀毒软件关闭。
如果你想要在任意位置使用 pip 等命令
(三)添加源
清华大学开源软件镜像站 提供 anaconda 国内镜像,能大大加快下载和更新速度。
打开 anaconda 命令行终端,输入
conda config --add channels https://mirrors.tuna.tsinghua.edu.cn/anaconda/pkgs/free/
conda config --add channels https://mirrors.tuna.tsinghua.edu.cn/anaconda/pkgs/main/
conda config --set show_channel_urls yes
或者,在 anaconda 导航工具中,点击 Channels 按钮添加

二、安装科学计算库和 TensorFlow
(一)tensorflow 版本选择
tensorflow 可用软件包分以下几种。nightly 是指不稳定的尝鲜版本,这里我们不做考虑。tensorflow 和 tensorflow-gpu 版本的区别是,tensorflow 仅支持使用 CPU 运行,tensorflow-gpu 不光可以在 CPU 上运行,再配置好 GPU 相关的软件后,还可以使用 GPU 对计算进行加速。
tensorflow - 仅支持 CPU 的最新稳定版(适用于 Ubuntu 和 Windows)
tensorflow-gpu - 支持 GPU 的最新稳定版(适用于 Ubuntu 和 Windows)
tf-nightly - 仅支持 CPU 的预览每夜版(不稳定)
tf-nightly-gpu - 支持 GPU 的预览每夜版(不稳定,适用于 Ubuntu 和 Windows)
我的电脑有独立显卡,所以我接下来将会安装 tensorflow-gpu 版本,释放 GPU 的计算性能,缩短训练时间。
(二)使用 anaconda 安装
在 tensorflow 之前,我们先需要安装 numpy、pandas、scipy、matplotlib、scikit-learn 等常用科学计算库(anaconda 默认已经安装好了这几个常用库),tensorflow 需要我们自行选择安装。
- 使用 anaconda 安装 Python 三方库最简单的方法就是:打开 anaconda Navigator,点击 Environments,在右边搜索框中搜索想要安装的包名,勾选并点击右下角 apply 安装。

- 或者,我们也可以打开终端,使用 conda 命令进行安装和管理,这两者是一样的效果。附:conda 入门指南、官方完整文档
(三)pip 安装
打开 anaconda 终端,输入以下 pip 命令 即可完成安装。
pip install numpy
pip install pandas
pip install scipy
pip install matplotlib
pip install scikit-learn
 pip install tensorflow-gpu
但是,在下载 python 三方库的时候,由于国内网络或三方包太大等原因下载速度非常慢,会导致超时问题 ReadTimeoutError :
pip._vendor.urllib3.exceptions.ReadTimeoutError: HTTPSConnectionPool(host='files.pythonhosted.org', port=443): Read timed out.
解决方案:
- 方法一:设置延时
修改超时参数,例如: pip install tensorflow-gpu --default-timeout=1000 - 方法二:
前,下载速度为 20kb/s 后,下载速度可以达到 1MB/s - 方法三:指定国内源
pip install tensorflow-gpu -i https://pypi.tuna.tsinghua.edu.cn/simple/
最后使用如下组合命令完成了安装:
pip install tensorflow-gpu -i https://pypi.tuna.tsinghua.edu.cn/simple/ --default-timeout=1000
查看终端打印结果可知,其实安装过程不光安装了 tensorflow 包,还安装和检查了很多的依赖包,如 numpy、wheel 等。
Successfully built termcolor absl-py gast
Installing collected packages: grpcio, absl-py, markdown, protobuf, tensorboard, tensorflow-estimator, termcolor, keras-preprocessing, gast, google-pasta, astor, keras-applications, tensorflow-gpu
Successfully installed absl-py-0.8.0 astor-0.8.0 gast-0.2.2 google-pasta-0.1.7 grpcio-1.23.0 keras-applications-1.0.8 keras-preprocessing-1.1.0 markdown-3.1.1 protobuf-3.9.1 tensorboard-1.14.0 tensorflow-estimator-1.14.0 tensorflow-gpu-1.14.0 termcolor-1.1.0
三、配置英伟达软件
(一)硬件要求
查看 Windows 设备管理器中的“显示适配器” 找到自己的 GPU 型号。在 https://developer.nvidia.com/cuda-gpus 中查找自己的 GPU 是否具有 CUDA 功能,如果你的 GPU 型号在网页中,则说明该 GPU 具有 CUDA 功能。
例如,如图我的显卡是 GTX 965M

在网页中可以看到,我的显卡是具有 CUDA 功能。GeForce GTX 965M 5.2

(二)软件要求
系统中必须安装好以下 NVIDIA® 软件:
- NVIDIA® GPU 驱动程序 - CUDA 10.0 需要 410.x 或更高版本。
- CUDA® 工具包 - TensorFlow 支持 CUDA 10.0(TensorFlow 1.13.0 及更高版本)
- CUDA 工具包附带的 CUPTI。
- cuDNN SDK(7.4.1 及更高版本)
- (可选)TensorRT 5.0,可缩短在某些模型上进行推断的延迟并提高吞吐量。
1、CUDA
CUDA® 工具包(CUDA Toolkit)为提供了一个创建高性能的 GPU 加速应用程序的开发环境。工具包包括:GPU加速库,调试和优化工具,C / C ++编译器和用于部署应用程序的运行时库。CUDA Toolkit 文档
(1)安装 CUDA
-
下载去往 CUDA Toolkit Archive 页面下载 CUDA 工具包。下载 CUDA Toolkit 10.0 版本,得到安装包 cuda_10.0.130_411.31_win10.exe。提醒:这里不是下载最新的 CUDA 10.1,因为当前的最新版 tensorflow 即 tensorflow 1.14.0 仍然是基于 CUDA 10.0。如果要使用 CUDA 10.1,你需要从源码编译安装 CUDA 10.1 和 tensorflow,这里我们不做探讨。


-
双击开始安装。注意几点:
- 如果安装过程中出现,未安装成功,计算机却在安装途中自动重启了,请将计算机中的 CUDA 程序卸载,重新安装。
- 不要修改安装目录,以免后续出现不可预计的错误。(修改目录后,出现了使用 Visual Studio 编译生成方案出错的问题)
- 最好确保计算机中先安装有 Visual Studio,再开始安装 CUDA。(能避免出现一些构建方案出错)
根据 CUDA Toolkit 文档 可知 CUDA 10.0 支持的 Visual Studio 和 Windows 版本如下:

所以注意安装 Visual Studio 2017 版,而不是最新的 Visual Studio 2019 版。
- 在命令行输入
nvcc -V检查是否安装成功
nvcc: NVIDIA (R) Cuda compiler driver
Copyright (c) 2005-2018 NVIDIA Corporation
Built on Sat_Aug_25_21:08:04_Central_Daylight_Time_2018
Cuda compilation tools, release 10.0, V10.0.130
- 检查 path 路径。正常情况下,安装完 CUDA,会自动设置好了以下环境变量。如果没有,你需要手动设置好他们。
(2)生成仿真方案 nbody
-
导航到 CUDA Samples 的 nbody目录,比如我的路径在
C:\ProgramData\NVIDIA Corporation\CUDA Samples\v10.0\5_Simulations\nbody。
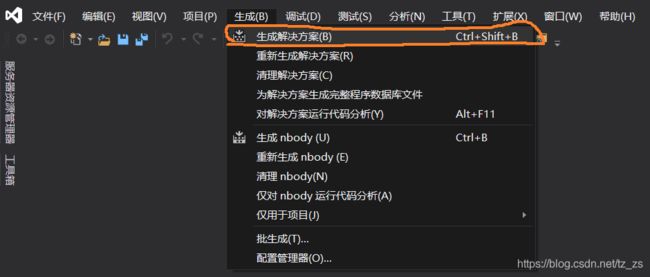
打开已安装的对应 Visual Studio 版本的 nbody Visual Studio 解决方案文件。 如图,我计算机中安装的是 Visual Studio 2017,所以使用 nbody_vs2017.sln 解决方案构建。

-
成功生成
1>------ 已启动生成: 项目: nbody, 配置: Debug x64 ------
1>Compiling CUDA source file bodysystemcuda.cu...
1>
1>C:\ProgramData\NVIDIA Corporation\CUDA Samples\v10.0\5_Simulations\nbody>"C:\Program Files\NVIDIA GPU Computing Toolkit\CUDA\v10.0\bin\nvcc.exe" -gencode=arch=compute_30,code=\"sm_30,compute_30\" -gencode=arch=compute_35,code=\"sm_35,compute_35\" -gencode=arch=compute_37,code=\"sm_37,compute_37\" -gencode=arch=compute_50,code=\"sm_50,compute_50\" -gencode=arch=compute_52,code=\"sm_52,compute_52\" -gencode=arch=compute_60,code=\"sm_60,compute_60\" -gencode=arch=compute_61,code=\"sm_61,compute_61\" -gencode=arch=compute_70,code=\"sm_70,compute_70\" -gencode=arch=compute_75,code=\"sm_75,compute_75\" --use-local-env -ccbin "C:\Program Files (x86)\Microsoft Visual Studio\2017\Community\VC\Tools\MSVC\14.16.27023\bin\HostX86\x64" -x cu  -I./ -I../../common/inc -I./ -I"C:\Program Files\NVIDIA GPU Computing Toolkit\CUDA\v10.0\/include" -I../../common/inc -I"C:\Program Files\NVIDIA GPU Computing Toolkit\CUDA\v10.0\include"  -G   --keep-dir x64\Debug -maxrregcount=0  --machine 64 --compile -cudart static -Xcompiler "/wd 4819" -g   -DWIN32 -DWIN32 -D_MBCS -D_MBCS -Xcompiler "/EHsc /W3 /nologo /Od /Fdx64/Debug/vc141.pdb /FS /Zi /RTC1 /MTd " -o x64/Debug/bodysystemcuda.cu.obj "C:\ProgramData\NVIDIA Corporation\CUDA Samples\v10.0\5_Simulations\nbody\bodysystemcuda.cu"
1>bodysystemcuda.cu
1>nbody.cpp
1>render_particles.cpp
1>正在生成代码...
1>  正在创建库 ../../bin/win64/Debug/nbody.lib 和对象 ../../bin/win64/Debug/nbody.exp
1>nbody_vs2017.vcxproj -> C:\ProgramData\NVIDIA Corporation\CUDA Samples\v10.0\5_Simulations\nbody\../../bin/win64/Debug/nbody.exe
========== 生成: 成功 1 个,失败 0 个,最新 0 个,跳过 0 个 ==========
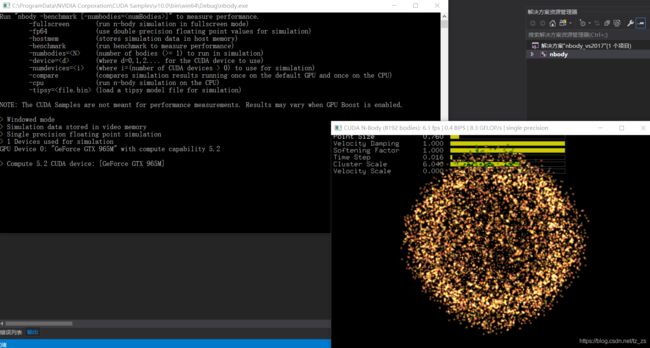
- 运行 nbody。导航到 CUDA Samples 的构建目录,例如我的目录
C:\ProgramData\NVIDIA Corporation\CUDA Samples\v10.0\bin\win64\Debug,运行 nbody.exe 示例

官方文档:
CUDA Toolkit 文档
2、CUPTI
CUDA Profiling Tools Interface (CUPTI) 支持创建面向 CUDA 应用程序的性能分析和跟踪工具。可以开发分析工具,去深入了解 CUDA 应用程序的 CPU 和 GPU 行为。
CUPTI 不用单独安装,CUDA 以动态库形式在所有平台上支持它。
文档:CUPTI documentation
3、cuDNN
NVIDIA CUDA® Deep Neural Network library(cuDNN) 是用于深度神经网络的原生的 GPU 加速库。cuDNN 为标准的操作(例如前向和后向卷积、池化、正则化和激活层)提供高度优化的实现。
(1)安装
-
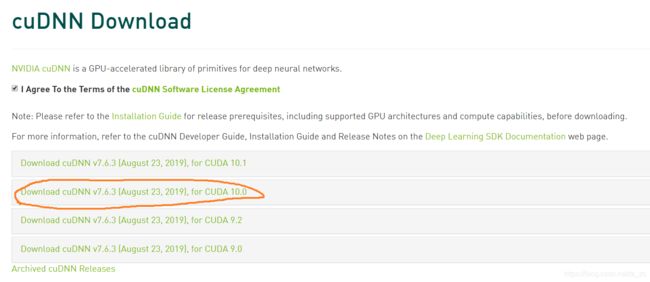
解压下载好的压缩包

将以下文件复制到 CUDA Toolkit 目录中:
复制cudnn-10.0-windows10-x64-v7.6.3.30\cuda\bin\cudnn64_7.dll到C:\Program Files\NVIDIA GPU Computing Toolkit\CUDA\v10.0\bin\
复制cudnn-10.1-windows10-x64-v7.6.3.30\cuda\include\cudnn.h到C:\Program Files\NVIDIA GPU Computing Toolkit\CUDA\v10.0\include\
复制cudnn-10.1-windows10-x64-v7.6.3.30\cuda\lib\x64\cudnn.lib到C:\Program Files\NVIDIA GPU Computing Toolkit\CUDA\v10.0\lib\x64\
官方文档:
NVIDIA 深度学习 SDK 文档
cuDNN 安装指南
四、附录:
安装 tensorflow 时控制台输出
(base) PS C:\Users\wang> pip install tensorflow-gpu -i https://pypi.tuna.tsinghua.edu.cn/simple/ --default-timeout=1000
Looking in indexes: https://pypi.tuna.tsinghua.edu.cn/simple/
Collecting tensorflow-gpu
  Downloading https://pypi.tuna.tsinghua.edu.cn/packages/81/d1/9222b9aac2fa27dccaef38917cde84c24888f3cd0dd139c7e12be9f49a7a/tensorflow_gpu-1.14.0-cp37-cp37m-win_amd64.whl (287.7MB)
     |████████████████████████████████| 287.7MB 59kB/s
Collecting tensorboard<1.15.0,>=1.14.0 (from tensorflow-gpu)
  Downloading https://pypi.tuna.tsinghua.edu.cn/packages/91/2d/2ed263449a078cd9c8a9ba50ebd50123adf1f8cfbea1492f9084169b89d9/tensorboard-1.14.0-py3-none-any.whl (3.1MB)
     |████████████████████████████████| 3.2MB 595kB/s
Collecting protobuf>=3.6.1 (from tensorflow-gpu)
  Downloading https://pypi.tuna.tsinghua.edu.cn/packages/46/8b/5e77963dac4a944a0c6b198c004fac4c85d7adc54221c288fc6ca9078072/protobuf-3.9.1-cp37-cp37m-win_amd64.whl (1.0MB)
     |████████████████████████████████| 1.0MB 47kB/s
Collecting grpcio>=1.8.6 (from tensorflow-gpu)
  Downloading https://pypi.tuna.tsinghua.edu.cn/packages/32/e7/478737fd426798caad32a2abb7cc63ddb4c12908d9e03471dd3c41992b05/grpcio-1.23.0-cp37-cp37m-win_amd64.whl (1.6MB)
     |████████████████████████████████| 1.6MB 595kB/s
Requirement already satisfied: numpy<2.0,>=1.14.5 in d:\programdata\anaconda3\lib\site-packages (from tensorflow-gpu) (1.16.4)
Collecting tensorflow-estimator<1.15.0rc0,>=1.14.0rc0 (from tensorflow-gpu)
  Downloading https://pypi.tuna.tsinghua.edu.cn/packages/3c/d5/21860a5b11caf0678fbc8319341b0ae21a07156911132e0e71bffed0510d/tensorflow_estimator-1.14.0-py2.py3-none-any.whl (488kB)
     |████████████████████████████████| 491kB 595kB/s
Collecting termcolor>=1.1.0 (from tensorflow-gpu)
  Downloading https://pypi.tuna.tsinghua.edu.cn/packages/8a/48/a76be51647d0eb9f10e2a4511bf3ffb8cc1e6b14e9e4fab46173aa79f981/termcolor-1.1.0.tar.gz
Collecting absl-py>=0.7.0 (from tensorflow-gpu)
  Downloading https://pypi.tuna.tsinghua.edu.cn/packages/3c/0d/7cbf64cac3f93617a2b6b079c0182e4a83a3e7a8964d3b0cc3d9758ba002/absl-py-0.8.0.tar.gz (102kB)
     |████████████████████████████████| 112kB 504kB/s
Collecting keras-preprocessing>=1.0.5 (from tensorflow-gpu)
  Downloading https://pypi.tuna.tsinghua.edu.cn/packages/28/6a/8c1f62c37212d9fc441a7e26736df51ce6f0e38455816445471f10da4f0a/Keras_Preprocessing-1.1.0-py2.py3-none-any.whl (41kB)
     |████████████████████████████████| 51kB 1.1MB/s
Requirement already satisfied: wrapt>=1.11.1 in d:\programdata\anaconda3\lib\site-packages (from tensorflow-gpu) (1.11.2)
Requirement already satisfied: six>=1.10.0 in d:\programdata\anaconda3\lib\site-packages (from tensorflow-gpu) (1.12.0)
Collecting gast>=0.2.0 (from tensorflow-gpu)
  Downloading https://pypi.tuna.tsinghua.edu.cn/packages/4e/35/11749bf99b2d4e3cceb4d55ca22590b0d7c2c62b9de38ac4a4a7f4687421/gast-0.2.2.tar.gz
Requirement already satisfied: wheel>=0.26 in d:\programdata\anaconda3\lib\site-packages (from tensorflow-gpu) (0.33.4)
Collecting google-pasta>=0.1.6 (from tensorflow-gpu)
  Downloading https://pypi.tuna.tsinghua.edu.cn/packages/d0/33/376510eb8d6246f3c30545f416b2263eee461e40940c2a4413c711bdf62d/google_pasta-0.1.7-py3-none-any.whl (52kB)
     |████████████████████████████████| 61kB 653kB/s
Collecting astor>=0.6.0 (from tensorflow-gpu)
  Downloading https://pypi.tuna.tsinghua.edu.cn/packages/d1/4f/950dfae467b384fc96bc6469de25d832534f6b4441033c39f914efd13418/astor-0.8.0-py2.py3-none-any.whl
Collecting keras-applications>=1.0.6 (from tensorflow-gpu)
  Downloading https://pypi.tuna.tsinghua.edu.cn/packages/71/e3/19762fdfc62877ae9102edf6342d71b28fbfd9dea3d2f96a882ce099b03f/Keras_Applications-1.0.8-py3-none-any.whl (50kB)
     |████████████████████████████████| 51kB 1.1MB/s
Requirement already satisfied: werkzeug>=0.11.15 in d:\programdata\anaconda3\lib\site-packages (from tensorboard<1.15.0,>=1.14.0->tensorflow-gpu) (0.15.4)
Requirement already satisfied: setuptools>=41.0.0 in d:\programdata\anaconda3\lib\site-packages (from tensorboard<1.15.0,>=1.14.0->tensorflow-gpu) (41.0.1)
Collecting markdown>=2.6.8 (from tensorboard<1.15.0,>=1.14.0->tensorflow-gpu)
  Downloading https://pypi.tuna.tsinghua.edu.cn/packages/c0/4e/fd492e91abdc2d2fcb70ef453064d980688762079397f779758e055f6575/Markdown-3.1.1-py2.py3-none-any.whl (87kB)
     |████████████████████████████████| 92kB 980kB/s
Requirement already satisfied: h5py in d:\programdata\anaconda3\lib\site-packages (from keras-applications>=1.0.6->tensorflow-gpu) (2.9.0)
Building wheels for collected packages: termcolor, absl-py, gast
  Building wheel for termcolor (setup.py) ... done
  Stored in directory: C:\Users\wang\AppData\Local\pip\Cache\wheels\e3\d8\fc\50ab6e66e3dead21d5afff006dc5298913a3064be2b1105359
  Building wheel for absl-py (setup.py) ... done
  Stored in directory: C:\Users\wang\AppData\Local\pip\Cache\wheels\26\3d\11\0009b742094d956da0ee0966ca6549c536ce2acbfc2113fc48
  Building wheel for gast (setup.py) ... done
  Stored in directory: C:\Users\wang\AppData\Local\pip\Cache\wheels\46\85\ca\e81b54f271ca53efa4212d02e67e6ac7cbf413cd8c0342f976
Successfully built termcolor absl-py gast
Installing collected packages: grpcio, absl-py, markdown, protobuf, tensorboard, tensorflow-estimator, termcolor, keras-preprocessing, gast, google-pasta, astor, keras-applications, tensorflow-gpu
Successfully installed absl-py-0.8.0 astor-0.8.0 gast-0.2.2 google-pasta-0.1.7 grpcio-1.23.0 keras-applications-1.0.8 keras-preprocessing-1.1.0 markdown-3.1.1 protobuf-3.9.1 tensorboard-1.14.0 tensorflow-estimator-1.14.0 tensorflow-gpu-1.14.0 termcolor-1.1.0


