Android笔记
参考:http://www.runoob.com/
(广播部分)https://www.jianshu.com/p/ca3d87a4cdf3
1. 布局
LinearLayout,RelativeLayout,FrameLayout
2. Activity(http://www.runoob.com/w3cnote/android-tutorial-activity.html)
活动是一种可以包含用户界面的组件,主要用于与用户进行交互。
创建布局 =〉加载布局 =〉在AndroidManifest.xml中注册活动 =〉配置主活动(intent)
2.1. Activity创建流程
//1.自定义Activity类名
class MyActivity extends Activity {
//2.重写onCreate()方法,在该方法中调用setContentView()设置要显示的视图
    public void onCreate(Bundle savedInstanceState)
    {
        super.onCreate(savedInstanceState);
        setContentView(R.layout.main);
    }
}
//3. AndroidManifest.xml中对Activity进行配置。AS一般会自动配置好
//4. 启动Activity: 调用startActivity(Intent)
Intent intent = new Intent(MainActivity.this, MyActivity.class);
startActivity(intent);
//5. 关闭Activity
finish();
2.2. 启动Activity的方式
当前Activity = MainActivity;
要启动的Activity = MyActivity;
================================Explicit intent=================================
//1. 最常见的
startActivity(new Intent(MainActivity.this, MyActivity.class));
//2. 通过Intent的ComponentName
ComponentName cn = new ComponentName("MainActivity的全限定类名","MyActivity的全限定类名");
Intent intent = new Intent();
intent.setComponent(cn);
startActivity(intent);
//3. 初始化Intent时指定包名
Intent intent = new Intent("android.intent.action.MAIN");
intent.setClassName("MainActivity的全限定类名","MyActivity的全限定类名");
startActivity(intent);
================================implicit intent=================================
AndroidManifest.xml文件中声明
MainActivity中启动:
Intent implicit = new Intent();
implicit.setAction("main_2");
implicit.addCategory("category_2");
startActivity(implicit);
================================通过包名启动=================================
Intent intent = getPackageManager().getLaunchIntentForPackage("apk第一个启动的Activity的全限定类名");
if(intent != null)
startActivity(intent);
2.3. 横竖屏
//横竖屏加载不同布局:一般加在onCreate()方法中
if (this.getResources().getConfiguration().orientation == Configuration.ORIENTATION_LANDSCAPE){
setContentView(R.layout.横屏);
}
else if (this.getResources().getConfiguration().orientation ==Configuration.ORIENTATION_PORTRAIT) {
setContentView(R.layout.竖屏);
}
//禁止横竖屏切换
2.4. Activity间的数据传递
//存数据
Intent it1 = new Intent(MainActivity.this, MyActivity.class);
it1.putExtra("key", value);
//取数据
Intent it2 = getIntent();
getStringExtra("key");

//多数据时
Intent it1 = new Intent(MainActivity.this, MyActivity.class);
Bundle bd = new Bundle();
bd.putInt("num", 1);
bd.putString("detail", "hehe");
it1.putExtras(bd);
startActivity(it1);

Intent it2 = getIntent();
Bundle bd = it2.getExtras();
int n = bd.getInt("num");
String d = bd.getString("detail");
2.5. Activity四种加载模式
123asdasd
3. Service(http://www.runoob.com/w3cnote/android-tutorial-service-1.html)
序:线程
程序:为了完成某个任务,用某种语言编写的一组指令集合。
进程:运行中的程序。由系统进行调度。
线程:每个进程可能有多个线程,线程需要放在一个进程中执行,由程序负责管理。
多线程:并行执行多个指令,实际是分时运行。
创建线程的三种方式:
- 继承Thread类
- 实现Runnable接口
- 实现Callable接口
Thread是线程,程序执行的最小单元。
Service是android中实现程序后台运行的解决方案,它非常时候去执行不需要与用户交互而且要求长期运行的任务。服务并不是运行在一个独立的进程当中的,而是依赖创建服务时所在的应用程序进程。若此进程被kill,所有依赖于此进程的Service也会停止。
![]()
- onCreate():若service没被创建过,则startservice()会执行onCreate()回调。若service已处于运行中,调用startservice()不会执行oncreate()方法。(适合完成一些初始化工作)
- onStartCommand():若多次执行startservice()方法,onStartCommand()方法也会被多次执行。
- onBind():service中onBind()是抽象方法,所以onBind()必须重写。
- onDestroy():在销毁时执行。
第一种方式:通过StartService启动Service
通过StartService启动后,service会一直运行下去,只有外部调用了stopservice()或者stopself()方法时,该service才会停止。
首先该类要继承service,然后重写方法。
第二种方式:通过bindservice启动Service
bindService模式下Service与调用者相互关联,bindService后若调用者销毁,则Service也立即终止。
4. BroadcastReceiver(http://www.runoob.com/w3cnote/android-tutorial-broadcastreceiver.html)
Android广播分为2个角色:广播发送者,广播接收者。
使用流程:
- 自定义广播接收者BroadcastReceiver。继承BroadcastReceiver基类,复写抽象方法onReceiver();
- 广播接收器注册。有2种方式,静态注册与动态注册。Android8.0以后推荐动态注册,即代码注册。代码中调用Context.registerReceiver()方法。动态注册需要程序启动后才能接收广播,静态注册可以让程序在未启动的情况下接收广播。
//1.实例化BroadcastReceiver子类与IntentFilter
MyBroadcastReceiver mBroadcast = new MyBroadcastReceiver();
IntentFilter filter = new IntentFilter();

//2.设置接收广播的类型
intentFilter.addAction("xxxx");

//3.动态注册:调用Context的registerReceiver()方法
registerReceiver(mBroadcast, filter);

//4. 销毁广播
 protected void onPause() {
        super.onPause();
        unregisterReceiver(mBroadcast);
    }
Activity生命周期的方法是成对出现的(onCreate() & onDestory(), onStart()&onStop(), onResume()&onPause())。之所以选择onResume()&onPause()是因为onPause()在APP死亡前一定会被执行,保证APP死亡前一定会被注销,防止内存泄露。
-
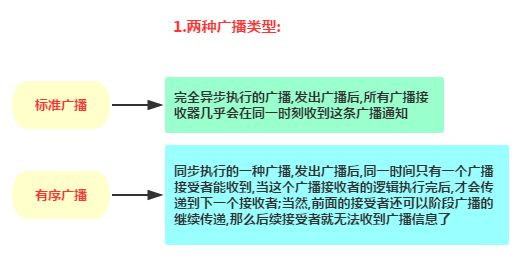
广播发送者向AMS(Activity Manager Service)发送广播。广播分为5类:普通广播,系统广播,有序广播,粘性广播,App应用内广播。
//普通广播
Intent intent = new Intent("xxxx");
//这里()里可以直接添加action,即Intent("xxxx")或者下面再加一句intent.setAction("xxxx")
sendBroadcast(intent);
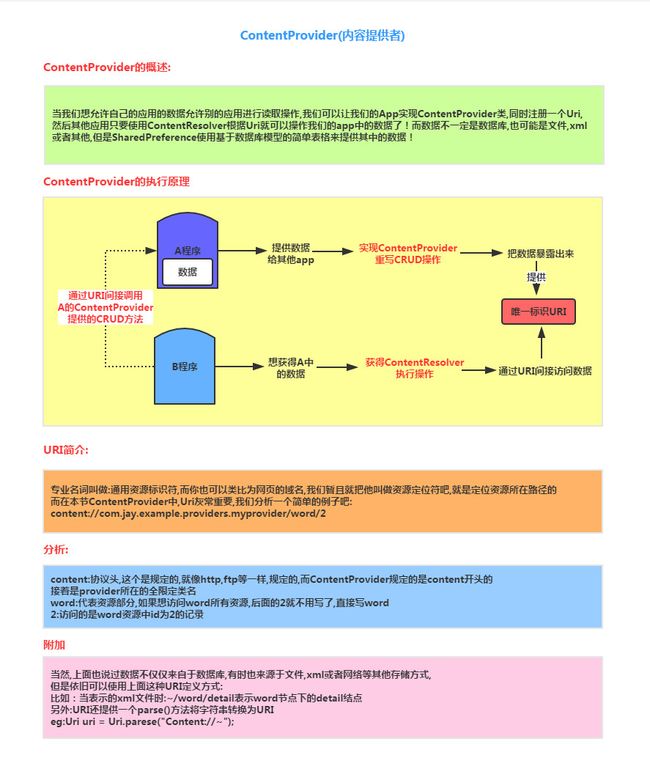
5. ContentProvider(http://www.runoob.com/w3cnote/android-tutorial-contentprovider.html)
to be continue
6. Intent
Explicit Intent:通过组件名指定启动的目标组件,每次启动的组件只有一个。比如startActivity(new Intent(A.this,B.class))。
Implicit Intent:不指定组件名,而指定Intent的Action,Data或Category。
6.1. Intent的七个属性
2. Action
3. Category
4. Data, Type
5. Extras
6. Flags
6.2. Explicit Intent
//点击返回HOME界面
Intent it = new Intent();
it.setAction(Intent.ACTION_MAIN);
it.addCategory(Intent.CATEGORY_HOME);
startActivity(it);

//点击打开百度网页
Intent it = new Intent();
it.setAction(Intent.ACTION_VIEW);
it.setData(Uri.parse("http://www.baidu.com"));
startActivity(it);


