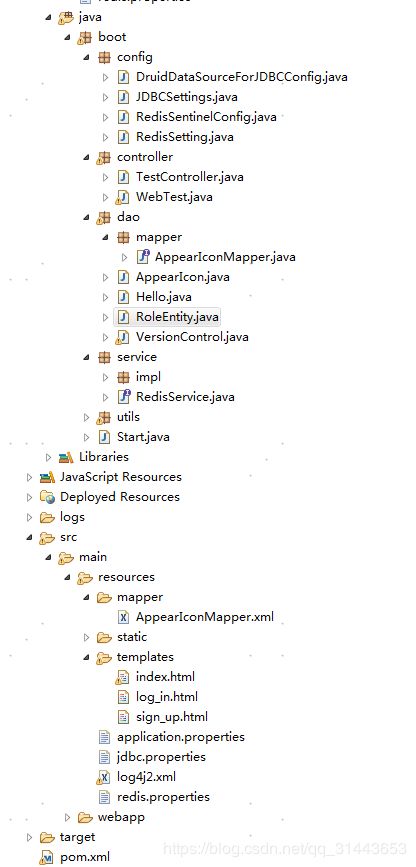
sprinboot系列四——接入redis,mysql(mybatis,mybatisplus,druid连接池)
redis接入
配置文件
pom添加:
      		redis.clients
      		jedis
SpringBoot有四种读取properties文件的方式,详情见springboot相关文档。
本文采取统一前缀直接隐射,properties文件统一放在resources根目录

redis.properties
redis.hosts=
redis.master=
redis.maxTotal=6000
redis.maxIdle=3000
redis.maxWaitMillis=3000
redis.testOnBorrow=false
redis.password=
接入配置文件
import org.springframework.boot.context.properties.ConfigurationProperties;
import org.springframework.context.annotation.PropertySource;
import org.springframework.stereotype.Component;

import lombok.Data;

@Data
@Component// 以组件的方式使用,使用的时候可以直接注入
@ConfigurationProperties(prefix="redis")// 用来指定properties配置文件中的key前缀
@PropertySource("classpath:redis.properties")// 用来指定配置文件的位置

public class RedisSetting {
	private String hosts;
	  private String master;
	  private int maxTotal;
	  private int maxIdle;
	  private int maxWaitMillis;
	  private boolean testOnBorrow;
	  private String password;
}
@Data 为lombok配置注入,也可用直接添加get set,lombok配置见相关文档
连接池使用
连接池激活
import java.util.Arrays;
import java.util.HashSet;

import org.springframework.beans.factory.annotation.Autowired;
import org.springframework.context.annotation.Bean;
import org.springframework.context.annotation.Configuration;

import redis.clients.jedis.JedisPoolConfig;
import redis.clients.jedis.JedisSentinelPool;

@Configuration
public class RedisSentinelConfig {
@Autowired
RedisSetting redisSetting;

@Bean("testRedis")
public JedisSentinelPool jedisSentinelPool() {
	JedisPoolConfig jedisPoolConfig = new JedisPoolConfig();
    jedisPoolConfig.setMaxIdle(this.redisSetting.getMaxIdle());
    jedisPoolConfig.setMaxTotal(this.redisSetting.getMaxTotal());
    jedisPoolConfig.setMinIdle(10);
    jedisPoolConfig.setMaxWaitMillis(this.redisSetting.getMaxWaitMillis());
    jedisPoolConfig.setTestOnBorrow(this.redisSetting.isTestOnBorrow());

    String[] hosts = this.redisSetting.getHosts().split(",");

	return new JedisSentinelPool(this.redisSetting.getMaster(), new HashSet<>(Arrays.asList(hosts)), jedisPoolConfig, 10000, this.redisSetting.getPassword());
}
}
连接池使用
	@Autowired
	@Qualifier("testRedis")
	private JedisSentinelPool testSentinelPool;
	public void setNew(String key, String val) {
		if(StringUtils.isEmpty(key)) {
			return;
		}

		Jedis jedis = null;
		try {
			jedis = this.testSentinelPool.getResource();
			jedis.set(key, val);
			jedis.expire(key, OUT_TIME);

		} catch (Exception e) {
			logger.error("异常", e);
		} finally {
			if(jedis != null) {
				jedis.close();
			}
		}
	}
调用相应方法即可使用,连接cluster集群方法类似
mysql接入
方式1,传统注入
mysql,druid
pom:
配置
    org.springframework.boot
    spring-boot-starter-jdbc


    mysql
    mysql-connector-java
    ${mysqlVersion}


    com.alibaba
    druid
    ${druidVersion}
jdbc.properties:
druid.spring.datasource.type=com.alibaba.druid.pool.DruidDataSource
druid.spring.datasource.url=jdbc:mysql://*****:3306/*********?useUnicode=true&characterEncoding=utf-8
druid.spring.datasource.username=******
druid.spring.datasource.password=*********
druid.spring.datasource.driverClassName=com.mysql.jdbc.Driver
druid.spring.datasource.initialSize=5
druid.spring.datasource.minIdle=5
druid.spring.datasource.maxActive=20
druid.spring.datasource.maxWait=60000
druid.spring.datasource.timeBetweenEvictionRunsMillis=60000
druid.spring.datasource.minEvictableIdleTimeMillis=300000
druid.spring.datasource.validationQuery=SELECT 1 FROM DUAL
druid.spring.datasource.testWhileIdle=true
druid.spring.datasource.testOnBorrow=false
druid.spring.datasource.testOnReturn=false
druid.spring.datasource.poolPreparedStatements=true
druid.spring.datasource.maxPoolPreparedStatementPerConnectionSize=20
注入方式与redis类似:
import org.springframework.boot.context.properties.ConfigurationProperties;
import org.springframework.context.annotation.PropertySource;
import org.springframework.stereotype.Component;

import lombok.Data;

@Data
@Component// 以组件的方式使用,使用的时候可以直接注入
@ConfigurationProperties(prefix="druid.spring.datasource")// 用来指定properties配置文件中的key前缀
@PropertySource("classpath:jdbc.properties")// 用来指定配置文件的位置
public class JDBCSettings {
	private String type;
    private String driverClassName;
    private String url;
    private String username;
    private String password;
    private Integer initialSize;
    private Integer minIdle;
    private Integer maxActive;
    private Long maxWait;
    private Long timeBetweenEvictionRunsMillis;
    private Long minEvictableIdleTimeMillis;
    private String validationQuery;
    private boolean testWhileIdle;
    private boolean testOnBorrow;
    private boolean testOnReturn;
    private boolean poolPreparedStatements;
    private Integer maxPoolPreparedStatementPerConnectionSize;
}
数据库连接池:
import org.springframework.beans.factory.annotation.Autowired;
import org.springframework.context.annotation.Bean;
import org.springframework.context.annotation.Configuration;

import com.alibaba.druid.pool.DruidDataSource;


/**
 * druid数据源配置
 * @author zzzH
 *
 */
@Configuration
public class DruidDataSourceForJDBCConfig {

	@Autowired
    private JDBCSettings druidSettings;

    @Bean
    public DruidDataSource dataSource() throws Exception{

        DruidDataSource dataSource = new DruidDataSource();
//        dataSource.setConnectionProperties("config.decrypt=true");
        dataSource.setDriverClassName(druidSettings.getDriverClassName());
        dataSource.setUrl(druidSettings.getUrl());
        dataSource.setUsername(druidSettings.getUsername());
        dataSource.setPassword(druidSettings.getPassword());
        dataSource.setInitialSize(druidSettings.getInitialSize());
        dataSource.setMinIdle(druidSettings.getMinIdle());
        dataSource.setMaxActive(druidSettings.getMaxActive());
        dataSource.setMaxWait(druidSettings.getMaxWait());
        dataSource.setTimeBetweenEvictionRunsMillis(druidSettings.getTimeBetweenEvictionRunsMillis());
        dataSource.setMinEvictableIdleTimeMillis(druidSettings.getMinEvictableIdleTimeMillis());
        String validationQuery = druidSettings.getValidationQuery();
        if (validationQuery != null && !"".equals(validationQuery)) {
            dataSource.setValidationQuery(validationQuery);
        }
        dataSource.setTestWhileIdle(druidSettings.isTestWhileIdle());
        dataSource.setTestOnBorrow(druidSettings.isTestOnBorrow());
        dataSource.setTestOnReturn(druidSettings.isTestOnReturn());
        if(druidSettings.isPoolPreparedStatements()){
            dataSource.setMaxPoolPreparedStatementPerConnectionSize(druidSettings.getMaxPoolPreparedStatementPerConnectionSize());
        }
        return dataSource;
    }
}
配置完成
方式2,利用druid-start注入
除了以上方式,还可以用druid-starter进行动态注入
加入pom
1.
            com.alibaba
            druid-spring-boot-starter
            1.1.10
在application.yml加入如下配置即可:
spring:
  application:
    name: ribbon-client
  # 配置数据库信息
  datasource:
     # 指定数据源为druid
    type: com.alibaba.druid.pool.DruidDataSource
    druid:
      # 数据源配置
      username: root
      password: *******
      url: jdbc:mysql://**************:****/************?useUnicode=true&characterEncoding=utf-8
      driver-class-name: com.mysql.cj.jdbc.Driver
      # 初始化 最小 最大
      initial-size: 5
      min-idle: 5
      max-active: 20
      # 配置获取连接等待超时的时间
      max-wait: 60000
      # 配置间隔多久才进行一次检测,检测需要关闭的空闲连接,单位是毫秒
      time-between-eviction-runs-millis: 60000
      # 配置一个连接在池中最小生存的时间,单位是毫秒
      min-evictable-idle-time-millis: 300000
      validation-query: SELECT 'x'
      test-while-idle: true
      test-on-borrow: false
      test-on-return: false
      # 打开PSCache,并且指定每个连接上PSCache的大小
      poolPreparedStatements: true
      maxPoolPreparedStatementPerConnectionSize: 20
      # 配置多个英文逗号分隔
      filters: stat,wall
mybatis
配置
pom:
    org.mybatis.spring.boot
    mybatis-spring-boot-starter
    1.3.2


            com.baomidou
            mybatis-plus-boot-starter
            2.2.0


    com.baomidou
    mybatis-plus
    3.0.7.1
在application.properties加入扫描xml路径等相关配置
#mybatis
mybatis-plus.mapper-locations=classpath:resources/mapper/*.xml
mybatis-plus.typeAliasesPackage=org.million.dao
mybatis-plus.global-config.id-type=0
mybatis-plus.global-config.field-strategy=0
mybatis-plus.global-config.db-column-underline=true
mybatis-plus.global-config.refresh-mapper=true
mybatis-plus.configuration.map-underscore-to-camel-case=true
mybatis-plus.configuration.cache-enabled=false
mapper的java文件的扫描,在启动类添加即可
@SpringBootApplication
//因为多模块中其他配置模块也需要spring组件功能,所以发布模块需要加载其他模块的内容.
@ComponentScan(basePackages = {"boot.**"})
//mybatis扫描
@MapperScan("boot.dao.**")
public class Start {
   public static void main(String[] args) {
       SpringApplication.run(Start.class, args);
   }
}
使用
使用mybatisplus
import com.baomidou.mybatisplus.annotation.TableId;
import com.baomidou.mybatisplus.annotation.TableName;
import com.baomidou.mybatisplus.extension.activerecord.Model;

@TableName("ts_role")
public class RoleEntity extends Model {

    /**
	 *
	 */
	private static final long serialVersionUID = -7089236713296989104L;

	@TableId
	private Long id;

	private String roleCode;

    private String roleName;

    private String roleDesc;
import java.io.Serializable;
import java.util.Date;

import com.baomidou.mybatisplus.annotation.TableName;
import com.baomidou.mybatisplus.extension.activerecord.Model;


@TableName("tc_dds_appear_icon")
public class AppearIcon extends Model {
    /**
	 *
	 */
	private static final long serialVersionUID = 6360422153757446810L;

	private Long id;

    private String srcDeptcode;
    private Date  startTime;
    private Date  endTime;
    private Date  createTime;
    private Date  modifyTime;
@Data
public class VersionControl implements Serializable{
private Long id;
private String deptCode;
private String isOn;
private String version;
private String createTime;
private String modifyTime;
private String cityCode;
private String countryCode;
}
mapper java
简单的可以直接查询,不用写xml,复杂的可以用xml,mybatisplus还有其他应用,有兴趣可以自行了解
import java.util.ArrayList;
import java.util.List;

import org.apache.ibatis.annotations.Param;
import org.apache.ibatis.annotations.Select;

import com.baomidou.mybatisplus.core.mapper.BaseMapper;
import com.baomidou.mybatisplus.extension.plugins.pagination.Page;

import boot.dao.AppearIcon;
import boot.dao.VersionControl;


public interface AppearIconMapper extends BaseMapper {
	/*
	 * @Update("update dds_appear_icon set start_time=#{appearIcon.startTime} , end_time=#{appearIcon.endTime} where id=#(appearIcon.id) "
	 * )
	 */
	Integer editSite(@Param("siteId") String siteId, @Param("start") String start, @Param("end") String end);

	@Select("SELECT  * FROM  tc_dds_appear_icon WHERE src_deptCode=#{deptCode} LIMIT 0,1")
	AppearIcon querySiteByDeptCode(@Param("deptCode") String deptCode);

	@Select("SELECT  * FROM  tc_dds_appear_icon  LIMIT #{start},#{pageSize}")
	List getSites(@Param("start")Integer start,@Param("pageSize")Integer pageSize);

	@Select("SELECT COUNT(*) FROM tc_dds_appear_icon")
	Integer getSitesCount();


	//版本控制
	public ArrayList getVersions(VersionControl updateReq,Page page);

	public Integer versionControlUpdate(VersionControl updateReq);

	public Integer versionControlDelete(VersionControl updateReq);

	public Integer versionControlAdd(VersionControl updateReq);

}
mapper xml
mapper 和mapperjava所在路径对应,type和相关实体类相对应
UPDATE tc_version_control
id=id
,is_on=#{isOn,jdbcType=VARCHAR}
,version=#{version,jdbcType=VARCHAR}
dept_code=#{deptCode,jdbcType=VARCHAR} and
city_code=#{cityCode,jdbcType=VARCHAR} and
country_code=#{countryCode,jdbcType=VARCHAR} and
1=1
INSERT INTO
tc_version_control(
is_on,
version,
dept_code,
city_code,
country_code
)
VALUES
(
#{isOn,jdbcType=VARCHAR},
#{version,jdbcType=VARCHAR},
#{deptCode,jdbcType=VARCHAR},
#{cityCode,jdbcType=VARCHAR},
#{countryCode,jdbcType=VARCHAR}
)
DELETE FROM tc_version_control
dept_code=#{deptCode,jdbcType=VARCHAR} and
city_code=#{cityCode,jdbcType=VARCHAR} and
country_code=#{countryCode,jdbcType=VARCHAR} and
1=1
使用
注入即可完成相应使用
	@Autowired
	AppearIconMapper appearIconMapper;

		@GetMapping("/mysqlTest")
	public void mysqlTest() {
		logger.info("hello-------:"+new Gson().toJson(appearIconMapper.getSitesCount()));
	}
